
Users Manual - English
Page 1
...will void your fax machine may not be compatible with the power available in Japan OWNER'S MANUAL IntelliFAX 3550 CONTENTS Chapter1 SETUP & PREPARATION BEFORE USE Chapter2 THE CONTROL PANEL KEYS Chapter3 HOW TO USE ON-SCREEN... AND DRUM UNIT Chapter13 REGULAR MAINTENANCE AND TROUBLESHOOTING Chapter14 IMPORTANT INFORMATION Chapter15 INDEX Chapter16 SPECIFICATIONS BSI Certificate of registration No. JQA-0340 UF72250013 Printed in foreign countries. 3550-US-5.0 Brother International Corporation 200 Cottontail Lane, Somerset, NJ 08875-6714, U.S.A. Brother International Corporation ...
...will void your fax machine may not be compatible with the power available in Japan OWNER'S MANUAL IntelliFAX 3550 CONTENTS Chapter1 SETUP & PREPARATION BEFORE USE Chapter2 THE CONTROL PANEL KEYS Chapter3 HOW TO USE ON-SCREEN... AND DRUM UNIT Chapter13 REGULAR MAINTENANCE AND TROUBLESHOOTING Chapter14 IMPORTANT INFORMATION Chapter15 INDEX Chapter16 SPECIFICATIONS BSI Certificate of registration No. JQA-0340 UF72250013 Printed in foreign countries. 3550-US-5.0 Brother International Corporation 200 Cottontail Lane, Somerset, NJ 08875-6714, U.S.A. Brother International Corporation ...

Users Manual - English
Page 2
Place the drum unit in the zip lock bag during transit. Repack the Machine. 3550-US-5.0 Shipment of the Fax Machine If for any reason you save and use the original packaging. The Fax Machine should be removed from the ...Fax Machine and placed in the zip lock bag. It is recommended that you must be adequately insured with the carrier. Remove the drum unit...
Place the drum unit in the zip lock bag during transit. Repack the Machine. 3550-US-5.0 Shipment of the Fax Machine If for any reason you save and use the original packaging. The Fax Machine should be removed from the ...Fax Machine and placed in the zip lock bag. It is recommended that you must be adequately insured with the carrier. Remove the drum unit...
Users Manual - English
Page 7
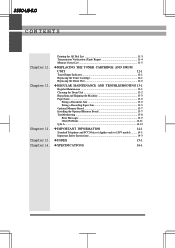
... (Xmit) Report 11-4 Memory Status List 11-5 y REPLACING THE TONER CARTRIDGE AND DRUM UNIT 12-1 Toner Empty Indicator 12-1 Replacing the Toner Cartridge 12-1 Replacing the Drum Unit 12-5 y REGULAR MAINTENANCE AND TROUBLESHOOTING 13-1 Regular Maintenance 13-1 Cleaning the Drum Unit 13-2 Repacking and Shipping the Machine 13-3 Paper Jams ...13-5 Fixing a... Telephone and FCC Notices (Applies only to 120V model 14-1 Important Safety Instructions 14-3 y INDEX 15-1 y SPECIFICATIONS 16-1 Chapter 13. Chapter 15. Chapter 16. 3550-US-5.0 CONTENTS Chapter 12. Chapter 14.
... (Xmit) Report 11-4 Memory Status List 11-5 y REPLACING THE TONER CARTRIDGE AND DRUM UNIT 12-1 Toner Empty Indicator 12-1 Replacing the Toner Cartridge 12-1 Replacing the Drum Unit 12-5 y REGULAR MAINTENANCE AND TROUBLESHOOTING 13-1 Regular Maintenance 13-1 Cleaning the Drum Unit 13-2 Repacking and Shipping the Machine 13-3 Paper Jams ...13-5 Fixing a... Telephone and FCC Notices (Applies only to 120V model 14-1 Important Safety Instructions 14-3 y INDEX 15-1 y SPECIFICATIONS 16-1 Chapter 13. Chapter 15. Chapter 16. 3550-US-5.0 CONTENTS Chapter 12. Chapter 14.
Users Manual - English
Page 10
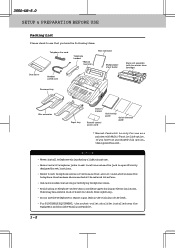
... the following items: Telephone line cord Telephone handset *Manual feed slot Wire extension Multipurpose sheet feeder Dust cover Handset curled cord Drum unit assembly (with free starter toner cartridge) Document tray Wire extension Paper tray Owner's manual Remote control access card Quick setup... using a telephone (other than a cordless type) during a lightningstorm. - If you have not purchased this option, then ignore this slot. 3550-US-5.0 SETUP & PREPARATION BEFORE USE Packing List Please check to report a gas leak in wet locations unless the jack is only for wet locations....
... the following items: Telephone line cord Telephone handset *Manual feed slot Wire extension Multipurpose sheet feeder Dust cover Handset curled cord Drum unit assembly (with free starter toner cartridge) Document tray Wire extension Paper tray Owner's manual Remote control access card Quick setup... using a telephone (other than a cordless type) during a lightningstorm. - If you have not purchased this option, then ignore this slot. 3550-US-5.0 SETUP & PREPARATION BEFORE USE Packing List Please check to report a gas leak in wet locations unless the jack is only for wet locations....
Users Manual - English
Page 11
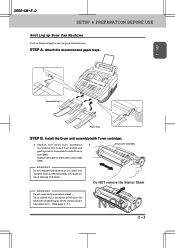
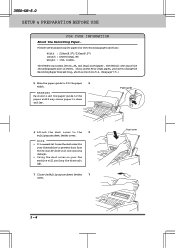
... Unseal the tape on the toner cartridge lever. Drum unit assembly WARNING Do not expose the drum unit to light for longer than a few minutes, because it from side to set up after installing a new drum unit. (See page 1-7.) NO ! 1-3 3550-US-5.0 SETUP & PREPARATION BEFORE USE Setting up Your... Fax Machine Follow these steps to side five or six times. This sheet will damage the drum. Ch. 1 Document tray Paper tray STEP B.
... Unseal the tape on the toner cartridge lever. Drum unit assembly WARNING Do not expose the drum unit to light for longer than a few minutes, because it from side to set up after installing a new drum unit. (See page 1-7.) NO ! 1-3 3550-US-5.0 SETUP & PREPARATION BEFORE USE Setting up Your... Fax Machine Follow these steps to side five or six times. This sheet will damage the drum. Ch. 1 Document tray Paper tray STEP B.

Users Manual - English
Page 12
Top cover 3) Holding the drum unit by its handles, 3) insert it into place. 3550-US-5.0 SETUP & PREPARATION BEFORE USE 2) Open the top cover of toner cartridge.) Top cover 1-4 Drum unit Handles 4) Closethetopcover. 4) (See page 12-1 for more information about replacement of the fax machine 2) until the latch clicks into the fax machine.
Top cover 3) Holding the drum unit by its handles, 3) insert it into place. 3550-US-5.0 SETUP & PREPARATION BEFORE USE 2) Open the top cover of toner cartridge.) Top cover 1-4 Drum unit Handles 4) Closethetopcover. 4) (See page 12-1 for more information about replacement of the fax machine 2) until the latch clicks into the fax machine.
Users Manual - English
Page 14
...feeder can accept letter, A4, and legal sized paper. NOTE • Itisessentialtousethedustcoverfor your fax machine will prolong the drum unit life. 7) Close the Multipurpose sheet feeder 7) cover. 3550-US-5.0 SETUP & PREPARATION BEFORE USE FOR YOUR INFORMATION About the Recording Paper... The default setting of the recording ... or legal paper, you have to skew and jam. Paper guide 6) Attach the dust cover to prevent dust from entering the drum unit and causing damage. • Using the dust cover on your fax machine to the 6) multipurpose sheet feeder cover. WARNING ...
...feeder can accept letter, A4, and legal sized paper. NOTE • Itisessentialtousethedustcoverfor your fax machine will prolong the drum unit life. 7) Close the Multipurpose sheet feeder 7) cover. 3550-US-5.0 SETUP & PREPARATION BEFORE USE FOR YOUR INFORMATION About the Recording Paper... The default setting of the recording ... or legal paper, you have to skew and jam. Paper guide 6) Attach the dust cover to prevent dust from entering the drum unit and causing damage. • Using the dust cover on your fax machine to the 6) multipurpose sheet feeder cover. WARNING ...

Users Manual - English
Page 73
... dark, you extend the life of the toner by turning the Print Density Dial located in the right corner under the top cover. (Remove the drum unit to find the dial. KEYS TO PRESS 1. Press Function. 2. THE DISPLAY WILL SHOW: 09/12/1996 15:25 1.TEMP.SETTINGS 5.USER OPTIONS ...See page 13-12 for more information.) KEYS TO PRESS 1. Press Set. 6. Press Z (left arrow) or X (right arrow) to ON, the print appears somewhat lighter. 3550-US-5.0 BASIC SETUP TO RECEIVE FAXES RECEIVING FAXES AND OTHER CALLS Setting the Print Density You can adjust it further by conserving its use.
... dark, you extend the life of the toner by turning the Print Density Dial located in the right corner under the top cover. (Remove the drum unit to find the dial. KEYS TO PRESS 1. Press Function. 2. THE DISPLAY WILL SHOW: 09/12/1996 15:25 1.TEMP.SETTINGS 5.USER OPTIONS ...See page 13-12 for more information.) KEYS TO PRESS 1. Press Set. 6. Press Z (left arrow) or X (right arrow) to ON, the print appears somewhat lighter. 3550-US-5.0 BASIC SETUP TO RECEIVE FAXES RECEIVING FAXES AND OTHER CALLS Setting the Print Density You can adjust it further by conserving its use.
Users Manual - English
Page 108
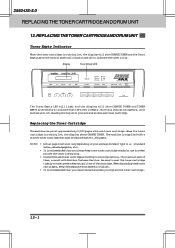
... 1,000 pages. Be sure to indicate that you always keep them , consult with one toner cartridge. 3550-US-5.0 REPLACING THE TONER CARTRIDGE AND DRUM UNIT 12. Display Toner Empty LED 3550 Set Function Clear Tel-index Fine Fax Photo TAD S.Fine F/ T Resolution Mode Super Q.Scan Help Enlarge...clean the machine when you have installed a new toner cartridge. Replacing the Toner Cartridge The machine can print approximately 2,200 pages with Brother Customer Service. NOTE: • Actual page count will vary depending on and off to indicate the toner is running low, the ...
... 1,000 pages. Be sure to indicate that you always keep them , consult with one toner cartridge. 3550-US-5.0 REPLACING THE TONER CARTRIDGE AND DRUM UNIT 12. Display Toner Empty LED 3550 Set Function Clear Tel-index Fine Fax Photo TAD S.Fine F/ T Resolution Mode Super Q.Scan Help Enlarge...clean the machine when you have installed a new toner cartridge. Replacing the Toner Cartridge The machine can print approximately 2,200 pages with Brother Customer Service. NOTE: • Actual page count will vary depending on and off to indicate the toner is running low, the ...
Users Manual - English
Page 109
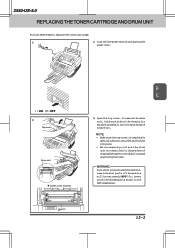
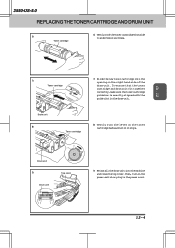
...3550-US-5.0 REPLACING THE TONER CARTRIDGE AND DRUM UNIT Follow these steps to avoid spilling and scattering the toner. To remove the drum unit, hold each side of the drum by lifting it until the latch clicks into place. • We recommend you place the drum... touch the shaded parts shown in the left illustration. Ch.12 : ON : OFF 2) Top cover Drum unit Inside of disposable paper to replace the toner cartridge: 1) 1) Turn off the power switch and ...its handles and gently lift the drum forward toward you have used the machine, some internal parts of the machine will be extremely HOT!
...3550-US-5.0 REPLACING THE TONER CARTRIDGE AND DRUM UNIT Follow these steps to avoid spilling and scattering the toner. To remove the drum unit, hold each side of the drum by lifting it until the latch clicks into place. • We recommend you place the drum... touch the shaded parts shown in the left illustration. Ch.12 : ON : OFF 2) Top cover Drum unit Inside of disposable paper to replace the toner cartridge: 1) 1) Turn off the power switch and ...its handles and gently lift the drum forward toward you have used the machine, some internal parts of the machine will be extremely HOT!
Users Manual - English
Page 110
...could void your hands or clothes, immediately wipe it off or wash it stops. The toner Toner cartridge cartridge can use only a genuine Brother toner cartridge (TN5000PF series), which is completely closed, by gently pulling it according to local regulations. WARNING Handle the toner cartridge carefully.... machine. WARNING • Waittounpackthetonercartridge until it with cold water. 5) New toner cartridge Old toner cartridge 5) Unpack the new toner cartridge. 3550-US-5.0 REPLACING THE TONER CARTRIDGE AND DRUM UNIT 3) Gently turn the lever on your machine's warranty. 12-3
...could void your hands or clothes, immediately wipe it off or wash it stops. The toner Toner cartridge cartridge can use only a genuine Brother toner cartridge (TN5000PF series), which is completely closed, by gently pulling it according to local regulations. WARNING Handle the toner cartridge carefully.... machine. WARNING • Waittounpackthetonercartridge until it with cold water. 5) New toner cartridge Old toner cartridge 5) Unpack the new toner cartridge. 3550-US-5.0 REPLACING THE TONER CARTRIDGE AND DRUM UNIT 3) Gently turn the lever on your machine's warranty. 12-3
Users Manual - English
Page 111
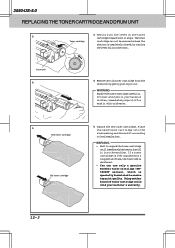
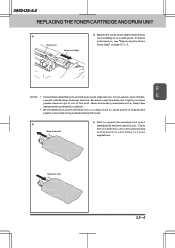
... cartridge and drum unit fit together correctly, make sure the toner cartridge guide bar is exactly aligned with the guide slot in the power cord. 12-4 Ch.12 7) Toner cartridge 7) Slide the new toner cartridge into the opening on the toner cartridge backward until it stops. 3550-US-5.0 REPLACING... THE TONER CARTRIDGE AND DRUM UNIT 6) Toner cartridge 6) Gentlyrockthetonercartridgefromside to side five or six times.
... cartridge and drum unit fit together correctly, make sure the toner cartridge guide bar is exactly aligned with the guide slot in the power cord. 12-4 Ch.12 7) Toner cartridge 7) Slide the new toner cartridge into the opening on the toner cartridge backward until it stops. 3550-US-5.0 REPLACING... THE TONER CARTRIDGE AND DRUM UNIT 6) Toner cartridge 6) Gentlyrockthetonercartridgefromside to side five or six times.

Users Manual - English
Page 112
..., such as temperature, humidity, type of its life. If there is shown, then the drum unit should be used the machine, some internal parts of pages per job. NOTE: The drum unit is a consumable, and it is rated at the end of paper and toner that will print ... dust-free environment with adequate ventilation. 3550-US-5.0 REPLACING THE TONER CARTRIDGE AND DRUM UNIT Replacing the Drum Unit The machine uses a drum unit to print without replacing the drum unit for a while. Even if the display shows CHANGE DRUM, you prepare a new drum unit to replace the drum unit: 1) Turn off the power ...
..., such as temperature, humidity, type of its life. If there is shown, then the drum unit should be used the machine, some internal parts of pages per job. NOTE: The drum unit is a consumable, and it is rated at the end of paper and toner that will print ... dust-free environment with adequate ventilation. 3550-US-5.0 REPLACING THE TONER CARTRIDGE AND DRUM UNIT Replacing the Drum Unit The machine uses a drum unit to print without replacing the drum unit for a while. Even if the display shows CHANGE DRUM, you prepare a new drum unit to replace the drum unit: 1) Turn off the power ...
Users Manual - English
Page 113
...3550-US-5.0 REPLACING THE TONER CARTRIDGE AND DRUM UNIT 4) Drum unit Toner cartridge 4) Removethetonercartridgefromthedrum unit and keep them separated from domestic rubbish. • We recommend you place the drum unit on page 12-1~4. Place the old drum... unit into the aluminum bag and discard it . Be sure to seal the drum unit tightly so toner ...powder does not spill out of disposable paper to avoid spilling and scattering the toner. 5) New drum unit 5) Wait to unpack the new drum unit...
...3550-US-5.0 REPLACING THE TONER CARTRIDGE AND DRUM UNIT 4) Drum unit Toner cartridge 4) Removethetonercartridgefromthedrum unit and keep them separated from domestic rubbish. • We recommend you place the drum unit on page 12-1~4. Place the old drum... unit into the aluminum bag and discard it . Be sure to seal the drum unit tightly so toner ...powder does not spill out of disposable paper to avoid spilling and scattering the toner. 5) New drum unit 5) Wait to unpack the new drum unit...
Users Manual - English
Page 114
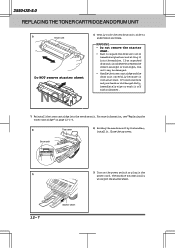
... the starter sheet. • Wait to excessive direct sunlight or room light, the unit may be damaged. • Handlethetonercartridgeandthe drum unit carefully because it off with cold water. 7) Reinstallthetonercartridgeintothenewdrumunit.Formoreinformation,see"Replacingthe Toner Cartridge" on the power switch or plug in...top cover. If an unpacked drum unit is subjected to unpack the drum unit until immediately before installing it . 3550-US-5.0 REPLACING THE TONER CARTRIDGE AND DRUM UNIT 6) Drum unit Do NOT remove starter sheet NO! 6) Gently rock the new drum unit side to side five...
... the starter sheet. • Wait to excessive direct sunlight or room light, the unit may be damaged. • Handlethetonercartridgeandthe drum unit carefully because it off with cold water. 7) Reinstallthetonercartridgeintothenewdrumunit.Formoreinformation,see"Replacingthe Toner Cartridge" on the power switch or plug in...top cover. If an unpacked drum unit is subjected to unpack the drum unit until immediately before installing it . 3550-US-5.0 REPLACING THE TONER CARTRIDGE AND DRUM UNIT 6) Drum unit Do NOT remove starter sheet NO! 6) Gently rock the new drum unit side to side five...
Users Manual - English
Page 115
... solvents to clean the machine and do not use water. When you reconnect these lines later, make sure to replace the toner cartridge and the drum unit during this routine. Glass cover Ch.13 13-1 It is a good idea to connect the power cord first, then the telephone line. 2. Avoid using...
... solvents to clean the machine and do not use water. When you reconnect these lines later, make sure to replace the toner cartridge and the drum unit during this routine. Glass cover Ch.13 13-1 It is a good idea to connect the power cord first, then the telephone line. 2. Avoid using...

Users Manual - English
Page 116
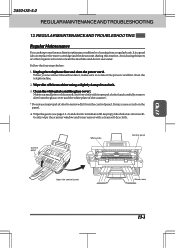
... 3550-US-5.0 REGULAR MAINTENANCE AND TROUBLESHOOTING WARNING • Donotuseisopropylalcoholtocleanthescannerwindoworthetonersensor. • Donottouchthescannerwindowwithyourfinger. • Handle the drum unit carefully because it off with cold water. Cleaning the Drum ...Unit NOTE: Werecommendyouplacethedrumunitonadropclothorlargepieceofdisposablepaper to the left. Turnthedrumunitupsidedownslowly. Gears Tonner sensor Electric terminal Gears Scanner window Shaded parts are extremelyHOT! Inside the machine WARNING Just after you have used the fax machine, some internal...
... 3550-US-5.0 REGULAR MAINTENANCE AND TROUBLESHOOTING WARNING • Donotuseisopropylalcoholtocleanthescannerwindoworthetonersensor. • Donottouchthescannerwindowwithyourfinger. • Handle the drum unit carefully because it off with cold water. Cleaning the Drum ...Unit NOTE: Werecommendyouplacethedrumunitonadropclothorlargepieceofdisposablepaper to the left. Turnthedrumunitupsidedownslowly. Gears Tonner sensor Electric terminal Gears Scanner window Shaded parts are extremelyHOT! Inside the machine WARNING Just after you have used the fax machine, some internal...

Users Manual - English
Page 117
... Pluginthepowercordandturnonthepowerswitch. TurnoffthepowerswitchandunplugthemachinefromtheACoutlet. 2. Openthetopcover. 3. Install the drum unit into the machine. Removethedrumunitassembly.Toremovethedrumunit,pleaserefertotheprevioussection (See page 12-5.) NOTE: Remove the drum unit and toner cartridge. Top cover Drum unit 13-3 Repacking and Shipping the Machine Whenever you... have vertical stripes. 4. Closethetopcover. 6. Leave the toner cartridge installed in the drum unit. Ch.13 3550-US-5.0 REGULAR MAINTENANCE AND TROUBLESHOOTING 2. See the section "REPLACING THE...
... Pluginthepowercordandturnonthepowerswitch. TurnoffthepowerswitchandunplugthemachinefromtheACoutlet. 2. Openthetopcover. 3. Install the drum unit into the machine. Removethedrumunitassembly.Toremovethedrumunit,pleaserefertotheprevioussection (See page 12-5.) NOTE: Remove the drum unit and toner cartridge. Top cover Drum unit 13-3 Repacking and Shipping the Machine Whenever you... have vertical stripes. 4. Closethetopcover. 6. Leave the toner cartridge installed in the drum unit. Ch.13 3550-US-5.0 REGULAR MAINTENANCE AND TROUBLESHOOTING 2. See the section "REPLACING THE...

Users Manual - English
Page 118
... and tape it in the plastic bag and place it shut. 13-4 Closethetopcover.Removethewireextension,documenttray,papertray,dustcoverand handset and pack them. 6. 3550-US-5.0 REGULAR MAINTENANCE AND TROUBLESHOOTING 4. Place the drum unit and toner cartridge assemply into the carton box as shown below. 8. Wrap the machine in the original carton box with the...
... and tape it in the plastic bag and place it shut. 13-4 Closethetopcover.Removethewireextension,documenttray,papertray,dustcoverand handset and pack them. 6. 3550-US-5.0 REGULAR MAINTENANCE AND TROUBLESHOOTING 4. Place the drum unit and toner cartridge assemply into the carton box as shown below. 8. Wrap the machine in the original carton box with the...

Users Manual - English
Page 119
3550-US-5.0 REGULAR MAINTENANCE AND TROUBLESHOOTING Paper Jams Your fax machine will show DOCUMENT JAM or PRINTER JAM. The display...8226; Afteryouhaveusedthemachine,someinternalpartsofthemachineareextremely HOT! Whenyouopenthetopcoverofthemachine,nevertouchtheshadedparts shown in the following diagram. Closethecontrolpanel. 4. Paper Top Cover Multipurpose Sheet Feeder Ch.13 Drum Unit WARNING • Donotforcethejammedpaperfromthepapertraybecauseyoumaydamagethe machine and cause toner to help locate the position of the paper. Openthecontrolpanel. 2. Fixing a Document Jam 1.
3550-US-5.0 REGULAR MAINTENANCE AND TROUBLESHOOTING Paper Jams Your fax machine will show DOCUMENT JAM or PRINTER JAM. The display...8226; Afteryouhaveusedthemachine,someinternalpartsofthemachineareextremely HOT! Whenyouopenthetopcoverofthemachine,nevertouchtheshadedparts shown in the following diagram. Closethecontrolpanel. 4. Paper Top Cover Multipurpose Sheet Feeder Ch.13 Drum Unit WARNING • Donotforcethejammedpaperfromthepapertraybecauseyoumaydamagethe machine and cause toner to help locate the position of the paper. Openthecontrolpanel. 2. Fixing a Document Jam 1.

