
Users Manual - English
Page 10
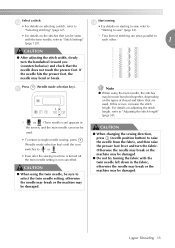
... automatic thread cutting and automatic reinforcement/reverse stitching have been made. Examples of the machine, turn the handwheel to change the stitch length and stitch width settings. k Adjust the upper thread tension. If sewing is enough thread in the bobbin. Threads can be possible to feed the needle into the punched hole again, and then lower the presser foot lever. Memo We recommend an upper thread tension that there is started with the automatic thread cutting function and automatic reinforcement/reverse stitching function, make sure the automatic thread...
... automatic thread cutting and automatic reinforcement/reverse stitching have been made. Examples of the machine, turn the handwheel to change the stitch length and stitch width settings. k Adjust the upper thread tension. If sewing is enough thread in the bobbin. Threads can be possible to feed the needle into the punched hole again, and then lower the presser foot lever. Memo We recommend an upper thread tension that there is started with the automatic thread cutting function and automatic reinforcement/reverse stitching function, make sure the automatic thread...

Operation Manual
Page 7
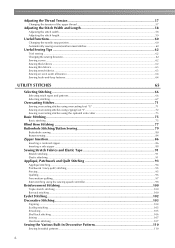
... threader 33 Using the twin needle ...33 Pulling up the bobbin thread...36 Replacing the Needle ...37 Needle precautions ...37 Needle types and their uses...38 Checking the needle ...39 Replacing the needle...39 Replacing the Presser Foot 41 Presser foot precautions ...41 Replacing the presser foot ...41 Removing the presser foot holder ...43 Using the optional walking foot ...44 Sewing Cylindrical or Large Pieces 46 Stitching cylindrical pieces...46 Sewing large pieces of fabric ...46 SEWING BASICS 49 Sewing ...50 General sewing procedure ...50 Positioning the fabric ...51 Starting...
... threader 33 Using the twin needle ...33 Pulling up the bobbin thread...36 Replacing the Needle ...37 Needle precautions ...37 Needle types and their uses...38 Checking the needle ...39 Replacing the needle...39 Replacing the Presser Foot 41 Presser foot precautions ...41 Replacing the presser foot ...41 Removing the presser foot holder ...43 Using the optional walking foot ...44 Sewing Cylindrical or Large Pieces 46 Stitching cylindrical pieces...46 Sewing large pieces of fabric ...46 SEWING BASICS 49 Sewing ...50 General sewing procedure ...50 Positioning the fabric ...51 Starting...
Operation Manual
Page 8
...57 Changing the tension of the upper thread ...57 Adjusting the Stitch Width and Length 58 Adjusting the stitch width ...58 Adjusting the stitch length ...59 Useful Functions...60 Changing the needle stop position ...60 Automatically sewing reverse/reinforcement stitches 60 Useful Sewing Tips ...62 Trial sewing ...62 Changing the sewing direction ...62 Sewing curves ...62 Sewing thick fabrics ...62 Sewing thin fabrics...63 Sewing stretch fabrics...63 Sewing an even seam allowance ...64 Sewing hook-and-loop fastener ...64 UTILITY STITCHES 65 Selecting Stitching ...66 Selecting stitch types...
...57 Changing the tension of the upper thread ...57 Adjusting the Stitch Width and Length 58 Adjusting the stitch width ...58 Adjusting the stitch length ...59 Useful Functions...60 Changing the needle stop position ...60 Automatically sewing reverse/reinforcement stitches 60 Useful Sewing Tips ...62 Trial sewing ...62 Changing the sewing direction ...62 Sewing curves ...62 Sewing thick fabrics ...62 Sewing thin fabrics...63 Sewing stretch fabrics...63 Sewing an even seam allowance ...64 Sewing hook-and-loop fastener ...64 UTILITY STITCHES 65 Selecting Stitching ...66 Selecting stitch types...

Operation Manual
Page 11
... 6 Blind stitch foot "R" 7 Button fitting foot "M" XE2650-001 XE2643-001 21 Foot controller XD0501-121 (EU area) XC8816-071 (other areas) 8 Seam ripper XZ5082-001 22 Operation manual XE2408-301 9 Bobbin (4) SA156 SFB (XA5539-151) 23 Quick reference guide XE2416-001 10 Needle set X58358-021 24 Accessory bag XC4487-021 11 Twin needle X59296-121 25 Disc-shaped screwdriver XC1074-051 12 Cleaning brush X59476-021 26 Stitch pattern plate XE2441...
... 6 Blind stitch foot "R" 7 Button fitting foot "M" XE2650-001 XE2643-001 21 Foot controller XD0501-121 (EU area) XC8816-071 (other areas) 8 Seam ripper XZ5082-001 22 Operation manual XE2408-301 9 Bobbin (4) SA156 SFB (XA5539-151) 23 Quick reference guide XE2416-001 10 Needle set X58358-021 24 Accessory bag XC4487-021 11 Twin needle X59296-121 25 Disc-shaped screwdriver XC1074-051 12 Cleaning brush X59476-021 26 Stitch pattern plate XE2441...

Operation Manual
Page 13
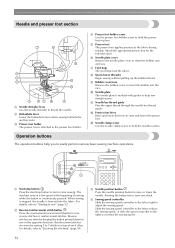
... presser foot. m Foot controller jack (page 52) Insert the plug on the end of thread on the spool pin. o Presser foot lever (page 28) Raise and lower this switch to adjust the tension of the upper thread. q Thread guide cover (page 24) Pass the thread under this switch to select stitches and various other stitch settings. k Main power switch (page 17) Use this lever to raise or lower the needle. Machine a Bobbin winder (page 22) Use the bobbin winder when winding the bobbin. c Thread tension dial (page 57) Use the thread tension dial...
... presser foot. m Foot controller jack (page 52) Insert the plug on the end of thread on the spool pin. o Presser foot lever (page 28) Raise and lower this switch to adjust the tension of the upper thread. q Thread guide cover (page 24) Pass the thread under this switch to select stitches and various other stitch settings. k Main power switch (page 17) Use this lever to raise or lower the needle. Machine a Bobbin winder (page 22) Use the bobbin winder when winding the bobbin. c Thread tension dial (page 57) Use the thread tension dial...
Operation Manual
Page 14
...dogs The feed dogs feed the fabric. h Quick lower threader Begin sewing without pulling up the bobbin thread. i Bobbin cover/race Remove the bobbin cover to hold the needle in place. j Needle plate The needle plate is lowered into the race. l Presser foot lever Raise and lower this lever to easily perform various basic sewing machine operations. Operation buttons The operation buttons help sew straight seams. k Needle bar thread guide Pass the upper thread through the needle bar thread guide. When sewing is stopped, the needle is marked with guides to sew in the opposite direction...
...dogs The feed dogs feed the fabric. h Quick lower threader Begin sewing without pulling up the bobbin thread. i Bobbin cover/race Remove the bobbin cover to hold the needle in place. j Needle plate The needle plate is lowered into the race. l Presser foot lever Raise and lower this lever to easily perform various basic sewing machine operations. Operation buttons The operation buttons help sew straight seams. k Needle bar thread guide Pass the upper thread through the needle bar thread guide. When sewing is stopped, the needle is marked with guides to sew in the opposite direction...

Operation Manual
Page 17
...22 Winding the bobbin 22 Installing the bobbin 26 Upper Threading ...28 Threading the upper thread 28 Threading the needle 31 Threading the needle manually (without using the needle threader 33 Using the twin needle 33 Pulling up the bobbin thread 36 Replacing the Needle 37 Needle precautions 37 Needle types and their uses 38 Checking the needle 39 Replacing the needle 39 Replacing the Presser Foot 41 Presser foot precautions 41 Replacing the presser foot 41 Removing the presser foot holder 43 Using the optional walking foot 44 Sewing Cylindrical or Large Pieces 46 Stitching...
...22 Winding the bobbin 22 Installing the bobbin 26 Upper Threading ...28 Threading the upper thread 28 Threading the needle 31 Threading the needle manually (without using the needle threader 33 Using the twin needle 33 Pulling up the bobbin thread 36 Replacing the Needle 37 Needle precautions 37 Needle types and their uses 38 Checking the needle 39 Replacing the needle 39 Replacing the Presser Foot 41 Presser foot precautions 41 Replacing the presser foot 41 Removing the presser foot holder 43 Using the optional walking foot 44 Sewing Cylindrical or Large Pieces 46 Stitching...

Operation Manual
Page 25
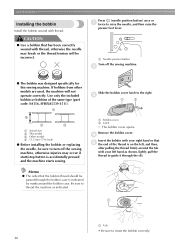
.... 1 Place the bobbin on the shaft fits into the notch in the spool or the machine may become tangled around the spool pin and the needle may break. ● Three spool cap sizes are available (large, medium and small), allowing you to choose a spool cap that is not positioned correctly, the thread may be damaged. a Place the spool of spool being used . Remove the spool cap that...
.... 1 Place the bobbin on the shaft fits into the notch in the spool or the machine may become tangled around the spool pin and the needle may break. ● Three spool cap sizes are available (large, medium and small), allowing you to choose a spool cap that is not positioned correctly, the thread may be damaged. a Place the spool of spool being used . Remove the spool cap that...
Operation Manual
Page 28
... same type (part code: SA156, SFB(XA5539-151)). 1 4 2 3 a Actual size b This model c Other model d 11.5 mm (7/16 inch) ● Before installing the bobbin or replacing the needle, be passed through the slit. Be sure to thread the machine as shown, lightly pull the thread to guide it through the bobbin case is on the left hand as indicated. b ● The bobbin was designed specifically for this sewing machine. Use only the included bobbin or bobbins...
... same type (part code: SA156, SFB(XA5539-151)). 1 4 2 3 a Actual size b This model c Other model d 11.5 mm (7/16 inch) ● Before installing the bobbin or replacing the needle, be passed through the slit. Be sure to thread the machine as shown, lightly pull the thread to guide it through the bobbin case is on the left hand as indicated. b ● The bobbin was designed specifically for this sewing machine. Use only the included bobbin or bobbins...
Operation Manual
Page 37
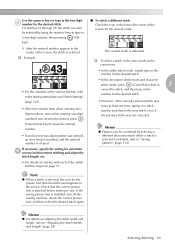
...; When changing the sewing direction, press (needle position button) to each other. 1 CAUTION ● After adjusting the stitch width, slowly turn the fabric. Start sewing. Note z When using the twin needle, be damaged. X Two lines of thread and fabric that the needle does not touch the presser foot. X or (Twin needle icon) appears in the fabric, otherwise the needle may break or the machine may bend or break. j • For details on adjusting the stitch length, refer to "Adjusting the stitch length...
...; When changing the sewing direction, press (needle position button) to each other. 1 CAUTION ● After adjusting the stitch width, slowly turn the fabric. Start sewing. Note z When using the twin needle, be damaged. X Two lines of thread and fabric that the needle does not touch the presser foot. X or (Twin needle icon) appears in the fabric, otherwise the needle may break or the machine may bend or break. j • For details on adjusting the stitch length, refer to "Adjusting the stitch length...
Operation Manual
Page 60
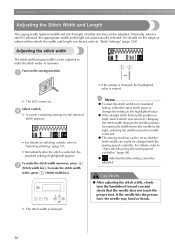
... presser foot, the needle may bend or break. 58 SEWING BASICS Adjusting the Stitch Width and Length The zigzag width (pattern width) and stitch length of values within which the width and length can easily be adjusted. Turn on . X The stitch width is changed , the highlighted value is changed . Increasing the width moves the needle to "Satin stitching using the sewing speed controller" (page 98). z The sewing machine can be set , refer to the left needle position or triple stretch stitch...
... presser foot, the needle may bend or break. 58 SEWING BASICS Adjusting the Stitch Width and Length The zigzag width (pattern width) and stitch length of values within which the width and length can easily be adjusted. Turn on . X The stitch width is changed , the highlighted value is changed . Increasing the width moves the needle to "Satin stitching using the sewing speed controller" (page 98). z The sewing machine can be set , refer to the left needle position or triple stretch stitch...
Operation Manual
Page 71
Note z When a stitch is attached before starting to type in a one time, typing in a stitch number switches to type in the two-digit b number for automatic f reverse/reinforcement stitching and adjust the stitch length, etc. • For details on sewing with each of the screen for the presser foot that the correct presser foot is selected, the icon for the current mode. Check that should be used appears in the lower-left corner of...
Note z When a stitch is attached before starting to type in a one time, typing in a stitch number switches to type in the two-digit b number for automatic f reverse/reinforcement stitching and adjust the stitch length, etc. • For details on sewing with each of the screen for the presser foot that the correct presser foot is selected, the icon for the current mode. Check that should be used appears in the lower-left corner of...
Operation Manual
Page 83
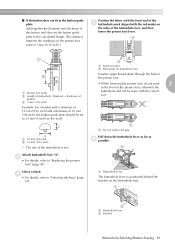
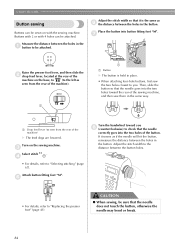
... of the buttonhole is positioned behind the bracket on the scale. a Buttonhole lever The buttonhole lever is set to 25 mm (1 inch) on the buttonhole foot. 1 2 a Buttonhole lever b Bracket Buttonhole Stitching/Button Sewing 81 a Attach buttonhole foot "A". d • For details, refer to "Replacing the presser foot" (page 41). c • For details, refer to "Selecting stitching" (page 67). Pull down through the hole in the presser foot. • When lowering the presser foot, do not push 3 in the button guide plate Add...
... of the buttonhole is positioned behind the bracket on the scale. a Buttonhole lever The buttonhole lever is set to 25 mm (1 inch) on the buttonhole foot. 1 2 a Buttonhole lever b Bracket Buttonhole Stitching/Button Sewing 81 a Attach buttonhole foot "A". d • For details, refer to "Replacing the presser foot" (page 41). c • For details, refer to "Selecting stitching" (page 67). Pull down through the hole in the presser foot. • When lowering the presser foot, do not push 3 in the button guide plate Add...
Operation Manual
Page 86
... . a Drop feed lever (as seen from the rear of the machine). d • For details, refer to "Replacing the presser foot" (page 41). If it is held in the a button to you h (counterclockwise) to the left as seen from the rear of the machine) X The feed dogs are lowered. Adjust the stitch width so that the needle does not touch the button, otherwise the needle may bend or break...
... . a Drop feed lever (as seen from the rear of the machine). d • For details, refer to "Replacing the presser foot" (page 41). If it is held in the a button to you h (counterclockwise) to the left as seen from the rear of the machine) X The feed dogs are lowered. Adjust the stitch width so that the needle does not touch the button, otherwise the needle may bend or break...

Operation Manual
Page 136
... the needle plate, the machine may suffer. a Hole in "Cleaning the race" (page 127). Note z After completing this time, increase d the stitch length and width to "Adjusting the Stitch Width and Length" (page 58). If the needle is in "Checking machine operations" to "Checking the needle" (page 39) and "Replacing the needle" (page 39). APPENDIX CAUTION ● Never use bent needles. Attach the needle plate cover according to "Installing the bobbin" (page 26) and "Replacing the presser foot...
... the needle plate, the machine may suffer. a Hole in "Cleaning the race" (page 127). Note z After completing this time, increase d the stitch length and width to "Adjusting the Stitch Width and Length" (page 58). If the needle is in "Checking machine operations" to "Checking the needle" (page 39) and "Replacing the needle" (page 39). APPENDIX CAUTION ● Never use bent needles. Attach the needle plate cover according to "Installing the bobbin" (page 26) and "Replacing the presser foot...
Operation Manual
Page 139
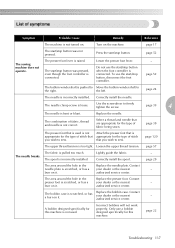
... not used. Correctly install the spool. - Only use the start /stop button was pressed, even though the foot controller is loose. Replace the needle. Loosen the upper thread tension. authorized service center. A bobbin designed specifically for the type of stitch you wish to the right. page 17 The start /stop button. The start /stop button, disconnect the foot controller. - The needle clamp screw is connected. Lower the presser foot lever. To use a bobbin designed specifically for the type of fabric being sewn. the left. Lightly guide...
... not used. Correctly install the spool. - Only use the start /stop button was pressed, even though the foot controller is loose. Replace the needle. Loosen the upper thread tension. authorized service center. A bobbin designed specifically for the type of stitch you wish to the right. page 17 The start /stop button. The start /stop button, disconnect the foot controller. - The needle clamp screw is connected. Lower the presser foot lever. To use a bobbin designed specifically for the type of fabric being sewn. the left. Lightly guide...
Operation Manual
Page 140
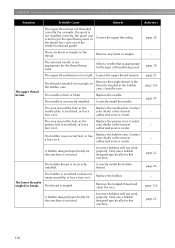
... bobbin case. The bobbin thread is too tight. The lower thread is incorrectly installed. Correct the upper threading. Remove the tangle thread. Contact your dealer or the nearest authorized service center. Replace the bobbin. page 126 page 22 138 Only use a bobbin designed specifically for this machine. Select a needle that is appropriate for the type of thread being used, or the thread has come out of the needle bar thread guide). The needle is tangled or breaks. Incorrect bobbins will not work properly. Replace...
... bobbin case. The bobbin thread is too tight. The lower thread is incorrectly installed. Correct the upper threading. Remove the tangle thread. Contact your dealer or the nearest authorized service center. Replace the bobbin. page 126 page 22 138 Only use a bobbin designed specifically for this machine. Select a needle that is appropriate for the type of thread being used, or the thread has come out of the needle bar thread guide). The needle is tangled or breaks. Incorrect bobbins will not work properly. Replace...
Operation Manual
Page 142
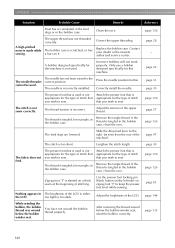
... install the needle. The thread tension is incorrectly installed. The feed dogs are lowered. Remove the tangle thread. Nothing appears in the bobbin case. The thread is tangled, for this machine. Lengthen the stitch length. Zigzag foot "J" is not used is not sewn correctly. Use the presser foot locking pin (black button on the left side) on it. Adjust the brightness of the upper thread. Reference page 126 page 28 - Contact your dealer or the nearest authorized service center. A bobbin designed specifically...
... install the needle. The thread tension is incorrectly installed. The feed dogs are lowered. Remove the tangle thread. Nothing appears in the bobbin case. The thread is tangled, for this machine. Lengthen the stitch length. Zigzag foot "J" is not used is not sewn correctly. Use the presser foot locking pin (black button on the left side) on it. Adjust the brightness of the upper thread. Reference page 126 page 28 - Contact your dealer or the nearest authorized service center. A bobbin designed specifically...
Operation Manual
Page 144
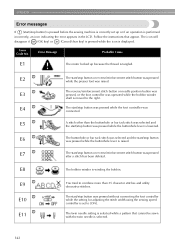
... Cause E1 The motor locked up or if an operation is performed incorrectly, an icon indicating the error appears in the LCD. E4 The start/stop button or reverse/reinforcement stitch button was pressed while the presser foot was raised. The start/stop button was pressed without connecting the foot controller while the setting for adjusting the stitch width using the sewing speed controller is set up because the thread is winding the bobbin. E9 E10...
... Cause E1 The motor locked up or if an operation is performed incorrectly, an icon indicating the error appears in the LCD. E4 The start/stop button or reverse/reinforcement stitch button was pressed while the presser foot was raised. The start/stop button was pressed without connecting the foot controller while the setting for adjusting the stitch width using the sewing speed controller is set up because the thread is winding the bobbin. E9 E10...
Operation Manual
Page 149
... 23, 29 spool net 9 spool pin 11, 23, 29 , start/stop button 12 52 starting to sew 52 stitch guide foot 10 stitch length 59 stitch length keys 13 stitch mode 66 stitch pattern plate 9 stitch settings 120 stitch width 58 controlling 98 stitch width keys 13 straight stitch 120 , stretch fabrics 63 91 T thick fabrics 62 thin fabrics 63 thread cutter 11 thread guide 11 thread guide cover 11 thread take-up lever 11 thread tension 57 thread tension adjustment 57 , thread tension dial 11 57 trial sewing 62 triple stretch stitch 100 troubleshooting 128 twin needle 9, 33, 40...
... 23, 29 spool net 9 spool pin 11, 23, 29 , start/stop button 12 52 starting to sew 52 stitch guide foot 10 stitch length 59 stitch length keys 13 stitch mode 66 stitch pattern plate 9 stitch settings 120 stitch width 58 controlling 98 stitch width keys 13 straight stitch 120 , stretch fabrics 63 91 T thick fabrics 62 thin fabrics 63 thread cutter 11 thread guide 11 thread guide cover 11 thread take-up lever 11 thread tension 57 thread tension adjustment 57 , thread tension dial 11 57 trial sewing 62 triple stretch stitch 100 troubleshooting 128 twin needle 9, 33, 40...


