Users Manual - English
Page 2
...Work Free-Motion Sewing ...11 Templates for sewing (utility stitches, decorative stitches or free-motion sewing). The images and patterns used in this manual are for illustration purposes and may differ from the actual items. This is a kit used for machine embroidering. BEFORE YOU START Thank you... for sewing bobbin work. This manual describes the procedures for choosing our product. This kit cannot be used for Free-Motion Sewing ...12 ADJUSTING THE THREAD TENSION...13 Adjusting ...
...Work Free-Motion Sewing ...11 Templates for sewing (utility stitches, decorative stitches or free-motion sewing). The images and patterns used in this manual are for illustration purposes and may differ from the actual items. This is a kit used for machine embroidering. BEFORE YOU START Thank you... for sewing bobbin work. This manual describes the procedures for choosing our product. This kit cannot be used for Free-Motion Sewing ...12 ADJUSTING THE THREAD TENSION...13 Adjusting ...

Users Manual - English
Page 3
... the bobbin cover with the same shape as the bobbin cover included with tabs (*See Note.) Screwdriver (small) (X55468-051) CD-ROM (Contains the Operation Manual and the Templates for freemotion sewing.) (USA/CANADA: XE9382-001, Other areas: XE9501-001) Note • Two bobbin covers may be included, depending on the...
... the bobbin cover with the same shape as the bobbin cover included with tabs (*See Note.) Screwdriver (small) (X55468-051) CD-ROM (Contains the Operation Manual and the Templates for freemotion sewing.) (USA/CANADA: XE9382-001, Other areas: XE9501-001) Note • Two bobbin covers may be included, depending on the...
Users Manual - English
Page 8
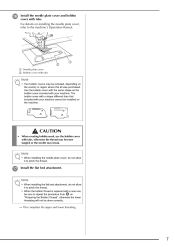
... on "Preparing the Bobbin Thread", otherwise the lower threading will not be included, depending on installing the needle plate cover, refer to the machine's Operation Manual. Note • When installing the flat bed attachment, do not allow it to repeat the procedure from a on the machine. Use the bobbin cover with...
... on "Preparing the Bobbin Thread", otherwise the lower threading will not be included, depending on installing the needle plate cover, refer to the machine's Operation Manual. Note • When installing the flat bed attachment, do not allow it to repeat the procedure from a on the machine. Use the bobbin cover with...

Users Manual - English
Page 10
...results, select a longer stitch length and a wider stitch width. We recommend selecting a simple stitch and sewing trial stitches to the machine's Operation Manual. For details on adjusting the upper thread tension, refer to check the sewing results. l Note • Before sewing, check that is enough...higher than the standard setting. Threads can be damaged. Depending on the selected stitch, it will be possible to the machine's Operation Manual. • Depending on , the thread may become tangled or the needle may be released after several stitches have reached the end of...
...results, select a longer stitch length and a wider stitch width. We recommend selecting a simple stitch and sewing trial stitches to the machine's Operation Manual. For details on adjusting the upper thread tension, refer to check the sewing results. l Note • Before sewing, check that is enough...higher than the standard setting. Threads can be damaged. Depending on the selected stitch, it will be possible to the machine's Operation Manual. • Depending on , the thread may become tangled or the needle may be released after several stitches have reached the end of...
Users Manual - English
Page 12
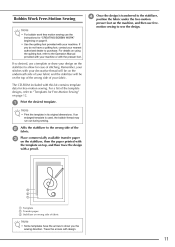
... BOBBIN WORK" beginning on page 8. • Use the quilting foot provided with the presser foot. For a list of the template designs, refer to the Operation Manual provided with your machine or with your machine. Remember, your stitches with your decorative thread will be on the underneath side of your fabric and...
... BOBBIN WORK" beginning on page 8. • Use the quilting foot provided with the presser foot. For a list of the template designs, refer to the Operation Manual provided with your machine or with your machine. Remember, your stitches with your decorative thread will be on the underneath side of your fabric and...
Users Manual - English
Page 14
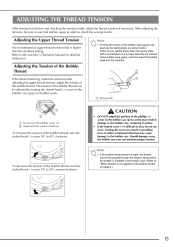
If this may cause damage to the machine's Operation Manual for bobbin work. To increase the tension of the bobbin thread, turn the slotted-head (-) screw 30° to 45° clockwise. Note • If ...
If this may cause damage to the machine's Operation Manual for bobbin work. To increase the tension of the bobbin thread, turn the slotted-head (-) screw 30° to 45° clockwise. Note • If ...
Operation Manual
Page 1
We recommend that you keep this document before using the machine. GETTING READY SEWING BASICS UTILITY STITCHES APPENDIX Operation Manual Computerized Sewing Machine Product Code: 885-V14 Be sure to read this document nearby for future reference.
We recommend that you keep this document before using the machine. GETTING READY SEWING BASICS UTILITY STITCHES APPENDIX Operation Manual Computerized Sewing Machine Product Code: 885-V14 Be sure to read this document nearby for future reference.
Operation Manual
Page 3
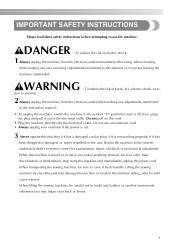
...reduce the risk of electric shock: 1 Always unplug the machine from the electrical outlet when making any user servicing adjustments mentioned in the instruction manual: • To unplug the machine, switch the machine to the symbol "O" position to turn it off, then grasp the plug and pull...before attempting to use an extension cord. • Always unplug your back or knees. 1 While the machine is cut. 3 Never operate this manual, or if you notice anything unusual, such an odor, heat, discoloration or deformation, stop using the machine and immediately unplug the power cord. When...
...reduce the risk of electric shock: 1 Always unplug the machine from the electrical outlet when making any user servicing adjustments mentioned in the instruction manual: • To unplug the machine, switch the machine to the symbol "O" position to turn it off, then grasp the plug and pull...before attempting to use an extension cord. • Always unplug your back or knees. 1 While the machine is cut. 3 Never operate this manual, or if you notice anything unusual, such an odor, heat, discoloration or deformation, stop using the machine and immediately unplug the power cord. When...

Operation Manual
Page 4
...; Do not use extension cords. Benzene, thinner, and scouring powders can damage the case and machine, and should be used. • Always consult the operation manual when replacing or installing any assemblies, the presser feet, needle, or other hot objects. • Use only neutral soaps or detergents to clean the case...
...; Do not use extension cords. Benzene, thinner, and scouring powders can damage the case and machine, and should be used. • Always consult the operation manual when replacing or installing any assemblies, the presser feet, needle, or other hot objects. • Use only neutral soaps or detergents to clean the case...
Operation Manual
Page 5
...given supervision or instruction concerning use of the appliance by a person responsible for use . The contents of this manual and specifications of the operation manual to inspect and adjust the machine yourself. This appliance is not intended for their safety. Cleaning and user ...play with the appliance. Children should be supervised to change without supervision. 3 For additional product information, visit our web site at www.brother.com SAVE THESE INSTRUCTIONS. 8 For repair or adjustment: • If the Light unit (light-emitting diode) is damaged, it must...
...given supervision or instruction concerning use of the appliance by a person responsible for use . The contents of this manual and specifications of the operation manual to inspect and adjust the machine yourself. This appliance is not intended for their safety. Cleaning and user ...play with the appliance. Children should be supervised to change without supervision. 3 For additional product information, visit our web site at www.brother.com SAVE THESE INSTRUCTIONS. 8 For repair or adjustment: • If the Light unit (light-emitting diode) is damaged, it must...

Operation Manual
Page 7
... precautions ...22 Winding the bobbin ...22 Installing the bobbin ...26 Upper Threading ...28 Threading the upper thread ...28 Threading the needle ...31 Threading the needle manually (without using the needle threader 33 Using the twin needle ...33 Pulling up the bobbin thread...36 Replacing the Needle ...37 Needle precautions ...37 Needle...
... precautions ...22 Winding the bobbin ...22 Installing the bobbin ...26 Upper Threading ...28 Threading the upper thread ...28 Threading the needle ...31 Threading the needle manually (without using the needle threader 33 Using the twin needle ...33 Pulling up the bobbin thread...36 Replacing the Needle ...37 Needle precautions ...37 Needle...
Operation Manual
Page 10
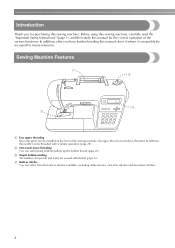
Before using this sewing machine, carefully read the "Important Safety Instructions" (page 1), and then study this manual for the correct operation of the sewing machine, the upper thread can easily be threaded. In addition, the needle can be threaded with thread (page ... various functions. c Simple bobbin-winding The bobbin can quickly and easily be wound with a simple operation (page 28). Introduction Thank you have finished reading this manual, store it where it can quickly be accessed for future reference.
Before using this sewing machine, carefully read the "Important Safety Instructions" (page 1), and then study this manual for the correct operation of the sewing machine, the upper thread can easily be threaded. In addition, the needle can be threaded with thread (page ... various functions. c Simple bobbin-winding The bobbin can quickly and easily be wound with a simple operation (page 28). Introduction Thank you have finished reading this manual, store it where it can quickly be accessed for future reference.

Operation Manual
Page 11
... foot "R" 7 Button fitting foot "M" XE2650-001 XE2643-001 21 Foot controller XD0501-121 (EU area) XC8816-071 (other areas) 8 Seam ripper XZ5082-001 22 Operation manual XE2408-301 9 Bobbin (4) SA156 SFB (XA5539-151) 23 Quick reference guide XE2416-001 10 Needle set X58358-021 24 Accessory bag XC4487-021 11 Twin...
... foot "R" 7 Button fitting foot "M" XE2650-001 XE2643-001 21 Foot controller XD0501-121 (EU area) XC8816-071 (other areas) 8 Seam ripper XZ5082-001 22 Operation manual XE2408-301 9 Bobbin (4) SA156 SFB (XA5539-151) 23 Quick reference guide XE2416-001 10 Needle set X58358-021 24 Accessory bag XC4487-021 11 Twin...

Operation Manual
Page 17
... precautions 22 Winding the bobbin 22 Installing the bobbin 26 Upper Threading ...28 Threading the upper thread 28 Threading the needle 31 Threading the needle manually (without using the needle threader 33 Using the twin needle 33 Pulling up the bobbin thread 36 Replacing the Needle 37 Needle precautions 37 Needle...
... precautions 22 Winding the bobbin 22 Installing the bobbin 26 Upper Threading ...28 Threading the upper thread 28 Threading the needle 31 Threading the needle manually (without using the needle threader 33 Using the twin needle 33 Pulling up the bobbin thread 36 Replacing the Needle 37 Needle precautions 37 Needle...
Operation Manual
Page 30
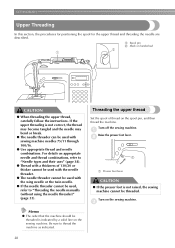
... can be used with sewing machine needles 75/11 through 100/16. ● Use appropriate thread and needle combinations. Be sure to "Threading the needle manually (without using the needle threader)" (page 33). GETTING READY Upper Threading In this section, the procedures for positioning the spool for the upper thread and...
... can be used with sewing machine needles 75/11 through 100/16. ● Use appropriate thread and needle combinations. Be sure to "Threading the needle manually (without using the needle threader)" (page 33). GETTING READY Upper Threading In this section, the procedures for positioning the spool for the upper thread and...
Operation Manual
Page 33
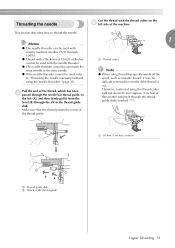
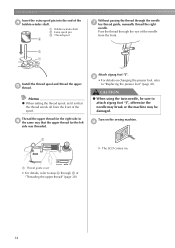
... be used with the thread cutter on the b left (A), and then firmly pull it from the front (B) through the thread guide disks (marked "7"). 1 a 80 mm (3 inches) or more a b B A a Thread guide disk b Notch of the thread guide Upper Threading 31 Therefore, instead of the machine. This... threader. z Thread with a thickness of the thread guide. z The needle threader cannot be difficult to "Threading the needle manually (without using the thread cutter, pull out about 80 mm (approx. 3 inches) of the thread, which has been a passed through 100/16. Make sure that quickly winds ...
... be used with the thread cutter on the b left (A), and then firmly pull it from the front (B) through the thread guide disks (marked "7"). 1 a 80 mm (3 inches) or more a b B A a Thread guide disk b Notch of the thread guide Upper Threading 31 Therefore, instead of the machine. This... threader. z Thread with a thickness of the thread guide. z The needle threader cannot be difficult to "Threading the needle manually (without using the thread cutter, pull out about 80 mm (approx. 3 inches) of the thread, which has been a passed through 100/16. Make sure that quickly winds ...
Operation Manual
Page 35
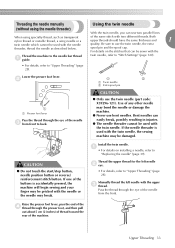
...the needle as transparent nylon thread or metallic thread, a wing needle or a of the same stitch with the needle quality. Install the twin needle. Manually thread the left needle b eye. • For details, refer to use bent needles. a • For details on the stitches that can be ... same thickness and 1 twin needle which cannot be used with the Thread the machine to "Upper Threading" (page 28). Threading the needle manually Using the twin needle (without using the needle threader) With the twin needle, you can sew two parallel lines When using specialty thread,...
...the needle as transparent nylon thread or metallic thread, a wing needle or a of the same stitch with the needle quality. Install the twin needle. Manually thread the left needle b eye. • For details, refer to use bent needles. a • For details on the stitches that can be ... same thickness and 1 twin needle which cannot be used with the Thread the machine to "Upper Threading" (page 28). Threading the needle manually Using the twin needle (without using the needle threader) With the twin needle, you can sew two parallel lines When using specialty thread,...
Operation Manual
Page 36
... the needle from the front of the d bobbin winder shaft. a Thread guide cover • For details, refer to step i through the needle g bar thread guide, manually thread the right needle. GETTING READY Insert the extra spool pin into the end of the spool.
... the needle from the front of the d bobbin winder shaft. a Thread guide cover • For details, refer to step i through the needle g bar thread guide, manually thread the right needle. GETTING READY Insert the extra spool pin into the end of the spool.
Operation Manual
Page 46
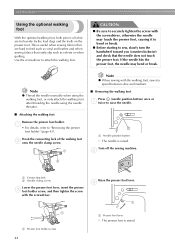
... bend or break. Raise the presser foot lever. c a a a Presser foot holder screw 44 a Presser foot lever X The presser foot is raised. Note z Thread the needle manually when using the walking foot, or only attach the walking foot after threading the needle using the needle threader. ■ Attaching the walking foot Remove...
... bend or break. Raise the presser foot lever. c a a a Presser foot holder screw 44 a Presser foot lever X The presser foot is raised. Note z Thread the needle manually when using the walking foot, or only attach the walking foot after threading the needle using the needle threader. ■ Attaching the walking foot Remove...
Operation Manual
Page 73
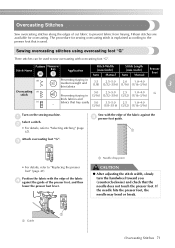
... fray easily 5.0 3.5-5.0 2.5 1.0-4.0 (3/16) (1/8-3/16) (3/32) (1/16-3/16) Turn on the sewing machine. Pattern Numeric Stitch Name Key Application Stitch Width [mm (inch)] Auto Manual Stitch Length [mm (inch)] Auto Manual Presser Foot 08 Preventing fraying in medium weight and thin fabrics 3.5 2.5-5.0 2.0 1.0-4.0 (1/8) (3/32-3/16) (1/16) (1/16-3/16) 3 Overcasting 09 stitch 10 5.0 2.5-5.0 2.5 1.0-4.0 G Preventing fraying...
... fray easily 5.0 3.5-5.0 2.5 1.0-4.0 (3/16) (1/8-3/16) (3/32) (1/16-3/16) Turn on the sewing machine. Pattern Numeric Stitch Name Key Application Stitch Width [mm (inch)] Auto Manual Stitch Length [mm (inch)] Auto Manual Presser Foot 08 Preventing fraying in medium weight and thin fabrics 3.5 2.5-5.0 2.0 1.0-4.0 (1/8) (3/32-3/16) (1/16) (1/16-3/16) 3 Overcasting 09 stitch 10 5.0 2.5-5.0 2.5 1.0-4.0 G Preventing fraying...


