
Users Manual - English
Page 10
... hole again, and then lower the presser foot lever. o If your machine is higher than the standard setting. h Align the upper thread and bobbin thread, and then pass them under the presser foot toward the rear of simple stitches: , , n Select a low speed, gently hold the threads behind the presser foot and start sewing. m While gently holding threads at the end of the fabric. For details on the machine. i j Turn on adjusting the upper thread tension, refer to change...
... hole again, and then lower the presser foot lever. o If your machine is higher than the standard setting. h Align the upper thread and bobbin thread, and then pass them under the presser foot toward the rear of simple stitches: , , n Select a low speed, gently hold the threads behind the presser foot and start sewing. m While gently holding threads at the end of the fabric. For details on the machine. i j Turn on adjusting the upper thread tension, refer to change...
Operation Manual
Page 12
... Machine Setting Mode Key 22 Using the Sewing Machine Help Key 32 Using the Operation Guide Function 33 Using the Sewing Guide Function 34 Using the Pattern Explanation Function 35 LOWER THREADING 37 Winding the Bobbin 37 Setting the Bobbin 43 Pulling Up the Bobbin Thread 45 UPPER THREADING 46 Upper Threading 46 Using the Twin Needle Mode 49 Using the Spool Stand 52 Using Threads that Unwind Quickly 53 CHANGING THE PRESSER FOOT 54 Removing the Presser Foot 54 Attaching the Presser Foot 54 Attaching the Walking Foot 55 CHANGING THE NEEDLE 56 About the Needle 58 Fabric/Thread...
... Machine Setting Mode Key 22 Using the Sewing Machine Help Key 32 Using the Operation Guide Function 33 Using the Sewing Guide Function 34 Using the Pattern Explanation Function 35 LOWER THREADING 37 Winding the Bobbin 37 Setting the Bobbin 43 Pulling Up the Bobbin Thread 45 UPPER THREADING 46 Upper Threading 46 Using the Twin Needle Mode 49 Using the Spool Stand 52 Using Threads that Unwind Quickly 53 CHANGING THE PRESSER FOOT 54 Removing the Presser Foot 54 Attaching the Presser Foot 54 Attaching the Walking Foot 55 CHANGING THE NEEDLE 56 About the Needle 58 Fabric/Thread...
Operation Manual
Page 15
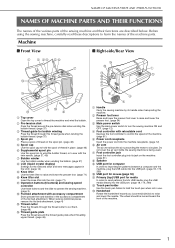
... used. b Presser foot lever Raise and lower the presser foot lever to raise and lower the presser foot. (page 54) c Main power switch Use the main power switch to turn the sewing machine ON and OFF. (page 12) d Foot controller with the twin needle. (page 37, 49) g Bobbin winder Use the bobbin winder when winding the bobbin. (page 37) h LCD (liquid crystal display) Settings for bobbin winding Pass the thread through the thread cutter to cut them. (page 48) n Thread guide plate Pass the thread around the thread guide plate...
... used. b Presser foot lever Raise and lower the presser foot lever to raise and lower the presser foot. (page 54) c Main power switch Use the main power switch to turn the sewing machine ON and OFF. (page 12) d Foot controller with the twin needle. (page 37, 49) g Bobbin winder Use the bobbin winder when winding the bobbin. (page 37) h LCD (liquid crystal display) Settings for bobbin winding Pass the thread through the thread cutter to cut them. (page 48) n Thread guide plate Pass the thread around the thread guide plate...

Operation Manual
Page 17
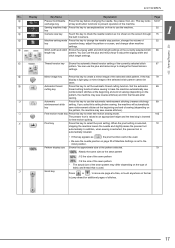
... sewing. c "Needle Position" button Use this button, and the machine sews 3 stitches in the opposite direction). For straight and zigzag stitch patterns that take reverse stitches, the machine will sew a few stitches at a slow speed and then begin sewing at slower speeds. Press this button after the threads have been cut. The needle may break and threads may become tangled, or damage to raise or lower the needle position. Press the button again to automatically trim the excess thread. d "Thread Cutter" button Press this button to the machine...
... sewing. c "Needle Position" button Use this button, and the machine sews 3 stitches in the opposite direction). For straight and zigzag stitch patterns that take reverse stitches, the machine will sew a few stitches at a slow speed and then begin sewing at slower speeds. Press this button after the threads have been cut. The needle may break and threads may become tangled, or damage to raise or lower the needle position. Press the button again to automatically trim the excess thread. d "Thread Cutter" button Press this button to the machine...

Operation Manual
Page 22
... cover case. (In some specifications may not work with guide 9 Embroidery bobbin thread (white) Embroidery bobbin thread (black) 10 Seam guide 11 Embroidery positioning sticker × 6 (Snowman™ Embroidery Positioning Marker) 12 Edge sewing sheet × 5 Part Code U.S.A./ Canada Others SABF6000D BF2: XE5059-001 SA560 SATFM6000D SA439 TS4: XE5065-001 TFM-3: XE5062-001 EF75: XC8481-052 SAECRI - NAMES OF MACHINE PARTS AND THEIR FUNCTIONS Memo • Always use accessories recommended for this machine. • The screw...
... cover case. (In some specifications may not work with guide 9 Embroidery bobbin thread (white) Embroidery bobbin thread (black) 10 Seam guide 11 Embroidery positioning sticker × 6 (Snowman™ Embroidery Positioning Marker) 12 Edge sewing sheet × 5 Part Code U.S.A./ Canada Others SABF6000D BF2: XE5059-001 SA560 SATFM6000D SA439 TS4: XE5065-001 TFM-3: XE5062-001 EF75: XC8481-052 SAECRI - NAMES OF MACHINE PARTS AND THEIR FUNCTIONS Memo • Always use accessories recommended for this machine. • The screw...
Operation Manual
Page 31
... before changing the needle, the presser foot, etc. This key locks 54-57 exchange key all key and button functions to prevent operation of fabric and thread that is automatically lowered. • If this key to an appropriate height and the feed dog is shown on the type of the machine. p Stitch width and stitch Shows the zigzag width and stitch length settings of sewing (depending on how to change the thread tension settings. You can use...
... before changing the needle, the presser foot, etc. This key locks 54-57 exchange key all key and button functions to prevent operation of fabric and thread that is automatically lowered. • If this key to an appropriate height and the feed dog is shown on the type of the machine. p Stitch width and stitch Shows the zigzag width and stitch length settings of sewing (depending on how to change the thread tension settings. You can use...

Operation Manual
Page 75
... "Start/ Stop" button. • The foot controller cannot be used when embroidering. • The foot controller can also use the foot controller to adjust sewing speed during machine operation. h Press the sewing. Doing so could tangle the thread or break the needle and damage the machine. • Do not press the "Thread Cutter" button when there is no fabric set in the machine or during sewing. o The needle will return to trim j When the needle has stopped moving, raise the presser foot...
... "Start/ Stop" button. • The foot controller cannot be used when embroidering. • The foot controller can also use the foot controller to adjust sewing speed during machine operation. h Press the sewing. Doing so could tangle the thread or break the needle and damage the machine. • Do not press the "Thread Cutter" button when there is no fabric set in the machine or during sewing. o The needle will return to trim j When the needle has stopped moving, raise the presser foot...

Operation Manual
Page 100
... opening on the machine. CAUTION • Always use the straight stitch foot in the needle plate. 86 a Round hole Note • Align the two screw holes on the needle plate with the two holes on the foot provides support for the fabric as the needle travels through 56). a Press the "Needle Position" button to raise the needle and turn the main power to screw driver included unscrew and remove the regular needle plate. a Bobbin case f Use the disc-shaped with the machine...
... opening on the machine. CAUTION • Always use the straight stitch foot in the needle plate. 86 a Round hole Note • Align the two screw holes on the needle plate with the two holes on the foot provides support for the fabric as the needle travels through 56). a Press the "Needle Position" button to raise the needle and turn the main power to screw driver included unscrew and remove the regular needle plate. a Bobbin case f Use the disc-shaped with the machine...

Operation Manual
Page 101
... needle position stitches. a Notch b Pin k Start sewing. * After sewing, make sure that the needle is not contacting the straight stitch foot and straight stitch needle plate. needle and attach the straight stitch ■ Basting a Select SEWING THE STITCHES and attach presser foot "J". you should lift the presser foot, rotate the handwheel toward you (counterclockwise) before inserting the bobbin case into its original the needle plate cover. b Press the "Reverse/Reinforcement Stitch" button to remove the straight stitch needle plate and the straight...
... needle position stitches. a Notch b Pin k Start sewing. * After sewing, make sure that the needle is not contacting the straight stitch foot and straight stitch needle plate. needle and attach the straight stitch ■ Basting a Select SEWING THE STITCHES and attach presser foot "J". you should lift the presser foot, rotate the handwheel toward you (counterclockwise) before inserting the bobbin case into its original the needle plate cover. b Press the "Reverse/Reinforcement Stitch" button to remove the straight stitch needle plate and the straight...

Operation Manual
Page 119
... fabric can be moved freely in middle (center) needle position. Press to display "Free Motion Foot Height" on 2/7 of the fabric to match the sewing speed. tension. b Select or . SEWING THE STITCHES Example: Changing the width Memo • When starting to sew, the internal sensor detects the thickness of the fabric, and the quilting foot is selected, and set the ■ Free Motion Quilting With free motion quilting, the feed dogs can adjust the sewing speed with the speed control slide on the machine...
... fabric can be moved freely in middle (center) needle position. Press to display "Free Motion Foot Height" on 2/7 of the fabric to match the sewing speed. tension. b Select or . SEWING THE STITCHES Example: Changing the width Memo • When starting to sew, the internal sensor detects the thickness of the fabric, and the quilting foot is selected, and set the ■ Free Motion Quilting With free motion quilting, the feed dogs can adjust the sewing speed with the speed control slide on the machine...

Operation Manual
Page 121
...lowered for free motion sewing. 107 You cannot change the needle position using free motion open toe quilting foot "O" 3 Memo • In order to adjust the upper thread tension (see page 67). to cancel the free motion sewing → Rotate the handwheel toward you (counterclockwise) to remove the straight stitch needle plate and presser foot "C", and reinstall the regular needle plate and the needle plate cover. i After sewing, make sure to raise the feed dogs. For details on fabric with free motion sewing of fabrics of quilting fabric. Free motion open...
...lowered for free motion sewing. 107 You cannot change the needle position using free motion open toe quilting foot "O" 3 Memo • In order to adjust the upper thread tension (see page 67). to cancel the free motion sewing → Rotate the handwheel toward you (counterclockwise) to remove the straight stitch needle plate and presser foot "C", and reinstall the regular needle plate and the needle plate cover. i After sewing, make sure to raise the feed dogs. For details on fabric with free motion sewing of fabrics of quilting fabric. Free motion open...
Operation Manual
Page 344
... selected fabric. Upper threading is dull. Press at [http://solutions.brother.com]. Press the "Needle Position" button to the original screen. Reset the bobbin. (If needle plate was raised using the "Presser Foot Press the "Presser Foot Lifter" button to cut the twisted thread and remove it from the race, etc. wrong spool cap, spool cap is loose, the thread did not catch the needle bar threader, etc.) Needle is turned, bent or the point is incorrect. use a bobbin designed specifically...
... selected fabric. Upper threading is dull. Press at [http://solutions.brother.com]. Press the "Needle Position" button to the original screen. Reset the bobbin. (If needle plate was raised using the "Presser Foot Press the "Presser Foot Lifter" button to cut the twisted thread and remove it from the race, etc. wrong spool cap, spool cap is loose, the thread did not catch the needle bar threader, etc.) Needle is turned, bent or the point is incorrect. use a bobbin designed specifically...

Operation Manual
Page 345
.... Replace the needle. 56 Upper threading is too strong. "STITCH SETTING CHART" Upper thread tension is incorrect. Bobbin is defective. Attach the presser foot correctly. 54 Screw of thin paper under the needle plate. Fabric is loose. Use scissors, etc. Needle breaks Needle is set incorrectly. Check the method for the Check the "Fabric/Thread/Needle 58 selected fabric. TROUBLESHOOTING Problem Cause Solution Page Bobbin thread breaks Bobbin is installed incorrectly. use a bobbin designed specifically for this machine Incorrect bobbins...
.... Replace the needle. 56 Upper threading is too strong. "STITCH SETTING CHART" Upper thread tension is incorrect. Bobbin is defective. Attach the presser foot correctly. 54 Screw of thin paper under the needle plate. Fabric is loose. Use scissors, etc. Needle breaks Needle is set incorrectly. Check the method for the Check the "Fabric/Thread/Needle 58 selected fabric. TROUBLESHOOTING Problem Cause Solution Page Bobbin thread breaks Bobbin is installed incorrectly. use a bobbin designed specifically for this machine Incorrect bobbins...

Operation Manual
Page 347
... table or hold the fabric to OFF in the area where the frame may be shrinkage of the pattern. Adjust the thread tension. If the presser foot is bumped or the embroidery unit is incorrectly set Use the embroidery needle plate cover. Select a pattern. "Start/Stop" button was an object placed near the machine, and the carriage or embroidery frame hit the object during sewing, the pattern will turn out. the Width control...
... table or hold the fabric to OFF in the area where the frame may be shrinkage of the pattern. Adjust the thread tension. If the presser foot is bumped or the embroidery unit is incorrectly set Use the embroidery needle plate cover. Select a pattern. "Start/Stop" button was an object placed near the machine, and the carriage or embroidery frame hit the object during sewing, the pattern will turn out. the Width control...

Operation Manual
Page 361
Manual Stitch length [mm (inch)] Auto. Note • Quilting foot "C" is used . General sewing for each utility stitch concerning applications, stitch lengths, stitch widths, and whether or not the twin needle mode can be used when the straight stitch needle plate is attached to "Using Free motion Quilting Foot "C"" on page 105. Reverse stitch is sewn while pressing "Reverse/ Reinforcement Stitch" button. Refer to the machine. Manual Twin needle General sewing, gather, pintuck, etc. General sewing, gather, pintuck, etc. Start from right needle position, zigzag sew ...
Manual Stitch length [mm (inch)] Auto. Note • Quilting foot "C" is used . General sewing for each utility stitch concerning applications, stitch lengths, stitch widths, and whether or not the twin needle mode can be used when the straight stitch needle plate is attached to "Using Free motion Quilting Foot "C"" on page 105. Reverse stitch is sewn while pressing "Reverse/ Reinforcement Stitch" button. Refer to the machine. Manual Twin needle General sewing, gather, pintuck, etc. General sewing, gather, pintuck, etc. Start from right needle position, zigzag sew ...

Operation Manual
Page 370
... machine casing 326 race 326 Combining Patterns character/decorative stitches 162 embroidery edit 291 Cord guide bobbin cover 92 Crazy quilt 92 , Custom Thread Table 279 283 Cut/Tension key 227 D Darning 127 Dart seam 88 Density key 239 E Echo quilting 108 Edge sewing , edge sewing using the built-in camera vi 138 Editing character/decorative stitches 155 embroidery 234 embroidery edit 267 MY CUSTOM STITCH 316 Elastic zigzag stitches 93 Elongation key 157 Embroidery adjusting the speed 231 automatic thread...
... machine casing 326 race 326 Combining Patterns character/decorative stitches 162 embroidery edit 291 Cord guide bobbin cover 92 Crazy quilt 92 , Custom Thread Table 279 283 Cut/Tension key 227 D Darning 127 Dart seam 88 Density key 239 E Echo quilting 108 Edge sewing , edge sewing using the built-in camera vi 138 Editing character/decorative stitches 155 embroidery 234 embroidery edit 267 MY CUSTOM STITCH 316 Elastic zigzag stitches 93 Elongation key 157 Embroidery adjusting the speed 231 automatic thread...

Operation Manual
Page 371
...fabric/thread/needle combinations 58 mode 14 twin needle 49 , Needle bar thread guides 2 50 Needle clamp screw 2 Needle mode selection key 49 Needle plate 2 , Needle position 74 85 Needle Position button 3 O , Operation buttons 1 3 Overcasting 91, 93, 94 P Patchwork 92 Piecing 102 Pintuck 90 Pivoting 72 Point delete key 318 Power cord 13 Power cord receptacle 1 Presser foot attaching 54 pressure 73 removing 54 types 347 , Presser foot code 15 196 , Presser foot holder 2 54 Presser foot holder screw 2 , Presser foot lever 1 63 Presser Foot Lifter button 3 Presser foot...
...fabric/thread/needle combinations 58 mode 14 twin needle 49 , Needle bar thread guides 2 50 Needle clamp screw 2 Needle mode selection key 49 Needle plate 2 , Needle position 74 85 Needle Position button 3 O , Operation buttons 1 3 Overcasting 91, 93, 94 P Patchwork 92 Piecing 102 Pintuck 90 Pivoting 72 Point delete key 318 Power cord 13 Power cord receptacle 1 Presser foot attaching 54 pressure 73 removing 54 types 347 , Presser foot code 15 196 , Presser foot holder 2 54 Presser foot holder screw 2 , Presser foot lever 1 63 Presser Foot Lifter button 3 Presser foot...

Operation Manual for Premium Pack I Optional accessories
Page 3
... the upgrade for Kit I. • The bobbin case (gray) and bobbin cover (for bobbin work embroidery patterns or sew using decorative thread or ribbon too thick to flow freely through the needle. (page 5) • Positioning of the embroidery pattern can be sewn. (page 25) • One cursive font of Version 2 guide. The machine can immediately be aligned while displaying the fabric being used as outlined in the Installation Guide. Additional new machine features and instructions...
... the upgrade for Kit I. • The bobbin case (gray) and bobbin cover (for bobbin work embroidery patterns or sew using decorative thread or ribbon too thick to flow freely through the needle. (page 5) • Positioning of the embroidery pattern can be sewn. (page 25) • One cursive font of Version 2 guide. The machine can immediately be aligned while displaying the fabric being used as outlined in the Installation Guide. Additional new machine features and instructions...
Operation Manual for Premium Pack I Optional accessories
Page 6
... machine's Operation Manual. ■ Presser foot Utility stitches or decorative stitches: Monogramming foot "N" Free motion sewing: Free motion quilting foot "C", Free motion open toe quilting foot "O" or Free motion echo quilting foot "E" Flexible woven ribbon (When embroidering: approx. 2mm (approx. 5/64 inch) recommended) Fine embroidery ribbon (silk or silk-like material) (3.5 mm (approx. 1/8 inch) or less, recommended) * If ribbon is the same as the fabric used in your project. If you do not wish for the upper thread to page 8 for bobbin work...
... machine's Operation Manual. ■ Presser foot Utility stitches or decorative stitches: Monogramming foot "N" Free motion sewing: Free motion quilting foot "C", Free motion open toe quilting foot "O" or Free motion echo quilting foot "E" Flexible woven ribbon (When embroidering: approx. 2mm (approx. 5/64 inch) recommended) Fine embroidery ribbon (silk or silk-like material) (3.5 mm (approx. 1/8 inch) or less, recommended) * If ribbon is the same as the fabric used in your project. If you do not wish for the upper thread to page 8 for bobbin work...
Operation Manual for Premium Pack I Optional accessories
Page 9
... tension spring. m Gently pull the upper thread to the bobbin thread If the bobbin thread in the trial stitching is not frayed. Hold the bobbin with your right hand. k Pull out about 10 cm (approx. 4 inches) of the threads and pass them under the presser foot toward you (counterclockwise) until the mark on the tension spring of the bobbin thread comes out through the hole in the needle plate cover, otherwise the lower threading...
... tension spring. m Gently pull the upper thread to the bobbin thread If the bobbin thread in the trial stitching is not frayed. Hold the bobbin with your right hand. k Pull out about 10 cm (approx. 4 inches) of the threads and pass them under the presser foot toward you (counterclockwise) until the mark on the tension spring of the bobbin thread comes out through the hole in the needle plate cover, otherwise the lower threading...


