Users Manual - English
Page 92
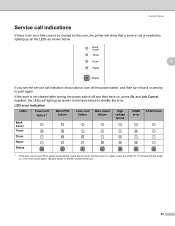
If the error occurs again, call your dealer or Brother Customer Service. 82 If the error is not cleared after turning the ... below to print again. Control Panel Service call indications 4 If there is needed by the user, the printer will light up all the LEDs as shown in the table below . 4 If you see the service call ...then turn it on again. Leave the printer for 15 minutes with the power on and try to identify the error. LED error indication 4 LEDs Back Cover Toner Fuser unit failure 1 Main PCB failure Laser unit failure Main motor failure High voltage failure DIMM...
If the error occurs again, call your dealer or Brother Customer Service. 82 If the error is not cleared after turning the ... below to print again. Control Panel Service call indications 4 If there is needed by the user, the printer will light up all the LEDs as shown in the table below . 4 If you see the service call ...then turn it on again. Leave the printer for 15 minutes with the power on and try to identify the error. LED error indication 4 LEDs Back Cover Toner Fuser unit failure 1 Main PCB failure Laser unit failure Main motor failure High voltage failure DIMM...

Users Manual - English
Page 93
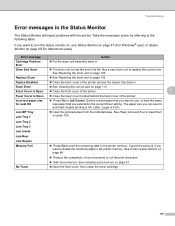
For example, the LED indication below shows a fuser unit failure. Control Panel 4 Make a note of the indication, referring to the table on page 82, and report the error status to your dealer or Brother Customer Service. Note Make sure that the front cover is completely closed before you report a service call. 83
For example, the LED indication below shows a fuser unit failure. Control Panel 4 Make a note of the indication, referring to the table on page 82, and report the error status to your dealer or Brother Customer Service. Note Make sure that the front cover is completely closed before you report a service call. 83
Users Manual - English
Page 126
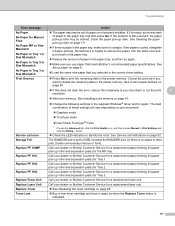
... to clear them on page 120. Replace Drum „ See Replacing the drum unit on page 63(For Macintosh users). Front Cover is Open „ Close the front cover of the printer. 7 Fuser Cover is near the end of the printer and put the duplex tray back in . Jam Tray 2 Jam Tray 3 Jam Inside... on page 84. „ Reduce the complexity of the printer. The paper size you can use , or load the same size paper that you want to replace the current one. Drum End Soon „ The drum unit is Open „ Close the fuser cover located behind the back cover of your document or...
... to clear them on page 120. Replace Drum „ See Replacing the drum unit on page 63(For Macintosh users). Front Cover is Open „ Close the front cover of the printer. 7 Fuser Cover is near the end of the printer and put the duplex tray back in . Jam Tray 2 Jam Tray 3 Jam Inside... on page 84. „ Reduce the complexity of the printer. The paper size you can use , or load the same size paper that you want to replace the current one. Drum End Soon „ The drum unit is Open „ Close the fuser cover located behind the back cover of your document or...
Users Manual - English
Page 127
...If it back in the paper tray. „ Reduce the amount of your document: „ Graphics mode „ TrueType mode „ Use Printer TrueType® Fonts Service call indications on page 84. „ If this does not clear the error, reduce the complexity of paper in the... kit (paper pick up roller and separation plate) for a replacement fuser unit. Or there is empty, put it is no space to identify the error. Replace PF Kit1 Call your dealer or Brother Customer Service for a replacement laser unit. „ See Replacing the toner cartridge on your document or cut...
...If it back in the paper tray. „ Reduce the amount of your document: „ Graphics mode „ TrueType mode „ Use Printer TrueType® Fonts Service call indications on page 84. „ If this does not clear the error, reduce the complexity of paper in the... kit (paper pick up roller and separation plate) for a replacement fuser unit. Or there is empty, put it is no space to identify the error. Replace PF Kit1 Call your dealer or Brother Customer Service for a replacement laser unit. „ See Replacing the toner cartridge on your document or cut...
Users Manual - English
Page 137
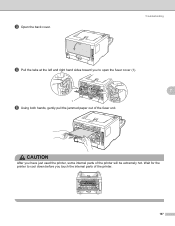
Wait for the printer to open the fuser cover (1). 7 1 e Using both hands, gently pull the jammed paper out of the printer. 127 CAUTION After you touch the internal parts of the fuser unit. Troubleshooting d Pull the tabs at the left and right hand sides toward you to cool down before you have just used the printer, some internal parts of the printer will be extremely hot. c Open the back cover.
Wait for the printer to open the fuser cover (1). 7 1 e Using both hands, gently pull the jammed paper out of the printer. 127 CAUTION After you touch the internal parts of the fuser unit. Troubleshooting d Pull the tabs at the left and right hand sides toward you to cool down before you have just used the printer, some internal parts of the printer will be extremely hot. c Open the back cover.
Users Manual - English
Page 139
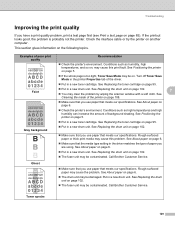
...meets our specifications. Rough-surfaced paper may cause this print fault. Put in a new drum unit. See Positioning the printer on page 5. „ If the whole page is probably not the printer. See Replacing the toner cartridge on page 102. 7 „ You may be contaminated....Call Brother Customer Service. Examples of background shading. See Replacing the drum unit on page 95. See Replacing the drum unit on page 6. „ Put in a new drum unit. See Replacing the drum unit on the following topics. This section gives information on page 102. „ The fuser unit may ...
...meets our specifications. Rough-surfaced paper may cause this print fault. Put in a new drum unit. See Positioning the printer on page 5. „ If the whole page is probably not the printer. See Replacing the toner cartridge on page 102. 7 „ You may be contaminated....Call Brother Customer Service. Examples of background shading. See Replacing the drum unit on page 95. See Replacing the drum unit on page 6. „ Put in a new drum unit. See Replacing the drum unit on the following topics. This section gives information on page 102. „ The fuser unit may ...
Users Manual - English
Page 140
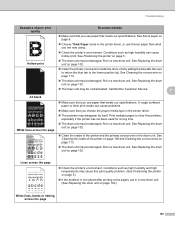
... „ The drum unit may be damaged. Call Brother Customer Service. 7 All black White lines across the page „ Make sure that you use paper that you are now using. „ Check the printer's environment. Put in a new drum unit. A rough surfaced paper...unit may be damaged. Lines across the page 130 See Replacing the drum unit on page 102. „ Clean the primary corona wire inside of the printer and the primary corona wire in the printer driver, or use paper that meets our specifications. See Replacing the drum unit on page 102. „ The fuser unit...
... „ The drum unit may be damaged. Call Brother Customer Service. 7 All black White lines across the page „ Make sure that you use paper that you are now using. „ Check the printer's environment. Put in a new drum unit. A rough surfaced paper...unit may be damaged. Lines across the page 130 See Replacing the drum unit on page 102. „ Clean the primary corona wire inside of the printer and the primary corona wire in the printer driver, or use paper that meets our specifications. See Replacing the drum unit on page 102. „ The fuser unit...
Users Manual - English
Page 142
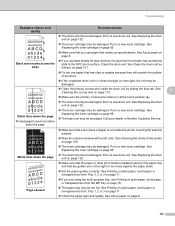
...the drum unit. See Replacing the drum unit on page 102. „ Make sure that the paper or other print media is in the paper tray and that you use label sheets for laser printers, the ...correctly. Put in a new drum unit. See Replacing the drum unit on page 102. See About paper on page 95. Put in a new toner cartridge. Call your dealer or Brother Customer Service. „ Make ...3 on page 11. „ Check the paper type and quality. See Replacing the drum unit on page 95. „ The fuser unit may be damaged. Put in a new toner cartridge. See Replacing the toner cartridge on page...
...the drum unit. See Replacing the drum unit on page 102. „ Make sure that the paper or other print media is in the paper tray and that you use label sheets for laser printers, the ...correctly. Put in a new drum unit. See Replacing the drum unit on page 102. See About paper on page 95. Put in a new toner cartridge. Call your dealer or Brother Customer Service. „ Make ...3 on page 11. „ Check the paper type and quality. See Replacing the drum unit on page 95. „ The fuser unit may be damaged. Put in a new toner cartridge. See Replacing the toner cartridge on page...


