Users Manual - English
Page 1
... read this manual with Screen Reader 'text-to . Version A USA Brother Laser Printer USER'S GUIDE HL-5340D HL-5350DN HL-5370DW For visually-impaired users You can find a printed copy in HTML format by visiting our web site at http://solutions.brother.com/ where you can use the printer. Please read the User's Guide in the box. Please visit...
... read this manual with Screen Reader 'text-to . Version A USA Brother Laser Printer USER'S GUIDE HL-5340D HL-5350DN HL-5370DW For visually-impaired users You can find a printed copy in HTML format by visiting our web site at http://solutions.brother.com/ where you can use the printer. Please read the User's Guide in the box. Please visit...
Users Manual - English
Page 2
... in this guide We use the following icons throughout this User's Guide: Warnings tell you must follow or avoid to prevent possible damage to the printer or other features. Important specify procedures you what to do to prevent possible personal injury.
... in this guide We use the following icons throughout this User's Guide: Warnings tell you must follow or avoid to prevent possible damage to the printer or other features. Important specify procedures you what to do to prevent possible personal injury.

Users Manual - English
Page 3
... cord from the AC power outlet to shut off the power switch and unplugged the printer from lightning. In case of a fire, electrical shock, burn or suffocation. We recommend that you use the printer safely If you DO NOT follow these instructions for later reference and read them before ...attempting any maintenance. Always make sure the plug is a possibility of an emergency, you must be a remote risk of the printer, make sure that is easily accessible. ii Safety precautions To use a quality surge protection device on the AC power line, or unplug the cords ...
... cord from the AC power outlet to shut off the power switch and unplugged the printer from lightning. In case of a fire, electrical shock, burn or suffocation. We recommend that you use the printer safely If you DO NOT follow these instructions for later reference and read them before ...attempting any maintenance. Always make sure the plug is a possibility of an emergency, you must be a remote risk of the printer, make sure that is easily accessible. ii Safety precautions To use a quality surge protection device on the AC power line, or unplug the cords ...

Users Manual - English
Page 4
...outlet. DO NOT use a vacuum cleaner to clean up scattered toner. Cleaning the outside of the printer: Make sure that contain ammonia. DO NOT use cleaning materials that you have unplugged the printer from babies and children. iii Use neutral detergents. DO NOT use flammable substances, any type of ... and dispose of it according to clean the machine. Doing this might cause the toner dust to ignite inside or outside surface of the printer. See Cleaning on page 106 for how to local regulations. Plastic bags are used in the vicinity of the leak. Cleaning with the ...
...outlet. DO NOT use a vacuum cleaner to clean up scattered toner. Cleaning the outside of the printer: Make sure that contain ammonia. DO NOT use cleaning materials that you have unplugged the printer from babies and children. iii Use neutral detergents. DO NOT use flammable substances, any type of ... and dispose of it according to clean the machine. Doing this might cause the toner dust to ignite inside or outside surface of the printer. See Cleaning on page 106 for how to local regulations. Plastic bags are used in the vicinity of the leak. Cleaning with the ...
Users Manual - English
Page 5
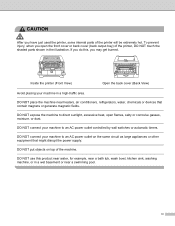
...to direct sunlight, excessive heat, open the front cover or back cover (back output tray) of the printer, DO NOT touch the shaded parts shown in a high-traffic area. DO NOT put objects on the... same circuit as large appliances or other equipment that contain magnets or generate magnetic fields. Inside the printer (Front View) Open the back cover (Back View) Avoid placing your machine in the illustration. DO... the power supply. DO NOT connect your machine to an AC power outlet on top of the printer will be extremely hot. DO NOT use this , you may get burned. DO NOT connect your...
...to direct sunlight, excessive heat, open the front cover or back cover (back output tray) of the printer, DO NOT touch the shaded parts shown in a high-traffic area. DO NOT put objects on the... same circuit as large appliances or other equipment that contain magnets or generate magnetic fields. Inside the printer (Front View) Open the back cover (Back View) Avoid placing your machine in the illustration. DO... the power supply. DO NOT connect your machine to an AC power outlet on top of the printer will be extremely hot. DO NOT use this , you may get burned. DO NOT connect your...
Users Manual - English
Page 7
... and Publication Notice Under the supervision of International Business Machines Corporation in the United States and/or other countries. The contents of this manual and the specifications of this product are trademarks of the Printer If for any reason you save and use the original packaging. Brother reserves the right to make changes...
... and Publication Notice Under the supervision of International Business Machines Corporation in the United States and/or other countries. The contents of this manual and the specifications of this product are trademarks of the Printer If for any reason you save and use the original packaging. Brother reserves the right to make changes...
Users Manual - English
Page 8
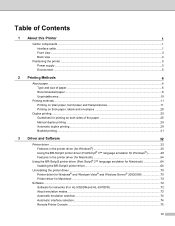
... emulation for Macintosh 64 Installing the BR-Script3 printer driver 64 Uninstalling the printer driver ...70 Printer driver for Windows® and Windows Vista® and Windows Server® 2003/2008 70 Printer driver for Macintosh ...70 Software ...72 Software for networks (For HL-5350DN and HL-5370DW 72 About emulation modes...73 Automatic emulation selection...
... emulation for Macintosh 64 Installing the BR-Script3 printer driver 64 Uninstalling the printer driver ...70 Printer driver for Windows® and Windows Vista® and Windows Server® 2003/2008 70 Printer driver for Macintosh ...70 Software ...72 Software for networks (For HL-5350DN and HL-5370DW 72 About emulation modes...73 Automatic emulation selection...
Users Manual - English
Page 9
... 93 Replacing the consumable items...93 Consumables...93 Toner cartridge ...94 Drum unit ...101 Cleaning ...106 Cleaning the outside of the printer 106 Cleaning the inside of the printer...108 Cleaning the paper pick-up roller...111 Cleaning the corona wires ...113 Cleaning the corona wire...113 7 Troubleshooting 115 Identifying... MP tray / Tray1 / Tray2 / Tray3 / Inside 120 Jam Rear / Duplex...125 Improving the print quality...129 Solving print problems ...136 Network problems (For HL-5350DN and HL-5370DW 137 Other problems ...137 For Macintosh with USB ...137 BR-Script 3 ...138 viii
... 93 Replacing the consumable items...93 Consumables...93 Toner cartridge ...94 Drum unit ...101 Cleaning ...106 Cleaning the outside of the printer 106 Cleaning the inside of the printer...108 Cleaning the paper pick-up roller...111 Cleaning the corona wires ...113 Cleaning the corona wire...113 7 Troubleshooting 115 Identifying... MP tray / Tray1 / Tray2 / Tray3 / Inside 120 Jam Rear / Duplex...125 Improving the print quality...129 Solving print problems ...136 Network problems (For HL-5350DN and HL-5370DW 137 Other problems ...137 For Macintosh with USB ...137 BR-Script 3 ...138 viii

Users Manual - English
Page 10
A Appendix 139 Printer specifications...139 Engine ...139 Controller ...140 Software ...141 Control panel ...141 Paper handling ...141 Media specifications ...142 Supplies ...142 Dimensions / weights...143 Other...143 Computer ... sets list...149 Quick reference for bar code control commands 150 Print bar codes or expanded characters 150 B Appendix (for Europe and Other Countries) 158 Brother numbers ...158 C Appendix (for USA and Canada) 159...
A Appendix 139 Printer specifications...139 Engine ...139 Controller ...140 Software ...141 Control panel ...141 Paper handling ...141 Media specifications ...142 Supplies ...142 Dimensions / weights...143 Other...143 Computer ... sets list...149 Quick reference for bar code control commands 150 Print bar codes or expanded characters 150 B Appendix (for Europe and Other Countries) 158 Brother numbers ...158 C Appendix (for USA and Canada) 159...
Users Manual - English
Page 11
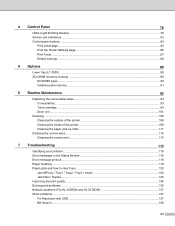
... have all of your computer and not to a USB port on a keyboard or non-powered USB hub. 1 Connecting the interface cable is done during the printer driver installation process. About this time. Make sure that you connect it to the USB port of the following parts. DO NOT connect the interface... cable at this Printer1 1 1 1 Quick Setup Guide Printer CD-ROM AC Power Cord Drum Unit and Toner Cartridge Assembly Interface cable 1 The interface cable is not a standard accessory. 1 About this...
... have all of your computer and not to a USB port on a keyboard or non-powered USB hub. 1 Connecting the interface cable is done during the printer driver installation process. About this time. Make sure that you connect it to the USB port of the following parts. DO NOT connect the interface... cable at this Printer1 1 1 1 Quick Setup Guide Printer CD-ROM AC Power Cord Drum Unit and Toner Cartridge Assembly Interface cable 1 The interface cable is not a standard accessory. 1 About this...
Users Manual - English
Page 12
About this Printer Third party USB ports are not supported by Macintosh. „ Parallel cable 1 DO NOT use a parallel interface cable that is longer than 6 feet (2.0 meters). Use a shielded interface cable that is IEEE 1284-compliant. „ Network cable (For HL-5350DN and 5370DW only) Use a straight-through Category5 (or greater) twisted-pair cable for 10BASE-T or 100BASE-TX Fast Ethernet Network. 2
About this Printer Third party USB ports are not supported by Macintosh. „ Parallel cable 1 DO NOT use a parallel interface cable that is longer than 6 feet (2.0 meters). Use a shielded interface cable that is IEEE 1284-compliant. „ Network cable (For HL-5350DN and 5370DW only) Use a straight-through Category5 (or greater) twisted-pair cable for 10BASE-T or 100BASE-TX Fast Ethernet Network. 2
Users Manual - English
Page 13
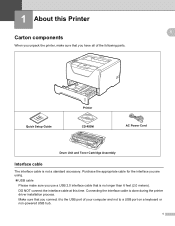
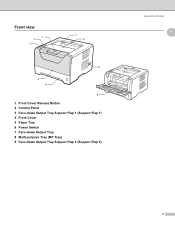
Front view 1 2 3 7 9 6 4 5 8 1 Front Cover Release Button 2 Control Panel 3 Face-down Output Tray Support Flap 1 (Support Flap 1) 4 Front Cover 5 Paper Tray 6 Power Switch 7 Face-down Output Tray 8 Multi-purpose Tray (MP Tray) 9 Face-down Output Tray Support Flap 2 (Support Flap 2) About this Printer 1 1 3
Front view 1 2 3 7 9 6 4 5 8 1 Front Cover Release Button 2 Control Panel 3 Face-down Output Tray Support Flap 1 (Support Flap 1) 4 Front Cover 5 Paper Tray 6 Power Switch 7 Face-down Output Tray 8 Multi-purpose Tray (MP Tray) 9 Face-down Output Tray Support Flap 2 (Support Flap 2) About this Printer 1 1 3
Users Manual - English
Page 14
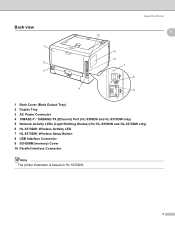
Back view 1 2 3 About this Printer 1 1 10 9 8 7 6 4 5 1 Back Cover (Back Output Tray) 2 Duplex Tray 3 AC Power Connector 4 10BASE-T / 100BASE-TX (Ethernet) Port (HL-5350DN and HL-5370DW only) 5 Network Activity LEDs (Light Emitting Diodes) (For HL-5350DN and HL-5370DW only) 6 HL-5370DW: Wireless Activity LED 7 HL-5370DW: Wireless Setup Button 8 USB Interface Connector 9 SO-DIMM (memory) Cover 10 Parallel Interface Connector Note The printer illustration is based on HL-5370DW. 4
Back view 1 2 3 About this Printer 1 1 10 9 8 7 6 4 5 1 Back Cover (Back Output Tray) 2 Duplex Tray 3 AC Power Connector 4 10BASE-T / 100BASE-TX (Ethernet) Port (HL-5350DN and HL-5370DW only) 5 Network Activity LEDs (Light Emitting Diodes) (For HL-5350DN and HL-5370DW only) 6 HL-5370DW: Wireless Activity LED 7 HL-5370DW: Wireless Setup Button 8 USB Interface Connector 9 SO-DIMM (memory) Cover 10 Parallel Interface Connector Note The printer illustration is based on HL-5370DW. 4
Users Manual - English
Page 15
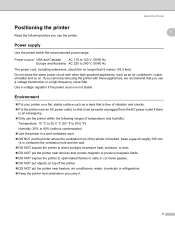
... open/naked flames or salty or corrosive gasses. „ DO NOT put objects on top of the printer. „ DO NOT put the printer where the ventilation hole of the printer is not stable. Use a voltage regulator if the power source is blocked. Keep a gap of roughly 100 mm (4... when you carry it can be no longer than 5 meters (16.5 feet). About this Printer Positioning the printer Read the following before you use the printer. 1 1 Power supply 1 Use the printer within the following ranges of temperature and humidity: Temperature: 10 °C to 32.5 °C (50 °F to 90.5 °...
... open/naked flames or salty or corrosive gasses. „ DO NOT put objects on top of the printer. „ DO NOT put the printer where the ventilation hole of the printer is not stable. Use a voltage regulator if the power source is blocked. Keep a gap of roughly 100 mm (4... when you carry it can be no longer than 5 meters (16.5 feet). About this Printer Positioning the printer Read the following before you use the printer. 1 1 Power supply 1 Use the printer within the following ranges of temperature and humidity: Temperature: 10 °C to 32.5 °C (50 °F to 90.5 °...
Users Manual - English
Page 16
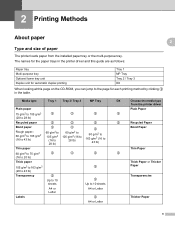
Printing Methods2 2 Printing Methods 2 About paper Type and size of paper The printer loads paper from the printer driver Plain Paper p p Recycled Paper Bond Paper Thin Paper p Thick Paper or Thicker Paper Transparencies Thicker Paper 6 The names for automatic duplex printing Tray 1 MP ... (16 to 28 lb) p p p p 60 g/m2 to 163 g/m2 (16 to 43 lb) p p p Up to the page for each printing method by clicking p in the printer driver and this guide are as follows: 2 2 2 Paper tray Multi-purpose tray Optional lower tray unit Duplex unit for the paper trays in the table.
Printing Methods2 2 Printing Methods 2 About paper Type and size of paper The printer loads paper from the printer driver Plain Paper p p Recycled Paper Bond Paper Thin Paper p Thick Paper or Thicker Paper Transparencies Thicker Paper 6 The names for automatic duplex printing Tray 1 MP ... (16 to 28 lb) p p p p 60 g/m2 to 163 g/m2 (16 to 43 lb) p p p Up to the page for each printing method by clicking p in the printer driver and this guide are as follows: 2 2 2 Paper tray Multi-purpose tray Optional lower tray unit Duplex unit for the paper trays in the table.

Users Manual - English
Page 17
... sheets 1 Legal or Folio size paper is not available in .) Length: 116 to 406.4 mm (4.57 to 3 sheets DX Choose the media type from the printer driver Envelopes Env.
... sheets 1 Legal or Folio size paper is not available in .) Length: 116 to 406.4 mm (4.57 to 3 sheets DX Choose the media type from the printer driver Envelopes Env.
Users Manual - English
Page 18
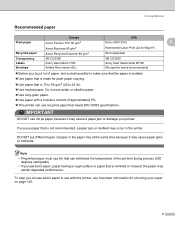
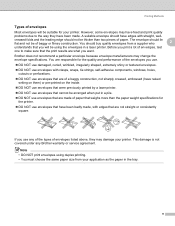
... Supreme 80 g/m2 (Not supported) Transparency 3M CG3300 3M CG3300 Labels Avery laser label L7163 Avery laser labels white #5160 Envelope Antalis River series (DL) (No specific brand recommended) „ Before you buy a lot of the printer's fusing process (200 degrees centigrade). • If you use bond paper,... it may cause a paper jam or damage your paper on page 145. 8 DO NOT put different types of approximately 5%. „ This printer can withstand the temperature of paper, test a small quantity to 24 lb). „ Use neutral paper. Do not use recycled paper that ...
... Supreme 80 g/m2 (Not supported) Transparency 3M CG3300 3M CG3300 Labels Avery laser label L7163 Avery laser labels white #5160 Envelope Antalis River series (DL) (No specific brand recommended) „ Before you buy a lot of the printer's fusing process (200 degrees centigrade). • If you use bond paper,... it may cause a paper jam or damage your paper on page 145. 8 DO NOT put different types of approximately 5%. „ This printer can withstand the temperature of paper, test a small quantity to 24 lb). „ Use neutral paper. Do not use recycled paper that ...
Users Manual - English
Page 19
... raised writing on them) or pre-printed on the inside. „ DO NOT use envelopes that were previously printed by a laser printer. „ DO NOT use any Brother warranty or service agreement. If you will be suitable for the quality and performance of the envelopes you want. A suitable envelope ... You must choose the same paper size from a supplier who 2 understands that you use envelopes that cannot be arranged when put in a laser printer. Note • DO NOT print envelopes using the envelopes in a pile. „ DO NOT use envelopes that have been badly made .
... raised writing on them) or pre-printed on the inside. „ DO NOT use envelopes that were previously printed by a laser printer. „ DO NOT use any Brother warranty or service agreement. If you will be suitable for the quality and performance of the envelopes you want. A suitable envelope ... You must choose the same paper size from a supplier who 2 understands that you use envelopes that cannot be arranged when put in a laser printer. Note • DO NOT print envelopes using the envelopes in a pile. „ DO NOT use envelopes that have been badly made .
Users Manual - English
Page 21
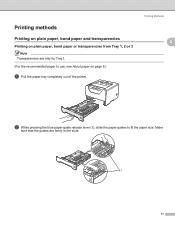
Printing methods Printing on plain paper, bond paper and transparencies Printing on page 6.) a Pull the paper tray completely out of the printer. Printing Methods 2 2 2 2 b While pressing the blue paper-guide release lever (1), slide the paper guides to use, see About paper on plain paper, bond paper or transparencies from Tray 1, 2 or 3 Note Transparencies are firmly in the slots. 1 11 Make sure that the guides are only for Tray1. (For the recommended paper to fit the paper size.
Printing methods Printing on plain paper, bond paper and transparencies Printing on page 6.) a Pull the paper tray completely out of the printer. Printing Methods 2 2 2 2 b While pressing the blue paper-guide release lever (1), slide the paper guides to use, see About paper on plain paper, bond paper or transparencies from Tray 1, 2 or 3 Note Transparencies are firmly in the slots. 1 11 Make sure that the guides are only for Tray1. (For the recommended paper to fit the paper size.
Users Manual - English
Page 22
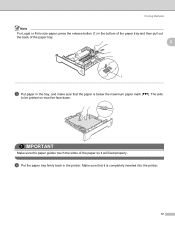
The side to be printed on must be face down. d Put the paper tray firmly back in the printer. Make sure that the paper is completely inserted into the printer. 12 IMPORTANT Make sure the paper guides touch the sides of the paper tray. 2 1 c Put paper in the tray, and make sure that it will feed properly. Printing Methods Note For Legal or Folio size paper, press the release button (1) in the bottom of the paper tray and then pull out the back of the paper so it is below the maximum paper mark (bbb).
The side to be printed on must be face down. d Put the paper tray firmly back in the printer. Make sure that the paper is completely inserted into the printer. 12 IMPORTANT Make sure the paper guides touch the sides of the paper tray. 2 1 c Put paper in the tray, and make sure that it will feed properly. Printing Methods Note For Legal or Folio size paper, press the release button (1) in the bottom of the paper tray and then pull out the back of the paper so it is below the maximum paper mark (bbb).


