Users Manual - English
Page 112
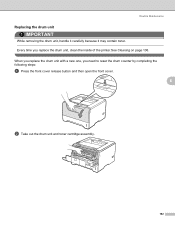
Every time you need to reset the drum counter by completing the following steps: a Press the front cover release button and then open the front cover. 6 b Take out the drum unit and toner cartridge assembly. 102 Routine Maintenance Replacing the drum unit 6 IMPORTANT While removing the drum unit, handle it carefully because it may contain toner. When you replace the drum unit with a new one, you replace the drum unit, clean the inside of the printer.See Cleaning on page 106.
Every time you need to reset the drum counter by completing the following steps: a Press the front cover release button and then open the front cover. 6 b Take out the drum unit and toner cartridge assembly. 102 Routine Maintenance Replacing the drum unit 6 IMPORTANT While removing the drum unit, handle it carefully because it may contain toner. When you replace the drum unit with a new one, you replace the drum unit, clean the inside of the printer.See Cleaning on page 106.
Users Manual - English
Page 115
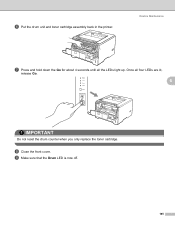
Once all the LEDs light up. h Close the front cover. f Put the drum unit and toner cartridge assembly back in the printer. Routine Maintenance g Press and hold down the Go for about 4 seconds until all four LEDs are lit, release Go. 6 IMPORTANT Do not reset the drum counter when you only replace the toner cartridge. i Make sure that the Drum LED is now off. 105
Once all the LEDs light up. h Close the front cover. f Put the drum unit and toner cartridge assembly back in the printer. Routine Maintenance g Press and hold down the Go for about 4 seconds until all four LEDs are lit, release Go. 6 IMPORTANT Do not reset the drum counter when you only replace the toner cartridge. i Make sure that the Drum LED is now off. 105


