Quick Setup Guide - English
Page 3
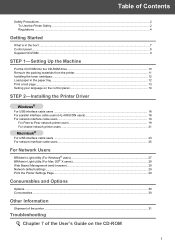
...ROM into the CD-ROM drive 10 Remove the packing materials from the printer 11 Installing the toner cartridges ...12 Load paper in the box?...7 Control panel...8 Supplied CD-ROM ...9 STEP 1- Installing the Printer Driver Windows® For USB interface cable users ...16 For parallel interface... cable users (HL-4050CDN users 18 For network interface cable users ...19 For Peer-to-Peer network printer ...
...ROM into the CD-ROM drive 10 Remove the packing materials from the printer 11 Installing the toner cartridges ...12 Load paper in the box?...7 Control panel...8 Supplied CD-ROM ...9 STEP 1- Installing the Printer Driver Windows® For USB interface cable users ...16 For parallel interface... cable users (HL-4050CDN users 18 For network interface cable users ...19 For Peer-to-Peer network printer ...
Quick Setup Guide - English
Page 9
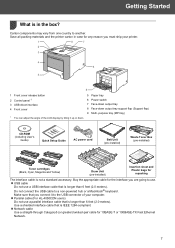
...Quick Setup Guide AC power cord Belt Unit (pre-installed) Waste Toner Box (pre-installed) Toner cartridges (Black, Cyan, Magenta and Yellow) Drum Unit (pre-installed) Insertion sheet and Plastic bags for...not a standard accessory. Make sure that you must ship your computer. „ Parallel cable (For HL-4050CDN users) Do not use a USB interface cable that is IEEE 1284-compliant. „ Network ... for 10BASE-T or 100BASE-TX Fast Ethernet Network. 7 Save all packing materials and the printer carton in case for repacking The interface cable is in the box? 1 Carton components may...
...Quick Setup Guide AC power cord Belt Unit (pre-installed) Waste Toner Box (pre-installed) Toner cartridges (Black, Cyan, Magenta and Yellow) Drum Unit (pre-installed) Insertion sheet and Plastic bags for...not a standard accessory. Make sure that you must ship your computer. „ Parallel cable (For HL-4050CDN users) Do not use a USB interface cable that is IEEE 1284-compliant. „ Network ... for 10BASE-T or 100BASE-TX Fast Ethernet Network. 7 Save all packing materials and the printer carton in case for repacking The interface cable is in the box? 1 Carton components may...
Quick Setup Guide - English
Page 10
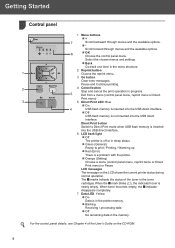
...menus and the available options. „- Pause and Continue printing. 2 4 Cancel button Stop and cancel the print operation in the toner cartridges.When the o mark blinks (n), the indicated toner is not inserted into the USB direct interface. The o marks indicate the status of ...the User's Guide on the LCD shows the current printer status during normal operation. Getting Started Control panel 2 1 Menu buttons „+ 7 Scroll backward through menus and the available options. 6 ...
...menus and the available options. „- Pause and Continue printing. 2 4 Cancel button Stop and cancel the print operation in the toner cartridges.When the o mark blinks (n), the indicated toner is not inserted into the USB direct interface. The o marks indicate the status of ...the User's Guide on the LCD shows the current printer status during normal operation. Getting Started Control panel 2 1 Menu buttons „+ 7 Scroll backward through menus and the available options. 6 ...
Quick Setup Guide - English
Page 14
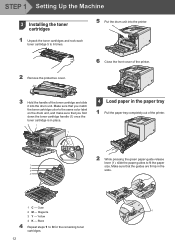
...paper tray 1 Pull the paper tray completely out of the toner cartridge and slide it into the printer. 2 Remove the protective cover. 6 Close the front cover of the printer. 3 Hold the handle of the printer. 2 While pressing the green paper-guide release lever (1), slide ...the paper guides to fit the paper 1 2 3 size. Yellow 4 K - Magenta 1 3 Y - Make sure that you match the toner cartridge color ...
...paper tray 1 Pull the paper tray completely out of the toner cartridge and slide it into the printer. 2 Remove the protective cover. 6 Close the front cover of the printer. 3 Hold the handle of the printer. 2 While pressing the green paper-guide release lever (1), slide ...the paper guides to fit the paper 1 2 3 size. Yellow 4 K - Magenta 1 3 Y - Make sure that you match the toner cartridge color ...
Quick Setup Guide - English
Page 32
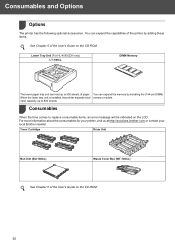
...solutions.brother.com or contact your local Brother reseller. input capacity up to 500 sheets of the User's Guide on the CD-ROM. You can expand the memory by adding these items. See Chapter 5 of paper. Consumables and Options 1 Options 1 The printer has the following optional accessories. Toner Cartridge ... tray unit is installed, the printer expands total memory module. You can hold up to replace consumable items, an error message will be indicated on the CD-ROM. 30 Consumables 2 When the time comes to 800 sheets. Lower Tray Unit (For HL-4050CDN only) LT-100CL DIMM...
...solutions.brother.com or contact your local Brother reseller. input capacity up to 500 sheets of the User's Guide on the CD-ROM. You can expand the memory by adding these items. See Chapter 5 of paper. Consumables and Options 1 Options 1 The printer has the following optional accessories. Toner Cartridge ... tray unit is installed, the printer expands total memory module. You can hold up to replace consumable items, an error message will be indicated on the CD-ROM. 30 Consumables 2 When the time comes to 800 sheets. Lower Tray Unit (For HL-4050CDN only) LT-100CL DIMM...
Users Manual - English
Page 7
... Manual Registration...91 5 Options 92 Lower tray (LT-100CL) (HL-4050CDN / HL-4070CDW only 92 SO-DI M M ...93 SO-DIMM types ...93 Installing extra memory ...94 6 Routine Maintenance 96 Replacing the consumable items...96 Toner cartridges ...98 Drum unit ...105 Belt unit...111 Waste toner box ...116... Cleaning ...122 Cleaning the outside of the printer 122 ...
... Manual Registration...91 5 Options 92 Lower tray (LT-100CL) (HL-4050CDN / HL-4070CDW only 92 SO-DI M M ...93 SO-DIMM types ...93 Installing extra memory ...94 6 Routine Maintenance 96 Replacing the consumable items...96 Toner cartridges ...98 Drum unit ...105 Belt unit...111 Waste toner box ...116... Cleaning ...122 Cleaning the outside of the printer 122 ...
Users Manual - English
Page 10
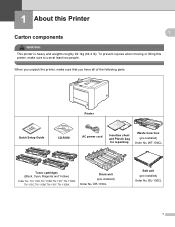
To prevent injuries when moving or lifting this Printer 1 1 Carton components 1 WA RNING This printer is heavy and weights roughly 29.1kg (64.2 lb). WT-100CL Toner cartridges (Black, Cyan, Magenta and Yellow) Order No. TN-110C,TN-110M,TN-110Y,TN-110BK TN-115C,TN-115M,TN-115Y,TN-115BK Drum unit (...pre-installed) Order No. DR-110CL Belt unit (pre-installed) Order No. When you unpack the printer, make sure to use at...
To prevent injuries when moving or lifting this Printer 1 1 Carton components 1 WA RNING This printer is heavy and weights roughly 29.1kg (64.2 lb). WT-100CL Toner cartridges (Black, Cyan, Magenta and Yellow) Order No. TN-110C,TN-110M,TN-110Y,TN-110BK TN-115C,TN-115M,TN-115Y,TN-115BK Drum unit (...pre-installed) Order No. DR-110CL Belt unit (pre-installed) Order No. When you unpack the printer, make sure to use at...
Users Manual - English
Page 81
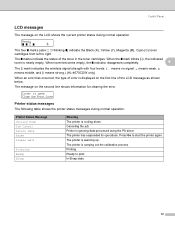
...four o marks (also n, n=blinking o) indicate the Black (K), Yellow (Y), Magenta (M), Cyan (C) toner cartridges from left to print. Canceling the job. The printer is ignoring data processed using the PS driver. Printer is carrying out the calibration process. Printing. When the o mark blinks (n), the indicated toner is ... means weak, means middle, and means strong.) (HL-4070CDW only) When an error has occurred, the type of error is open Close the Front Cover Printer status messages 4 The following table shows the printer status messages during normal operation. Ready to right. ...
...four o marks (also n, n=blinking o) indicate the Black (K), Yellow (Y), Magenta (M), Cyan (C) toner cartridges from left to print. Canceling the job. The printer is ignoring data processed using the PS driver. Printer is carrying out the calibration process. Printing. When the o mark blinks (n), the indicated toner is ... means weak, means middle, and means strong.) (HL-4070CDW only) When an error has occurred, the type of error is open Close the Front Cover Printer status messages 4 The following table shows the printer status messages during normal operation. Ready to right. ...
Users Manual - English
Page 88
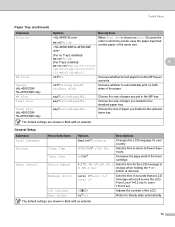
...to feed paper from the MP tray as Auto: Chooses the order in which the printer uses the paper trays that an LCD message will scroll across the LCD. From Level ...1=0.2 sec to Level 10=2.0 sec. -nnonn+ Adjusts the contrast of the toner cartridge. 0.1*/0.4/0.6/0.8/1.0/1.4 Sets the time for your country. 0/1/2/3/4/5*.../ 240 Min Sets the time to return to.... Control Panel Paper Tray (continued) Submenu Priority MP First Duplex (HL-4050CDN/ HL-4070CDW only) MP Size Tray1 Size Tray2 Size (HL-4050CDN/ HL-4070CDW only) Options Descriptions MP>T1*/T1>MP When Tray Use is...
...to feed paper from the MP tray as Auto: Chooses the order in which the printer uses the paper trays that an LCD message will scroll across the LCD. From Level ...1=0.2 sec to Level 10=2.0 sec. -nnonn+ Adjusts the contrast of the toner cartridge. 0.1*/0.4/0.6/0.8/1.0/1.4 Sets the time for your country. 0/1/2/3/4/5*.../ 240 Min Sets the time to return to.... Control Panel Paper Tray (continued) Submenu Priority MP First Duplex (HL-4050CDN/ HL-4070CDW only) MP Size Tray1 Size Tray2 Size (HL-4050CDN/ HL-4070CDW only) Options Descriptions MP>T1*/T1>MP When Tray Use is...
Users Manual - English
Page 105
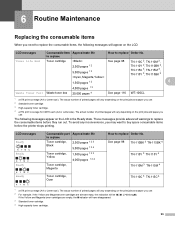
6 Routine Maintenance 6 Replacing the consumable items 6 When you need to replace the consumable items before the printer stops printing. These messages provide advanced warnings to replace the consumable items, the following messages appear on the LCD in the ... How to buy spare consumable items before they run out. The actual number of printed pages will have disappeared. 3 Standard toner cartridge. 4 High-capacity toner cartridge. 96 Toner Life End Toner cartridge See page 98 TN-110C 2, TN-110M 2, 2,500 pages 1 2 5,000 pages 1 3 TN-110Y 2, TN-110BK 2, TN-115C 3, TN...
6 Routine Maintenance 6 Replacing the consumable items 6 When you need to replace the consumable items before the printer stops printing. These messages provide advanced warnings to replace the consumable items, the following messages appear on the LCD in the ... How to buy spare consumable items before they run out. The actual number of printed pages will have disappeared. 3 Standard toner cartridge. 4 High-capacity toner cartridge. 96 Toner Life End Toner cartridge See page 98 TN-110C 2, TN-110M 2, 2,500 pages 1 2 5,000 pages 1 3 TN-110Y 2, TN-110BK 2, TN-115C 3, TN...
Users Manual - English
Page 106
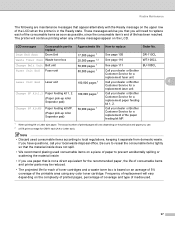
...been reached. Frequency of replacement will continue printing when any color toner cartridge. Routine Maintenance The following are maintenance messages that appear alternately with the Ready message on the upper row of the LCD when the printer is based on an average of 5% coverage of the ...printable area using any of these messages appear on the LCD. Laser Unit End Laser unit 100,000 pages 1 Call your dealer or Brother Customer Service for a replacement fuser unit. The printer will vary depending on the complexity of printed pages, percentage of coverage and type...
...been reached. Frequency of replacement will continue printing when any color toner cartridge. Routine Maintenance The following are maintenance messages that appear alternately with the Ready message on the upper row of the LCD when the printer is based on an average of 5% coverage of the ...printable area using any of these messages appear on the LCD. Laser Unit End Laser unit 100,000 pages 1 Call your dealer or Brother Customer Service for a replacement fuser unit. The printer will vary depending on the complexity of printed pages, percentage of coverage and type...
Users Manual - English
Page 107
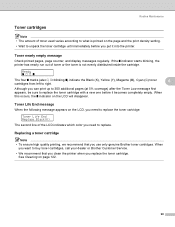
...LCD, you need to replace the toner cartridge: Toner Life End Replace Black(K) The second line of the LCD indicates which color you need to buy toner cartridges, call your dealer or Brother Customer Service. • We recommend that you replace the toner cartridge. Ready o n n o The four... first appears, be sure to right. Replacing a toner cartridge 6 Note • To ensure high quality printing, we recommend that you clean the printer when you use only genuine Brother toner cartridges. Routine Maintenance Toner cartridges 6 Note • The amount of toner used varies according...
...LCD, you need to replace the toner cartridge: Toner Life End Replace Black(K) The second line of the LCD indicates which color you need to buy toner cartridges, call your dealer or Brother Customer Service. • We recommend that you replace the toner cartridge. Ready o n n o The four... first appears, be sure to right. Replacing a toner cartridge 6 Note • To ensure high quality printing, we recommend that you clean the printer when you use only genuine Brother toner cartridges. Routine Maintenance Toner cartridges 6 Note • The amount of toner used varies according...
Users Manual - English
Page 108
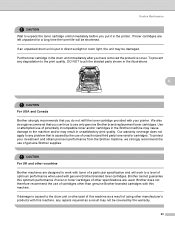
... be damaged. If an unpacked drum unit is caused to the drum unit or other manufacturer's products with this machine. To protect your printer. Brother does not therefore recommend the use only genuine Brother brand replacement toner cartridges. If toner cartridges are used with this machine, any problem that you do not refill the toner...
... be damaged. If an unpacked drum unit is caused to the drum unit or other manufacturer's products with this machine. To protect your printer. Brother does not therefore recommend the use only genuine Brother brand replacement toner cartridges. If toner cartridges are used with this machine, any problem that you do not refill the toner...
Users Manual - English
Page 109
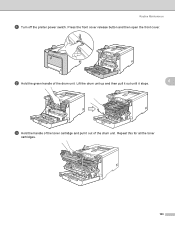
Lift the drum unit up and then pull it out until it stops. 6 c Hold the handle of the toner cartridge and pull it out of the drum unit. Repeat this for all the toner cartridges. 100 Press the front cover release button and then open the front cover. Routine Maintenance a Turn off the printer power switch. b Hold the green handle of the drum unit.
Lift the drum unit up and then pull it out until it stops. 6 c Hold the handle of the toner cartridge and pull it out of the drum unit. Repeat this for all the toner cartridges. 100 Press the front cover release button and then open the front cover. Routine Maintenance a Turn off the printer power switch. b Hold the green handle of the drum unit.
Users Manual - English
Page 110
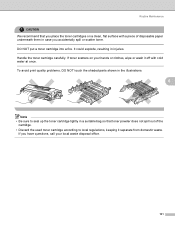
...problems, DO NOT touch the shaded parts shown in the illustrations. 6 Note • Be sure to seal up the toner cartridge tightly in a suitable bag so that you place the toner cartridges on your local waste disposal office. 101 If you accidentally spill or scatter toner. Routine Maintenance CA UTI ON We..., call your hands or clothes, wipe or wash it separate from domestic waste. If toner scatters on a clean, flat surface with a piece of the cartridge. • Discard the used toner cartridge according to local regulations, keeping it off with cold water at once. DO NOT put a toner...
...problems, DO NOT touch the shaded parts shown in the illustrations. 6 Note • Be sure to seal up the toner cartridge tightly in a suitable bag so that you place the toner cartridges on your local waste disposal office. 101 If you accidentally spill or scatter toner. Routine Maintenance CA UTI ON We..., call your hands or clothes, wipe or wash it separate from domestic waste. If toner scatters on a clean, flat surface with a piece of the cartridge. • Discard the used toner cartridge according to local regulations, keeping it off with cold water at once. DO NOT put a toner...
Users Manual - English
Page 112
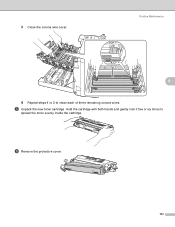
e Unpack the new toner cartridge. Hold the cartridge with both hands and gently rock it five or six times to clean each of three remaining corona wires. Routine Maintenance 1 1 1 2 2 1 2 1 2 6 4 Repeat steps 1 to 3 to spread the toner evenly inside the cartridge. f Remove the protective cover. 103 3 Close the corona wire cover.
e Unpack the new toner cartridge. Hold the cartridge with both hands and gently rock it five or six times to clean each of three remaining corona wires. Routine Maintenance 1 1 1 2 2 1 2 1 2 6 4 Repeat steps 1 to 3 to spread the toner evenly inside the cartridge. f Remove the protective cover. 103 3 Close the corona wire cover.

Users Manual - English
Page 113
Cyan 2.M - Repeat this for all the toner cartridges. (1) (1) 1 2 3 4 1.C - Black 6 h Put the drum unit back in place. i Close the front cover of the toner cartridge and slide the toner cartridge into the drum unit. Make sure that you match the toner cartridge color to the same color label on the drum unit, and make sure that you fold down the toner cartridge handle (1) once the toner cartridge is in the printer. Magenta 3.Y - Routine Maintenance g Hold the handle of the printer. 104 Yellow 4.K -
Cyan 2.M - Repeat this for all the toner cartridges. (1) (1) 1 2 3 4 1.C - Black 6 h Put the drum unit back in place. i Close the front cover of the toner cartridge and slide the toner cartridge into the drum unit. Make sure that you match the toner cartridge color to the same color label on the drum unit, and make sure that you fold down the toner cartridge handle (1) once the toner cartridge is in the printer. Magenta 3.Y - Routine Maintenance g Hold the handle of the printer. 104 Yellow 4.K -
Users Manual - English
Page 115
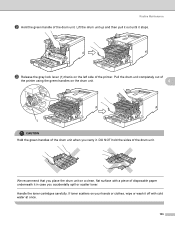
Lift the drum unit up and then pull it out until it off with a piece of the printer. Pull the drum unit completely out of the printer using the green handles on a clean, flat surface with cold water at once. 106 If toner scatters on the left side of disposable paper underneath ... that is on your hands or clothes, wipe or wash it stops. Routine Maintenance b Hold the green handle of the drum unit. Handle the toner cartridges carefully.
Lift the drum unit up and then pull it out until it off with a piece of the printer. Pull the drum unit completely out of the printer using the green handles on a clean, flat surface with cold water at once. 106 If toner scatters on the left side of disposable paper underneath ... that is on your hands or clothes, wipe or wash it stops. Routine Maintenance b Hold the green handle of the drum unit. Handle the toner cartridges carefully.

Users Manual - English
Page 116
Routine Maintenance d Hold the handle of the toner cartridge and pull it out of the drum unit. To avoid print quality problems, DO NOT touch the shaded parts shown in the illustration. Repeat this for all the toner cartridges. 6 CA UTI ON To prevent damage to the printer from static electricity, DO NOT touch the electrodes shown in the illustrations. 107
Routine Maintenance d Hold the handle of the toner cartridge and pull it out of the drum unit. To avoid print quality problems, DO NOT touch the shaded parts shown in the illustration. Repeat this for all the toner cartridges. 6 CA UTI ON To prevent damage to the printer from static electricity, DO NOT touch the electrodes shown in the illustrations. 107

Users Manual - English
Page 117
... sure that you match the toner cartridge color to the same color label on the drum unit, and make sure that you put it in place. Exposure to direct sunlight or room light may damage the drum unit. 6 f Hold the handle of the toner cartridge and slide the toner cartridge into the drum unit. Magenta...
... sure that you match the toner cartridge color to the same color label on the drum unit, and make sure that you put it in place. Exposure to direct sunlight or room light may damage the drum unit. 6 f Hold the handle of the toner cartridge and slide the toner cartridge into the drum unit. Magenta...


