Network Users Manual - English
Page 4
...20 SSID (Service Set Identifier) and channels 20 Authentication and encryption ...20 Configuring your printer for a wireless network 23 Using the SecureEasySetup™ software to configure your printer for a wireless network 23 Using the Brother automatic installer application on the CD-ROM to configure your wireless network printer ...28 Using the Setup Wizard from the control panel 28 Changing the print server settings ...35 Using the BRAdmin Professional utility to change print server settings (for Windows 35 Using the control panel to change print server settings 36 Using Web Based...
...20 SSID (Service Set Identifier) and channels 20 Authentication and encryption ...20 Configuring your printer for a wireless network 23 Using the SecureEasySetup™ software to configure your printer for a wireless network 23 Using the Brother automatic installer application on the CD-ROM to configure your wireless network printer ...28 Using the Setup Wizard from the control panel 28 Changing the print server settings ...35 Using the BRAdmin Professional utility to change print server settings (for Windows 35 Using the control panel to change print server settings 36 Using Web Based...
Network Users Manual - English
Page 9
... Quick Setup Guide we provided with a web browser that supports JRE (Java Runtime Environment). For more advanced management of Brother network connected devices. BRAdmin Professional has additional features from any client PC with the printer. By installing the Web BRAdmin server utility on a PC running Windows® system. This utility can search for Brother products on your network, view the status and configure the network settings. Network printing 1 The print server provides printing services for Windows...
... Quick Setup Guide we provided with a web browser that supports JRE (Java Runtime Environment). For more advanced management of Brother network connected devices. BRAdmin Professional has additional features from any client PC with the printer. By installing the Web BRAdmin server utility on a PC running Windows® system. This utility can search for Brother products on your network, view the status and configure the network settings. Network printing 1 The print server provides printing services for Windows...
Network Users Manual - English
Page 16
... Setup Guide. 2 Configuring your printer for more information, see Control panel setup on -screen instructions until you are unable to use the automatic installer or any of Brother's software tools, you can easily connect your printer to your printer without using the automatic installer application, refer to the remainder of this chapter, you will be guided by the on page 108. 9 By using this application, you can also use the printer's control panel to change network settings...
... Setup Guide. 2 Configuring your printer for more information, see Control panel setup on -screen instructions until you are unable to use the automatic installer or any of Brother's software tools, you can easily connect your printer to your printer without using the automatic installer application, refer to the remainder of this chapter, you will be guided by the on page 108. 9 By using this application, you can also use the printer's control panel to change network settings...
Network Users Manual - English
Page 20
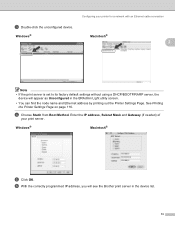
Windows® Configuring your print server. Windows® Macintosh® e Click OK. Enter the IP address, Subnet Mask and Gateway (if needed) of your printer for a network with an Ethernet cable connection Macintosh® 2 Note • If the print server is set to its factory default settings without using a DHCP/BOOTP/RARP server, the device will see the Brother print server in the BRAdmin Light utility screen. • You can find the node name and...
Windows® Configuring your print server. Windows® Macintosh® e Click OK. Enter the IP address, Subnet Mask and Gateway (if needed) of your printer for a network with an Ethernet cable connection Macintosh® 2 Note • If the print server is set to its factory default settings without using a DHCP/BOOTP/RARP server, the device will see the Brother print server in the BRAdmin Light utility screen. • You can find the node name and...
Network Users Manual - English
Page 31
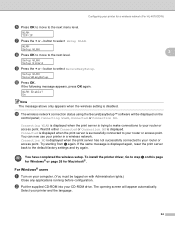
... your CD-ROM drive. Connection NG is displayed again, reset the print server back to your router or access point. If the following message appears, press OK again. If the same message is displayed when the print server has not successfully connected to the default factory settings and try again. Configuring your printer for Macintosh®. button to select SecureEasySetup. k The wireless network connection status using the SecureEasySetup™ software will appear automatically. Setup WLAN SecureEasySetup...
... your CD-ROM drive. Connection NG is displayed again, reset the print server back to your router or access point. If the following message appears, press OK again. If the same message is displayed when the print server has not successfully connected to the default factory settings and try again. Configuring your printer for Macintosh®. button to select SecureEasySetup. k The wireless network connection status using the SecureEasySetup™ software will appear automatically. Setup WLAN SecureEasySetup...
Network Users Manual - English
Page 71
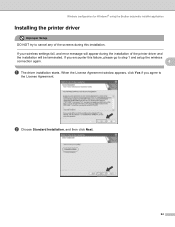
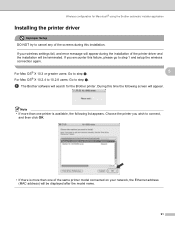
... this installation. If you agree to the License Agreement. If your wireless settings fail, and error message will be terminated. Wireless configuration for Windows® using the Brother automatic installer application Installing the printer driver 4 Improper Setup DO NOT try to cancel any of the screens during the installation of the printer driver and the installation will appear during this failure, please go to step 1 and setup the wireless connection again. 4 a The driver installation starts...
... this installation. If you agree to the License Agreement. If your wireless settings fail, and error message will be terminated. Wireless configuration for Windows® using the Brother automatic installer application Installing the printer driver 4 Improper Setup DO NOT try to cancel any of the screens during the installation of the printer driver and the installation will appear during this failure, please go to step 1 and setup the wireless connection again. 4 a The driver installation starts...
Network Users Manual - English
Page 88
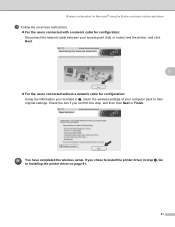
... the wireless setup. Check the box if you recorded in step e, Go to their original settings. If you chose to install the printer driver in l, return the wireless settings of your computer back to Installing the printer driver on -screen instructions. „ For the users connected with a network cable for configuration: Disconnect the network cable between your access point (hub or router) and the printer, and click Next. 5 „ For the users connected without a network cable...
... the wireless setup. Check the box if you recorded in step e, Go to their original settings. If you chose to install the printer driver in l, return the wireless settings of your computer back to Installing the printer driver on -screen instructions. „ For the users connected with a network cable for configuration: Disconnect the network cable between your access point (hub or router) and the printer, and click Next. 5 „ For the users connected without a network cable...
Network Users Manual - English
Page 98
... Installing the printer driver 5 Improper Setup DO NOT try to cancel any of the screens during the installation of the same printer model connected on your wireless settings fail, and error message will appear during this failure, please go to step 1 and setup the wireless connection again. Choose the printer you encounter this installation. Wireless configuration for the Brother printer. During this time the following list appears. If your network, the Ethernet address (MAC address) will appear. a The Brother software...
... Installing the printer driver 5 Improper Setup DO NOT try to cancel any of the screens during the installation of the same printer model connected on your wireless settings fail, and error message will appear during this failure, please go to step 1 and setup the wireless connection again. Choose the printer you encounter this installation. Wireless configuration for the Brother printer. During this time the following list appears. If your network, the Ethernet address (MAC address) will appear. a The Brother software...

Network Users Manual - English
Page 103
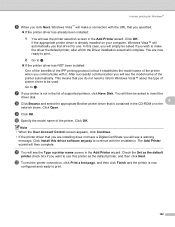
... select the Have Disk option to browse to start the Add Printer Wizard. f The Add Standard TCP/IP Printer Port Wizard will appear. Click Next. 6 g Enter the IP address, or the print server name you see the Welcome to configure. Select the appropriate driver from Windows®: basic TCP/IP Peer-to use. k For example, select the "X:\Driver\PCL\WIN2K_XP\your language" folder (where X is your printer model, then click...
... select the Have Disk option to browse to start the Add Printer Wizard. f The Add Standard TCP/IP Printer Port Wizard will appear. Click Next. 6 g Enter the IP address, or the print server name you see the Welcome to configure. Select the appropriate driver from Windows®: basic TCP/IP Peer-to use. k For example, select the "X:\Driver\PCL\WIN2K_XP\your language" folder (where X is your printer model, then click...
Network Users Manual - English
Page 109
... use this printer as the default printer check box if you want to make a connection with the URL that you do not need to inform Windows Vista™ about the type of printer driver to print. 102 Click OK. l To test the printer connection, click Print a test page, and then click Finish and the printer is already installed on your printer is contained in the CD-ROM or in the list of supported printers...
... use this printer as the default printer check box if you want to make a connection with the URL that you do not need to inform Windows Vista™ about the type of printer driver to print. 102 Click OK. l To test the printer connection, click Print a test page, and then click Finish and the printer is already installed on your printer is contained in the CD-ROM or in the list of supported printers...

Network Users Manual - English
Page 158
... printer/print server does not appear in the root directory of BRAdmin Light 13 „ For Windows® The Firewall setting on your keyboard. d Click the Advanced tab. Under Internet Connection Firewall, verify that Off (not recommended) is disabled, try reinstalling the Brother software package. c Click the General tab. Windows® XP SP1 users: 13 a Locate the "Windows" key on your computer does not support...
... printer/print server does not appear in the root directory of BRAdmin Light 13 „ For Windows® The Firewall setting on your keyboard. d Click the Advanced tab. Under Internet Connection Firewall, verify that Off (not recommended) is disabled, try reinstalling the Brother software package. c Click the General tab. Windows® XP SP1 users: 13 a Locate the "Windows" key on your computer does not support...
Network Users Manual - English
Page 168
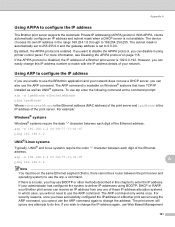
For more information, see Disabling the APIPA protocol on Windows® systems that is not available. If there is enabled. The print server will not need to use the arp -s command. By default, the APIPA protocol is a router, you can easily change this IP address number to 255.255.0.0 and the gateway address is the IP address of the print server. If you want to...
For more information, see Disabling the APIPA protocol on Windows® systems that is not available. If there is enabled. The print server will not need to use the arp -s command. By default, the APIPA protocol is a router, you can easily change this IP address number to 255.255.0.0 and the gateway address is the IP address of the print server. If you want to...
Quick Setup Guide - English
Page 1
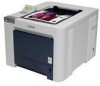
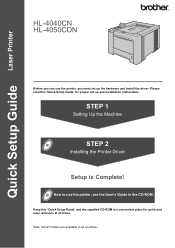
Keep this 'Quick Setup Guide' for quick and easy reference at all times. Please read this 'Quick Setup Guide' and the supplied CD-ROM in a convenient place for proper set up and installation instructions. Quick Setup Guide Laser Printer HL-4040CN HL-4050CDN Before you can use the printer, see the User's Guide in all models are available in the CD-ROM. How to use the printer, you must set up the hardware and install the driver. STEP 1 Setting Up the Machine STEP 2 Installing the Printer Driver Setup is Complete! Note: Not all countries.
Keep this 'Quick Setup Guide' for quick and easy reference at all times. Please read this 'Quick Setup Guide' and the supplied CD-ROM in a convenient place for proper set up and installation instructions. Quick Setup Guide Laser Printer HL-4040CN HL-4050CDN Before you can use the printer, see the User's Guide in all models are available in the CD-ROM. How to use the printer, you must set up the hardware and install the driver. STEP 1 Setting Up the Machine STEP 2 Installing the Printer Driver Setup is Complete! Note: Not all countries.
Users Manual - English
Page 92
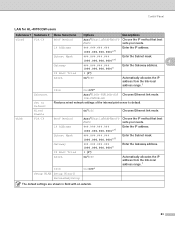
... link mode. Enter the IP address. Subnet Mask 000.000.000.000)* 1 Enter the Subnet mask. Gateway 000.000.000.000)* Enter the Gateway address. Set to Default Restores wired network settings of the internal print server to default. Auto*/Static/RARP/BOOTP /DHCP 000.000.000.000)* 1 Choose the IP method that best suits your needs. Control Panel LAN for HL-4070CDW users Submenu 1 Submenu 2 Menu Selections Options Descriptions...
... link mode. Enter the IP address. Subnet Mask 000.000.000.000)* 1 Enter the Subnet mask. Gateway 000.000.000.000)* Enter the Gateway address. Set to Default Restores wired network settings of the internal print server to default. Auto*/Static/RARP/BOOTP /DHCP 000.000.000.000)* 1 Choose the IP method that best suits your needs. Control Panel LAN for HL-4070CDW users Submenu 1 Submenu 2 Menu Selections Options Descriptions...
Users Manual - English
Page 104
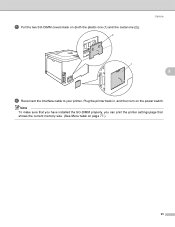
Note To make sure that you have installed the SO-DIMM properly, you can print the printer settings page that shows the current memory size. (See Menu table on the power switch. Plug the printer back in, and then turn on page 77.) 95 e Put the two SO-DIMM covers back on (both the plastic one (1) and the metal one (2)). 2 Options 1 5 f Reconnect the interface cable to your printer.
Note To make sure that you have installed the SO-DIMM properly, you can print the printer settings page that shows the current memory size. (See Menu table on the power switch. Plug the printer back in, and then turn on page 77.) 95 e Put the two SO-DIMM covers back on (both the plastic one (1) and the metal one (2)). 2 Options 1 5 f Reconnect the interface cable to your printer.
Users Manual - English
Page 151
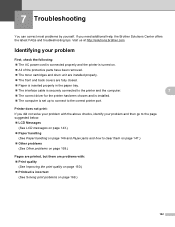
... Brother Solutions Center offers the latest FAQs and troubleshooting tips. The front and back covers are installed properly. The toner cartridges and drum unit are fully closed. The correct driver for the printer has been chosen and is inserted properly in the paper tray. If you did not solve your problem with : Print quality (See Improving the print quality on page 160.) Printout is turned on page 169.) 7 7 7 7 7 142 LCD Messages...
... Brother Solutions Center offers the latest FAQs and troubleshooting tips. The front and back covers are installed properly. The toner cartridges and drum unit are fully closed. The correct driver for the printer has been chosen and is inserted properly in the paper tray. If you did not solve your problem with : Print quality (See Improving the print quality on page 160.) Printout is turned on page 169.) 7 7 7 7 7 142 LCD Messages...
Users Manual - English
Page 152
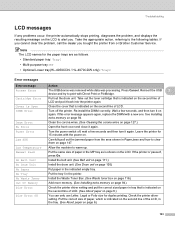
...; Optional Lower tray(HL-4050CDN / HL-4070CDW only): Tray2 Error messages Error message A ction Access Error The USB device was removed while data was processing. Leave the printer for duplex printing. If you cannot clear the problem, call the dealer you . Take out the toner cartridge that is shown on the LCD. Jam XXX Carefully pull out the jammed paper from or Brother Customer Service. No Belt Unit Install the belt unit. (See Belt unit on page 111.) No Drum Unit Install the drum unit. (See Drum unit on page...
...; Optional Lower tray(HL-4050CDN / HL-4070CDW only): Tray2 Error messages Error message A ction Access Error The USB device was removed while data was processing. Leave the printer for duplex printing. If you cannot clear the problem, call the dealer you . Take out the toner cartridge that is shown on the LCD. Jam XXX Carefully pull out the jammed paper from or Brother Customer Service. No Belt Unit Install the belt unit. (See Belt unit on page 111.) No Drum Unit Install the drum unit. (See Drum unit on page...
Users Manual - English
Page 171
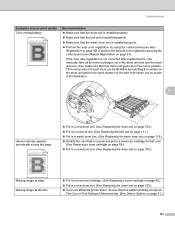
... in a waste toner box. (See Replacing the waste toner box on page 116.) Put in the driver and by using the custom setting in a new drum unit. (See Replacing the drum unit on page 105.) 162 The printer may not be able to reproduce the colors on your printouts is not solved after printing a few pages, the drum unit may cause this print quality problem. (See Positioning the printer on page 5.) Make sure that you use paper that the drum unit is installed properly...
... in a waste toner box. (See Replacing the waste toner box on page 116.) Put in the driver and by using the custom setting in a new drum unit. (See Replacing the drum unit on page 105.) 162 The printer may not be able to reproduce the colors on your printouts is not solved after printing a few pages, the drum unit may cause this print quality problem. (See Positioning the printer on page 5.) Make sure that you use paper that the drum unit is installed properly...
Users Manual - English
Page 172
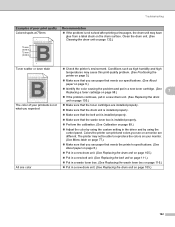
... page 105.) If you use Windows printer driver, choose Improve pattern printing or Improve Thin Line in a new toner cartridge for that is installed properly. Put in a new drum unit. (See Replacing the drum unit on page 105.) Put in a new belt unit. (See Replacing the belt unit on page 111.) Put in a waste toner box. (See Replacing the waste toner box on page 116.) Identify the color that color. (See Replacing a toner cartridge on page 98.) Put in a new drum unit. (See Replacing the drum unit on page 105.) Missing image at edge Missing image...
... page 105.) If you use Windows printer driver, choose Improve pattern printing or Improve Thin Line in a new toner cartridge for that is installed properly. Put in a new drum unit. (See Replacing the drum unit on page 105.) Put in a new belt unit. (See Replacing the belt unit on page 111.) Put in a waste toner box. (See Replacing the waste toner box on page 116.) Identify the color that color. (See Replacing a toner cartridge on page 98.) Put in a new drum unit. (See Replacing the drum unit on page 105.) Missing image at edge Missing image...
Users Manual - English
Page 178
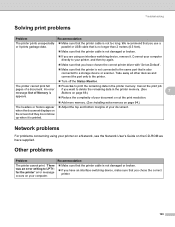
... using an interface-switching device, remove it prints garbage data. Troubleshooting Solving print problems 7 Problem Recommendation The printer prints unexpectedly or it . Make sure that is not damaged or broken. Connect your printer, and then try again. Make sure that the printer is not connected to the same port that the printer cable is also connected to your computer directly to a storage device or scanner. Reduce the complexity of your computer. Cancel the print job pages of Memory is printed. Turn...
... using an interface-switching device, remove it prints garbage data. Troubleshooting Solving print problems 7 Problem Recommendation The printer prints unexpectedly or it . Make sure that is not damaged or broken. Connect your printer, and then try again. Make sure that the printer is not connected to the same port that the printer cable is also connected to your computer directly to a storage device or scanner. Reduce the complexity of your computer. Cancel the print job pages of Memory is printed. Turn...


