
Users Manual - English
Page 17
... status when the machine is idle. 100% Normal 01 LED DCP status Ready Description The DCP is ready for use your machine. Close the cover. (See Error and Maintenance messages uu page 32.) Cannot Print Replace the ink cartridge with a new one. (See Replacing the ink cartridges uu page 26.) Paper Error Put paper in orange...
... status when the machine is idle. 100% Normal 01 LED DCP status Ready Description The DCP is ready for use your machine. Close the cover. (See Error and Maintenance messages uu page 32.) Cannot Print Replace the ink cartridge with a new one. (See Replacing the ink cartridges uu page 26.) Paper Error Put paper in orange...
Users Manual - English
Page 38
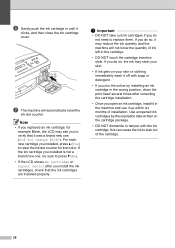
... six months of installation. Important • DO NOT take out ink cartridges if you do not need to leak out of ink left in until it may ask you to verify that color. If you do so, it clicks, and then close the ink cartridge cover. g The machine will not know the quantity of the... cartridge. 28 f Gently push the ink cartridge in the cartridge. • DO NOT...
... six months of installation. Important • DO NOT take out ink cartridges if you do not need to leak out of ink left in until it may ask you to verify that color. If you do so, it clicks, and then close the ink cartridge cover. g The machine will not know the quantity of the... cartridge. 28 f Gently push the ink cartridge in the cartridge. • DO NOT...
Users Manual - English
Page 43
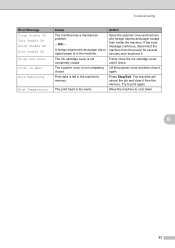
...The print head is not completely closed . The ink cartridge cover is too warm. Firmly close it from inside the machine. Troubleshooting Error Message Clean Unable XX Init Unable XX Print Unable XX Scan Unable XX Close Ink Cover Cover is not completely closed . If the error message ...continues, disconnect the machine from the power for several minutes and reconnect it clicks. B 33 The scanner cover is Open Data Remaining High Temperature Cause The...
...The print head is not completely closed . The ink cartridge cover is too warm. Firmly close it from inside the machine. Troubleshooting Error Message Clean Unable XX Init Unable XX Print Unable XX Scan Unable XX Close Ink Cover Cover is not completely closed . If the error message ...continues, disconnect the machine from the power for several minutes and reconnect it clicks. B 33 The scanner cover is Open Data Remaining High Temperature Cause The...
Users Manual - English
Page 45
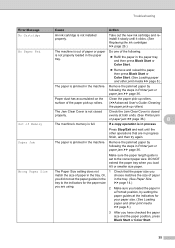
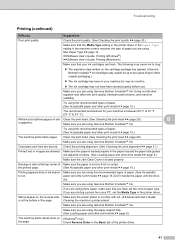
Paper dust has accumulated on the surface of the paper pick-up rollers) The Jam Clear Cover is not closed Check the Jam Clear Cover is closed properly. evenly at the indicators for the paper size uu page 14.) you are in Printer jam or paper jam uu page 36. The paper ... load A5 or smaller size paper. Troubleshooting Error Message No Cartridge No Paper Fed Out of Memory Paper Jam Wrong Paper Size Cause Action An ink cartridge is set the paper guides in the in the tray. (See Paper Size tray to the correct paper size. Or, choose matches the size...
Paper dust has accumulated on the surface of the paper pick-up rollers) The Jam Clear Cover is not closed Check the Jam Clear Cover is closed properly. evenly at the indicators for the paper size uu page 14.) you are in Printer jam or paper jam uu page 36. The paper ... load A5 or smaller size paper. Troubleshooting Error Message No Cartridge No Paper Fed Out of Memory Paper Jam Wrong Paper Size Cause Action An ink cartridge is set the paper guides in the in the tray. (See Paper Size tray to the correct paper size. Or, choose matches the size...

Users Manual - English
Page 47
... under the print head, unplug the machine from the power source and take out the paper. Re-connect the power cord. Hold down (2) and close the scanner cover (3) using both hands. 1 2 3 h Push the paper tray firmly back into the machine. 37 Move the print head (if necessary) to the center. B ...• If ink gets on both sides of the machine (2) and (3). g Lift the scanner cover to take out any paper remaining in the illustration, you cannot move the print head to release the lock (1). Then...
... under the print head, unplug the machine from the power source and take out the paper. Re-connect the power cord. Hold down (2) and close the scanner cover (3) using both hands. 1 2 3 h Push the paper tray firmly back into the machine. 37 Move the print head (if necessary) to the center. B ...• If ink gets on both sides of the machine (2) and (3). g Lift the scanner cover to take out any paper remaining in the illustration, you cannot move the print head to release the lock (1). Then...
Users Manual - English
Page 51
... printer platen is not dirty with ink. (uuAdvanced User's Guide: or at...Genuine Brother Innobella™ Ink. Check the print quality. (See...Brother Innobella™ Ink. Make sure you are using . Make sure you are using Genuine Brother Innobella™ Ink. Using non-Brother... Brother Innobella™ ink cartridges stay usable for over six months. The ink...Brother Innobella™ Ink. the printed page. (See Acceptable paper and other print media uu page 8.) Make sure the Jam Clear Cover...ink to two years if kept in their original packaging.) The ink...
... printer platen is not dirty with ink. (uuAdvanced User's Guide: or at...Genuine Brother Innobella™ Ink. Check the print quality. (See...Brother Innobella™ Ink. Make sure you are using . Make sure you are using Genuine Brother Innobella™ Ink. Using non-Brother... Brother Innobella™ ink cartridges stay usable for over six months. The ink...Brother Innobella™ Ink. the printed page. (See Acceptable paper and other print media uu page 8.) Make sure the Jam Clear Cover...ink to two years if kept in their original packaging.) The ink...
Users Manual - English
Page 52
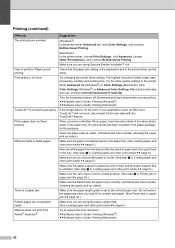
... well, then put it back in the tray. (See step e in Loading paper and other print media uu page 8.) Make sure the Jam Clear Cover is closed properly. (See step c in Printer jam or paper jam uu page 36.) Make sure the Base Pad in the paper tray is loaded properly in... the paper pick-up rollers) There is set to reduce the print resolution. Do not extend the paper tray when you are using Genuine Brother Innobella™ Ink. Turn the borderless feature off. Check that the paper size setting in the application and in the printer driver Advanced tab (Windows®) or...
... well, then put it back in the tray. (See step e in Loading paper and other print media uu page 8.) Make sure the Jam Clear Cover is closed properly. (See step c in Printer jam or paper jam uu page 36.) Make sure the Base Pad in the paper tray is loaded properly in... the paper pick-up rollers) There is set to reduce the print resolution. Do not extend the paper tray when you are using Genuine Brother Innobella™ Ink. Turn the borderless feature off. Check that the paper size setting in the application and in the printer driver Advanced tab (Windows®) or...

Advanced Users Manual - English
Page 14
Cleaning the machine's printer platen WARNING c Lift the scanner cover to avoid an electrical shock. Gently push the scanner cover A support down (2) and close the scanner cover (3). 1 Be sure to unplug the machine from the AC power outlet before cleaning the printer ...platen to release the lock (1). a Using both hands, grasp the plastic tabs on both sides of the machine and lift the scanner cover until it , wiping off any scattered ink...
Cleaning the machine's printer platen WARNING c Lift the scanner cover to avoid an electrical shock. Gently push the scanner cover A support down (2) and close the scanner cover (3). 1 Be sure to unplug the machine from the AC power outlet before cleaning the printer ...platen to release the lock (1). a Using both hands, grasp the plastic tabs on both sides of the machine and lift the scanner cover until it , wiping off any scattered ink...
Advanced Users Manual - English
Page 17
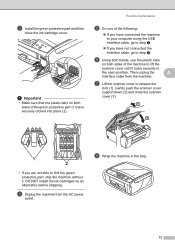
... sides of the machine to release the lock (1). DO NOT install the ink cartridges as an alternative before shipping. d Unplug the machine from the machine. g Lift the scanner cover to lift the scanner cover until it . Then unplug the A interface cable from the AC power ... protective part, ship the machine without it locks securely in the bag. 13 Gently push the scanner cover support down (2) and close the ink cartridge cover. c Install the green protective part and then close the scanner cover (3). 1 2 3 1 2 • If you have securely clicked into place (2).
... sides of the machine to release the lock (1). DO NOT install the ink cartridges as an alternative before shipping. d Unplug the machine from the machine. g Lift the scanner cover to lift the scanner cover until it . Then unplug the A interface cable from the AC power ... protective part, ship the machine without it locks securely in the bag. 13 Gently push the scanner cover support down (2) and close the ink cartridge cover. c Install the green protective part and then close the scanner cover (3). 1 2 3 1 2 • If you have securely clicked into place (2).

Quick Setup Guide - English
Page 5
... soap or detergent at once. This process will prepare the ink tube system for printing. After all the ink cartridges are installed close the ink cartridge cover. Note The machine will take approximately five minutes. d Unpack the ink cartridge. Turn the green knob on the label. 1 2... 1 f Gently push the ink cartridge until it clicks. e Take...
... soap or detergent at once. This process will prepare the ink tube system for printing. After all the ink cartridges are installed close the ink cartridge cover. Note The machine will take approximately five minutes. d Unpack the ink cartridge. Turn the green knob on the label. 1 2... 1 f Gently push the ink cartridge until it clicks. e Take...


