
Users Manual - English
Page 2
... machine and foot control free from all instructions before using and before cleaning. SAVE THESE INSTRUCTIONS This machine is not intended for examination, repair, electrical or mechanical adjustment. 4. Do not allow this machine. 18. Never drop or insert any object into water. IMPORTANT SAFETY INSTRUCTIONS When using this manual. 3. Always unplug the machine from outlet. 9. Use only accessories recommended by or near children. 2. Never operate this machine only for household use the proper needle plate...
... machine and foot control free from all instructions before using and before cleaning. SAVE THESE INSTRUCTIONS This machine is not intended for examination, repair, electrical or mechanical adjustment. 4. Do not allow this machine. 18. Never drop or insert any object into water. IMPORTANT SAFETY INSTRUCTIONS When using this manual. 3. Always unplug the machine from outlet. 9. Use only accessories recommended by or near children. 2. Never operate this machine only for household use the proper needle plate...
Users Manual - English
Page 4
... and adjust the machine yourself. If the problem persists, please consult your eye on the foot controller. 4. When storing this manual and specifications of the operation manual to clean the case. Do not drop or hit the machine. 4. PLEASE READ BEFORE USING THIS MACHINE For safe operation 1. For a longer service life 1. CONGRATULATIONS ON CHOOSING OUR MACHINE Your machine is completed • Replacing or removing the needle or any assemblies, the presser feet, needle, or other moving parts. 2.
... and adjust the machine yourself. If the problem persists, please consult your eye on the foot controller. 4. When storing this manual and specifications of the operation manual to clean the case. Do not drop or hit the machine. 4. PLEASE READ BEFORE USING THIS MACHINE For safe operation 1. For a longer service life 1. CONGRATULATIONS ON CHOOSING OUR MACHINE Your machine is completed • Replacing or removing the needle or any assemblies, the presser feet, needle, or other moving parts. 2.
Users Manual - English
Page 5
... 5 The main parts ...5 Needle and presser foot section ...6 Operation buttons ...6 Operation panel ...7 Flat bed attachment ...7 ACCESSORIES ...8 Optional accessories ...8 USING YOUR SEWING MACHINE 9 Power supply precautions ...9 Power supply ...9 Foot controller ...10 Sewing speed controller (for models equipped with the start/stop button 10 Changing the needle stop position ...10 THREADING THE MACHINE 11 Winding the bobbin ...11 Lower threading ...14 Upper threading ...16 Drawing up the lower thread ...19 REPLACING THE NEEDLE 20 Needle precautions ...20 Needle types and their uses ...20...
... 5 The main parts ...5 Needle and presser foot section ...6 Operation buttons ...6 Operation panel ...7 Flat bed attachment ...7 ACCESSORIES ...8 Optional accessories ...8 USING YOUR SEWING MACHINE 9 Power supply precautions ...9 Power supply ...9 Foot controller ...10 Sewing speed controller (for models equipped with the start/stop button 10 Changing the needle stop position ...10 THREADING THE MACHINE 11 Winding the bobbin ...11 Lower threading ...14 Upper threading ...16 Drawing up the lower thread ...19 REPLACING THE NEEDLE 20 Needle precautions ...20 Needle types and their uses ...20...
Users Manual - English
Page 7
... used when winding the thread onto the bobbin and then threading the machine. l Main power and sewing light switch (page 9) You can use as the lower thread. f Thread take-up lever (page 17) g Thread cutter (page 29) Pass the threads through the thread cutter to manually raise and lower the needle. n Foot controller jack/socket (page 10) Plug in the foot controller plug. p Presser foot lever (page 16) Used to lower the feed dogs. o Feed dog position lever (pages 38 and 45) Use the feed dog position lever to raise and lower the presser foot. b Spool pin...
... used when winding the thread onto the bobbin and then threading the machine. l Main power and sewing light switch (page 9) You can use as the lower thread. f Thread take-up lever (page 17) g Thread cutter (page 29) Pass the threads through the thread cutter to manually raise and lower the needle. n Foot controller jack/socket (page 10) Plug in the foot controller plug. p Presser foot lever (page 16) Used to lower the feed dogs. o Feed dog position lever (pages 38 and 45) Use the feed dog position lever to raise and lower the presser foot. b Spool pin...
Users Manual - English
Page 8
... feed dogs feed the fabric in the fabric. KNOWING YOUR SEWING MACHINE Needle and presser foot section a Buttonhole lever Lower the buttonhole lever when sewing buttonholes and bar tacks. d Presser foot holder screw Use the presser foot holder screw to set bobbin (for models equipped with the start/stop button) Press the start/stop sewing. Attach the appropriate presser foot for models equipped with the sewing speed controller) Slide the sewing speed controller to sew reverse stitches. h Bobbin cover Open the bobbin cover to hold the needle in the opposite direction...
... feed dogs feed the fabric in the fabric. KNOWING YOUR SEWING MACHINE Needle and presser foot section a Buttonhole lever Lower the buttonhole lever when sewing buttonholes and bar tacks. d Presser foot holder screw Use the presser foot holder screw to set bobbin (for models equipped with the start/stop button) Press the start/stop sewing. Attach the appropriate presser foot for models equipped with the sewing speed controller) Slide the sewing speed controller to sew reverse stitches. h Bobbin cover Open the bobbin cover to hold the needle in the opposite direction...
Users Manual - English
Page 10
..., CE-5000PRW, SM-6500PRW, CS-770 ● The screw of the presser foot holder is available through your authorized dealer. (Part code: 132730-122) 1. 2. 3. 4. 5. 6. 7. 8. 9. 10. 11. 12. 13. 14. 15. 75/11 1 needle 90/14 1 needle 100/16 1 needle No. We have designed these accessories to help you be used on machine) 6 Blind stitch foot "R" 7 Button fitting foot "M" 8 Seam ripper Part Code U.S.A. / Canada Others No. Part Name SA140 F033N: XC2214-002 4 Quilting guide SA129 F005N: XC1948-002...
..., CE-5000PRW, SM-6500PRW, CS-770 ● The screw of the presser foot holder is available through your authorized dealer. (Part code: 132730-122) 1. 2. 3. 4. 5. 6. 7. 8. 9. 10. 11. 12. 13. 14. 15. 75/11 1 needle 90/14 1 needle 100/16 1 needle No. We have designed these accessories to help you be used on machine) 6 Blind stitch foot "R" 7 Button fitting foot "M" 8 Seam ripper Part Code U.S.A. / Canada Others No. Part Name SA140 F033N: XC2214-002 4 Quilting guide SA129 F005N: XC1948-002...
Users Manual - English
Page 12
... a Sewing speed controller • The speed set using the sewing speed controller is stopped. After turning on the sewing machine. Instead, the machine can be set to the lowered position. 10 When you press harder, the machine's speed will increase. a Faster You should make sure that nothing is placed on the foot controller when the machine is stopped. Memo • Perform the same operation to select the desired sewing speed. Changing the needle stop button) Slide the sewing speed controller...
... a Sewing speed controller • The speed set using the sewing speed controller is stopped. After turning on the sewing machine. Instead, the machine can be set to the lowered position. 10 When you press harder, the machine's speed will increase. a Faster You should make sure that nothing is placed on the foot controller when the machine is stopped. Memo • Perform the same operation to select the desired sewing speed. Changing the needle stop button) Slide the sewing speed controller...
Users Manual - English
Page 14
... be used to break. Slide the sewing speed controller back to fast). (For models equipped with the sewing speed controller.) Memo ● When the sewing machine is started or the handwheel is plugged in, the start/stop button cannot be operated using the foot controller, connect the foot controller before turning on the machine. ● When the foot controller is turned after winding the thread around the bobbin a few times. Slide the sewing speed controller to the right h (to set the speed...
... be used to break. Slide the sewing speed controller back to fast). (For models equipped with the sewing speed controller.) Memo ● When the sewing machine is started or the handwheel is plugged in, the start/stop button cannot be operated using the foot controller, connect the foot controller before turning on the machine. ● When the foot controller is turned after winding the thread around the bobbin a few times. Slide the sewing speed controller to the right h (to set the speed...
Users Manual - English
Page 15
... models equipped with the sewing speed controller). Pull the thread to a suitable length. a Slit in bobbin winder seat (with built-in cutter) X The thread is to start /stop button) (for models equipped with the sewing speed controller). Note ● If the sewing machine is cut the thread as described. If the bobbin is plugged in the bobbin. Turn on the machine. ● When the foot controller is wound without cutting the thread using the foot controller, connect the foot controller...
... models equipped with the sewing speed controller). Pull the thread to a suitable length. a Slit in bobbin winder seat (with built-in cutter) X The thread is to start /stop button) (for models equipped with the sewing speed controller). Note ● If the sewing machine is cut the thread as described. If the bobbin is plugged in the bobbin. Turn on the machine. ● When the foot controller is wound without cutting the thread using the foot controller, connect the foot controller...
Users Manual - English
Page 16
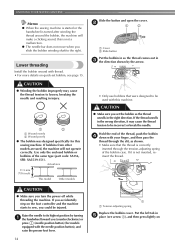
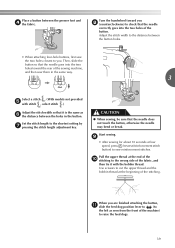
... on the foot controller and the machine starts to the right. Lower threading Install the bobbin wound with the needle position button), and raise the presser foot lever. 14 1 a Tension-adjusting spring Replace the bobbin cover. Use only the enclosed bobbin or bobbins of the bobbin case. If you (counterclockwise) or press (needle position button) (for this is not a malfunction. ● The needle bar does not move when you slide the bobbin winding shaft to sew, you could be injured. KNOWING YOUR SEWING MACHINE Memo...
... on the foot controller and the machine starts to the right. Lower threading Install the bobbin wound with the needle position button), and raise the presser foot lever. 14 1 a Tension-adjusting spring Replace the bobbin cover. Use only the enclosed bobbin or bobbins of the bobbin case. If you (counterclockwise) or press (needle position button) (for this is not a malfunction. ● The needle bar does not move when you slide the bobbin winding shaft to sew, you could be injured. KNOWING YOUR SEWING MACHINE Memo...

Users Manual - English
Page 17
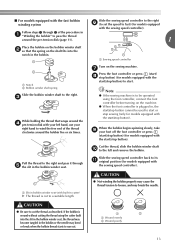
... bobbin thread before you start to sew, follow to thread the machine as shown by the line in the diagram). ■ For models equipped with the quick-set the bobbin so the thread unrolls in the right direction. If it is not inserted, reinsert the thread. 1 1 a Tension-adjusting spring Memo ● The order that the bobbin thread should be used with the needle position button), and raise the presser foot lever. Put the left side of the cover...
... bobbin thread before you start to sew, follow to thread the machine as shown by the line in the diagram). ■ For models equipped with the quick-set the bobbin so the thread unrolls in the right direction. If it is not inserted, reinsert the thread. 1 1 a Tension-adjusting spring Memo ● The order that the bobbin thread should be used with the needle position button), and raise the presser foot lever. Put the left side of the cover...
Users Manual - English
Page 19
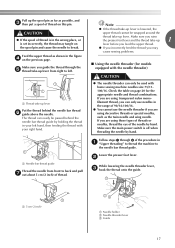
... needle to break. Make sure you are using decorative threads or special needles, such as the twin needle and wing needle. Make sure the main power switch is lowered, the upper thread cannot be wrapped around the thread take -up lever is off when threading the needle by hand. a Needle bar thread guide Thread the needle from right to the needle bar thread guide. If you guide the thread through 6 of thread. Lower the presser foot lever. Note ● If the thread take -up lever. a 5 cm (2 inch) a Needle holder b Needle threader lever c Guide...
... needle to break. Make sure you are using decorative threads or special needles, such as the twin needle and wing needle. Make sure the main power switch is lowered, the upper thread cannot be wrapped around the thread take -up lever is off when threading the needle by hand. a Needle bar thread guide Thread the needle from right to the needle bar thread guide. If you guide the thread through 6 of thread. Lower the presser foot lever. Note ● If the thread take -up lever. a 5 cm (2 inch) a Needle holder b Needle threader lever c Guide...
Users Manual - English
Page 35
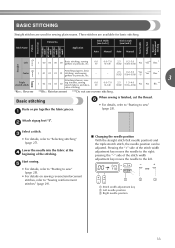
...(inch.)] Stitch Length [mm (inch.)] Auto Manual Auto Manual Straight Pattern Presser Foot 70 stitches model 60 stitches model 50 stitches model 40 stitches model Twin Needle Walking Foot Reverse/ Reinforcement Stitching Left J 00 00 00 00 Basic stitching, sewing gathers or pintucks, etc. 0.0 (0) 0.0-7.0 (0-1/4) 2.5 (3/32) 0.2-5.0 (1/64-3/16) No Ye*s** Rev.* Center Triple stretch stitch Attaching zippers, basic J 01 01 01 01 stitching, and sewing - gathers or pintucks, etc. Basic stitching Baste or pin together the fabric pieces. Attach zigzag foot "J". Lower the needle into...
...(inch.)] Stitch Length [mm (inch.)] Auto Manual Auto Manual Straight Pattern Presser Foot 70 stitches model 60 stitches model 50 stitches model 40 stitches model Twin Needle Walking Foot Reverse/ Reinforcement Stitching Left J 00 00 00 00 Basic stitching, sewing gathers or pintucks, etc. 0.0 (0) 0.0-7.0 (0-1/4) 2.5 (3/32) 0.2-5.0 (1/64-3/16) No Ye*s** Rev.* Center Triple stretch stitch Attaching zippers, basic J 01 01 01 01 stitching, and sewing - gathers or pintucks, etc. Basic stitching Baste or pin together the fabric pieces. Attach zigzag foot "J". Lower the needle into...

Users Manual - English
Page 38
... upper thread down through the hole in the button guide plate Add together the diameter and thickness of the button, and then set the button guide plate to 25 mm (1 inch) on the scale. 1 2 a 10 mm (3/8 inch) b 15 mm (9/16 inch) Attach buttonhole foot "A". UTILITY STITCHES The names of parts of buttonhole foot "A", which is used for sewing buttonholes, are indicated below. 1 2 5 ■ If the button does not fit in the presser foot. 1 X The size...
... upper thread down through the hole in the button guide plate Add together the diameter and thickness of the button, and then set the button guide plate to 25 mm (1 inch) on the scale. 1 2 a 10 mm (3/8 inch) b 15 mm (9/16 inch) Attach buttonhole foot "A". UTILITY STITCHES The names of parts of buttonhole foot "A", which is used for sewing buttonholes, are indicated below. 1 2 5 ■ If the button does not fit in the presser foot. 1 X The size...

Users Manual - English
Page 40
..., gently pull the gimp f thread to be attached. UTILITY STITCHES ■ Sewing buttonholes on stretch fabrics When sewing buttonholes on with 4 holes can be sewn on stretch fabrics, use a gimp thread. Button sewing Buttons can be attached. b Select a stitch or . With a seam ripper, cut the middle part of the h gimp thread remaining at the rear of the machine on the base, to (to the thickness of the fabric, and then tie it . X The feed dogs are lowered. Attach presser foot "M".
..., gently pull the gimp f thread to be attached. UTILITY STITCHES ■ Sewing buttonholes on stretch fabrics When sewing buttonholes on with 4 holes can be sewn on stretch fabrics, use a gimp thread. Button sewing Buttons can be attached. b Select a stitch or . With a seam ripper, cut the middle part of the h gimp thread remaining at the rear of the machine on the base, to (to the thickness of the fabric, and then tie it . X The feed dogs are lowered. Attach presser foot "M".
Users Manual - English
Page 41
... seconds at low speed, press (reverse/reinforcement stitch button) to the wrong side of the j stitching to sew reinforcement stitches. Pull the upper thread at the beginning of the sewing machine, and then sew them in the button. Use scissors to the shortest setting by g pressing the stitch length adjustment key. Then, slide the button so that it with the bobbin thread. Start sewing. When you h (counterclockwise) to check that the needle does not...
... seconds at low speed, press (reverse/reinforcement stitch button) to the wrong side of the j stitching to sew reinforcement stitches. Pull the upper thread at the beginning of the sewing machine, and then sew them in the button. Use scissors to the shortest setting by g pressing the stitch length adjustment key. Then, slide the button so that it with the bobbin thread. Start sewing. When you h (counterclockwise) to check that the needle does not...
Users Manual - English
Page 62
... hole in the needle plate is too thick. The thread is incorrect. Replace the presser foot. Only use a bobbin that has been designed for this machine. Incorrect bobbins will not work properly. Correct the upper threading. Fit the spool properly. Adjust the tension of fabric. You have not inserted the needle properly. The thread tension is wrinkled. Contact your retailer or the nearest authorised service center. Remove the tangled thread and clean the bobbin case. Only use a bobbin that has been designed...
... hole in the needle plate is too thick. The thread is incorrect. Replace the presser foot. Only use a bobbin that has been designed for this machine. Incorrect bobbins will not work properly. Correct the upper threading. Fit the spool properly. Adjust the tension of fabric. You have not inserted the needle properly. The thread tension is wrinkled. Contact your retailer or the nearest authorised service center. Remove the tangled thread and clean the bobbin case. Only use a bobbin that has been designed...

Users Manual - English
Page 63
... be used. Raise the needle either by pressing (needle position button) once or twice. page 21 The presser foot that the mark on . page 52 The stitch is too fine. The stitch is not sewn correctly. Remove the tangle thread. page 57 The sewing light bulb does not The sewing lamp is bent or blunt. Replace the needle. Replace the bobbin case. Adjust the tension of the upper thread. page 29 page 57 The feed dogs...
... be used. Raise the needle either by pressing (needle position button) once or twice. page 21 The presser foot that the mark on . page 52 The stitch is too fine. The stitch is not sewn correctly. Remove the tangle thread. page 57 The sewing light bulb does not The sewing lamp is bent or blunt. Replace the needle. Replace the bobbin case. Adjust the tension of the upper thread. page 29 page 57 The feed dogs...

Users Manual - English
Page 64
... the start /stop button was pressed while the presser foot is being used, the machine may be malfunctioning. The reverse/reinforcement stitch button or needle position button was pressed if the foot controller is not connected) while the buttonhole lever is tangled The sewing machine beeps for the cause of the error, and correct it before continuing to check for four seconds and the machine automatically stops. APPENDIX ERROR MESSAGES If an operation...
... the start /stop button was pressed while the presser foot is being used, the machine may be malfunctioning. The reverse/reinforcement stitch button or needle position button was pressed if the foot controller is not connected) while the buttonhole lever is tangled The sewing machine beeps for the cause of the error, and correct it before continuing to check for four seconds and the machine automatically stops. APPENDIX ERROR MESSAGES If an operation...

Users Manual - English
Page 65
...point zigzag stitch 32 main parts 5 main power switch 9 A , monogramming 49 51 accessories 8 appliqués 42 N needle 20 B bar tack 46 basic stitching 33 blind hem stitching 34 bobbin 14 , bobbin case 14 57 , bobbin cover 6 14 bobbin , winder 11 59, 62 button sewing 38 needle bar thread guide 6 , needle clamp screw 6 22 needle plate 6 needle plate cover 57 needle position 33 needle position button 6 needle threader 17 O buttonhole foot 36 openings 46 buttonhole , lever 6 37, 47 buttonhole sewing 35 operation beep 62 operation buttons 6 4 operation...
...point zigzag stitch 32 main parts 5 main power switch 9 A , monogramming 49 51 accessories 8 appliqués 42 N needle 20 B bar tack 46 basic stitching 33 blind hem stitching 34 bobbin 14 , bobbin case 14 57 , bobbin cover 6 14 bobbin , winder 11 59, 62 button sewing 38 needle bar thread guide 6 , needle clamp screw 6 22 needle plate 6 needle plate cover 57 needle position 33 needle position button 6 needle threader 17 O buttonhole foot 36 openings 46 buttonhole , lever 6 37, 47 buttonhole sewing 35 operation beep 62 operation buttons 6 4 operation...


