
Users Manual - English
Page 1
KNOWING YOUR SEWING MACHINE SEWING BASICS UTILITY STITCHES APPENDIX Computerized Sewing Machine Operation Manual
KNOWING YOUR SEWING MACHINE SEWING BASICS UTILITY STITCHES APPENDIX Computerized Sewing Machine Operation Manual
Users Manual - English
Page 2
... object into water. Do not unplug by young children or infirm persons without supervision. (For Australia and New Zealand only) 17. Always use outdoors. 7. This sewing machine is not intended for its intended use bent needles. 13. To reduce the risk of burns, fire, electric shock, or injury to the symbol...
... object into water. Do not unplug by young children or infirm persons without supervision. (For Australia and New Zealand only) 17. Always use outdoors. 7. This sewing machine is not intended for its intended use bent needles. 13. To reduce the risk of burns, fire, electric shock, or injury to the symbol...
Users Manual - English
Page 4
..., needle, or other hot objects. 2. PLEASE READ BEFORE USING THIS MACHINE For safe operation 1. Be sure to keep your local authorized Brother dealer. Do not use • Maintaining the machine • Leaving the machine unattended 3. Always consult the operation manual when replacing or ... the event a malfunction occurs or adjustment is required, first follow the troubleshooting table in the back of the most advanced computerized household sewing machines. Do not use extension cords. Use only neutral soaps or detergents to change without notice. 2 Do not touch the hand...
..., needle, or other hot objects. 2. PLEASE READ BEFORE USING THIS MACHINE For safe operation 1. Be sure to keep your local authorized Brother dealer. Do not use • Maintaining the machine • Leaving the machine unattended 3. Always consult the operation manual when replacing or ... the event a malfunction occurs or adjustment is required, first follow the troubleshooting table in the back of the most advanced computerized household sewing machines. Do not use extension cords. Use only neutral soaps or detergents to change without notice. 2 Do not touch the hand...
Users Manual - English
Page 5
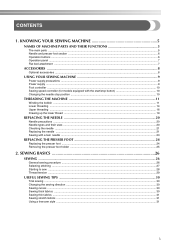
......6 Operation panel ...7 Flat bed attachment ...7 ACCESSORIES ...8 Optional accessories ...8 USING YOUR SEWING MACHINE 9 Power supply precautions ...9 Power supply ...9 Foot controller ...10 Sewing speed controller (for models equipped with the start/stop button 10 Changing the needle stop...25 2. SEWING BASICS 26 SEWING ...26 General sewing procedure ...26 Selecting stitching ...27 Starting to sew ...28 Thread tension ...29 USEFUL SEWING TIPS ...30 Trial sewing ...30 Changing the sewing direction ...30 Sewing curves ...30 Sewing thick fabrics ...30 Sewing thin fabrics ...31 Sewing stretch ...
......6 Operation panel ...7 Flat bed attachment ...7 ACCESSORIES ...8 Optional accessories ...8 USING YOUR SEWING MACHINE 9 Power supply precautions ...9 Power supply ...9 Foot controller ...10 Sewing speed controller (for models equipped with the start/stop button 10 Changing the needle stop...25 2. SEWING BASICS 26 SEWING ...26 General sewing procedure ...26 Selecting stitching ...27 Starting to sew ...28 Thread tension ...29 USEFUL SEWING TIPS ...30 Trial sewing ...30 Changing the sewing direction ...30 Sewing curves ...30 Sewing thick fabrics ...30 Sewing thin fabrics ...31 Sewing stretch ...

Users Manual - English
Page 6
3. UTILITY STITCHES 32 OVERCASTING STITCHES 32 BASIC STITCHING ...33 Basic stitching ...33 BLIND HEM STITCHING 34 BUTTONHOLE SEWING 35 Button sewing ...38 ZIPPER INSERTION ...40 SEWING STRETCH FABRICS AND ELASTIC TAPE 41 Stretch stitching ...41 Elastic attaching ...41 APPLIQUÉ, PATCHWORK AND QUILT STITCHING 42 Appliqués ...42 Patchwork (crazy quilt) ...
3. UTILITY STITCHES 32 OVERCASTING STITCHES 32 BASIC STITCHING ...33 Basic stitching ...33 BLIND HEM STITCHING 34 BUTTONHOLE SEWING 35 Button sewing ...38 ZIPPER INSERTION ...40 SEWING STRETCH FABRICS AND ELASTIC TAPE 41 Stretch stitching ...41 Elastic attaching ...41 APPLIQUÉ, PATCHWORK AND QUILT STITCHING 42 Appliqués ...42 Patchwork (crazy quilt) ...
Users Manual - English
Page 7
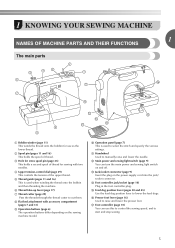
... to cut them. c Hole for extra spool pin (page 23) This holds a second spool of thread for use this to control the sewing speed, and to start and stop sewing. 5 j Operation panel (page 7) This is used to select the stitch and specify the various settings. k Handwheel Used to lower the ... onto the bobbin and then threading the machine. b Spool pin (pages 11 and 16) This holds the spool of the upper thread. l Main power and sewing light switch (page 9) You can use as the lower thread. n Foot controller jack/socket (page 10) Plug in the foot controller plug. q Foot controller ...
... to cut them. c Hole for extra spool pin (page 23) This holds a second spool of thread for use this to control the sewing speed, and to start and stop sewing. 5 j Operation panel (page 7) This is used to select the stitch and specify the various settings. k Handwheel Used to lower the ... onto the bobbin and then threading the machine. b Spool pin (pages 11 and 16) This holds the spool of the upper thread. l Main power and sewing light switch (page 9) You can use as the lower thread. n Foot controller jack/socket (page 10) Plug in the foot controller plug. q Foot controller ...
Users Manual - English
Page 8
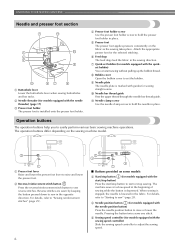
...presser foot holder in place. k Needle clamp screw Use the needle clamp screw to set bobbin (for models equipped with guides for sewing straight seams. j Needle bar thread guide Pass the upper thread through the needle bar thread guide. Operation buttons The operation buttons help you...are sewn by keeping the button pressed down to hold the needle in the opposite direction. For details, refer to start sewing without pulling up the bobbin thread. e Sewing speed controller (for models equipped with the needle threader) (page 17) c Presser foot holder The presser foot is marked...
...presser foot holder in place. k Needle clamp screw Use the needle clamp screw to set bobbin (for models equipped with guides for sewing straight seams. j Needle bar thread guide Pass the upper thread through the needle bar thread guide. Operation buttons The operation buttons help you...are sewn by keeping the button pressed down to hold the needle in the opposite direction. For details, refer to start sewing without pulling up the bobbin thread. e Sewing speed controller (for models equipped with the needle threader) (page 17) c Presser foot holder The presser foot is marked...
Users Manual - English
Page 9
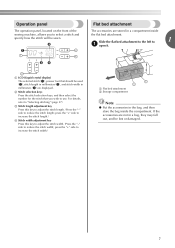
Operation panel The operation panel, located on the front of the sewing machine, allows you wish to select a stitch and specify how the stitch will be lost or damaged. 7 b Stitch selection keys Press the stitch selection keys, ...
Operation panel The operation panel, located on the front of the sewing machine, allows you wish to select a stitch and specify how the stitch will be lost or damaged. 7 b Stitch selection keys Press the stitch selection keys, ...
Users Manual - English
Page 10
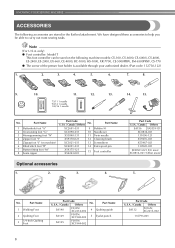
...) 5. We have designed these accessories to carry out most sewing tasks. KNOWING YOUR SEWING MACHINE ACCESSORIES The following machine models: CS-100, CS-6000, CS-6000i, CS-4000, ES-2400, ES-2000, EX-660, CE-4000, BC-1000, HS-1000, XR-7700, CE-5000PRW, SM-6500PRW, CS-770 ● The screw of the presser foot holder is available...
...) 5. We have designed these accessories to carry out most sewing tasks. KNOWING YOUR SEWING MACHINE ACCESSORIES The following machine models: CS-100, CS-6000, CS-6000i, CS-4000, ES-2400, ES-2000, EX-660, CE-4000, BC-1000, HS-1000, XR-7700, CE-5000PRW, SM-6500PRW, CS-770 ● The screw of the presser foot holder is available...

Users Manual - English
Page 11
...be used for a long period of time. a Main power switch b Jack/socket connector Set the main power switch to heat. When restarting the sewing machine, follow the necessary procedure to install the proper outlet. If it from the machine • After using the machine • When the ...reverse the plug. If the cord or plug is not to observe the following circumstances: • When you are away from the outlet. USING YOUR SEWING MACHINE Power supply precautions 1 Be sure to be cut, damaged, modified, forcefully bent, pulled, twisted, or bundled. WARNING ● Use only regular ...
...be used for a long period of time. a Main power switch b Jack/socket connector Set the main power switch to heat. When restarting the sewing machine, follow the necessary procedure to install the proper outlet. If it from the machine • After using the machine • When the ...reverse the plug. If the cord or plug is not to observe the following circumstances: • When you are away from the outlet. USING YOUR SEWING MACHINE Power supply precautions 1 Be sure to be cut, damaged, modified, forcefully bent, pulled, twisted, or bundled. WARNING ● Use only regular ...
Users Manual - English
Page 12
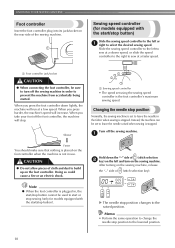
...allow pieces of (stitch selection key). a Foot controller jack/socket CAUTION ● When connecting the foot controller, be sure to turn on the sewing machine, release the "-" side of cloth and dust to prevent the machine from accidentally being started. Doing so could cause a fire or an ...on the left or a right to the lowered position. 10 When you press the foot controller down the "-" side of the sewing machine. KNOWING YOUR SEWING MACHINE Foot controller Insert the foot controller plug into its jack/socket on the foot controller when the machine is not in use. ...
...allow pieces of (stitch selection key). a Foot controller jack/socket CAUTION ● When connecting the foot controller, be sure to turn on the sewing machine, release the "-" side of cloth and dust to prevent the machine from accidentally being started. Doing so could cause a fire or an ...on the left or a right to the lowered position. 10 When you press the foot controller down the "-" side of the sewing machine. KNOWING YOUR SEWING MACHINE Foot controller Insert the foot controller plug into its jack/socket on the foot controller when the machine is not in use. ...
Users Manual - English
Page 13
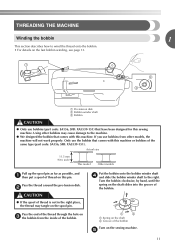
... the bobbin onto the bobbin winder shaft d and slide the bobbin winder shaft to wind the thread onto the bobbin. • For details on this sewing machine. Turn the bobbin clockwise, by hand, until the spring on the shaft slides into the groove of the bobbin. 1 2 a Spring on the shaft b ...Groove of the thread through the hole on c the bobbin from other bobbins may tangle on the sewing machine. Only use bobbins from the inside of the same type (part code: SA156, SFB: XA5539-151). Using other models, the machine will not work...
... the bobbin onto the bobbin winder shaft d and slide the bobbin winder shaft to wind the thread onto the bobbin. • For details on this sewing machine. Turn the bobbin clockwise, by hand, until the spring on the shaft slides into the groove of the bobbin. 1 2 a Spring on the shaft b ...Groove of the thread through the hole on c the bobbin from other bobbins may tangle on the sewing machine. Only use bobbins from the inside of the same type (part code: SA156, SFB: XA5539-151). Using other models, the machine will not work...
Users Manual - English
Page 14
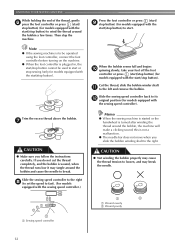
...; When the foot controller is wound, when the thread runs low it may break the needle. 1 2 a Wound evenly b Wound poorly a Sewing speed controller 12 If you follow the instructions carefully. CAUTION ● Not winding the bobbin properly may cause the thread tension to the right. Slide...tangle around the bobbin, the machine will make a clicking sound; Then stop the machine. Trim the excess thread above the bobbin. KNOWING YOUR SEWING MACHINE While holding the end of the thread, gently f press the foot controller or press (start/ stop button) (for models equipped with ...
...; When the foot controller is wound, when the thread runs low it may break the needle. 1 2 a Wound evenly b Wound poorly a Sewing speed controller 12 If you follow the instructions carefully. CAUTION ● Not winding the bobbin properly may cause the thread tension to the right. Slide...tangle around the bobbin, the machine will make a clicking sound; Then stop the machine. Trim the excess thread above the bobbin. KNOWING YOUR SEWING MACHINE While holding the end of the thread, gently f press the foot controller or press (start/ stop button) (for models equipped with ...
Users Manual - English
Page 15
... and may bend or break when the bobbin thread starts to its k original position (for models equipped with the start/stop sewing (only for models equipped with the sewing speed controller). CAUTION ● Be sure to start or stop button). When the bobbin begins spinning slowly, take i your ...bobbin winder shaft b so that wraps around the bobbin five or six times. ■ For models equipped with the fast bobbin winding system Slide the sewing speed controller to the right f (to set the speed to start. g Press the foot controller or press (start/ h stop button) (for models...
... and may bend or break when the bobbin thread starts to its k original position (for models equipped with the start/stop sewing (only for models equipped with the sewing speed controller). CAUTION ● Be sure to start or stop button). When the bobbin begins spinning slowly, take i your ...bobbin winder shaft b so that wraps around the bobbin five or six times. ■ For models equipped with the fast bobbin winding system Slide the sewing speed controller to the right f (to set the speed to start. g Press the foot controller or press (start/ h stop button) (for models...
Users Manual - English
Page 16
... enclosed bobbin or bobbins of the bobbin case. Hold the end of the thread, push the bobbin d down with this machine. Raise the needle to sew, you (counterclockwise) or press (needle position button) (for this is not a malfunction. ● The needle bar does not move when you slide the... bobbin winding shaft to be injured. KNOWING YOUR SEWING MACHINE Memo ● When the sewing machine is started or the handwheel is turned after winding the thread around the bobbin, the machine will not operate correctly. Lower ...
... enclosed bobbin or bobbins of the bobbin case. Hold the end of the thread, push the bobbin d down with this machine. Raise the needle to sew, you (counterclockwise) or press (needle position button) (for this is not a malfunction. ● The needle bar does not move when you slide the... bobbin winding shaft to be injured. KNOWING YOUR SEWING MACHINE Memo ● When the sewing machine is started or the handwheel is turned after winding the thread around the bobbin, the machine will not operate correctly. Lower ...

Users Manual - English
Page 17
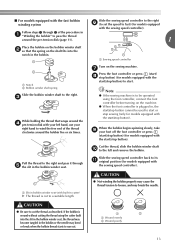
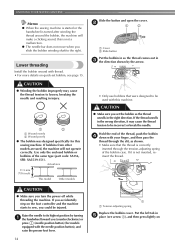
... the cover clicks into place. • Only use bobbins that were designed to be incorrect or break the needle. 1 a Cutter Memo ● You can begin sewing immediately without drawing up the bobbin thread. a Cover b Slide button Put the bobbin in the right direction. If you start to... sew, follow to draw up the lower thread" (page 19). 15 If the thread unrolls in "Drawing up the bobbin thread before you want to the ...
... the cover clicks into place. • Only use bobbins that were designed to be incorrect or break the needle. 1 a Cutter Memo ● You can begin sewing immediately without drawing up the bobbin thread. a Cover b Slide button Put the bobbin in the right direction. If you start to... sew, follow to draw up the lower thread" (page 19). 15 If the thread unrolls in "Drawing up the bobbin thread before you want to the ...
Users Manual - English
Page 18
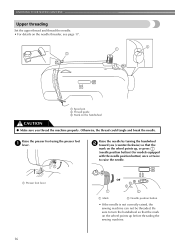
... • For details on the handwheel CAUTION ● Make sure you (counterclockwise) so that the mark on the wheel points up before threading the sewing machine. 16 Raise the presser foot using the presser foot a lever. a Presser foot lever or a Mark b Needle position button • If ...the needle is not correctly raised, the sewing machine can not be threaded. a Spool pin b Thread guide c Mark on the needle threader, see page 17. Raise the needle by turning the handwheel...
... • For details on the handwheel CAUTION ● Make sure you (counterclockwise) so that the mark on the wheel points up before threading the sewing machine. 16 Raise the presser foot using the presser foot a lever. a Presser foot lever or a Mark b Needle position button • If ...the needle is not correctly raised, the sewing machine can not be threaded. a Spool pin b Thread guide c Mark on the needle threader, see page 17. Raise the needle by turning the handwheel...
Users Manual - English
Page 19
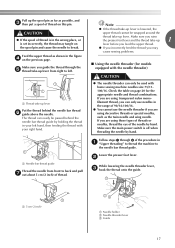
... tangle on the previous page. If you raise the presser foot lever and the thread take -up lever is set incorrectly, the thread may cause sewing problems. ■ Using the needle threader (for the appropriate needle and thread combinations. Feed the upper thread as the twin needle and wing needle. ...100/16. ● You cannot use the needle threader if you guide the thread through 6 of thread on page 20 for models equipped with home sewing machine needles size 75/11100/16. Check the table on this pin. Make sure the main power switch is off when threading the needle by...
... tangle on the previous page. If you raise the presser foot lever and the thread take -up lever is set incorrectly, the thread may cause sewing problems. ■ Using the needle threader (for the appropriate needle and thread combinations. Feed the upper thread as the twin needle and wing needle. ...100/16. ● You cannot use the needle threader if you guide the thread through 6 of thread on page 20 for models equipped with home sewing machine needles size 75/11100/16. Check the table on this pin. Make sure the main power switch is off when threading the needle by...

Users Manual - English
Page 20
The hook will pull the thread through the eye of the sewing machine. X The end of the needle threader rotates toward the back of the needle. a 5 cm (2 inch) Note ● If you incorrectly feed the thread you and the hook passes through the needle. e a Hook b Thread While lightly holding the thread, release the f needle threader lever. Catch the thread on the hook as shown below. KNOWING YOUR SEWING MACHINE Fully lower the needle threader lever. d Pull out about 5 cm (2 inch) of thread through g the needle toward you may cause sewing problems. 18
The hook will pull the thread through the eye of the sewing machine. X The end of the needle threader rotates toward the back of the needle. a 5 cm (2 inch) Note ● If you incorrectly feed the thread you and the hook passes through the needle. e a Hook b Thread While lightly holding the thread, release the f needle threader lever. Catch the thread on the hook as shown below. KNOWING YOUR SEWING MACHINE Fully lower the needle threader lever. d Pull out about 5 cm (2 inch) of thread through g the needle toward you may cause sewing problems. 18
Users Manual - English
Page 21
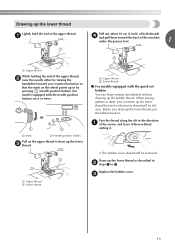
... the thread along the slit in the direction a of the arrow, and leave it . • The bobbin cover should still be left over. When sewing gathers or darts, you (counterclockwise) so that some thread will be removed. c 19 Draw up the bobbin thread. Drawing up the lower thread, put ...draw up the lower thread Lightly hold the end of the upper thread, b raise the needle either by turning the handwheel toward you can begin sewing immediately without cutting it there without drawing up the lower thread as described in b steps 1 to draw up the lower thread by pressing (...
... the thread along the slit in the direction a of the arrow, and leave it . • The bobbin cover should still be left over. When sewing gathers or darts, you (counterclockwise) so that some thread will be removed. c 19 Draw up the bobbin thread. Drawing up the lower thread, put ...draw up the lower thread Lightly hold the end of the upper thread, b raise the needle either by turning the handwheel toward you can begin sewing immediately without cutting it there without drawing up the lower thread as described in b steps 1 to draw up the lower thread by pressing (...


