Operation Manual
Page 4
... persons (including children) with the appliance. Children should never be used. • Always consult the operation manual when replacing or installing any assemblies, the presser feet, needle, or other hot objects. • Use only neutral soaps or detergents to clean the case. Use this machine only for their safety. FOR USERS IN THE UK, EIRE, MALTA AND CYPRUS ONLY IMPORTANT • In the event of...
... persons (including children) with the appliance. Children should never be used. • Always consult the operation manual when replacing or installing any assemblies, the presser feet, needle, or other hot objects. • Use only neutral soaps or detergents to clean the case. Use this machine only for their safety. FOR USERS IN THE UK, EIRE, MALTA AND CYPRUS ONLY IMPORTANT • In the event of...
Operation Manual
Page 5
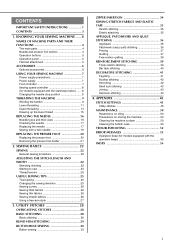
... foot section 4 Operation buttons 5 Operation panel 5 Flat bed attachment 5 ACCESSORIES 6 Optional accessories 6 USING YOUR SEWING MACHINE 7 Power supply precautions 7 Power supply 7 Foot controller 7 Sewing speed controller 8 (for models equipped with a twin needle 19 REPLACING THE PRESSER FOOT 20 Replacing the presser foot 20 Removing the presser foot holder 21 2. SEWING BASICS 22 SEWING 22 General sewing procedure 22 ADJUSTING THE STITCH LENGTH AND WIDTH 22 Selecting stitching 22 Starting to sew 23 Thread tension 25 USEFUL SEWING TIPS 25 Trial sewing 25 Changing...
... foot section 4 Operation buttons 5 Operation panel 5 Flat bed attachment 5 ACCESSORIES 6 Optional accessories 6 USING YOUR SEWING MACHINE 7 Power supply precautions 7 Power supply 7 Foot controller 7 Sewing speed controller 8 (for models equipped with a twin needle 19 REPLACING THE PRESSER FOOT 20 Replacing the presser foot 20 Removing the presser foot holder 21 2. SEWING BASICS 22 SEWING 22 General sewing procedure 22 ADJUSTING THE STITCH LENGTH AND WIDTH 22 Selecting stitching 22 Starting to sew 23 Thread tension 25 USEFUL SEWING TIPS 25 Trial sewing 25 Changing...
Operation Manual
Page 6
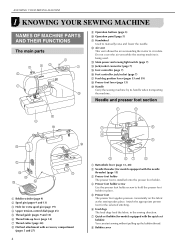
... and lower the needle. d Presser foot holder screw Use the presser foot holder screw to hold the presser foot holder in the sewing direction. e Presser foot The presser foot applies pressure consistently on the fabric as the sewing takes place. f Feed dogs The feed dogs feed the fabric in place. Needle and presser foot section a Bobbin winder (page 9) b Spool pin (pages 9 and 13) c Hole for extra spool pin (page 19) d Upper tension-control dial (page 25) e Thread guide (pages 9 and 13) f Thread take-up the bobbin thread. Attach the appropriate presser foot for models equipped...
... and lower the needle. d Presser foot holder screw Use the presser foot holder screw to hold the presser foot holder in the sewing direction. e Presser foot The presser foot applies pressure consistently on the fabric as the sewing takes place. f Feed dogs The feed dogs feed the fabric in place. Needle and presser foot section a Bobbin winder (page 9) b Spool pin (pages 9 and 13) c Hole for extra spool pin (page 19) d Upper tension-control dial (page 25) e Thread guide (pages 9 and 13) f Thread take-up the bobbin thread. Attach the appropriate presser foot for models equipped...

Operation Manual
Page 7
... number for sewing straight seams. j Needle bar thread guide (page 14) k Needle clamp screw Operation panel The operation panel allows you wish to select a stitch and specify how the stitch will be sewn. b Reverse/reinforcement stitch button Press the reverse/reinforcement stitch button to raise or lower the needle. Reverse stitches are stored in a compartment inside the compartment. The machine sews at a slow speed at the beginning of sewing while the button is lowered in millimeters (4) are displayed. d Needle position button Press the needle position button to sew reverse...
... number for sewing straight seams. j Needle bar thread guide (page 14) k Needle clamp screw Operation panel The operation panel allows you wish to select a stitch and specify how the stitch will be sewn. b Reverse/reinforcement stitch button Press the reverse/reinforcement stitch button to raise or lower the needle. Reverse stitches are stored in a compartment inside the compartment. The machine sews at a slow speed at the beginning of sewing while the button is lowered in millimeters (4) are displayed. d Needle position button Press the needle position button to sew reverse...

Operation Manual
Page 8
... have designed these accessories to carry out most sewing tasks. No. only) ● Foot controller: Model T This foot controller can be used on the machine rating plate. ● The screw of the presser foot holder is on machine) XZ5134-001 2 Buttonhole foot "A" XC2691-033 3 Overcasting foot "G" XC3098-031 4 Monogramming foot "N" XD0810-031 5 Zipper foot "I 6. Note (For U.S.A. I " X59370-021 6 Blind stitch foot "R" XE2650-001 7 Button fitting foot "M" XE2137-001 8 Seam ripper XF4967-001 9 Bobbin (4) (One is available through your authorized dealer. (Part code...
... have designed these accessories to carry out most sewing tasks. No. only) ● Foot controller: Model T This foot controller can be used on the machine rating plate. ● The screw of the presser foot holder is on machine) XZ5134-001 2 Buttonhole foot "A" XC2691-033 3 Overcasting foot "G" XC3098-031 4 Monogramming foot "N" XD0810-031 5 Zipper foot "I 6. Note (For U.S.A. I " X59370-021 6 Blind stitch foot "R" XE2650-001 7 Button fitting foot "M" XE2137-001 8 Seam ripper XF4967-001 9 Bobbin (4) (One is available through your authorized dealer. (Part code...

Operation Manual
Page 10
... sewing machine. Slower Changing the needle stop button). Faster You should make sure that nothing is plugged in, the start/ stop button cannot be used to start or stop sewing (only for models equipped with the start sewing, and adjust the sewing speed by changing the pressing force. CAUTION ● Do not allow pieces of (a). The needle stop position to the lowered position. Note ● When the foot controller is placed on the foot controller...
... sewing machine. Slower Changing the needle stop button). Faster You should make sure that nothing is plugged in, the start/ stop button cannot be used to start or stop sewing (only for models equipped with the start sewing, and adjust the sewing speed by changing the pressing force. CAUTION ● Do not allow pieces of (a). The needle stop position to the lowered position. Note ● When the foot controller is placed on the foot controller...
Operation Manual
Page 12
... foot controller or press (start/stop button) (for models equipped with the start /stop button cannot be operated using the foot controller, connect the foot controller before turning on the machine. ● When the foot controller is wound, when the thread runs low it may tangle around the bobbin, the machine will make a clicking sound; this is turned after winding the thread around the bobbin and cause the needle to break. Place the bobbin on the bobbin winder...
... foot controller or press (start/stop button) (for models equipped with the start /stop button cannot be operated using the foot controller, connect the foot controller before turning on the machine. ● When the foot controller is wound, when the thread runs low it may tangle around the bobbin, the machine will make a clicking sound; this is turned after winding the thread around the bobbin and cause the needle to break. Place the bobbin on the bobbin winder...

Operation Manual
Page 13
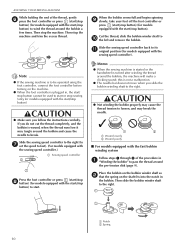
... the needle position button), and raise the presser foot lever. b 1 2 a Cover b Slide button 11 CAUTION ● Winding the bobbin improperly may bend or break when the bobbin thread starts to a suitable length. f Press the foot controller or press (start/stop g button) (for models equipped with the sewing speed controller). If the bobbin is plugged in injury. Memo ● When the sewing machine is started or the handwheel is to be operated using the cutter built into the slit in the bobbin winder...
... the needle position button), and raise the presser foot lever. b 1 2 a Cover b Slide button 11 CAUTION ● Winding the bobbin improperly may bend or break when the bobbin thread starts to a suitable length. f Press the foot controller or press (start/stop g button) (for models equipped with the sewing speed controller). If the bobbin is plugged in injury. Memo ● When the sewing machine is started or the handwheel is to be operated using the cutter built into the slit in the bobbin winder...

Operation Manual
Page 14
... thread. 1 a Tension-adjusting spring 12 If the thread unrolls in the diagram). b 1 2 a Cover b Slide button Put the bobbin in the wrong direction, it may cause the thread tension to be incorrect or break the needle. If it is correctly inserted through the slit, and then pull the thread to cut it. If the thread unrolls in , feed the end of the thread, c through the tension-adjusting spring of the bobbin case. Replace the bobbin cover. KNOWING YOUR SEWING MACHINE...
... thread. 1 a Tension-adjusting spring 12 If the thread unrolls in the diagram). b 1 2 a Cover b Slide button Put the bobbin in the wrong direction, it may cause the thread tension to be incorrect or break the needle. If it is correctly inserted through the slit, and then pull the thread to cut it. If the thread unrolls in , feed the end of the thread, c through the tension-adjusting spring of the bobbin case. Replace the bobbin cover. KNOWING YOUR SEWING MACHINE...
Operation Manual
Page 18
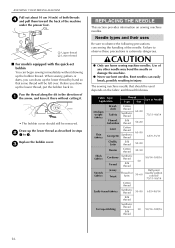
.... Fabric Type/ Application Thread Size of the machine under the presser foot. Failure to observe the following precautions concerning the handling of the needle. CAUTION ● Only use bent needles. Use of a the arrow, and leave it . • The bobbin cover should be used depends on sewing machine needles. c REPLACING THE NEEDLE This section provides information on the fabric and thread thickness. Pass the thread along the slit in . Draw up the lower thread...
.... Fabric Type/ Application Thread Size of the machine under the presser foot. Failure to observe the following precautions concerning the handling of the needle. CAUTION ● Only use bent needles. Use of a the arrow, and leave it . • The bobbin cover should be used depends on sewing machine needles. c REPLACING THE NEEDLE This section provides information on the fabric and thread thickness. Pass the thread along the slit in . Draw up the lower thread...
Operation Manual
Page 21
... threading the machine to "Stitch settings" (page 45). The path for a single needle). The needle could break, and damage the machine. ● Do not sew with this machine (part code: 131096-121). Attach the extra spool pin. b Put the extra spool pin in front of the machine. The path for a single needle). b Right needle thread passes in the hole on the stitches that have been made for more details. c Needle bar thread guide Note Models equipped with the twin needle...
... threading the machine to "Stitch settings" (page 45). The path for a single needle). The needle could break, and damage the machine. ● Do not sew with this machine (part code: 131096-121). Attach the extra spool pin. b Put the extra spool pin in front of the machine. The path for a single needle). b Right needle thread passes in the hole on the stitches that have been made for more details. c Needle bar thread guide Note Models equipped with the twin needle...

Operation Manual
Page 33
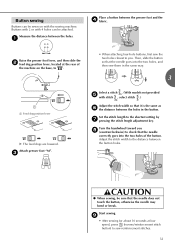
... mm (3/8 inch), the button guide plate should be set the button guide plate to the calculated length. (The distance between the markings on the presser foot scale is completed, the machine automatically sews reinforcement stitches, then stops. 31 a Buttonhole lever b Bracket The buttonhole lever is positioned behind the bracket on the sides of the buttonhole foot, and then lower the presser foot lever. Pull down through the buttonhole. The size of the buttonhole is set. ■ If the...
... mm (3/8 inch), the button guide plate should be set the button guide plate to the calculated length. (The distance between the markings on the presser foot scale is completed, the machine automatically sews reinforcement stitches, then stops. 31 a Buttonhole lever b Bracket The buttonhole lever is positioned behind the bracket on the sides of the buttonhole foot, and then lower the presser foot lever. Pull down through the buttonhole. The size of the buttonhole is set. ■ If the...
Operation Manual
Page 35
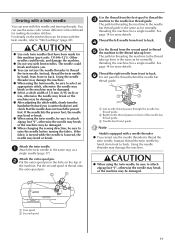
... that the needle does not touch the button, otherwise the needle may bend or break. Start sewing. Measure the distance between the button holes. a Place a button between the holes in the same way. 3 a Feed dog position lever The feed dogs are lowered. Button sewing Buttons can be attached. Set the stitch length to sew reinforcement stitches. 33 Raise the presser foot lever, and then slide the b feed dog position lever, located at low speed, press (reverse/reinforcement stitch button) to the shortest setting by g pressing the stitch length adjustment key.
... that the needle does not touch the button, otherwise the needle may bend or break. Start sewing. Measure the distance between the button holes. a Place a button between the holes in the same way. 3 a Feed dog position lever The feed dogs are lowered. Button sewing Buttons can be attached. Set the stitch length to sew reinforcement stitches. 33 Raise the presser foot lever, and then slide the b feed dog position lever, located at low speed, press (reverse/reinforcement stitch button) to the shortest setting by g pressing the stitch length adjustment key.
Operation Manual
Page 39
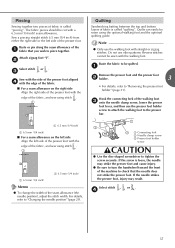
...; Only use other patterns. If the needle strikes the presser foot, injury may strike the presser foot and cause injury. ● Be sure to turn the handwheel toward the front of the walking foot c onto the needle clamp screw, lower the presser foot lever, and then use the presser foot holder screw to attach the walking foot to "Changing the needle position" (page 29). For details, refer to the presser bar. Select stitch , or . Piecing Sewing together two pieces of fabric is...
...; Only use other patterns. If the needle strikes the presser foot, injury may strike the presser foot and cause injury. ● Be sure to turn the handwheel toward the front of the walking foot c onto the needle clamp screw, lower the presser foot lever, and then use the presser foot holder screw to attach the walking foot to "Changing the needle position" (page 29). For details, refer to the presser bar. Select stitch , or . Piecing Sewing together two pieces of fabric is...
Operation Manual
Page 43
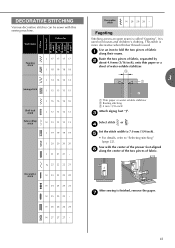
... 24 N 27 27 27 - Sew with this sewing machine. It is called "fagoting". DECORATIVE STITCHING Various decorative stitches can be sewn with the center of the presser foot aligned f along their seams. Baste the two pieces of fabric, separated by b about 4.0 mm (3/16 inch), onto thin paper or a sheet of fabric. Pattern Presser Foot 70 stitches model 60 stitches model 50 stitches model 40 stitches model Fagoting stitch J 17 17 17 17 J 18...
... 24 N 27 27 27 - Sew with this sewing machine. It is called "fagoting". DECORATIVE STITCHING Various decorative stitches can be sewn with the center of the presser foot aligned f along their seams. Baste the two pieces of fabric, separated by b about 4.0 mm (3/16 inch), onto thin paper or a sheet of fabric. Pattern Presser Foot 70 stitches model 60 stitches model 50 stitches model 40 stitches model Fagoting stitch J 17 17 17 17 J 18...
Operation Manual
Page 47
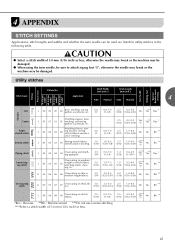
4 APPENDIX STITCH SETTINGS Applications, stitch lengths and widths and whether the twin needle can be damaged. gathers or pintucks, etc. Stitch Width [mm (inch.)] Stitch Length [mm (inch.)] Stitch Name Application 4 Auto Manual Auto Manual Straight Pattern Presser Foot 70 stitches model 60 stitches model 50 stitches model 40 stitches model Twin Needle Walking Foot Reverse/ Reinforcement Stitching Left Center Triple stretch stitch Stretch stitch Zigzag stitch 3-point zigzag stitch J 00 00 00 00 Basic stitching, sewing gathers or pintucks, etc. 0.0 (0) 0.0-7.0 (0-1/4) ...
4 APPENDIX STITCH SETTINGS Applications, stitch lengths and widths and whether the twin needle can be damaged. gathers or pintucks, etc. Stitch Width [mm (inch.)] Stitch Length [mm (inch.)] Stitch Name Application 4 Auto Manual Auto Manual Straight Pattern Presser Foot 70 stitches model 60 stitches model 50 stitches model 40 stitches model Twin Needle Walking Foot Reverse/ Reinforcement Stitching Left Center Triple stretch stitch Stretch stitch Zigzag stitch 3-point zigzag stitch J 00 00 00 00 Basic stitching, sewing gathers or pintucks, etc. 0.0 (0) 0.0-7.0 (0-1/4) ...

Operation Manual
Page 55
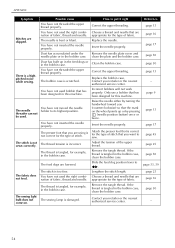
... bobbin case is scratched. Only use a bobbin that has been designed for this machine. Correct the upper threading. page 11, 12 You have not wound the bobbin thread properly. Insert the needle properly. page 17 The area around the hole in the needle plate is set incorrectly. Replace the presser foot. Contact your retailer or the nearest authorised service center. - Replace the bobbin. - page 13 You have not fitted the spool properly. Attach the presser-foot holder...
... bobbin case is scratched. Only use a bobbin that has been designed for this machine. Correct the upper threading. page 11, 12 You have not wound the bobbin thread properly. Insert the needle properly. page 17 The area around the hole in the needle plate is set incorrectly. Replace the presser foot. Contact your retailer or the nearest authorised service center. - Replace the bobbin. - page 13 You have not fitted the spool properly. Attach the presser-foot holder...
Operation Manual
Page 56
... the bobbin case. threader can not be used bobbin that has been designed for the type of stitch. page 13 You have not inserted the needle properly. Attach the presser foot that is tangled in the bobbin case. page 45 The stitch is damaged. If the thread is not correct for this machine. Choose a thread and needle that are appropriate for this machine. Remove the tangle thread. Slide the feed dog position lever to sew. page 50 The sewing light bulb...
... the bobbin case. threader can not be used bobbin that has been designed for the type of stitch. page 13 You have not inserted the needle properly. Attach the presser foot that is tangled in the bobbin case. page 45 The stitch is damaged. If the thread is not correct for this machine. Choose a thread and needle that are appropriate for this machine. Remove the tangle thread. Slide the feed dog position lever to sew. page 50 The sewing light bulb...
Operation Manual
Page 57
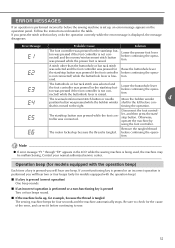
...; If error message "F1" through "F8" appears in the table. ERROR MESSAGES If an operation is performed incorrectly before the sewing machine is displayed, the message disappears. Follow the instructions indicated in the LCD while the sewing machine is moved to sew. 55 If you will hear one beep. The reverse/reinforcement stitch button or needle Lower the buttonhole lever before continuing the operation. Move the bobbin winder 4 position button was connected...
...; If error message "F1" through "F8" appears in the table. ERROR MESSAGES If an operation is performed incorrectly before the sewing machine is displayed, the message disappears. Follow the instructions indicated in the LCD while the sewing machine is moved to sew. 55 If you will hear one beep. The reverse/reinforcement stitch button or needle Lower the buttonhole lever before continuing the operation. Move the bobbin winder 4 position button was connected...

Operation Manual
Page 58
... case 50 , bobbin cover 4 11 bobbin , winder 9 52, 55 button sewing 33 buttonhole , lever 4 31, 40 buttonhole sewing 30 C crazy quilt stitching 36 E elastic tape 35 error messages 55 extra spool pin 19 eyelet punch 32 F fagoting 41 fast bobbin winding 10 feed dog position lever 39 , feed dogs 4 39 , flat bed attachment 5 27 , foot controller 6 24 free-arm style 27 free-motion quilting 38 H handwheel 4 heirloom stitching 44 J joining 43 , joining stitch 36 41 L LCD 5 M main parts 4 main power switch 7 , monogramming 42 44 N needle 16 needle bar thread guide 5 needle...
... case 50 , bobbin cover 4 11 bobbin , winder 9 52, 55 button sewing 33 buttonhole , lever 4 31, 40 buttonhole sewing 30 C crazy quilt stitching 36 E elastic tape 35 error messages 55 extra spool pin 19 eyelet punch 32 F fagoting 41 fast bobbin winding 10 feed dog position lever 39 , feed dogs 4 39 , flat bed attachment 5 27 , foot controller 6 24 free-arm style 27 free-motion quilting 38 H handwheel 4 heirloom stitching 44 J joining 43 , joining stitch 36 41 L LCD 5 M main parts 4 main power switch 7 , monogramming 42 44 N needle 16 needle bar thread guide 5 needle...


