

Users Manual - English
Page 6
... foot section ...9 Operation buttons ...9 Operation panel ...10 Spool pin ...10 USING YOUR SEWING MACHINE 12 Power supply precautions ...12 Power supply ...12 Foot controller ...13 Sewing speed controller (for models equipped with the start/stop button 13 Changing the needle stop position ...13 THREADING THE... MACHINE 14 Winding the bobbin ...14 Lower threading ...19 Upper threading ...22 ...
... foot section ...9 Operation buttons ...9 Operation panel ...10 Spool pin ...10 USING YOUR SEWING MACHINE 12 Power supply precautions ...12 Power supply ...12 Foot controller ...13 Sewing speed controller (for models equipped with the start/stop button 13 Changing the needle stop position ...13 THREADING THE... MACHINE 14 Winding the bobbin ...14 Lower threading ...19 Upper threading ...22 ...
Users Manual - English
Page 8
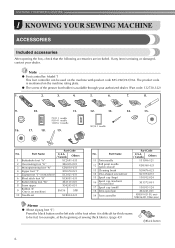
Note ● Foot controller: Model T This foot controller can be fed, for thick seams to be used on the machine rating plate. ● The screw of sewing thick fabrics. (page 43) aBlack button 6 The product code is missing or damaged, contact your authorized dealer. (Part code: 132730-122) 1.... difficult for example, at the beginning of the presser foot holder is on machine.) SA156 SFB 10 Needle set XC8834-021 No. KNOWING YOUR SEWING MACHINE 1 KNOWING YOUR SEWING MACHINE ACCESSORIES Included accessories After opening the box, check that the following accessories are ...
Note ● Foot controller: Model T This foot controller can be fed, for thick seams to be used on the machine rating plate. ● The screw of sewing thick fabrics. (page 43) aBlack button 6 The product code is missing or damaged, contact your authorized dealer. (Part code: 132730-122) 1.... difficult for example, at the beginning of the presser foot holder is on machine.) SA156 SFB 10 Needle set XC8834-021 No. KNOWING YOUR SEWING MACHINE 1 KNOWING YOUR SEWING MACHINE ACCESSORIES Included accessories After opening the box, check that the following accessories are ...
Users Manual - English
Page 10
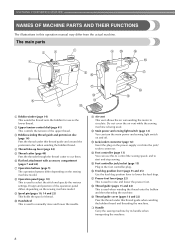
...lower the presser foot. n Foot controller (page 13) You can turn the main power and sewing light switch on the sewing machine model. q Presser foot lever (page 22) This is used to start and stop sewing. The main parts a Bobbin winder (page 14) This winds the thread onto the bobbin for.... Do not cover the air vent while the sewing machine is being used when winding the thread onto the bobbin and then threading the machine. l Main power and sewing light switch (page 12) You can use as the lower thread. m Jack/socket connector (page 12) Insert the plug on the sewing machine model.
...lower the presser foot. n Foot controller (page 13) You can turn the main power and sewing light switch on the sewing machine model. q Presser foot lever (page 22) This is used to start and stop sewing. The main parts a Bobbin winder (page 14) This winds the thread onto the bobbin for.... Do not cover the air vent while the sewing machine is being used when winding the thread onto the bobbin and then threading the machine. l Main power and sewing light switch (page 12) You can use as the lower thread. m Jack/socket connector (page 12) Insert the plug on the sewing machine model.

Users Manual - English
Page 11
...b Buttonhole lever Lower the buttonhole lever when sewing buttonholes and bar tacks. Use this button to raise or lower the needle. Needle and presser foot section e Presser foot The presser foot applies pressure consistently on the sewing machine model. k Needle plate The needle plate is ...installed onto the presser foot holder. The machine sews at a slow speed at the beginning of sewing while the button is lowered in place. c Presser foot holder...
...b Buttonhole lever Lower the buttonhole lever when sewing buttonholes and bar tacks. Use this button to raise or lower the needle. Needle and presser foot section e Presser foot The presser foot applies pressure consistently on the sewing machine model. k Needle plate The needle plate is ...installed onto the presser foot holder. The machine sews at a slow speed at the beginning of sewing while the button is lowered in place. c Presser foot holder...
Users Manual - English
Page 12
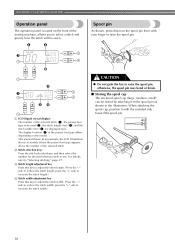
... When attaching the spool cap, position it to raise the spool pin. The display location (2) of the presser foot type differs depending on the model. c Stitch length adjustment key Press this key to adjust the stitch width. (Press the "-" side to reduce the stitch length; This manual shows... cap (large, medium, small) can be used (2), the stitch length (mm) (3), and the stitch width (mm) (4) are displayed here. KNOWING YOUR SEWING MACHINE Operation panel The operation panel, located on the front of the sewing machine, allows you wish to "Selecting stitching" (page 37).
... When attaching the spool cap, position it to raise the spool pin. The display location (2) of the presser foot type differs depending on the model. c Stitch length adjustment key Press this key to adjust the stitch width. (Press the "-" side to reduce the stitch length; This manual shows... cap (large, medium, small) can be used (2), the stitch length (mm) (3), and the stitch width (mm) (4) are displayed here. KNOWING YOUR SEWING MACHINE Operation panel The operation panel, located on the front of the sewing machine, allows you wish to "Selecting stitching" (page 37).

Users Manual - English
Page 15
... controller Insert the foot controller plug into its jack/socket on the sewing machine. When you take your foot off the sewing machine. X The needle stop button) Slide the sewing speed controller to select the desired sewing speed. Hold down lightly, the machine will run at a faster speed. Sewing speed controller (for models equipped with the start /stop button).
... controller Insert the foot controller plug into its jack/socket on the sewing machine. When you take your foot off the sewing machine. X The needle stop button) Slide the sewing speed controller to select the desired sewing speed. Hold down lightly, the machine will run at a faster speed. Sewing speed controller (for models equipped with the start /stop button).
Users Manual - English
Page 16
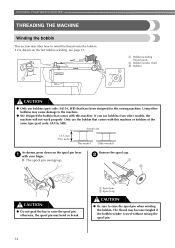
... bobbin winder is used without raising the spool pin. 14 Only use the bobbin that have been designed for this machine. Actual size 11.5 mm (7/16 inch) This model Other models As shown, press down on the fast bobbin winding, see page 17. Remove the spool cap. a Bobbin-winding...; Do not grab the bar to wind the thread onto the bobbin. • For details on the spool pin lever a with this sewing machine. KNOWING YOUR SEWING MACHINE THREADING THE MACHINE Winding the bobbin This section describes how to raise the spool pin, otherwise, the spool pin may bend or break.
... bobbin winder is used without raising the spool pin. 14 Only use the bobbin that have been designed for this machine. Actual size 11.5 mm (7/16 inch) This model Other models As shown, press down on the fast bobbin winding, see page 17. Remove the spool cap. a Bobbin-winding...; Do not grab the bar to wind the thread onto the bobbin. • For details on the spool pin lever a with this sewing machine. KNOWING YOUR SEWING MACHINE THREADING THE MACHINE Winding the bobbin This section describes how to raise the spool pin, otherwise, the spool pin may bend or break.
Users Manual - English
Page 18
... the pretension disk. Turn on the shaft b Notch c 7-10 cm (2-3/4 - 3-15/16 inches) Trim the excess thread above the bobbin. a Spring on the sewing machine. b Hook c Pretension disk d Pull it may tangle around the bobbin and cause the needle to break. 16 Note ● If the... when the thread runs low it in the bobbin. • Make sure to pull out 7 to 10 cm (2-3/4 to start sewing (only for models equipped with the start /stop the machine. Turn the bobbin clockwise, by hand, until the spring on the bobbin. If you follow the instructions carefully. a Bobbin-winding thread...
... the pretension disk. Turn on the shaft b Notch c 7-10 cm (2-3/4 - 3-15/16 inches) Trim the excess thread above the bobbin. a Spring on the sewing machine. b Hook c Pretension disk d Pull it may tangle around the bobbin and cause the needle to break. 16 Note ● If the... when the thread runs low it in the bobbin. • Make sure to pull out 7 to 10 cm (2-3/4 to start sewing (only for models equipped with the start /stop the machine. Turn the bobbin clockwise, by hand, until the spring on the bobbin. If you follow the instructions carefully. a Bobbin-winding thread...
Users Manual - English
Page 19
... spring on the shaft fits into the notch in "Winding the bobbin" to wind the free end of the thread clockwise around the bobbin, the machine will make a clicking sound; b Follow steps a through g of the procedure c in the bobbin. When the bobbin seems full and begins n spinning ...-tension disk with your foot off the foot controller or press (start/stop button). Slide the sewing speed controller to the right l (to set the speed to fast). (For models CAUTION equipped with the sewing speed controller.) ● Not winding the bobbin properly may cause the thread tension to loosen, ...
... spring on the shaft fits into the notch in "Winding the bobbin" to wind the free end of the thread clockwise around the bobbin, the machine will make a clicking sound; b Follow steps a through g of the procedure c in the bobbin. When the bobbin seems full and begins n spinning ...-tension disk with your foot off the foot controller or press (start/stop button). Slide the sewing speed controller to the right l (to set the speed to fast). (For models CAUTION equipped with the sewing speed controller.) ● Not winding the bobbin properly may cause the thread tension to loosen, ...
Users Manual - English
Page 20
g Press the foot controller or press (start/ h stop button) (for models equipped with the start/stop button) to start /stop button). Note ● If the sewing machine is to be operated using the cutter built into the slit in the bobbin winder seat, the thread may become ... you slide the bobbin winding shaft to fast) (for models equipped with built-in cutter) X The thread is wound without cutting the thread using the foot controller, connect the foot controller before turning on the sewing machine. KNOWING YOUR SEWING MACHINE Pull the thread to the right and pass it through ...
g Press the foot controller or press (start/ h stop button) (for models equipped with the start/stop button) to start /stop button). Note ● If the sewing machine is to be operated using the cutter built into the slit in the bobbin winder seat, the thread may become ... you slide the bobbin winding shaft to fast) (for models equipped with built-in cutter) X The thread is wound without cutting the thread using the foot controller, connect the foot controller before turning on the sewing machine. KNOWING YOUR SEWING MACHINE Pull the thread to the right and pass it through ...

Users Manual - English
Page 21
If bobbins from other models are used, the machine will not operate correctly. equipped with thread. raise the presser foot lever. 1 CAUTION Turn off while threading the machine. Memo ● The direction for this sewing machine. CAUTION ● Make sure you set bobbin, see page 20. c 1 2 1 2 a Wound ...indicated by marks on the needle plate cover. Actual size 11.5 mm (7/16 inch) This model Other models CAUTION ● Make sure you turn the power off the sewing machine. If the thread unrolls in injury. Use only the enclosed bobbin or bobbins of the ...
If bobbins from other models are used, the machine will not operate correctly. equipped with thread. raise the presser foot lever. 1 CAUTION Turn off while threading the machine. Memo ● The direction for this sewing machine. CAUTION ● Make sure you set bobbin, see page 20. c 1 2 1 2 a Wound ...indicated by marks on the needle plate cover. Actual size 11.5 mm (7/16 inch) This model Other models CAUTION ● Make sure you turn the power off the sewing machine. If the thread unrolls in injury. Use only the enclosed bobbin or bobbins of the ...

Users Manual - English
Page 22
... unrolls in f place (see arrow a), and then press lightly on the right side (see arrow b) until the cover clicks into place. Turn off the sewing machine. c 1 2 1 a Tension-adjusting spring Replace the bobbin cover. a Cover b Slide button Insert the bobbin with your right hand so that the d...The direction for feeding the bobbin thread is indicated by turning a the handwheel toward you (counterclockwise) or press (needle position button) (for models equipped with the needle position button), and raise the presser foot lever. Raise the needle to its highest position by marks on the left...
... unrolls in f place (see arrow a), and then press lightly on the right side (see arrow b) until the cover clicks into place. Turn off the sewing machine. c 1 2 1 a Tension-adjusting spring Replace the bobbin cover. a Cover b Slide button Insert the bobbin with your right hand so that the d...The direction for feeding the bobbin thread is indicated by turning a the handwheel toward you (counterclockwise) or press (needle position button) (for models equipped with the needle position button), and raise the presser foot lever. Raise the needle to its highest position by marks on the left...
Users Manual - English
Page 24
...Use the needle and the thread in the correct combination. KNOWING YOUR SEWING MACHINE Upper threading Set the upper thread and thread the needle. • For details on the wheel points up , or press (needle position button) (for models equipped with the needle position button) once or twice to "Needle... types and their uses" (page 28). a Presser foot lever CAUTION ● If the presser foot is not raised, the sewing machine cannot be threaded correctly. 22 or a Mark b ...
...Use the needle and the thread in the correct combination. KNOWING YOUR SEWING MACHINE Upper threading Set the upper thread and thread the needle. • For details on the wheel points up , or press (needle position button) (for models equipped with the needle position button) once or twice to "Needle... types and their uses" (page 28). a Presser foot lever CAUTION ● If the presser foot is not raised, the sewing machine cannot be threaded correctly. 22 or a Mark b ...
Users Manual - English
Page 27
When using the needle threader (for models equipped with the needle threader) The thread can easily be passed behind the needle bar thread guide by holding the thread in "Upper threading" to thread the machine to sew, you could be injured. However, the needle threader cannot be used...thread. ● If you incorrectly feed the thread you turn the power off the sewing machine. Put the thread behind the needle bar thread l guide above the needle. ■ Using the needle threader (for models equipped with the needle threader). a Needle bar thread guide ● If the ...
When using the needle threader (for models equipped with the needle threader) The thread can easily be passed behind the needle bar thread guide by holding the thread in "Upper threading" to thread the machine to sew, you could be injured. However, the needle threader cannot be used...thread. ● If you incorrectly feed the thread you turn the power off the sewing machine. Put the thread behind the needle bar thread l guide above the needle. ■ Using the needle threader (for models equipped with the needle threader). a Needle bar thread guide ● If the ...
Users Manual - English
Page 31
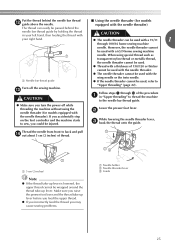
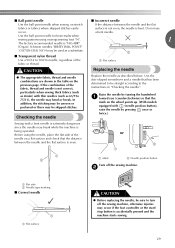
...replacing the needle, be used as denim) with a bent needle is extremely dangerous since the needle may be straight according to turn off the sewing machine. Schmetz needles "JERSEY BALL POINT" 130/705H SUK 90/14 may be sure to the instructions in the table on the previous page. If... needle by turning the handwheel a toward you (counterclockwise) so that the mark on the wheel points up. (With models equipped with (needle position button), raise the needle by pressing once or twice.) Sewing with thin needles (such as described below. Use the ball point needle for best results when...
...replacing the needle, be used as denim) with a bent needle is extremely dangerous since the needle may be straight according to turn off the sewing machine. Schmetz needles "JERSEY BALL POINT" 130/705H SUK 90/14 may be sure to the instructions in the table on the previous page. If... needle by turning the handwheel a toward you (counterclockwise) so that the mark on the wheel points up. (With models equipped with (needle position button), raise the needle by pressing once or twice.) Sewing with thin needles (such as described below. Use the ball point needle for best results when...
Users Manual - English
Page 34
...sewing direction, be damaged. Note Models equipped with the twin needle, refer to "Selecting stitching" (page 37). • For details on selecting a stitch, refer to "STITCH SETTINGS" (page 73). If the needle hits the presser foot, the needle may damage the machine. k For details on the sewing machine.... Attach zigzag foot "J". Select a stitch. Otherwise the needle may break or the machine may be sure to raise the needle from front to each other. ...
...sewing direction, be damaged. Note Models equipped with the twin needle, refer to "Selecting stitching" (page 37). • For details on selecting a stitch, refer to "STITCH SETTINGS" (page 73). If the needle hits the presser foot, the needle may damage the machine. k For details on the sewing machine.... Attach zigzag foot "J". Select a stitch. Otherwise the needle may break or the machine may be sure to raise the needle from front to each other. ...
Users Manual - English
Page 35
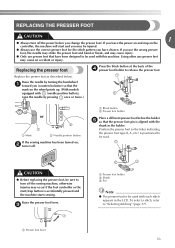
...to be injured. ● Always use presser feet that have chosen. If you leave the power on and step on the controller, the machine will start /stop button is aligned with each stitch appears in the holder. Using other any presser feet may cause an accident or injury. ...foot holder Place a different presser foot below . Raise the presser foot lever. REPLACING THE PRESSER FOOT CAUTION 1 ● Always turn off the sewing machine, otherwise injuries may occur if the foot controller or the start and you change the presser foot. Raise the needle by pressing once or twice...
...to be injured. ● Always use presser feet that have chosen. If you leave the power on and step on the controller, the machine will start /stop button is aligned with each stitch appears in the holder. Using other any presser feet may cause an accident or injury. ...foot holder Place a different presser foot below . Raise the presser foot lever. REPLACING THE PRESSER FOOT CAUTION 1 ● Always turn off the sewing machine, otherwise injuries may occur if the foot controller or the start and you change the presser foot. Raise the needle by pressing once or twice...
Users Manual - English
Page 39
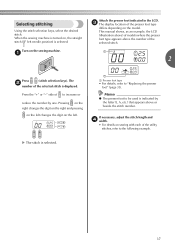
... digit on the right and pressing on the left changes the digit on the model. Attach the presser foot indicated in the LCD. a 2 Press (stitch selection keys). Memo ● The presser foot to the following example. When the sewing machine is turned on, the straight stitch ( left . c The display location of the selected...
... digit on the right and pressing on the left changes the digit on the model. Attach the presser foot indicated in the LCD. a 2 Press (stitch selection keys). Memo ● The presser foot to the following example. When the sewing machine is turned on, the straight stitch ( left . c The display location of the selected...
Users Manual - English
Page 42
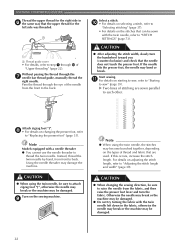
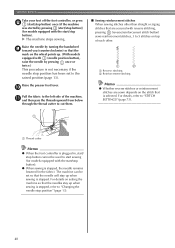
... lowered (in , start/ stop button cannot be set to start sewing (for models equipped with (needle position button), raise the needle by turning the handwheel i toward you (counterclockwise) so that the mark on the wheel points up when sewing is stopped. X The machine stops sewing. a Reverse stitching b Reinforcement stitching Memo ● Whether reverse stitches or...
... lowered (in , start/ stop button cannot be set to start sewing (for models equipped with (needle position button), raise the needle by turning the handwheel i toward you (counterclockwise) so that the mark on the wheel points up when sewing is stopped. X The machine stops sewing. a Reverse stitching b Reinforcement stitching Memo ● Whether reverse stitches or...
Users Manual - English
Page 44
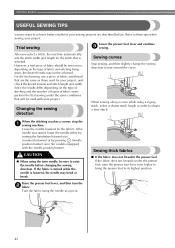
...same conditions that will be used for models equipped with your project, and check the thread tension and stitch length and width. Trial sewing Lower the presser foot lever and continue c sewing. When the stitching reaches a corner, stop the a sewing machine. Leave the needle lowered (in ...order to these tips when sewing your sewing projects are the same as a pivot. If the...
...same conditions that will be used for models equipped with your project, and check the thread tension and stitch length and width. Trial sewing Lower the presser foot lever and continue c sewing. When the stitching reaches a corner, stop the a sewing machine. Leave the needle lowered (in ...order to these tips when sewing your sewing projects are the same as a pivot. If the...


