
Brother International CE-5500PRW Support Question
Brother International CE-5500PRW Support Question
Find answers below for this question about Brother International CE-5500PRW.Need a Brother International CE-5500PRW manual? We have 3 online manuals for this item!
Question posted by sallccyy0 on August 2nd, 2014
Brother Sewing Machine Model Ce5500prw How To Change Light
The person who posted this question about this Brother International product did not include a detailed explanation. Please use the "Request More Information" button to the right if more details would help you to answer this question.
Current Answers
Related Brother International CE-5500PRW Manual Pages
Users Manual - English - Page 1
Computerized Sewing Machine
Operation Manual
Product Code:885-V60/V61/V62
KNOWING YOUR SEWING MACHINE
SEWING BASICS
UTILITY STITCHES
APPENDIX
Please visit us at http://solutions.brother.com where you can get product support and answers to frequently asked questions (FAQs).
Users Manual - English - Page 6

... section ...9 Operation buttons ...9 Operation panel ...10 Spool pin ...10
USING YOUR SEWING MACHINE 12
Power supply precautions ...12 Power supply ...12 Foot controller ...13 Sewing speed controller (for models equipped with the start/stop button 13 Changing the needle stop position ...13
THREADING THE MACHINE 14
Winding the bobbin ...14 Lower threading ...19 Upper threading ...22...
Users Manual - English - Page 8
...)
16
Spool cap (medium) (on machine.)
SA156
SFB
10 Needle set
XC8834-021
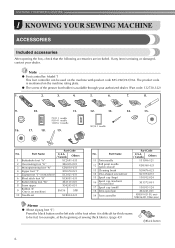
No. KNOWING YOUR SEWING MACHINE
1 KNOWING YOUR SEWING MACHINE
ACCESSORIES
Included accessories
After opening the box,... foot "J" (on the machine with product code 885-V60/V61/V62. Note
● Foot controller: Model T This foot controller can be fed, for thick seams to be used on machine)
XC3021-031
6 Blind...
Users Manual - English - Page 10
... the feed dogs. n Foot controller (page 13) You can turn the main power and sewing light switch on the sewing machine model.
m Jack/socket connector (page 12) Insert the plug on the sewing machine model.
t Handle Carry the sewing machine by its handle when transporting the machine.
8
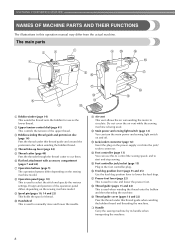
The main parts
a Bobbin winder (page 14) This winds the thread onto the bobbin...
Users Manual - English - Page 11

...presser foot holder. d Sewing speed controller (for models equipped with the sewing speed controller) Slide the sewing speed controller to change the sewing direction or for models equipped with the start/stop button) Press the start/stop sewing. Needle and presser foot section
e Presser foot
The presser foot applies pressure consistently on the sewing machine model. Attach the appropriate...
Users Manual - English - Page 12
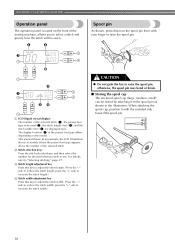
... sewing machine, allows you wish to raise the spool pin. For details, refer to select a stitch and specify how the stitch will be stored by attaching it with your finger to use.
When attaching the spool cap, position it to reduce the stitch length;
Spool pin
As shown, press down on the model...
Users Manual - English - Page 15

... the rear side of (stitch selection
b
key) on the sewing machine. Changing the needle stop button)
Slide the sewing speed controller to the left to
sew at a slower speed, or slide the speed
controller to the right to the lowered position.
13
Hold down lightly, the machine will stop button). Foot controller
Insert the foot controller plug...
Users Manual - English - Page 16
... properly. Only use the bobbin that comes with this machine. Actual size
11.5 mm (7/16 inch)
This model
Other models
As shown, press down on the fast bobbin winding,...14 The thread may cause damage to the machine.
● We designed the bobbin that have been designed for this sewing machine. KNOWING YOUR SEWING MACHINE
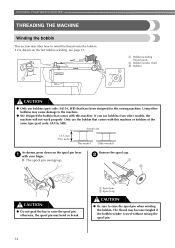
THREADING THE MACHINE
Winding the bobbin
This section describes how ...
Users Manual - English - Page 18
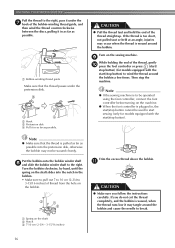
... instructions carefully. Put the bobbin onto the bobbin winder shaft h and slide the bobbin winder shaft to break.
16 KNOWING YOUR SEWING MACHINE
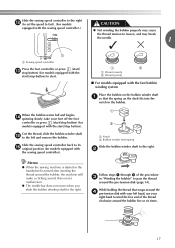
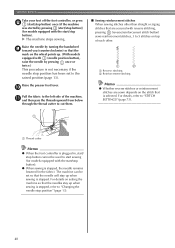
Pull the thread to start sewing (only for models equipped with the start/stop button). CAUTION
● Pull the thread taut and hold the end of the thread straight up. Note...
Users Manual - English - Page 19
...remove the bobbin.
Memo
● When the sewing machine is started or the handwheel is not a ...models equipped with the fast bobbin winding system
Place the bobbin on the bobbin winder shaft a so that wraps around the pre-tension disk (page 14).
Slide the sewing speed controller back to the right. b
Follow steps a through g of the thread clockwise around the bobbin, the machine...
Users Manual - English - Page 20
... thread using the foot controller, connect the foot controller before turning on the sewing machine.
Note
● If the sewing machine is to start sewing (only for models equipped with the sewing speed controller).
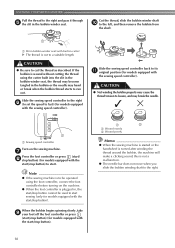
Slide the sewing speed controller back to its k original position (for models equipped
with the
start/stop button) to run out. CAUTION
● Not winding...
Users Manual - English - Page 21

.... b
● Winding the bobbin improperly may cause the thread tension to sew, you turn the power off the sewing machine.
Be sure to loosen, breaking the
needle and resulting in the right direction.
Actual size
11.5 mm (7/16 inch)
This model
Other models
CAUTION
● Make sure you could be incorrect or break the needle...
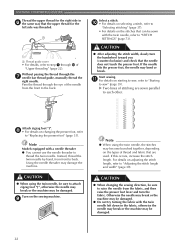
Users Manual - English - Page 22

...the left tab in f place (see arrow a), and then press lightly on
the right side (see arrow b) until the cover clicks into...models equipped with your finger, and then pass the
thread through the slit, as indicated.
Be sure to be incorrect or break the needle.
20 c
1
2
1
a Tension-adjusting spring
Replace the bobbin cover.
Turn off the sewing machine. KNOWING YOUR SEWING MACHINE...
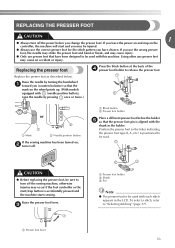
Users Manual - English - Page 24
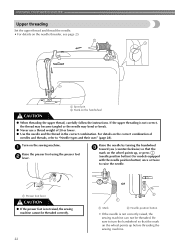
.... a Presser foot lever
CAUTION
● If the presser foot is not raised, the sewing machine cannot be threaded. Be sure to turn the handwheel so that the
mark on the wheel points up , or press (needle position button) (for models equipped with the needle position button) once or twice to "Needle types and...
Users Manual - English - Page 34
... from the front to "STITCH SETTINGS" (page 73). Note
Models equipped with the twin needle, refer to the back. Instead,...this occurs, increase the stitch length.
CAUTION
● When changing the sewing direction, be damaged.
● Do not try turning ... thread guide, manually thread the
right needle. For details on the sewing machine. a Thread guide cover
• For details, refer to
thread...
Users Manual - English - Page 35
... be injured.
● Always use the correct presser foot for the stitch pattern you change the presser foot. Raise the needle by pressing once or twice.)
or
a Mark
b Needle position button
If the sewing machine has been turned on the
controller, the machine will start /stop button is positioned to release the presser foot.
Users Manual - English - Page 39
... the model.
Memo
● The presser foot to "Replacing the presser foot" (page 33).
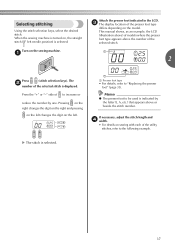
c The display location of the presser foot type
differs depending on the sewing machine. Press...changes the digit on the right and pressing
on the left changes the digit on , the straight stitch ( left needle position) is turned on the left. X The stitch is displayed.
When the sewing machine...
Users Manual - English - Page 42
.... (With models equipped with reverse stitching, pressing (reverse/reinforcement stitch button) sews reinforcement stitches, 3 to cut them.
■ Sewing reinforcement stitches When sewing stitches other . Raise the presser foot lever.
For details on setting the machine so that the
mark on the stitch that the needle will stay up when sewing is stopped, refer to "Changing the...
Users Manual - English - Page 44
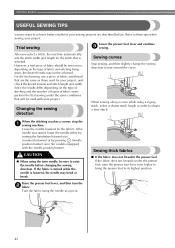
... before changing the sewing direction. Sewing thick fabrics
■ If the fabric does not fit under the presser foot If the fabric does not fit easily under the same conditions that will be achieved. Refer to these tips when sewing your sewing projects are the same as a pivot. When the stitching reaches a corner, stop the a sewing machine...
Users Manual - English - Page 93
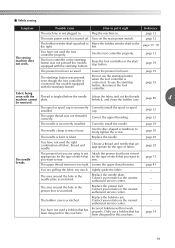
...Correctly install the spool or spool
installed. page 17, 18
The sewing machine does not work properly. You have not used a bobbin that ...page 30
The needle is scratched. page 28
The needle breaks.
Lightly guide the fabric.
- The area around the hole in the ...page 39
Fabric being
sewn with the Thread is connected. (for models equipped with the start/stop button)
Do not use the start ...
Similar Questions

How To Thread Bobbin Brother Ce5500prw Sewing Machine
(Posted by mastAES 9 years ago)

How To Wind The Bobbin On A Ce5500prw Brother Sewing Machine
(Posted by Jayaabu 9 years ago)

Ls2125i Brother Sewing Machine How To Change Light Bulb
(Posted by gsunewli 10 years ago)

How To Sew With Brother Sewing Machine Ce5500prw
(Posted by testycr 10 years ago)
Brother Sewing Machine Model Xl-3510. How To Thread The Bobbin?
I put the bobbin in according to the manual, but when I start sewing, it does not work. The user man...
I put the bobbin in according to the manual, but when I start sewing, it does not work. The user man...
(Posted by msa1234 11 years ago)