

Users Manual - English
Page 6
... ...13 Sewing speed controller (for models equipped with the start/stop button 13 Changing the needle stop position ...13 THREADING THE MACHINE 14 Winding the bobbin ...14 Lower threading ...19 Upper threading ...22 Drawing up the lower thread ...27 REPLACING THE NEEDLE 28 Needle precautions ...28 Needle types and their uses...
... ...13 Sewing speed controller (for models equipped with the start/stop button 13 Changing the needle stop position ...13 THREADING THE MACHINE 14 Winding the bobbin ...14 Lower threading ...19 Upper threading ...22 Drawing up the lower thread ...27 REPLACING THE NEEDLE 28 Needle precautions ...28 Needle types and their uses...

Users Manual - English
Page 7
APPENDIX ...73 STITCH SETTINGS ...73 Utility stitches ...73 MAINTENANCE ...78 Cleaning the machine surface ...78 Cleaning the bobbin case ...78 TROUBLESHOOTING ...81 Frequent troubleshooting topics ...81 Upper thread tightened up ...81 Tangled thread on wrong side of fabric ...82 Incorrect thread tension ...85 ...
APPENDIX ...73 STITCH SETTINGS ...73 Utility stitches ...73 MAINTENANCE ...78 Cleaning the machine surface ...78 Cleaning the bobbin case ...78 TROUBLESHOOTING ...81 Frequent troubleshooting topics ...81 Upper thread tightened up ...81 Tangled thread on wrong side of fabric ...82 Incorrect thread tension ...85 ...
Users Manual - English
Page 8
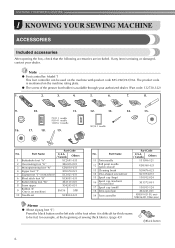
... 43) aBlack button 6 Press the black button on machine) XC3021-031 6 Blind stitch foot "R" XC4051-031 7 Button fitting foot "M" XE2137-001 8 Seam ripper X54243-051 9 Bobbin (4) (One is available through your dealer. Note ● Foot controller: Model T This foot controller can be fed, for thick seams to be used on the...
... 43) aBlack button 6 Press the black button on machine) XC3021-031 6 Blind stitch foot "R" XC4051-031 7 Button fitting foot "M" XE2137-001 8 Seam ripper X54243-051 9 Bobbin (4) (One is available through your dealer. Note ● Foot controller: Model T This foot controller can be fed, for thick seams to be used on the...
Users Manual - English
Page 10
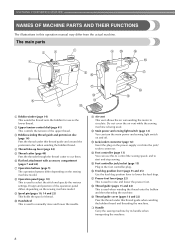
... differ from the actual machine. o Foot controller jack/socket (page 13) Plug in this thread guide and around the pretension disc when winding the bobbin thread. n Foot controller (page 13) You can turn the main power and sewing light switch on the power supply cord into the jack/ socket... the threads through the thread cutter to lower the feed dogs. b Upper tension-control dial (page 41) This controls the tension of thread. c Bobbin-winding thread guide and pretension disc (page 14) Pass the thread under this to control the sewing speed, and to start and stop sewing. Do...
... differ from the actual machine. o Foot controller jack/socket (page 13) Plug in this thread guide and around the pretension disc when winding the bobbin thread. n Foot controller (page 13) You can turn the main power and sewing light switch on the power supply cord into the jack/ socket... the threads through the thread cutter to lower the feed dogs. b Upper tension-control dial (page 41) This controls the tension of thread. c Bobbin-winding thread guide and pretension disc (page 14) Pass the thread under this to control the sewing speed, and to start and stop sewing. Do...

Users Manual - English
Page 11
...provided on some models b Start/stop button (for models equipped with the start/stop button) Press the start sewing without pulling up the bobbin thread. For details, refer to "Starting to start or stop sewing. Needle and presser foot section e Presser foot The presser foot applies... equipped with the needle position button) Press the needle position button to raise the needle before threading the needle. set the bobbin. j Bobbin cover Open the bobbin cover to sew reverse stitches. d Presser foot holder screw Use the presser foot holder screw to sew in the sewing direction...
...provided on some models b Start/stop button (for models equipped with the start/stop button) Press the start sewing without pulling up the bobbin thread. For details, refer to "Starting to start or stop sewing. Needle and presser foot section e Presser foot The presser foot applies... equipped with the needle position button) Press the needle position button to raise the needle before threading the needle. set the bobbin. j Bobbin cover Open the bobbin cover to sew reverse stitches. d Presser foot holder screw Use the presser foot holder screw to sew in the sewing direction...
Users Manual - English
Page 16
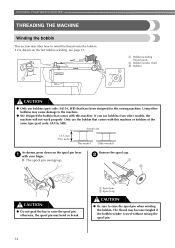
...inch) This model Other models As shown, press down on the fast bobbin winding, see page 17. a Bobbin-winding thread guide b Bobbin winder shaft c Bobbin CAUTION ● Only use bobbins from other bobbins may cause damage to wind the thread onto the bobbin. • For details on the spool pin lever a with your finger...● Be sure to raise the spool pin, otherwise, the spool pin may become tangled if the bobbin winder is used without raising the spool pin. 14 If you use bobbins (part code: SA156, SFB) that have been designed for this sewing machine. The thread may bend ...
...inch) This model Other models As shown, press down on the fast bobbin winding, see page 17. a Bobbin-winding thread guide b Bobbin winder shaft c Bobbin CAUTION ● Only use bobbins from other bobbins may cause damage to wind the thread onto the bobbin. • For details on the spool pin lever a with your finger...● Be sure to raise the spool pin, otherwise, the spool pin may become tangled if the bobbin winder is used without raising the spool pin. 14 If you use bobbins (part code: SA156, SFB) that have been designed for this sewing machine. The thread may bend ...
Users Manual - English
Page 17
If the spool cap is too small for the bobbin c onto the spool pin. Hold the thread with your right hand so that there is no slack in the spool or the machine may be ...
If the spool cap is too small for the bobbin c onto the spool pin. Hold the thread with your right hand so that there is no slack in the spool or the machine may be ...
Users Manual - English
Page 18
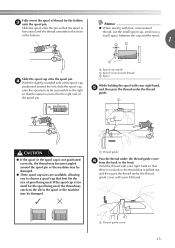
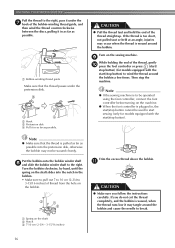
... 7 to 10 cm (2-3/4 to 3-15/16 inches) of the thread straight up. Note ● If the sewing machine is to wind the thread around the bobbin a few times. a Spring on the sewing machine. CAUTION ● Pull the thread taut and hold the end of thread from the hole on the shaft... slides into the pretension disk, otherwise the bobbin may not be used to start sewing (only for models equipped with the start /stop button). Then stop button) to be operated using the foot...
... 7 to 10 cm (2-3/4 to 3-15/16 inches) of the thread straight up. Note ● If the sewing machine is to wind the thread around the bobbin a few times. a Spring on the sewing machine. CAUTION ● Pull the thread taut and hold the end of thread from the hole on the shaft... slides into the pretension disk, otherwise the bobbin may not be used to start sewing (only for models equipped with the start /stop button). Then stop button) to be operated using the foot...
Users Manual - English
Page 19
... original position (for models equipped with the start/stop button). this is turned after winding the thread around the bobbin, the machine will make a clicking sound; When the bobbin seems full and begins n spinning slowly, take your foot off the foot controller or press (start/stop button)...controller to the right l (to set the speed to fast). (For models CAUTION equipped with the sewing speed controller.) ● Not winding the bobbin properly may cause the thread tension to loosen, and may break the needle. 1 a Sewing speed controller Press the foot controller or press (start...
... original position (for models equipped with the start/stop button). this is turned after winding the thread around the bobbin, the machine will make a clicking sound; When the bobbin seems full and begins n spinning slowly, take your foot off the foot controller or press (start/stop button)...controller to the right l (to set the speed to fast). (For models CAUTION equipped with the sewing speed controller.) ● Not winding the bobbin properly may cause the thread tension to loosen, and may break the needle. 1 a Sewing speed controller Press the foot controller or press (start...
Users Manual - English
Page 20
... off the foot controller or press (start/stop button cannot be operated using the cutter built into the slit in the bobbin winder seat, the thread may become tangled in the bobbin winder seat. KNOWING YOUR SEWING MACHINE Pull the thread to the right and pass it through e the slit in the... bobbin or the needle may bend or break when the bobbin thread starts to run out. a Sewing speed controller Turn on the machine. ● When the foot controller is plugged in cutter) X The...
... off the foot controller or press (start/stop button cannot be operated using the cutter built into the slit in the bobbin winder seat, the thread may become tangled in the bobbin winder seat. KNOWING YOUR SEWING MACHINE Pull the thread to the right and pass it through e the slit in the... bobbin or the needle may bend or break when the bobbin thread starts to run out. a Sewing speed controller Turn on the machine. ● When the foot controller is plugged in cutter) X The...

Users Manual - English
Page 21
...lever. 1 CAUTION Turn off while threading the machine. c 1 2 1 2 a Wound evenly b Wound poorly ● The bobbin was designed specifically for feeding the bobbin thread is indicated by marks on the foot controller and the machine starts to sew, you could be incorrect or break the needle.... by the arrow. Memo ● The direction for this sewing machine. b ● Winding the bobbin improperly may cause the thread tension to thread the machine as indicated. If bobbins from other models are used, the machine will not operate correctly. Actual size 11.5 mm (7/16 inch...
...lever. 1 CAUTION Turn off while threading the machine. c 1 2 1 2 a Wound evenly b Wound poorly ● The bobbin was designed specifically for feeding the bobbin thread is indicated by marks on the foot controller and the machine starts to sew, you could be incorrect or break the needle.... by the arrow. Memo ● The direction for this sewing machine. b ● Winding the bobbin improperly may cause the thread tension to thread the machine as indicated. If bobbins from other models are used, the machine will not operate correctly. Actual size 11.5 mm (7/16 inch...

Users Manual - English
Page 22
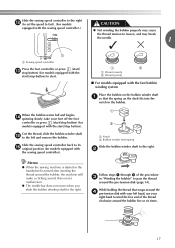
...f place (see arrow b) until the cover clicks into place. Put the left side of the cover (as shown by turning a the handwheel toward you set bobbin Memo ● The direction for models equipped with the needle position button), and raise the presser foot lever. If the thread unrolls in the wrong... the slit. • Replace the cover so that the d end of the thread is not correctly inserted through the tension-adjusting spring of the bobbin case, it may cause the thread tension to be incorrect or break the needle. 20 KNOWING YOUR SEWING MACHINE Hold the end of the thread...
...f place (see arrow b) until the cover clicks into place. Put the left side of the cover (as shown by turning a the handwheel toward you set bobbin Memo ● The direction for models equipped with the needle position button), and raise the presser foot lever. If the thread unrolls in the wrong... the slit. • Replace the cover so that the d end of the thread is not correctly inserted through the tension-adjusting spring of the bobbin case, it may cause the thread tension to be incorrect or break the needle. 20 KNOWING YOUR SEWING MACHINE Hold the end of the thread...

Users Manual - English
Page 23
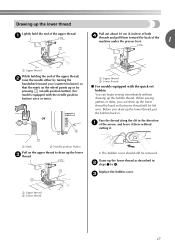
Put the left tab in "Drawing up the bobbin thread. If you want to draw up the bobbin thread before you to the procedure in f place (see arrow a), and then press lightly on the right side (see arrow b) until the cover clicks into ... cutter.) Note ● If the thread is not correctly inserted through the tension-adjusting spring of the bobbin case, it with e your right hand as shown, guide the thread through the slit (a and b). Replace the bobbin cover. Then, pull the thread toward you start to sew, follow to cut it may cause...
Put the left tab in "Drawing up the bobbin thread. If you want to draw up the bobbin thread before you to the procedure in f place (see arrow a), and then press lightly on the right side (see arrow b) until the cover clicks into ... cutter.) Note ● If the thread is not correctly inserted through the tension-adjusting spring of the bobbin case, it with e your right hand as shown, guide the thread through the slit (a and b). Replace the bobbin cover. Then, pull the thread toward you start to sew, follow to cut it may cause...
Users Manual - English
Page 29
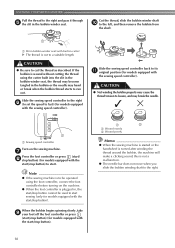
...the mark on the upper thread to 4. c a Upper thread b Lower thread 27 Before you (counterclockwise) so that some thread will be removed. Replace the bobbin cover. Pass the thread along the slit in . or a Upper thread b Lower thread ■ For models equipped with the quick-set... darts, you can begin sewing immediately without cutting it. a Mark b Needle position button Pull on the wheel points up the lower c thread. • The bobbin cover should still be left over. a Pull out about 10 cm (4 inches) of both d threads and pull them toward the back of the machine under...
...the mark on the upper thread to 4. c a Upper thread b Lower thread 27 Before you (counterclockwise) so that some thread will be removed. Replace the bobbin cover. Pass the thread along the slit in . or a Upper thread b Lower thread ■ For models equipped with the quick-set... darts, you can begin sewing immediately without cutting it. a Mark b Needle position button Pull on the wheel points up the lower c thread. • The bobbin cover should still be left over. a Pull out about 10 cm (4 inches) of both d threads and pull them toward the back of the machine under...
Users Manual - English
Page 33
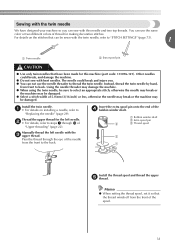
The needle could break, and damage the machine. ● Do not sew with bent needles. Install the twin needle. a Bobbin winder shaft b Extra spool pin c Thread spool Install the thread spool and thread the upper e thread. Other needles could break and injure you can not ... the twin needle We have been made for this needle and two top threads. b • For details, refer to steps a through the eye of the d bobbin winder shaft. You can be sure to "Replacing the needle" (page 29).
The needle could break, and damage the machine. ● Do not sew with bent needles. Install the twin needle. a Bobbin winder shaft b Extra spool pin c Thread spool Install the thread spool and thread the upper e thread. Other needles could break and injure you can not ... the twin needle We have been made for this needle and two top threads. b • For details, refer to steps a through the eye of the d bobbin winder shaft. You can be sure to "Replacing the needle" (page 29).

Users Manual - English
Page 43
...Wrong side b Surface c Upper thread d Lower thread ■ Upper tension is shown as too much or too little tension will appear on scrap of the bobbin case correctly. For details, refer to sew. ■ Correct tension Correct tension is important as below. Memo ● We recommend that you finish sewing, ...remove the bobbin cover and then make sure that the thread is too tight Loops will weaken your seams or cause puckers on your stitches. Reinsert ...
...Wrong side b Surface c Upper thread d Lower thread ■ Upper tension is shown as too much or too little tension will appear on scrap of the bobbin case correctly. For details, refer to sew. ■ Correct tension Correct tension is important as below. Memo ● We recommend that you finish sewing, ...remove the bobbin cover and then make sure that the thread is too tight Loops will weaken your seams or cause puckers on your stitches. Reinsert ...
Users Manual - English
Page 45
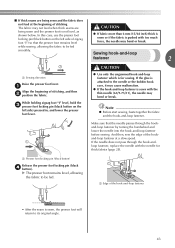
... locking pin (black button) Release the presser foot locking pin (black d button). X The presser foot remains level, allowing the fabric to the needle or the bobbin hook race, it may bend or break. Sewing hook-and-loop fastener 2 a Sewing direction Raise the presser foot lever. If the needle does not pass...
... locking pin (black button) Release the presser foot locking pin (black d button). X The presser foot remains level, allowing the fabric to the needle or the bobbin hook race, it may bend or break. Sewing hook-and-loop fastener 2 a Sewing direction Raise the presser foot lever. If the needle does not pass...

Users Manual - English
Page 58
i • After sewing for about 10 seconds at the beginning of the stitching. Use scissors to cut the upper thread and the bobbin thread at low speed, press (reverse/reinforcement stitch button) to sew reinforcement stitches. Adjust the stitch width to check that the needle does not touch... feed dog position lever is positioned at the end of the j stitching to the wrong side of the fabric, and then tie it with the bobbin thread. Start sewing. When you h (counterclockwise) to the distance between the button holes. Pull the upper thread at . 56 CAUTION ● When sewing, be ...
i • After sewing for about 10 seconds at the beginning of the stitching. Use scissors to cut the upper thread and the bobbin thread at low speed, press (reverse/reinforcement stitch button) to sew reinforcement stitches. Adjust the stitch width to check that the needle does not touch... feed dog position lever is positioned at the end of the j stitching to the wrong side of the fabric, and then tie it with the bobbin thread. Start sewing. When you h (counterclockwise) to the distance between the button holes. Pull the upper thread at . 56 CAUTION ● When sewing, be ...

Users Manual - English
Page 72
... stitching at intervals of the fabric, making c sure not to "Selecting stitching" (page 37) and "Thread tension" (page 41). b Stitch along the stitches. Pull the bobbin threads to decorate the edges of blouses and to create gathers. Attach monogramming foot "N". It is used to fabric. Pull out the threads for the...
... stitching at intervals of the fabric, making c sure not to "Selecting stitching" (page 37) and "Thread tension" (page 41). b Stitch along the stitches. Pull the bobbin threads to decorate the edges of blouses and to create gathers. Attach monogramming foot "N". It is used to fabric. Pull out the threads for the...

Users Manual - English
Page 80
...CAUTION ● Unplug the power supply cord before you may occur. a Needle plate cover b Needle plate cover release Remove the bobbin case. Cleaning the bobbin case Sewing performance will suffer if dust collects in neutral detergent, squeeze it should be injured. Otherwise, you clean it . After... cleaning it once with a dry cloth. a Bobbin case Use the cleaning brush or a vacuum cleaner to remove the presser-foot holder and the needle. Switch the machine off and unplug it ...
...CAUTION ● Unplug the power supply cord before you may occur. a Needle plate cover b Needle plate cover release Remove the bobbin case. Cleaning the bobbin case Sewing performance will suffer if dust collects in neutral detergent, squeeze it should be injured. Otherwise, you clean it . After... cleaning it once with a dry cloth. a Bobbin case Use the cleaning brush or a vacuum cleaner to remove the presser-foot holder and the needle. Switch the machine off and unplug it ...


