
Users Manual - English
Page 3
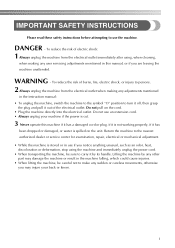
... center for examination, repair, electrical or mechanical adjustment. • While the machine is stored or in use the machine. Lifting the machine by any other part may injure your machine if the power is cut. 3 Never operate this manual, or if you are leaving the machine unattended. DANGER - Do not pull...
... center for examination, repair, electrical or mechanical adjustment. • While the machine is stored or in use the machine. Lifting the machine by any other part may injure your machine if the power is cut. 3 Never operate this manual, or if you are leaving the machine unattended. DANGER - Do not pull...
Users Manual - English
Page 4
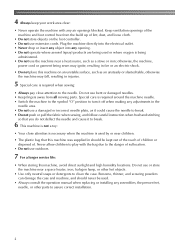
...; Do not use bent or damaged needles. • Keep fingers away from the build up of the machine and foot control free from all moving parts. Do not use a damaged or incorrect needle plate, as it could cause the needle to break. • Do not push or pull the fabric when... required when sewing: • Always pay close attention is necessary when the machine is used by or near a space heater, iron, halogen lamp, or other parts to assure correct installation. 2 4 Always keep your work area clear: • Never operate the machine with the bag due to the danger of . Do not...
...; Do not use bent or damaged needles. • Keep fingers away from the build up of the machine and foot control free from all moving parts. Do not use a damaged or incorrect needle plate, as it could cause the needle to break. • Do not push or pull the fabric when... required when sewing: • Always pay close attention is necessary when the machine is used by or near a space heater, iron, halogen lamp, or other parts to assure correct installation. 2 4 Always keep your work area clear: • Never operate the machine with the bag due to the danger of . Do not...

Users Manual - English
Page 6
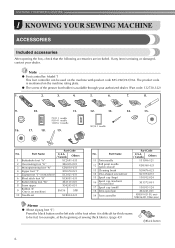
KNOWING YOUR SEWING MACHINE 6 ACCESSORIES ...6 Included accessories ...6 Optional accessories ...7 Accessory compartment ...7 NAMES OF MACHINE PARTS AND THEIR FUNCTIONS 8 The main parts ...8 Needle and presser foot section ...9 Operation buttons ...9 Operation panel ...10 Spool pin ...10 USING YOUR SEWING MACHINE 12 Power supply precautions ...12 Power supply ...12 ...
KNOWING YOUR SEWING MACHINE 6 ACCESSORIES ...6 Included accessories ...6 Optional accessories ...7 Accessory compartment ...7 NAMES OF MACHINE PARTS AND THEIR FUNCTIONS 8 The main parts ...8 Needle and presser foot section ...9 Operation buttons ...9 Operation panel ...10 Spool pin ...10 USING YOUR SEWING MACHINE 12 Power supply precautions ...12 Power supply ...12 ...
Users Manual - English
Page 8
...the machine rating plate. ● The screw of the presser foot holder is mentioned on machine.) SA156 SFB 10 Needle set XC8834-021 No. Part Name 11 Twin needle 12 Ball point needle (gold colored) 13 Cleaning brush 14 Disc-shaped screwdriver 15 Spool cap (large) 16 Spool cap .../V61/V62. If any item is difficult for example, at the beginning of the foot when it is missing or damaged, contact your authorized dealer. (Part code: 132730-122) 1. 2. 3. 4. 5. 6. 7. 8. 9. 10. 11. 75/11 1 needle 90/14 1 needle 100/16 1 needle 16. 17. 18. 19. 12. 13. 90/14 1 needle...
...the machine rating plate. ● The screw of the presser foot holder is mentioned on machine.) SA156 SFB 10 Needle set XC8834-021 No. Part Name 11 Twin needle 12 Ball point needle (gold colored) 13 Cleaning brush 14 Disc-shaped screwdriver 15 Spool cap (large) 16 Spool cap .../V61/V62. If any item is difficult for example, at the beginning of the foot when it is missing or damaged, contact your authorized dealer. (Part code: 132730-122) 1. 2. 3. 4. 5. 6. 7. 8. 9. 10. 11. 75/11 1 needle 90/14 1 needle 100/16 1 needle 16. 17. 18. 19. 12. 13. 90/14 1 needle...

Users Manual - English
Page 9
... guide 5 Eyelet punch Part Code U.S.A. / Canada Others SA132 F016N XZ5051-001 Accessory compartment The accessories are not in a bag, they may fall out, and be lost or damaged. a Flat ... bag, and then store the bag inside the flat bed attachment. Note ● Put the accessories in a compartment inside the compartment. Part Name 1 Walking Foot 2 Quilting Foot 3 1/4-Inch Quilting Foot Part Code U.S.A. / Canada Others SA140 F033N SA129 F005N SA125 F001N No. Optional accessories 1. 2. 3. 4. 5. 1 No. Slide the flat bed attachment to the left...
... guide 5 Eyelet punch Part Code U.S.A. / Canada Others SA132 F016N XZ5051-001 Accessory compartment The accessories are not in a bag, they may fall out, and be lost or damaged. a Flat ... bag, and then store the bag inside the flat bed attachment. Note ● Put the accessories in a compartment inside the compartment. Part Name 1 Walking Foot 2 Quilting Foot 3 1/4-Inch Quilting Foot Part Code U.S.A. / Canada Others SA140 F033N SA129 F005N SA125 F001N No. Optional accessories 1. 2. 3. 4. 5. 1 No. Slide the flat bed attachment to the left...
Users Manual - English
Page 10
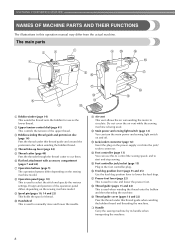
... and 24) This is used to manually raise and lower the needle. KNOWING YOUR SEWING MACHINE NAMES OF MACHINE PARTS AND THEIR FUNCTIONS The illustrations in the foot controller plug. The main parts a Bobbin winder (page 14) This winds the thread onto the bobbin for use this operation manual may differ from...
... and 24) This is used to manually raise and lower the needle. KNOWING YOUR SEWING MACHINE NAMES OF MACHINE PARTS AND THEIR FUNCTIONS The illustrations in the foot controller plug. The main parts a Bobbin winder (page 14) This winds the thread onto the bobbin for use this operation manual may differ from...
Users Manual - English
Page 16
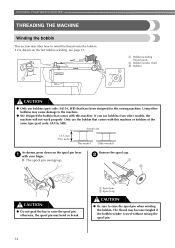
a Bobbin-winding thread guide b Bobbin winder shaft c Bobbin CAUTION ● Only use bobbins (part code: SA156, SFB) that have been designed for this machine or bobbins of the same type (part code: SA156, SFB). b CAUTION ● Do not grab the bar to the machine. ● We designed the bobbin that comes with your...
a Bobbin-winding thread guide b Bobbin winder shaft c Bobbin CAUTION ● Only use bobbins (part code: SA156, SFB) that have been designed for this machine or bobbins of the same type (part code: SA156, SFB). b CAUTION ● Do not grab the bar to the machine. ● We designed the bobbin that comes with your...

Users Manual - English
Page 21
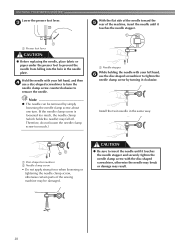
Slide the button and open the cover. Use only the enclosed bobbin or bobbins of the same type (part code: SA156, SFB). Memo ● The direction for feeding the bobbin thread is indicated by the arrow. a Cover b Slide button Put the bobbin in so ...
Slide the button and open the cover. Use only the enclosed bobbin or bobbins of the same type (part code: SA156, SFB). Memo ● The direction for feeding the bobbin thread is indicated by the arrow. a Cover b Slide button Put the bobbin in so ...
Users Manual - English
Page 32
... can be damaged. a Disc-shaped screwdriver b Needle clamp screw • Do not apply strong force when loosening or tightening the needle clamp screw, otherwise certain parts of the machine, insert the needle until it clockwise. CAUTION ● Be sure to prevent the needle from falling into the hole in the same...
... can be damaged. a Disc-shaped screwdriver b Needle clamp screw • Do not apply strong force when loosening or tightening the needle clamp screw, otherwise certain parts of the machine, insert the needle until it clockwise. CAUTION ● Be sure to prevent the needle from falling into the hole in the same...
Users Manual - English
Page 33
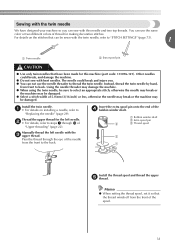
... use the same color or two different colors of the d bobbin winder shaft. Other needles could break and injure you can sew with this machine (part code: 131096-121). b • For details, refer to steps a through the eye of "Upper threading" (page 22). For details on installing a needle, refer to back...
... use the same color or two different colors of the d bobbin winder shaft. Other needles could break and injure you can sew with this machine (part code: 131096-121). b • For details, refer to steps a through the eye of "Upper threading" (page 22). For details on installing a needle, refer to back...
Users Manual - English
Page 38
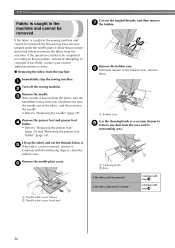
In addition, keep your hands away from all moving parts such as the needle and handwheel, otherwise injuries may occur. ● Do not pull or push the fabric too hard while sewing, otherwise injuries may ...
In addition, keep your hands away from all moving parts such as the needle and handwheel, otherwise injuries may occur. ● Do not pull or push the fabric too hard while sewing, otherwise injuries may ...
Users Manual - English
Page 46
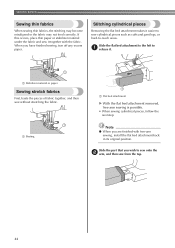
...-to-reach areas. Slide the flat bed attachment to the left to sew onto the b arm, and then sew from the top. 44 Slide the part that you wish to a release it. a Basting a Flat bed attachment X With the flat bed attachment removed, free-arm sewing is possible. • When sewing cylindrical...
...-to-reach areas. Slide the flat bed attachment to the left to sew onto the b arm, and then sew from the top. 44 Slide the part that you wish to a release it. a Basting a Flat bed attachment X With the flat bed attachment removed, free-arm sewing is possible. • When sewing cylindrical...
Users Manual - English
Page 51
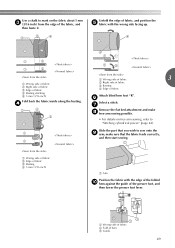
... of fabric b Edge of fabric c Basting d 5 mm (3/16 inch) a Wrong side of fabric 3 b Right side of fabric c Basting d Edge of hem c Guide 49 Slide the part that the fabric feeds correctly, and then start sewing. a Arm Position the fabric with the wrong side facing up. 3 5 4 1 2 1 2 1 2 a Wrong side of fabric b Right side...
... of fabric b Edge of fabric c Basting d 5 mm (3/16 inch) a Wrong side of fabric 3 b Right side of fabric c Basting d Edge of hem c Guide 49 Slide the part that the fabric feeds correctly, and then start sewing. a Arm Position the fabric with the wrong side facing up. 3 5 4 1 2 1 2 1 2 a Wrong side of fabric b Right side...
Users Manual - English
Page 54
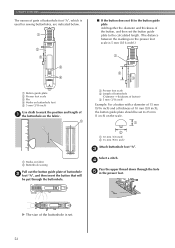
... sewing Pull out the button guide plate of buttonhole b foot "A", and then insert the button that will be set . 52 UTILITY STITCHES The names of parts of buttonhole foot "A", which is set to mark the position and length of a the buttonhole on the fabric. 2 1 a Marks on the scale. 1 2 a 10 mm (3/8 inch...
... sewing Pull out the button guide plate of buttonhole b foot "A", and then insert the button that will be set . 52 UTILITY STITCHES The names of parts of buttonhole foot "A", which is set to mark the position and length of a the buttonhole on the fabric. 2 1 a Marks on the scale. 1 2 a 10 mm (3/8 inch...

Users Manual - English
Page 56
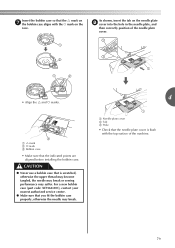
... the gimp g thread to the wrong side of the fabric, and then tie it is finished, gently pull the gimp f thread to cut the middle part of the h gimp thread remaining at the end of the gimp thread. 54 Memo ● Before sewing buttonholes, check the stitch length and width by... the hole in the cutting path, otherwise injuries may result if the seam ripper slips. When sewing is intended. Hook the gimp thread onto the part of a buttonhole foot "A" shown in the illustration so that it fits into the grooves, and then loosely tie it. 1 a Seam ripper b Pin For keyhole buttonholes...
... the gimp g thread to the wrong side of the fabric, and then tie it is finished, gently pull the gimp f thread to cut the middle part of the h gimp thread remaining at the end of the gimp thread. 54 Memo ● Before sewing buttonholes, check the stitch length and width by... the hole in the cutting path, otherwise injuries may result if the seam ripper slips. When sewing is intended. Hook the gimp thread onto the part of a buttonhole foot "A" shown in the illustration so that it fits into the grooves, and then loosely tie it. 1 a Seam ripper b Pin For keyhole buttonholes...
Users Manual - English
Page 81
... the top surface of the needle plate cover. • Align the U and { marks. As shown, insert the tab on the race. For a new bobbin case (part code: XE7560-001), contact your nearest authorized service center. ● Make sure that you fit the bobbin case properly, otherwise the needle may suffer. CAUTION...
... the top surface of the needle plate cover. • Align the U and { marks. As shown, insert the tab on the race. For a new bobbin case (part code: XE7560-001), contact your nearest authorized service center. ● Make sure that you fit the bobbin case properly, otherwise the needle may suffer. CAUTION...
Users Manual - English
Page 88
..., instead of the fabric, and then remove the needle. • Refer to "Replacing the needle" (page 29). a Needle plate cover release b Needle plate cover (front part) 86 If the operation could not be removed, remove it . Remove the presser foot and presser foot d holder. • Refer to i remove any dust from...
..., instead of the fabric, and then remove the needle. • Refer to "Replacing the needle" (page 29). a Needle plate cover release b Needle plate cover (front part) 86 If the operation could not be removed, remove it . Remove the presser foot and presser foot d holder. • Refer to i remove any dust from...

Users Manual - English
Page 90
...; Align the U and { marks. Bent needles can easily break, possibly resulting in "Cleaning the bobbin case" (page 79 and 80). 88 For a new bobbin case (part code: XE7560-001), contact your nearest authorized service center. ● Make sure that you fit the bobbin case properly, otherwise the needle may suffer. CAUTION...
...; Align the U and { marks. Bent needles can easily break, possibly resulting in "Cleaning the bobbin case" (page 79 and 80). 88 For a new bobbin case (part code: XE7560-001), contact your nearest authorized service center. ● Make sure that you fit the bobbin case properly, otherwise the needle may suffer. CAUTION...
Users Manual - English
Page 98
... foot controller 6 13, 39 free-motion quilting 64 H , handwheel 8 39 heirloom stitching 72 hook-and-loop fastener 43 J joining 71 , joining stitch 61 68 M main parts 8 main power switch 12 , monogramming 70 72 96 N needle 28 , needle bar thread guide 9 25 , needle clamp screw 9 30 needle plate 9 , needle plate cover 9 78...
... foot controller 6 13, 39 free-motion quilting 64 H , handwheel 8 39 heirloom stitching 72 hook-and-loop fastener 43 J joining 71 , joining stitch 61 68 M main parts 8 main power switch 12 , monogramming 70 72 96 N needle 28 , needle bar thread guide 9 25 , needle clamp screw 9 30 needle plate 9 , needle plate cover 9 78...


