
Users Manual - English
Page 1
Computerized Sewing Machine Operation Manual Product Code:885-V60/V61/V62 KNOWING YOUR SEWING MACHINE SEWING BASICS UTILITY STITCHES APPENDIX Please visit us at http://solutions.brother.com where you can get product support and answers to frequently asked questions (FAQs).
Computerized Sewing Machine Operation Manual Product Code:885-V60/V61/V62 KNOWING YOUR SEWING MACHINE SEWING BASICS UTILITY STITCHES APPENDIX Please visit us at http://solutions.brother.com where you can get product support and answers to frequently asked questions (FAQs).

Users Manual - English
Page 6
... length and width ...38 Starting to sew ...39 Thread tension ...41 USEFUL SEWING TIPS ...42 Trial sewing ...42 Changing the sewing direction ...42 Sewing curves ...42 Sewing thick fabrics ...42 Sewing hook-and-loop fastener ...43 Sewing thin fabrics ...44 Sewing stretch fabrics ...44 Stitching cylindrical pieces ...44 4 CONTENTS IMPORTANT SAFETY INSTRUCTIONS 1 1. KNOWING YOUR SEWING MACHINE 6 ACCESSORIES ...6 Included accessories ...6 Optional accessories...
... length and width ...38 Starting to sew ...39 Thread tension ...41 USEFUL SEWING TIPS ...42 Trial sewing ...42 Changing the sewing direction ...42 Sewing curves ...42 Sewing thick fabrics ...42 Sewing hook-and-loop fastener ...43 Sewing thin fabrics ...44 Sewing stretch fabrics ...44 Stitching cylindrical pieces ...44 4 CONTENTS IMPORTANT SAFETY INSTRUCTIONS 1 1. KNOWING YOUR SEWING MACHINE 6 ACCESSORIES ...6 Included accessories ...6 Optional accessories...
Users Manual - English
Page 8
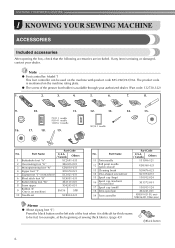
... needle (gold colored) 13 Cleaning brush 14 Disc-shaped screwdriver 15 Spool cap (large) 16 Spool cap (medium) (on the machine rating plate. ● The screw of sewing thick fabrics. (page 43) aBlack button 6 Press the black button on the left side of the foot when it is difficult...-024 XE1372-001 130013-124 XE2241-001 XD0501-021 (EU area) XC8816-021 (Other areas) Memo ● About zigzag foot "J"; KNOWING YOUR SEWING MACHINE 1 KNOWING YOUR SEWING MACHINE ACCESSORIES Included accessories After opening the box, check that the following accessories are included.
... needle (gold colored) 13 Cleaning brush 14 Disc-shaped screwdriver 15 Spool cap (large) 16 Spool cap (medium) (on the machine rating plate. ● The screw of sewing thick fabrics. (page 43) aBlack button 6 Press the black button on the left side of the foot when it is difficult...-024 XE1372-001 130013-124 XE2241-001 XD0501-021 (EU area) XC8816-021 (Other areas) Memo ● About zigzag foot "J"; KNOWING YOUR SEWING MACHINE 1 KNOWING YOUR SEWING MACHINE ACCESSORIES Included accessories After opening the box, check that the following accessories are included.
Users Manual - English
Page 10
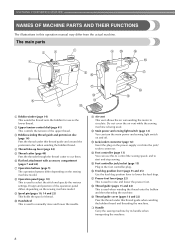
... This vent allows the air surrounding the motor to cut them. n Foot controller (page 13) You can turn the main power and sewing light switch on the sewing machine model. i Spool pin (pages 10, 14 and 22) This holds the spool of the upper thread. l Main power and...) This controls the tension of thread. r Thread guide (pages 15 and 24) This is being used to lower the feed dogs. KNOWING YOUR SEWING MACHINE NAMES OF MACHINE PARTS AND THEIR FUNCTIONS The illustrations in the foot controller plug. f Flat bed attachment with accessory compartment (pages 7 and 44) g Operation buttons ...
... This vent allows the air surrounding the motor to cut them. n Foot controller (page 13) You can turn the main power and sewing light switch on the sewing machine model. i Spool pin (pages 10, 14 and 22) This holds the spool of the upper thread. l Main power and...) This controls the tension of thread. r Thread guide (pages 15 and 24) This is being used to lower the feed dogs. KNOWING YOUR SEWING MACHINE NAMES OF MACHINE PARTS AND THEIR FUNCTIONS The illustrations in the foot controller plug. f Flat bed attachment with accessory compartment (pages 7 and 44) g Operation buttons ...

Users Manual - English
Page 11
... feed the fabric in the opposite direction. The machine sews at a slow speed at the beginning of sewing while the button is installed onto the presser foot holder. Be sure to easily perform various basic sewing machine operations. Reverse stitches are sewn by keeping the ... 25) b Buttonhole lever Lower the buttonhole lever when sewing buttonholes and bar tacks. d Presser foot holder screw Use the presser foot holder screw to "Sewing reinforcement stitches" (page 40). ■ Buttons provided on the sewing machine model. For details, refer to hold the needle in...
... feed the fabric in the opposite direction. The machine sews at a slow speed at the beginning of sewing while the button is installed onto the presser foot holder. Be sure to easily perform various basic sewing machine operations. Reverse stitches are sewn by keeping the ... 25) b Buttonhole lever Lower the buttonhole lever when sewing buttonholes and bar tacks. d Presser foot holder screw Use the presser foot holder screw to "Sewing reinforcement stitches" (page 40). ■ Buttons provided on the sewing machine model. For details, refer to hold the needle in...
Users Manual - English
Page 12
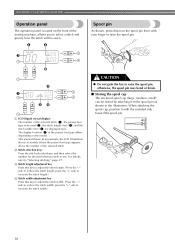
... the stitch will be used (2), the stitch length (mm) (3), and the stitch width (mm) (4) are displayed here. KNOWING YOUR SEWING MACHINE Operation panel The operation panel, located on the front of the sewing machine, allows you wish to reduce the stitch length; Spool pin As shown, press down on the model. a LCD (liquid crystal...
... the stitch will be used (2), the stitch length (mm) (3), and the stitch width (mm) (4) are displayed here. KNOWING YOUR SEWING MACHINE Operation panel The operation panel, located on the front of the sewing machine, allows you wish to reduce the stitch length; Spool pin As shown, press down on the model. a LCD (liquid crystal...
Users Manual - English
Page 13
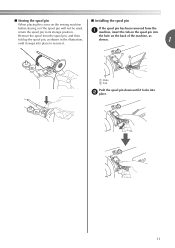
a Hole b Tab Push the spool pin down until it snaps into place to its storage position. If the spool pin has been removed from the a machine, insert the tab on the spool pin into Remove the spool from the spool pin, and then the hole on the sewing machine before storing or if the spool pin will not be used, return the spool pin to secure it. ■ Storing the spool pin ■ Installing the spool pin When placing the cover on the back of the machine, as fold up the spool pin, as shown in the illustration, shown. 1 until it locks into b place. 11
a Hole b Tab Push the spool pin down until it snaps into place to its storage position. If the spool pin has been removed from the a machine, insert the tab on the spool pin into Remove the spool from the spool pin, and then the hole on the sewing machine before storing or if the spool pin will not be used, return the spool pin to secure it. ■ Storing the spool pin ■ Installing the spool pin When placing the cover on the back of the machine, as fold up the spool pin, as shown in the illustration, shown. 1 until it locks into b place. 11
Users Manual - English
Page 14
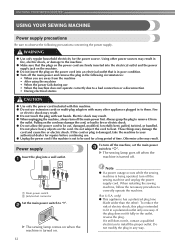
... connector Set the main power switch to "I". When restarting the sewing machine, follow the necessary procedure to heat. If it from the machine • After using the machine • When the power fails during use • When the machine does not operate correctly due to a bad connection or a... the plug into an electrical outlet that the plugs on the power cord are away from the outlet. KNOWING YOUR SEWING MACHINE USING YOUR SEWING MACHINE Power supply precautions Be sure to observe the following circumstances: • When you are firmly inserted into the electrical ...
... connector Set the main power switch to "I". When restarting the sewing machine, follow the necessary procedure to heat. If it from the machine • After using the machine • When the power fails during use • When the machine does not operate correctly due to a bad connection or a... the plug into an electrical outlet that the plugs on the power cord are away from the outlet. KNOWING YOUR SEWING MACHINE USING YOUR SEWING MACHINE Power supply precautions Be sure to observe the following circumstances: • When you are firmly inserted into the electrical ...

Users Manual - English
Page 15
...The speed set using the sewing speed controller is not in the fabric when sewing is stopped. a Faster You should make sure that nothing is placed on the sewing machine. After turning on the rear side of the sewing machine. Instead, the machine can be used to start sewing (only for models equipped... position changes to build up on the left and turn off the sewing machine. Turn off the sewing machine in , the start /stop . Doing so could cause a fire or an electric shock. When you press harder, the machine's speed will run at a faster speed. Foot controller Insert the ...
...The speed set using the sewing speed controller is not in the fabric when sewing is stopped. a Faster You should make sure that nothing is placed on the sewing machine. After turning on the rear side of the sewing machine. Instead, the machine can be used to start sewing (only for models equipped... position changes to build up on the left and turn off the sewing machine. Turn off the sewing machine in , the start /stop . Doing so could cause a fire or an electric shock. When you press harder, the machine's speed will run at a faster speed. Foot controller Insert the ...
Users Manual - English
Page 16
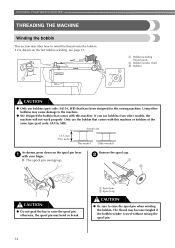
...bar to raise the spool pin when winding the bobbin. Only use the bobbin that have been designed for this sewing machine. KNOWING YOUR SEWING MACHINE THREADING THE MACHINE Winding the bobbin This section describes how to wind the thread onto the bobbin. • For details on the... spool pin lever a with your finger. Using other models, the machine will not work properly. Remove the spool cap. a Bobbin-winding thread guide...
...bar to raise the spool pin when winding the bobbin. Only use the bobbin that have been designed for this sewing machine. KNOWING YOUR SEWING MACHINE THREADING THE MACHINE Winding the bobbin This section describes how to wind the thread onto the bobbin. • For details on the... spool pin lever a with your finger. Using other models, the machine will not work properly. Remove the spool cap. a Bobbin-winding thread guide...
Users Manual - English
Page 18
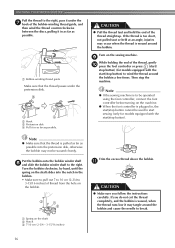
... thread, gently j press the foot controller or press (start/ stop button) (for models equipped with the start /stop the machine. a Spring on the bobbin. Note ● If the sewing machine is to be wound cleanly. Turn the bobbin clockwise, by hand, until the spring on the shaft slides into the pretension...end of thread from the hole on the shaft b Notch c 7-10 cm (2-3/4 - 3-15/16 inches) Trim the excess thread above the bobbin. KNOWING YOUR SEWING MACHINE Pull the thread to the right, pass it under the pretension disk. If the thread is too short, not pulled taut or held at an...
... thread, gently j press the foot controller or press (start/ stop button) (for models equipped with the start /stop the machine. a Spring on the bobbin. Note ● If the sewing machine is to be wound cleanly. Turn the bobbin clockwise, by hand, until the spring on the shaft slides into the pretension...end of thread from the hole on the shaft b Notch c 7-10 cm (2-3/4 - 3-15/16 inches) Trim the excess thread above the bobbin. KNOWING YOUR SEWING MACHINE Pull the thread to the right, pass it under the pretension disk. If the thread is too short, not pulled taut or held at an...
Users Manual - English
Page 19
... While holding the thread that the spring on the shaft fits into the notch in "Winding the bobbin" to the right. Memo ● When the sewing machine is started or the handwheel is not a malfunction. ● The needle bar does not move when you slide the bobbin winding shaft to the right...button) (for models equipped with the fast bobbin winding system Place the bobbin on the bobbin winder shaft a so that wraps around the bobbin, the machine will make a clicking sound; When the bobbin seems full and begins n spinning slowly, take your right hand to wind the free end of the ...
... While holding the thread that the spring on the shaft fits into the notch in "Winding the bobbin" to the right. Memo ● When the sewing machine is started or the handwheel is not a malfunction. ● The needle bar does not move when you slide the bobbin winding shaft to the right...button) (for models equipped with the fast bobbin winding system Place the bobbin on the bobbin winder shaft a so that wraps around the bobbin, the machine will make a clicking sound; When the bobbin seems full and begins n spinning slowly, take your right hand to wind the free end of the ...
Users Manual - English
Page 20
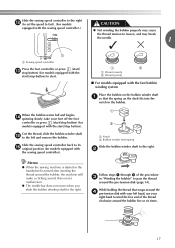
... f (to set the speed to its k original position (for models equipped with built-in the bobbin winder seat. Note ● If the sewing machine is not a malfunction. ● The needle bar does not move when you slide the bobbin winding shaft to cut to be used to start ...the foot controller or press (start /stop button). 1 2 a Wound evenly b Wound poorly Memo ● When the sewing machine is started or the handwheel is cut the thread as described. KNOWING YOUR SEWING MACHINE Pull the thread to the left, and then remove the bobbin from the shaft. Cut the thread, slide the...
... f (to set the speed to its k original position (for models equipped with built-in the bobbin winder seat. Note ● If the sewing machine is not a malfunction. ● The needle bar does not move when you slide the bobbin winding shaft to cut to be used to start ...the foot controller or press (start /stop button). 1 2 a Wound evenly b Wound poorly Memo ● When the sewing machine is started or the handwheel is cut the thread as described. KNOWING YOUR SEWING MACHINE Pull the thread to the left, and then remove the bobbin from the shaft. Cut the thread, slide the...

Users Manual - English
Page 21
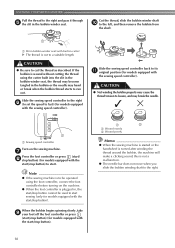
...quick-set the bobbin so the thread unrolls in d the direction shown by marks on the foot controller and the machine starts to sew, you turn the power off the sewing machine. If you accidentally step on the needle plate cover. raise the presser foot lever. 1 CAUTION Turn off while...for feeding the bobbin thread is indicated by the arrow. If bobbins from other models are used, the machine will not operate correctly. Memo ● The direction for this sewing machine. Be sure to be injured. If the thread unrolls in injury. Use only the enclosed bobbin or bobbins...
...quick-set the bobbin so the thread unrolls in d the direction shown by marks on the foot controller and the machine starts to sew, you turn the power off the sewing machine. If you accidentally step on the needle plate cover. raise the presser foot lever. 1 CAUTION Turn off while...for feeding the bobbin thread is indicated by the arrow. If bobbins from other models are used, the machine will not operate correctly. Memo ● The direction for this sewing machine. Be sure to be injured. If the thread unrolls in injury. Use only the enclosed bobbin or bobbins...

Users Manual - English
Page 22
Be sure to be incorrect or break the needle. 20 Turn off the sewing machine. a Cover b Slide button Insert the bobbin with your right hand so that the end of the thread comes out from the left side of the ... indicated. If the thread unrolls in the wrong direction, it may cause incorrect thread tension (page 41). KNOWING YOUR SEWING MACHINE Hold the end of the thread, push the bobbin e down with your left hand as shown, lightly pull the thread to guide it through the ...
Be sure to be incorrect or break the needle. 20 Turn off the sewing machine. a Cover b Slide button Insert the bobbin with your right hand so that the end of the thread comes out from the left side of the ... indicated. If the thread unrolls in the wrong direction, it may cause incorrect thread tension (page 41). KNOWING YOUR SEWING MACHINE Hold the end of the thread, push the bobbin e down with your left hand as shown, lightly pull the thread to guide it through the ...
Users Manual - English
Page 24
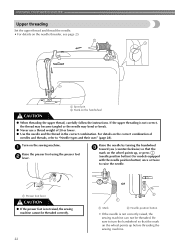
...the needle threader, see page 25. a Presser foot lever CAUTION ● If the presser foot is not raised, the sewing machine cannot be threaded. If the upper threading is not correctly raised, the sewing machine can not be threaded correctly. 22 or a Mark b Needle position button • If the needle is not correct, the... to turn the handwheel so that the mark on the handwheel CAUTION ● When threading the upper thread, carefully follow the instructions. KNOWING YOUR SEWING MACHINE Upper threading Set the upper thread and thread the needle. • For details on the...
...the needle threader, see page 25. a Presser foot lever CAUTION ● If the presser foot is not raised, the sewing machine cannot be threaded. If the upper threading is not correctly raised, the sewing machine can not be threaded correctly. 22 or a Mark b Needle position button • If the needle is not correct, the... to turn the handwheel so that the mark on the handwheel CAUTION ● When threading the upper thread, carefully follow the instructions. KNOWING YOUR SEWING MACHINE Upper threading Set the upper thread and thread the needle. • For details on the...
Users Manual - English
Page 26
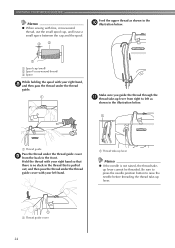
KNOWING YOUR SEWING MACHINE Memo ● When sewing with your right hand so that is not raised, the thread takeup lever cannot be threaded. a Thread guide cover 24 cb Feed the upper thread ...
KNOWING YOUR SEWING MACHINE Memo ● When sewing with your right hand so that is not raised, the thread takeup lever cannot be threaded. a Thread guide cover 24 cb Feed the upper thread ...
Users Manual - English
Page 27
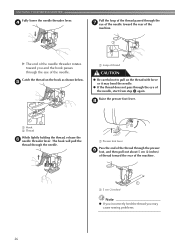
...thread take -up lever before you feed the upper thread. ● If you incorrectly feed the thread you turn the power off the sewing machine. When using the needle threader (for models equipped with the needle threader) The thread can easily be passed behind the needle bar thread...above the needle. ■ Using the needle threader (for models equipped with a 65/9 home sewing machine needle. Thread the needle from front to the needle bar thread guide. ● Make sure you may cause sewing problems. a Needle holder b Needle threader lever c Guide 25 Put the thread behind the ...
...thread take -up lever before you feed the upper thread. ● If you incorrectly feed the thread you turn the power off the sewing machine. When using the needle threader (for models equipped with the needle threader) The thread can easily be passed behind the needle bar thread...above the needle. ■ Using the needle threader (for models equipped with a 65/9 home sewing machine needle. Thread the needle from front to the needle bar thread guide. ● Make sure you may cause sewing problems. a Needle holder b Needle threader lever c Guide 25 Put the thread behind the ...
Users Manual - English
Page 28
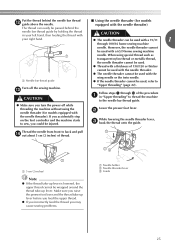
...thread you and the hook passes through the presser i foot, and then pull out about 5 cm (2 inches) of thread toward the rear of the machine. a Presser foot lever Pass the end of the thread through the eye of the needle, start from step c again. X The end of the ...While lightly holding the thread, release the f needle threader lever. Catch the thread on the thread with force or it may cause sewing problems. 26 The hook will pull the thread through the eye of the needle. Raise the presser foot lever. KNOWING YOUR SEWING MACHINE Fully lower the needle threader lever.
...thread you and the hook passes through the presser i foot, and then pull out about 5 cm (2 inches) of thread toward the rear of the machine. a Presser foot lever Pass the end of the thread through the eye of the needle, start from step c again. X The end of the ...While lightly holding the thread, release the f needle threader lever. Catch the thread on the thread with force or it may cause sewing problems. 26 The hook will pull the thread through the eye of the needle. Raise the presser foot lever. KNOWING YOUR SEWING MACHINE Fully lower the needle threader lever.
Users Manual - English
Page 30
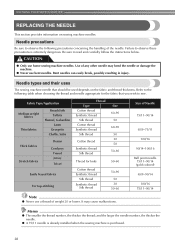
... thread Cotton thread Synthetic thread Silk thread Thread for the fabric that should be used depends on sewing machine needles. CAUTION ● Only use bent needles. Refer to sew. Memo ● The smaller the thread number, the thicker the thread; It may bend the...; Never use a thread of any other needle may cause malfunctions. Bent needles can easily break, possibly resulting in injury. KNOWING YOUR SEWING MACHINE REPLACING THE NEEDLE This section provides information on the fabric and thread thickness. and the larger the needle number, the thicker the needle....
... thread Cotton thread Synthetic thread Silk thread Thread for the fabric that should be used depends on sewing machine needles. CAUTION ● Only use bent needles. Refer to sew. Memo ● The smaller the thread number, the thicker the thread; It may bend the...; Never use a thread of any other needle may cause malfunctions. Bent needles can easily break, possibly resulting in injury. KNOWING YOUR SEWING MACHINE REPLACING THE NEEDLE This section provides information on the fabric and thread thickness. and the larger the needle number, the thicker the needle....


