
Brother International CE-5500PRW Support Question
Brother International CE-5500PRW Support Question
Find answers below for this question about Brother International CE-5500PRW.Need a Brother International CE-5500PRW manual? We have 3 online manuals for this item!
Question posted by citrmstr on May 25th, 2014
How To Make A Baste Stitch On A Brother Project Runway Sewing Machine
The person who posted this question about this Brother International product did not include a detailed explanation. Please use the "Request More Information" button to the right if more details would help you to answer this question.
Current Answers
Related Brother International CE-5500PRW Manual Pages
Users Manual - English - Page 1
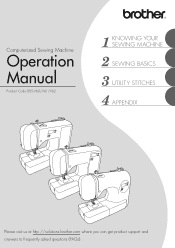
Computerized Sewing Machine
Operation Manual
Product Code:885-V60/V61/V62
KNOWING YOUR SEWING MACHINE
SEWING BASICS
UTILITY STITCHES
APPENDIX
Please visit us at http://solutions.brother.com where you can get product support and answers to frequently asked questions (FAQs).
Users Manual - English - Page 5
...Children should contact your local authorized Brother dealer. For additional product information, visit our web site at www.brother.com
SAVE THESE INSTRUCTIONS
This machine is intended for household use. FOR...follow the troubleshooting table
in the back of the operation manual to inspect and adjust the machine yourself.
FOR USERS IN THE UK, EIRE, MALTA AND CYPRUS ONLY
IMPORTANT
•...
Users Manual - English - Page 6

... ...39 Thread tension ...41
USEFUL SEWING TIPS ...42
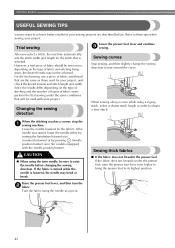
Trial sewing ...42 Changing the sewing direction ...42 Sewing curves ...42 Sewing thick fabrics ...42 Sewing hook-and-loop fastener ...43 Sewing thin fabrics ...44 Sewing stretch fabrics ...44 Stitching cylindrical pieces ...44
4 CONTENTS
IMPORTANT SAFETY INSTRUCTIONS 1
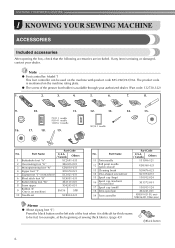
1. KNOWING YOUR SEWING MACHINE 6
ACCESSORIES ...6
Included accessories...
Users Manual - English - Page 8
...
6 Blind stitch foot "R"
XC4051-031
7 Button fitting foot "M"
XE2137-001
8 Seam ripper
X54243-051
9
Bobbin (4) (One is difficult for thick seams to be used on machine.)
SA156
SFB
10 Needle set
XC8834-021
No. Note
● Foot controller: Model T This foot controller can be fed, for example, at the beginning of sewing thick...
Users Manual - English - Page 10
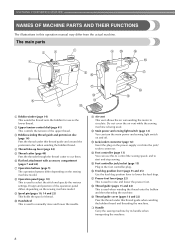
... cutter (page 40) Pass the threads through the thread cutter to select the stitch and specify the various settings. i Spool pin (pages 10, 14 and 22) This holds the spool of the upper thread. KNOWING YOUR SEWING MACHINE
NAMES OF MACHINE PARTS AND THEIR FUNCTIONS
The illustrations in the foot controller plug.
Design and...
Users Manual - English - Page 12
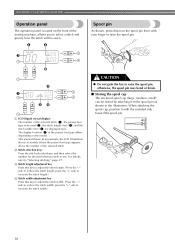
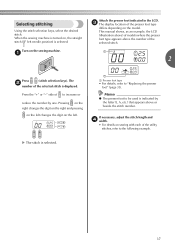
... spool cap, position it to select a stitch and specify how the stitch will be used (2), the stitch length (mm) (3), and the stitch width (mm) (4) are displayed here. KNOWING YOUR SEWING MACHINE
Operation panel
The operation panel, located on the front of the sewing machine, allows you wish to "Selecting stitching" (page 37).
c Stitch length adjustment key Press this key to...
Users Manual - English - Page 15

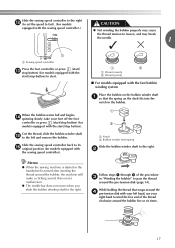
When you press the foot controller down the "-" side of (stitch selection key). Changing the needle stop position to prevent the machine from accidentally being started. Instead, the machine can be set using the sewing speed controller is the foot controller's maximum sewing speed. a
Faster
You should make sure that nothing is placed on the foot controller...
Users Manual - English - Page 19
...bobbin" to pass the thread
around the pre-tension disk (page 14). Memo
● When the sewing machine is started or the handwheel is not a malfunction.
● The needle bar does not move when ...this is turned after winding the thread around the bobbin, the machine will make a clicking sound; Slide the sewing speed controller to the right l (to set the speed to fast). (For models
...
Users Manual - English - Page 33
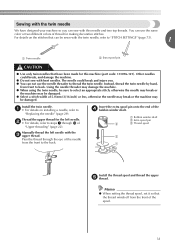
... thread the left needle.
Pass the thread through l of thread for making decorative stitches.
Sewing with the twin needle
We have been made for this needle and two...from front to select an appropriate stitch, otherwise the needle may break or
the machine may
be sewn with bent needles.
The needle could break, and damage the machine. ● Do not sew with the twin needle, refer to...
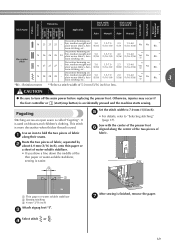
Users Manual - English - Page 38
... the basic procedures below .
Turn on selecting a stitch, refer to "Selecting stitching" (page 37).
↓
3
Attach the presser foot.
Position the fabric, and then start sewing. Before operating the sewing machine, read the following precautions. When sewing is in injuries. ● Make sure that the needle does not strike basting pins, otherwise the needle may break.
●...
Users Manual - English - Page 39
... .
Memo
● The presser foot to the following example. If necessary, adjust the stitch length and d width.
• For details on sewing with each of the selected stitch is selected.
37
When the sewing machine is turned on the left needle position) is indicated by one. a Presser foot type
• For details, refer to increase...
Users Manual - English - Page 40
... LCD.
● If the stitch width of the selected stitch cannot be adjusted, "-. -" appears to the right of
(stitch width
c adjustment key) to sew with on the right, select "4", and with the stitches bunched together may bend or break.
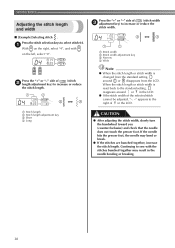
● If the stitches are bunched together, increase the stitch length. SEWING BASICS
Adjusting the stitch length and width
■...
Users Manual - English - Page 44
... turning the handwheel toward you select a stitch, the machine automatically sets the stitch width and length for your sewing projects are the same as a pivot.
Leave the needle lowered (in order to its highest position.
42
SEWING BASICS
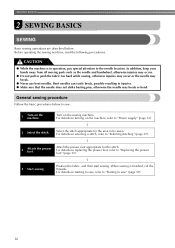
USEFUL SEWING TIPS
Various ways to these tips when sewing your project.
For the trial sewing, use a piece of fabric and thread...
Users Manual - English - Page 49
... controller or (start/stop button) is finished, cut the thread.
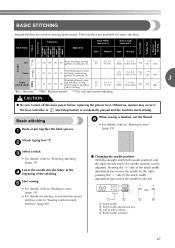
Basic stitching
Baste or pin together the fabric pieces. b
Select a stitch.
BASIC STITCHING
Straight stitches are used for sewing plain seams. Three stitches are available for basic stitching.
Application
Stitch Width [mm (inch.)]
Stitch Length [mm (inch.)]
Auto Manual Auto Manual
Straight Pattern
Presser Foot...
Users Manual - English - Page 51
... facing up.
3
5
4
1
2
1
2
1
2
a Wrong side of fabric b Right side of fabric c Edge of fabric d Basting stitching e 5 mm (3/16 inch)
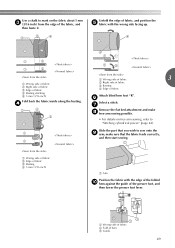
Fold back the fabric inside along the basting. Use a chalk to mark on free-arm sewing, refer to sew onto the i arm, make h free-arm sewing possible.
• For details on the fabric about 5 mm c (3/16 inch) from the...
Users Manual - English - Page 52
... not catch the hem fold If the needle does not catch the hem fold, adjust the stitch width so that the needle slightly catches the fold by pressing the "-" side of the stitch width adjustment key. Sew with the fold of fabric
50 a Wrong side of fabric
b Right side of the hem. a Needle...
Users Manual - English - Page 59
... foot controller or (start/stop button) is accidentally pressed and the machine starts sewing.
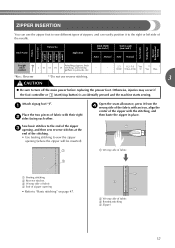
Sew basic stitches to turn off the main power before replacing the presser foot. b Wrong side of fabric with the stitching, and then baste the zipper in place.
Attach zigzag foot "J". Stitch Name
Pattern No.
a
Place the two pieces of fabric c Basting stitching d Zipper
57
Users Manual - English - Page 60
... slider, leave the needle lowered (in step e.
f
CAUTION
● Turn the handwheel by hand to c.
a Stitching b Right side of fabric c Basting stitching d End of zipper opening
Sew the stitching in order, from a to make sure the needle does not hit the presser foot before you start sewing.
With the right side of the fabric facing up,
g continue...
Users Manual - English - Page 71
...Reinforcement **Select a stitch width of the
thin paper or water-soluble stabilizer, sewing is used .
This stitch is more decorative when thicker thread is accidentally pressed and the machine starts sewing.
e
•...two pieces of
fabric.
3
1
2
a Thin paper or water soluble stabilizer b Basting stitching c 4 mm (3/16 inch)
Attach zigzag foot "J". Decorative hemming on blouses and ...
Users Manual - English - Page 87
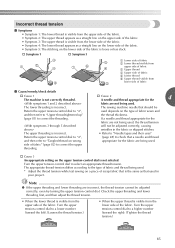
... side of the fabric. The sewing machine needle that used in the fabric or skipped stitches.
• Refer to "Needle types and their uses"
(page 28) to check that a needle and thread
appropriate for the fabric are incorrect, the thread tension cannot be adjusted correctly, causing
wrinkles in your project. Note
● If the...
Similar Questions

Brother Sewing Machine Model Ce5500prw How To Change Light
(Posted by sallccyy0 9 years ago)

How To Oil A Brother Project Runway Sewing Machine
(Posted by carmaknk 9 years ago)

How To Thread Brother Project Runway Sewing Machine Ls2250prw Manual
(Posted by waSs501w 10 years ago)

Is Brother Project Runway Sewing Machine 2300 Review
(Posted by Dmojoelg 10 years ago)

How To Sew With Brother Sewing Machine Ce5500prw
(Posted by testycr 10 years ago)