
Users Manual - English
Page 4
...unsteady or slanted table, otherwise the machine may fall, resulting in fire or an electric shock. • Do not place this machine on the foot controller. • Do not use bent or damaged needles. • Keep fingers away from the build up of . Do not use or store ...8226; Switch the machine to the symbol "O" position to turn it off when making any air openings blocked. Keep ventilation openings of the machine and foot control free from all moving parts. Do not use extension cords. Never allow children to assure correct installation. 2 otherwise, the machine, power cord or...
...unsteady or slanted table, otherwise the machine may fall, resulting in fire or an electric shock. • Do not place this machine on the foot controller. • Do not use bent or damaged needles. • Keep fingers away from the build up of . Do not use or store ...8226; Switch the machine to the symbol "O" position to turn it off when making any air openings blocked. Keep ventilation openings of the machine and foot control free from all moving parts. Do not use extension cords. Never allow children to assure correct installation. 2 otherwise, the machine, power cord or...

Users Manual - English
Page 6
......9 Operation buttons ...9 Operation panel ...10 Spool pin ...10 USING YOUR SEWING MACHINE 12 Power supply precautions ...12 Power supply ...12 Foot controller ...13 Sewing speed controller (for models equipped with the start/stop button 13 Changing the needle stop position ...13 THREADING THE MACHINE 14 Winding the bobbin ...14... types and their uses ...28 Checking the needle ...29 Replacing the needle ...29 Sewing with the twin needle ...31 REPLACING THE PRESSER FOOT 33 Replacing the presser foot ...33 Removing the presser foot holder ...34 2. CONTENTS IMPORTANT SAFETY INSTRUCTIONS 1 1.
......9 Operation buttons ...9 Operation panel ...10 Spool pin ...10 USING YOUR SEWING MACHINE 12 Power supply precautions ...12 Power supply ...12 Foot controller ...13 Sewing speed controller (for models equipped with the start/stop button 13 Changing the needle stop position ...13 THREADING THE MACHINE 14 Winding the bobbin ...14... types and their uses ...28 Checking the needle ...29 Replacing the needle ...29 Sewing with the twin needle ...31 REPLACING THE PRESSER FOOT 33 Replacing the presser foot ...33 Removing the presser foot holder ...34 2. CONTENTS IMPORTANT SAFETY INSTRUCTIONS 1 1.
Users Manual - English
Page 8
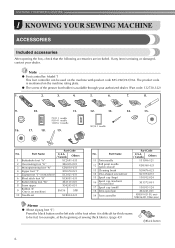
... Included accessories After opening the box, check that the following accessories are included. Note ● Foot controller: Model T This foot controller can be fed, for example, at the beginning of the presser foot holder is difficult for thick seams to be used on machine) XC3021-031 6 Blind stitch...fabrics. (page 43) aBlack button 6 The product code is mentioned on machine) 17 Spool cap (small) 18 Extra spool pin 19 Foot controller Part Code U.S.A. / Canada Others 131096-121 XD0360-021 X59476-021 XC1074-051 130012-024 XE1372-001 130013-124 XE2241-001 XD0501-021 (...
... Included accessories After opening the box, check that the following accessories are included. Note ● Foot controller: Model T This foot controller can be fed, for example, at the beginning of the presser foot holder is difficult for thick seams to be used on machine) XC3021-031 6 Blind stitch...fabrics. (page 43) aBlack button 6 The product code is mentioned on machine) 17 Spool cap (small) 18 Extra spool pin 19 Foot controller Part Code U.S.A. / Canada Others 131096-121 XD0360-021 X59476-021 XC1074-051 130012-024 XE1372-001 130013-124 XE2241-001 XD0501-021 (...
Users Manual - English
Page 10
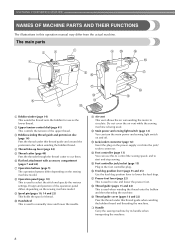
...disc when winding the bobbin thread. j Handwheel This is used . KNOWING YOUR SEWING MACHINE NAMES OF MACHINE PARTS AND THEIR FUNCTIONS The illustrations in the foot controller plug. The main parts a Bobbin winder (page 14) This winds the thread onto the bobbin for use this operation manual may differ from the ...used when winding the thread onto the bobbin and then threading the machine. m Jack/socket connector (page 12) Insert the plug on and off. n Foot controller (page 13) You can turn the main power and sewing light switch on the power supply cord into the jack/ socket connector...
...disc when winding the bobbin thread. j Handwheel This is used . KNOWING YOUR SEWING MACHINE NAMES OF MACHINE PARTS AND THEIR FUNCTIONS The illustrations in the foot controller plug. The main parts a Bobbin winder (page 14) This winds the thread onto the bobbin for use this operation manual may differ from the ...used when winding the thread onto the bobbin and then threading the machine. m Jack/socket connector (page 12) Insert the plug on and off. n Foot controller (page 13) You can turn the main power and sewing light switch on the power supply cord into the jack/ socket connector...

Users Manual - English
Page 15
... sewing machine. Changing the needle stop position changes to build up on the foot controller. a Faster You should make sure that nothing is placed on the foot controller when the machine is the foot controller's maximum sewing speed. X The needle stop position Normally, the sewing machine .... Slide the sewing speed controller to the left to sew at a slower speed, or slide the speed controller to the right to prevent the machine from accidentally being started. Note ● When the foot controller is stopped. Foot controller Insert the foot controller plug into its jack/socket...
... sewing machine. Changing the needle stop position changes to build up on the foot controller. a Faster You should make sure that nothing is placed on the foot controller when the machine is the foot controller's maximum sewing speed. X The needle stop position Normally, the sewing machine .... Slide the sewing speed controller to the left to sew at a slower speed, or slide the speed controller to the right to prevent the machine from accidentally being started. Note ● When the foot controller is stopped. Foot controller Insert the foot controller plug into its jack/socket...
Users Manual - English
Page 18
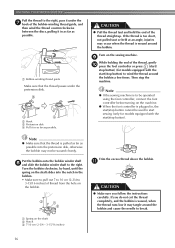
...at an angle, injuries may occur when the thread is wound, when the thread runs low it may not be operated using the foot controller, connect the foot controller before turning on the shaft slides into the pretension disk, otherwise the bobbin may tangle around the bobbin a few times. a ...the right, pass it under the pretension disk. Note ● Make sure that the thread passes under the g hook of the thread, gently j press the foot controller or press (start/ stop button) (for models equipped with the start /stop button). Turn on the shaft b Notch c 7-10 cm (2-3/4 - 3-15...
...at an angle, injuries may occur when the thread is wound, when the thread runs low it may not be operated using the foot controller, connect the foot controller before turning on the shaft slides into the pretension disk, otherwise the bobbin may tangle around the bobbin a few times. a ...the right, pass it under the pretension disk. Note ● Make sure that the thread passes under the g hook of the thread, gently j press the foot controller or press (start/ stop button) (for models equipped with the start /stop button). Turn on the shaft b Notch c 7-10 cm (2-3/4 - 3-15...
Users Manual - English
Page 19
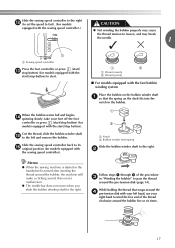
...set the speed to fast). (For models CAUTION equipped with the sewing speed controller.) ● Not winding the bobbin properly may cause the thread tension to loosen, and may break the needle. 1 a Sewing speed controller Press the foot controller or press (start/ m stop button) (for models equipped with the ...start/stop button) to start /stop button) (for models equipped with your foot off the foot controller or press (start/stop button). a Notch b Bobbin winder shaft spring Slide the bobbin winder shaft to the left hand, use ...
...set the speed to fast). (For models CAUTION equipped with the sewing speed controller.) ● Not winding the bobbin properly may cause the thread tension to loosen, and may break the needle. 1 a Sewing speed controller Press the foot controller or press (start/ m stop button) (for models equipped with the ...start/stop button) to start /stop button) (for models equipped with your foot off the foot controller or press (start/stop button). a Notch b Bobbin winder shaft spring Slide the bobbin winder shaft to the left hand, use ...
Users Manual - English
Page 20
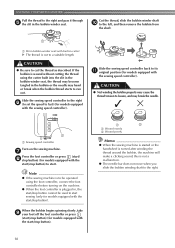
...j to the right and pass it through e the slit in cutter) X The thread is wound without cutting the thread using the foot controller, connect the foot controller before turning on the sewing machine. CAUTION ● Not winding the bobbin properly may cause the thread tension to loosen, and may ...equipped with the start . this is turned after winding the thread around the bobbin, the machine will make a clicking sound; g Press the foot controller or press (start/ h stop button) (for models equipped with the start/stop button cannot be operated using the cutter built into the slit ...
...j to the right and pass it through e the slit in cutter) X The thread is wound without cutting the thread using the foot controller, connect the foot controller before turning on the sewing machine. CAUTION ● Not winding the bobbin properly may cause the thread tension to loosen, and may ...equipped with the start . this is turned after winding the thread around the bobbin, the machine will make a clicking sound; g Press the foot controller or press (start/ h stop button) (for models equipped with the start/stop button cannot be operated using the cutter built into the slit ...

Users Manual - English
Page 21
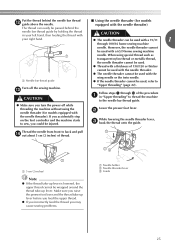
... wrong direction, it may cause the thread tension to sew, you could be incorrect or break the needle. 19 If you accidentally step on the foot controller and the machine starts to loosen, breaking the needle and resulting in injury. Be sure to be injured. raise the presser... foot lever. 1 CAUTION Turn off while threading the machine. Actual size 11.5 mm (7/16 inch) This model Other models CAUTION ● Make sure you turn the ...
... wrong direction, it may cause the thread tension to sew, you could be incorrect or break the needle. 19 If you accidentally step on the foot controller and the machine starts to loosen, breaking the needle and resulting in injury. Be sure to be injured. raise the presser... foot lever. 1 CAUTION Turn off while threading the machine. Actual size 11.5 mm (7/16 inch) This model Other models CAUTION ● Make sure you turn the ...
Users Manual - English
Page 27
...sewing problems. a Needle holder b Needle threader lever c Guide 25 Follow steps a through 100/16 home sewing machine needle. Lower the presser foot lever. a Needle bar thread guide ● If the needle threader cannot be passed behind the needle bar thread guide by holding the thread in... is lowered, the upper thread cannot be used with the wing needle or the twin needle. If you accidentally step on the foot controller and the machine starts to Turn off while threading the machine without using special thread such as transparent nylon thread or metallic thread,...
...sewing problems. a Needle holder b Needle threader lever c Guide 25 Follow steps a through 100/16 home sewing machine needle. Lower the presser foot lever. a Needle bar thread guide ● If the needle threader cannot be passed behind the needle bar thread guide by holding the thread in... is lowered, the upper thread cannot be used with the wing needle or the twin needle. If you accidentally step on the foot controller and the machine starts to Turn off while threading the machine without using special thread such as transparent nylon thread or metallic thread,...
Users Manual - English
Page 31
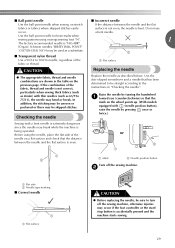
... thick fabrics (such as denim) with a bent needle is extremely dangerous since the needle may break while the machine is being operated. Before using monogramming foot "N". 1 The factory recommended needle is "HG-4BR" (Organ). b a Flat side b Needle type marking ■ Correct needle 1 a Flat surface CAUTION ● Before replacing ...the needle and the flat surface is even. 1 2 a Mark b Needle position button Turn off the sewing machine, otherwise injuries may occur if the foot controller or the start/ stop button is accidentally pressed and the machine starts sewing. 29
... thick fabrics (such as denim) with a bent needle is extremely dangerous since the needle may break while the machine is being operated. Before using monogramming foot "N". 1 The factory recommended needle is "HG-4BR" (Organ). b a Flat side b Needle type marking ■ Correct needle 1 a Flat surface CAUTION ● Before replacing ...the needle and the flat surface is even. 1 2 a Mark b Needle position button Turn off the sewing machine, otherwise injuries may occur if the foot controller or the start/ stop button is accidentally pressed and the machine starts sewing. 29
Users Manual - English
Page 35
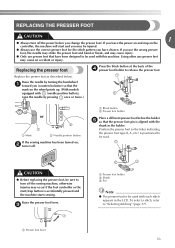
.... a Black button b Presser foot holder Place a different presser foot below . c a Presser foot holder b Shank c Pin Note ● The presser foot to be sure to turn off the power before you change the presser foot. REPLACING THE PRESSER FOOT CAUTION 1 ● Always turn off the sewing machine, otherwise injuries may occur if the foot controller or the start and...
.... a Black button b Presser foot holder Place a different presser foot below . c a Presser foot holder b Shank c Pin Note ● The presser foot to be sure to turn off the power before you change the presser foot. REPLACING THE PRESSER FOOT CAUTION 1 ● Always turn off the sewing machine, otherwise injuries may occur if the foot controller or the start and...
Users Manual - English
Page 41
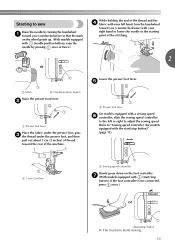
...twice.) While holding the end of the stitching. 2 or a Mark b Needle position button Raise the presser foot lever. Refer to "Sewing speed controller (for models equipped with the start /stop button), if the foot controller is not connected, press once.) or aStart/stop button)" (page 13). b a Presser... foot lever Place the fabric under the presser foot, pass c the thread under the presser foot, and then pull out about 5 cm (2 inches) of ...
...twice.) While holding the end of the stitching. 2 or a Mark b Needle position button Raise the presser foot lever. Refer to "Sewing speed controller (for models equipped with the start /stop button), if the foot controller is not connected, press once.) or aStart/stop button)" (page 13). b a Presser... foot lever Place the fabric under the presser foot, pass c the thread under the presser foot, and then pull out about 5 cm (2 inches) of ...
Users Manual - English
Page 42
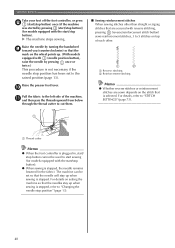
...and then pass the threads upward from below through the thread cutter to "STITCH SETTINGS" (page 73). 1 a Thread cutter Memo ● When the foot controller is selected. X The machine stops sewing. For details, refer to cut them. ■ Sewing reinforcement stitches When sewing stitches other . a Reverse stitching ... is not necessary if the needle stop position has been set so that is plugged in the fabric). SEWING BASICS Take your foot off the foot controller, or press h (start/stop button) once (if the machine was started by pressing (start/stop button)) (for models equipped...
...and then pass the threads upward from below through the thread cutter to "STITCH SETTINGS" (page 73). 1 a Thread cutter Memo ● When the foot controller is selected. X The machine stops sewing. For details, refer to cut them. ■ Sewing reinforcement stitches When sewing stitches other . a Reverse stitching ... is not necessary if the needle stop position has been set so that is plugged in the fabric). SEWING BASICS Take your foot off the foot controller, or press h (start/stop button) once (if the machine was started by pressing (start/stop button)) (for models equipped...
Users Manual - English
Page 47
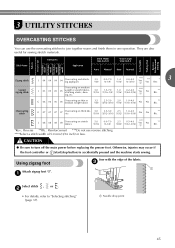
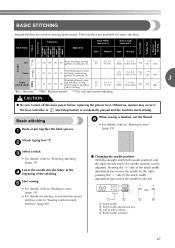
...) **** Yes ( J ) No ** Rfc. CAUTION ● Be sure to "Selecting stitching" (page 37). Otherwise, injuries may occur if the foot controller or (start/stop button) is accidentally pressed and the machine starts sewing. They are also useful for sewing stretch materials. J 08 08 08 08 Overcasting... on thick fabrics 5.0 (3/16) 2.5-5.0 (3/32-3/16) 2.5 (3/32) 1.0-4.0 (1/16-3/16) No No ** Rfc. c Attach zigzag foot "J". Application Stitch Width [mm (inch.)] Stitch Length [mm (inch.)] Auto Manual Auto Manual Zigzag stitch 3-point zigzag stitch J 04 04 04...
...) **** Yes ( J ) No ** Rfc. CAUTION ● Be sure to "Selecting stitching" (page 37). Otherwise, injuries may occur if the foot controller or (start/stop button) is accidentally pressed and the machine starts sewing. They are also useful for sewing stretch materials. J 08 08 08 08 Overcasting... on thick fabrics 5.0 (3/16) 2.5-5.0 (3/32-3/16) 2.5 (3/32) 1.0-4.0 (1/16-3/16) No No ** Rfc. c Attach zigzag foot "J". Application Stitch Width [mm (inch.)] Stitch Length [mm (inch.)] Auto Manual Auto Manual Zigzag stitch 3-point zigzag stitch J 04 04 04...
Users Manual - English
Page 49
... 01 01 stitching, and sewing - rative stitching *Rev.: Reverse **Rfc.: Reinforcement ***Do not use reverse stitching. Attach zigzag foot "J". Lower the needle into the fabric at the d beginning of the stitch width adjustment key moves the needle to "Sewing ... inseams, sewing stretch fabrics and deco- 0.0 (0) 0.0-7.0 (0-1/4) 2.5 (3/32) 1.5-4.0 (1/16-3/16) No No ** Rfc. Otherwise, injuries may occur if the foot controller or (start/stop button) is finished, cut the thread. a Stitch width b Stitch width adjustment key c Left needle position d Right needle position 47 BASIC ...
... 01 01 stitching, and sewing - rative stitching *Rev.: Reverse **Rfc.: Reinforcement ***Do not use reverse stitching. Attach zigzag foot "J". Lower the needle into the fabric at the d beginning of the stitch width adjustment key moves the needle to "Sewing ... inseams, sewing stretch fabrics and deco- 0.0 (0) 0.0-7.0 (0-1/4) 2.5 (3/32) 1.5-4.0 (1/16-3/16) No No ** Rfc. Otherwise, injuries may occur if the foot controller or (start/stop button) is finished, cut the thread. a Stitch width b Stitch width adjustment key c Left needle position d Right needle position 47 BASIC ...

Users Manual - English
Page 50
...to slide onto the arm or the length is accidentally pressed and the machine starts sewing. Otherwise, injuries may occur if the foot controller or (start/stop button) is too short, the fabric will not feed and desired results may be displayed on the LCD... Width [mm (inch.)] Stitch Length [mm (inch.)] Stitch Name Application Auto Manual Auto Manual Pattern Presser Foot 70 stitches model 60 stitches model 50 stitches model 40 stitches model Twin Needle Walking Foot Reverse/ Reinforcement Stitching Blind hem stitch R 09 09 09 09 Blind hem stitching on stretch fabrics 0 (0) -3...
...to slide onto the arm or the length is accidentally pressed and the machine starts sewing. Otherwise, injuries may occur if the foot controller or (start/stop button) is too short, the fabric will not feed and desired results may be displayed on the LCD... Width [mm (inch.)] Stitch Length [mm (inch.)] Stitch Name Application Auto Manual Auto Manual Pattern Presser Foot 70 stitches model 60 stitches model 50 stitches model 40 stitches model Twin Needle Walking Foot Reverse/ Reinforcement Stitching Blind hem stitch R 09 09 09 09 Blind hem stitching on stretch fabrics 0 (0) -3...

Users Manual - English
Page 53
...) No No * Auto Rfc. Otherwise, injuries may occur if the foot controller or (start/stop button) is about 28 mm (1-1/8 inches) (diameter + thickness of the presser foot to turn off the main power before replacing the presser foot. Application Stitch Width [mm (inch.)] Stitch Length [mm (inch.)] ... (1/64-1/16) No No * Auto Rfc. A 34 34 - BUTTONHOLE SEWING Pattern Presser Foot 70 stitches model 60 stitches model 50 stitches model 40 stitches model Twin Needle Walking Foot Reverse/ Reinforcement Stitching Buttonholes can be sewn and buttons can be sewn on thin and medium...
...) No No * Auto Rfc. Otherwise, injuries may occur if the foot controller or (start/stop button) is about 28 mm (1-1/8 inches) (diameter + thickness of the presser foot to turn off the main power before replacing the presser foot. Application Stitch Width [mm (inch.)] Stitch Length [mm (inch.)] ... (1/64-1/16) No No * Auto Rfc. A 34 34 - BUTTONHOLE SEWING Pattern Presser Foot 70 stitches model 60 stitches model 50 stitches model 40 stitches model Twin Needle Walking Foot Reverse/ Reinforcement Stitching Buttonholes can be sewn and buttons can be sewn on thin and medium...
Users Manual - English
Page 59
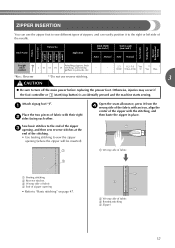
... to the right or left side of fabric with the stitching, and then baste the zipper in place. Otherwise, injuries may occur if the foot controller or (start/stop button) is accidentally pressed and the machine starts sewing. b Wrong side of the zipper with their right b sides facing ...each other. Attach zigzag foot "J". Sew basic stitches to the end of the zipper c opening, and then sew reverse stitches at the end of zipper opening (where the zipper...
... to the right or left side of fabric with the stitching, and then baste the zipper in place. Otherwise, injuries may occur if the foot controller or (start/stop button) is accidentally pressed and the machine starts sewing. b Wrong side of the zipper with their right b sides facing ...each other. Attach zigzag foot "J". Sew basic stitches to the end of the zipper c opening, and then sew reverse stitches at the end of zipper opening (where the zipper...
Users Manual - English
Page 61
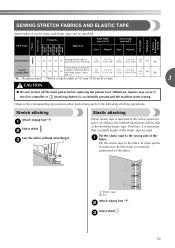
...16-3/16) ( J ) No * Rfc. 3-point zigzag stitch J 05 05 05 Overcasting on the fabric. 1 2 a Elastic tape b Pin Attach zigzag foot "J". Otherwise, injuries may occur if the foot controller or (start/stop button) is necessary that a suitable length of the elastic tape be used. b Select stitch . ing, etc. 5.0 (3/16) 1.5-7.0 (1/16... the wrong side of the a fabric. Pin the elastic tape to turn off the main power before replacing the presser foot. Stretch stitching Attach zigzag foot "J". a Select stitch . Pin the elastic tape to the fabric at a few points to the cuff or waist of...
...16-3/16) ( J ) No * Rfc. 3-point zigzag stitch J 05 05 05 Overcasting on the fabric. 1 2 a Elastic tape b Pin Attach zigzag foot "J". Otherwise, injuries may occur if the foot controller or (start/stop button) is necessary that a suitable length of the elastic tape be used. b Select stitch . ing, etc. 5.0 (3/16) 1.5-7.0 (1/16... the wrong side of the a fabric. Pin the elastic tape to turn off the main power before replacing the presser foot. Stretch stitching Attach zigzag foot "J". a Select stitch . Pin the elastic tape to the fabric at a few points to the cuff or waist of...


