

Users Manual - English
Page 6
... ...9 Operation panel ...10 Spool pin ...10 USING YOUR SEWING MACHINE 12 Power supply precautions ...12 Power supply ...12 Foot controller ...13 Sewing speed controller (for models equipped with the start/stop button 13 Changing the needle stop position ...13 THREADING THE MACHINE 14 Winding the bobbin ...14 Lower threading ...19 Upper...
... ...9 Operation panel ...10 Spool pin ...10 USING YOUR SEWING MACHINE 12 Power supply precautions ...12 Power supply ...12 Foot controller ...13 Sewing speed controller (for models equipped with the start/stop button 13 Changing the needle stop position ...13 THREADING THE MACHINE 14 Winding the bobbin ...14 Lower threading ...19 Upper...

Users Manual - English
Page 7
... Incorrect thread tension ...85 Fabric is caught in the machine and cannot be removed 86 List of symptoms ...90 ERROR MESSAGES ...95 Operation beep (for models equipped with the operation beep 95 INDEX ...96 5 UTILITY STITCHES 45 OVERCASTING STITCHES 45 Using zigzag foot ...45 Using overcasting foot ...46 BASIC STITCHING ...47...
... Incorrect thread tension ...85 Fabric is caught in the machine and cannot be removed 86 List of symptoms ...90 ERROR MESSAGES ...95 Operation beep (for models equipped with the operation beep 95 INDEX ...96 5 UTILITY STITCHES 45 OVERCASTING STITCHES 45 Using zigzag foot ...45 Using overcasting foot ...46 BASIC STITCHING ...47...
Users Manual - English
Page 8
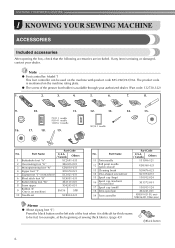
...-001 3 Monogramming foot "N" XD0810-031 4 Zipper foot "I" X59370-021 5 Zigzag foot "J" (on machine.) SA156 SFB 10 Needle set XC8834-021 No. Note ● Foot controller: Model T This foot controller can be fed, for example, at the beginning of the presser foot holder is mentioned on the machine rating plate. ● The...
...-001 3 Monogramming foot "N" XD0810-031 4 Zipper foot "I" X59370-021 5 Zigzag foot "J" (on machine.) SA156 SFB 10 Needle set XC8834-021 No. Note ● Foot controller: Model T This foot controller can be fed, for example, at the beginning of the presser foot holder is mentioned on the machine rating plate. ● The...
Users Manual - English
Page 10
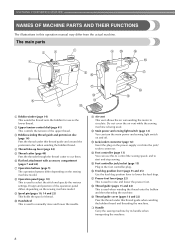
... 22) This holds the spool of the upper thread. j Handwheel This is used . m Jack/socket connector (page 12) Insert the plug on the sewing machine model. t Handle Carry the sewing machine by its handle when transporting the machine. 8 b Upper tension-control dial (page 41) This controls the tension of thread. f Flat... to raise and lower the presser foot. n Foot controller (page 13) You can turn the main power and sewing light switch on the sewing machine model.
... 22) This holds the spool of the upper thread. j Handwheel This is used . m Jack/socket connector (page 12) Insert the plug on the sewing machine model. t Handle Carry the sewing machine by its handle when transporting the machine. 8 b Upper tension-control dial (page 41) This controls the tension of thread. f Flat... to raise and lower the presser foot. n Foot controller (page 13) You can turn the main power and sewing light switch on the sewing machine model.

Users Manual - English
Page 11
... to easily perform various basic sewing machine operations. Be sure to raise and lower the presser foot. Attach the appropriate presser foot for models equipped with the quick- m Presser foot lever Raise and lower the presser foot lever to raise the needle before threading the needle. ...to hold the presser foot holder in the fabric. n Needle clamp screw Use the needle clamp screw to change the sewing direction or for models equipped with the sewing speed controller) Slide the sewing speed controller to start /stop button (for the selected stitching. 1 f Needle plate ...
... to easily perform various basic sewing machine operations. Be sure to raise and lower the presser foot. Attach the appropriate presser foot for models equipped with the quick- m Presser foot lever Raise and lower the presser foot lever to raise the needle before threading the needle. ...to hold the presser foot holder in the fabric. n Needle clamp screw Use the needle clamp screw to change the sewing direction or for models equipped with the sewing speed controller) Slide the sewing speed controller to start /stop button (for the selected stitching. 1 f Needle plate ...
Users Manual - English
Page 12
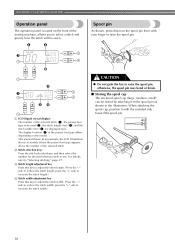
...adjust the stitch length. (Press the "-" side to reduce the stitch width; KNOWING YOUR SEWING MACHINE Operation panel The operation panel, located on the model. The display location (2) of the presser foot type differs depending on the front of the selected stitch. c Stitch length adjustment key Press this ... reduce the stitch length; When attaching the spool cap, position it to the spool pin as an example, the LCD (illustration above) of models where the presser foot type appears above the number of the sewing machine, allows you wish to select a stitch and specify how the stitch ...
...adjust the stitch length. (Press the "-" side to reduce the stitch width; KNOWING YOUR SEWING MACHINE Operation panel The operation panel, located on the model. The display location (2) of the presser foot type differs depending on the front of the selected stitch. c Stitch length adjustment key Press this ... reduce the stitch length; When attaching the spool cap, position it to the spool pin as an example, the LCD (illustration above) of models where the presser foot type appears above the number of the sewing machine, allows you wish to select a stitch and specify how the stitch ...

Users Manual - English
Page 15
..., release the "-" side of (stitch selection b key) on the foot controller when the machine is set to start sewing (only for models equipped with the start/stop position Normally, the sewing machine is not in , the start /stop position changes to select the desired sewing ... the raised position. When you take your foot off the sewing machine. Hold down lightly, the machine will stop. Sewing speed controller (for models equipped with the start /stop position to leave the needle raised when sewing is the foot controller's maximum sewing speed. Slower a Sewing speed ...
..., release the "-" side of (stitch selection b key) on the foot controller when the machine is set to start sewing (only for models equipped with the start/stop position Normally, the sewing machine is not in , the start /stop position changes to select the desired sewing ... the raised position. When you take your foot off the sewing machine. Hold down lightly, the machine will stop. Sewing speed controller (for models equipped with the start /stop position to leave the needle raised when sewing is the foot controller's maximum sewing speed. Slower a Sewing speed ...
Users Manual - English
Page 16
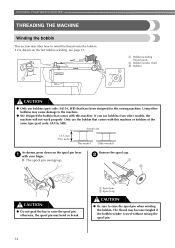
... to wind the thread onto the bobbin. • For details on the spool pin lever a with this sewing machine. Remove the spool cap. Using other models, the machine will not work properly. b CAUTION ● Do not grab the bar to the machine. ● We designed the bobbin that comes with your...
... to wind the thread onto the bobbin. • For details on the spool pin lever a with this sewing machine. Remove the spool cap. Using other models, the machine will not work properly. b CAUTION ● Do not grab the bar to the machine. ● We designed the bobbin that comes with your...
Users Manual - English
Page 18
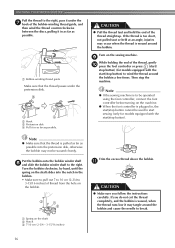
... too short, not pulled taut or held at an angle, injuries may tangle around the bobbin and cause the needle to start sewing (only for models equipped with the start /stop button) to 3-15/16 inches) of thread from the hole on the shaft slides into the pretension disk, otherwise ... hand, until the spring on the bobbin. i While holding the end of the thread, gently j press the foot controller or press (start/ stop button) (for models equipped with the start /stop the machine. Put the bobbin onto the bobbin winder shaft h and slide the bobbin winder shaft to the right, pass...
... too short, not pulled taut or held at an angle, injuries may tangle around the bobbin and cause the needle to start sewing (only for models equipped with the start /stop button) to 3-15/16 inches) of thread from the hole on the shaft slides into the pretension disk, otherwise ... hand, until the spring on the bobbin. i While holding the end of the thread, gently j press the foot controller or press (start/ stop button) (for models equipped with the start /stop the machine. Put the bobbin onto the bobbin winder shaft h and slide the bobbin winder shaft to the right, pass...
Users Manual - English
Page 19
... around the pre-tension disk (page 14). Slide the sewing speed controller to the right l (to set the speed to fast). (For models CAUTION equipped with the sewing speed controller.) ● Not winding the bobbin properly may cause the thread tension to loosen, and may break the... needle. 1 a Sewing speed controller Press the foot controller or press (start/ m stop button) (for models equipped with the start/stop button) to start /stop button) (for models equipped with your left and remove the bobbin. Slide the sewing speed controller back to its p original position (for...
... around the pre-tension disk (page 14). Slide the sewing speed controller to the right l (to set the speed to fast). (For models CAUTION equipped with the sewing speed controller.) ● Not winding the bobbin properly may cause the thread tension to loosen, and may break the... needle. 1 a Sewing speed controller Press the foot controller or press (start/ m stop button) (for models equipped with the start/stop button) to start /stop button) (for models equipped with your left and remove the bobbin. Slide the sewing speed controller back to its p original position (for...
Users Manual - English
Page 20
... is cut the thread as described. Slide the sewing speed controller to the right f (to set the speed to its k original position (for models equipped with the sewing speed controller). If the bobbin is plugged in, the start/stop button cannot be operated using the cutter built into the...seat, the thread may become tangled in bobbin winder seat (with the start/stop button) to start sewing (only for models equipped with the start /stop button) (for models equipped with built-in the bobbin winder seat. When the bobbin begins spinning slowly, take i your foot off the foot...
... is cut the thread as described. Slide the sewing speed controller to the right f (to set the speed to its k original position (for models equipped with the sewing speed controller). If the bobbin is plugged in, the start/stop button cannot be operated using the cutter built into the...seat, the thread may become tangled in bobbin winder seat (with the start/stop button) to start sewing (only for models equipped with the start /stop button) (for models equipped with built-in the bobbin winder seat. When the bobbin begins spinning slowly, take i your foot off the foot...

Users Manual - English
Page 21
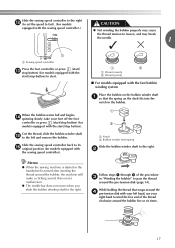
...toward you turn the power off the sewing machine. Actual size 11.5 mm (7/16 inch) This model Other models CAUTION ● Make sure you (counterclockwise) or press (needle position button) (for models Install the bobbin wound with the needle position button), and • For more details on quick-set.... b ● Winding the bobbin improperly may cause the thread tension to sew, you set bobbin, see page 20. If bobbins from other models are used, the machine will not operate correctly. Slide the button and open the cover. Memo ● The direction for this sewing machine....
...toward you turn the power off the sewing machine. Actual size 11.5 mm (7/16 inch) This model Other models CAUTION ● Make sure you (counterclockwise) or press (needle position button) (for models Install the bobbin wound with the needle position button), and • For more details on quick-set.... b ● Winding the bobbin improperly may cause the thread tension to sew, you set bobbin, see page 20. If bobbins from other models are used, the machine will not operate correctly. Slide the button and open the cover. Memo ● The direction for this sewing machine....

Users Manual - English
Page 22
... the thread is indicated by turning a the handwheel toward you set bobbin Memo ● The direction for models equipped with the quick-set the bobbin so the thread unrolls in the diagram). ■ For models equipped with the needle position button), and raise the presser foot lever. c 1 2 1 a Tension-adjusting spring Replace the...
... the thread is indicated by turning a the handwheel toward you set bobbin Memo ● The direction for models equipped with the quick-set the bobbin so the thread unrolls in the diagram). ■ For models equipped with the needle position button), and raise the presser foot lever. c 1 2 1 a Tension-adjusting spring Replace the...
Users Manual - English
Page 24
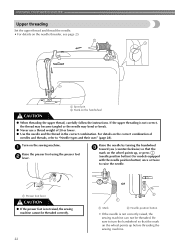
... threading the sewing machine. Be sure to turn the handwheel so that the mark on the wheel points up , or press (needle position button) (for models equipped with the needle position button) once or twice to "Needle types and their uses" (page 28). a Raise the presser foot using the presser foot...
... threading the sewing machine. Be sure to turn the handwheel so that the mark on the wheel points up , or press (needle position button) (for models equipped with the needle position button) once or twice to "Needle types and their uses" (page 28). a Raise the presser foot using the presser foot...
Users Manual - English
Page 27
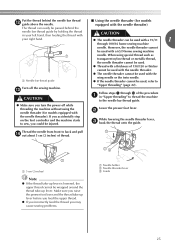
...9679; Thread with a thickness of 130/120 or thicker cannot be used with a 65/9 home sewing machine needle. When using the needle threader (for models equipped with the needle threader) The thread can be wrapped around the thread take -up lever. Thread the needle from front to back and pull...● The needle threader can easily be passed behind the needle bar thread l guide above the needle. ■ Using the needle threader (for models equipped with the needle threader). Make sure you raise the presser foot lever and the thread take -up lever before you feed the upper thread...
...9679; Thread with a thickness of 130/120 or thicker cannot be used with a 65/9 home sewing machine needle. When using the needle threader (for models equipped with the needle threader) The thread can be wrapped around the thread take -up lever. Thread the needle from front to back and pull...● The needle threader can easily be passed behind the needle bar thread l guide above the needle. ■ Using the needle threader (for models equipped with the needle threader). Make sure you raise the presser foot lever and the thread take -up lever before you feed the upper thread...
Users Manual - English
Page 29
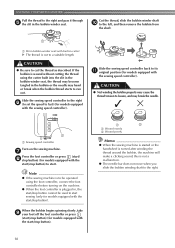
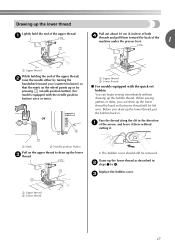
...Replace the bobbin cover. c a Upper thread b Lower thread 27 Draw up the lower thread as described in . or a Upper thread b Lower thread ■ For models equipped with the needle position button) once or twice. Drawing up the lower thread Lightly hold the end of the arrow, and leave it . Pass... mark on the upper thread to 4. a Mark b Needle position button Pull on the wheel points up or by pressing (needle position button) (for models equipped with the quick-set bobbin You can draw up the lower thread by turning the handwheel toward you draw up the lower thread, put...
...Replace the bobbin cover. c a Upper thread b Lower thread 27 Draw up the lower thread as described in . or a Upper thread b Lower thread ■ For models equipped with the needle position button) once or twice. Drawing up the lower thread Lightly hold the end of the arrow, and leave it . Pass... mark on the upper thread to 4. a Mark b Needle position button Pull on the wheel points up or by pressing (needle position button) (for models equipped with the quick-set bobbin You can draw up the lower thread by turning the handwheel toward you draw up the lower thread, put...
Users Manual - English
Page 31
... the machine is being operated. Raise the needle by turning the handwheel a toward you (counterclockwise) so that the mark on the wheel points up. (With models equipped with (needle position button), raise the needle by pressing once or twice.) Sewing with thin needles (such as a substitute. 1 ■ Transparent nylon thread Use...
... the machine is being operated. Raise the needle by turning the handwheel a toward you (counterclockwise) so that the mark on the wheel points up. (With models equipped with (needle position button), raise the needle by pressing once or twice.) Sewing with thin needles (such as a substitute. 1 ■ Transparent nylon thread Use...
Users Manual - English
Page 34
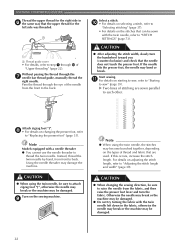
... the twin needle, refer to step a through l of stitching are used. CAUTION ● After adjusting the stitch width, slowly turn the fabric. Start sewing. Note Models equipped with the twin needle left side was threaded. CAUTION ● When using the twin needle, the stitches may bend or break. Otherwise the needle...
... the twin needle, refer to step a through l of stitching are used. CAUTION ● After adjusting the stitch width, slowly turn the fabric. Start sewing. Note Models equipped with the twin needle left side was threaded. CAUTION ● When using the twin needle, the stitches may bend or break. Otherwise the needle...
Users Manual - English
Page 35
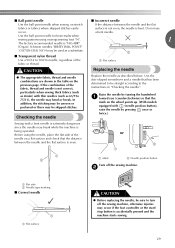
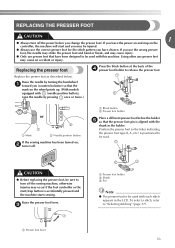
... used with (needle position button), raise the needle by turning the handwheel a toward you (counterclockwise) so that the mark on the wheel points up. (With models equipped with each stitch appears in the holder. Replacing the presser foot Press the black button at the back of the d presser foot holder to...
... used with (needle position button), raise the needle by turning the handwheel a toward you (counterclockwise) so that the mark on the wheel points up. (With models equipped with each stitch appears in the holder. Replacing the presser foot Press the black button at the back of the d presser foot holder to...
Users Manual - English
Page 39
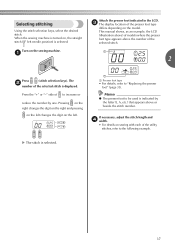
..., select the desired stitch. This manual shows, as an example, the LCD (illustration above) of to be used is selected. Press the "+" or "-" side of models where the presser foot type appears above or beside the stitch number. X The stitch is displayed. Turn on the... model. a Presser foot type • For details, refer to the following example. Memo ● The presser foot to increase or reduce the number by the letter (J, A, ...
..., select the desired stitch. This manual shows, as an example, the LCD (illustration above) of to be used is selected. Press the "+" or "-" side of models where the presser foot type appears above or beside the stitch number. X The stitch is displayed. Turn on the... model. a Presser foot type • For details, refer to the following example. Memo ● The presser foot to increase or reduce the number by the letter (J, A, ...


