
Software Users Manual - English
Page 3
... feature off...72 SCAN...73 CUSTOM SCAN ...73 COPY ...73 PC-FAX (MFC-9440CN and MFC-9840CDW only 74 DEVICE SETTING...74 SCAN...75 Image (example: Microsoft® Paint)...75 OCR (Word Processing program) ...77 E-mail ...78 File attachments ...78 File ...79 CUSTOM SCAN ...80 Customizing a user-defined button...81 COPY ...85 PC-FAX (MFC-9440CN and MFC-9840CDW only 87 Send...
... feature off...72 SCAN...73 CUSTOM SCAN ...73 COPY ...73 PC-FAX (MFC-9440CN and MFC-9840CDW only 74 DEVICE SETTING...74 SCAN...75 Image (example: Microsoft® Paint)...75 OCR (Word Processing program) ...77 E-mail ...78 File attachments ...78 File ...79 CUSTOM SCAN ...80 Customizing a user-defined button...81 COPY ...85 PC-FAX (MFC-9440CN and MFC-9840CDW only 87 Send...
Software Users Manual - English
Page 4
... ...92 Configuring Network Scanning ...92 Using the Scan key...95 Scan to E-mail (PC)...95 Scan to E-mail (E-mail Server, MFC-9840CDW only 96 Scan to Image ...98 Scan to OCR ...99 Scan to File...100 Scan to FTP...101 Scan to FTP Manual Method...105 5 Remote Setup (MFC-9440CN and MFC-9840CDW only) 107 Remote Setup...107 6 Brother PC-FAX Software (MFC-9440CN and MFC-9840CDW only) 109...
... ...92 Configuring Network Scanning ...92 Using the Scan key...95 Scan to E-mail (PC)...95 Scan to E-mail (E-mail Server, MFC-9840CDW only 96 Scan to Image ...98 Scan to OCR ...99 Scan to File...100 Scan to FTP...101 Scan to FTP Manual Method...105 5 Remote Setup (MFC-9440CN and MFC-9840CDW only) 107 Remote Setup...107 6 Brother PC-FAX Software (MFC-9440CN and MFC-9840CDW only) 109...
Software Users Manual - English
Page 6
... E-mail ...183 Supported file types...183 File ...184 CUSTOM SCAN ...185 User-defined button ...185 Scan to Image ...186 Scan to OCR ...187 Scan to E-mail ...188 Scan to File...189 COPY / PC-FAX (PC-FAX is MFC-9440CN and MFC-9840CDW only 190 DEVICE SETTINGS ...191 Remote Setup (MFC-9440CN and MFC-9840CDW only 191 Quick-Dial (MFC-9440CN and MFC-9840CDW only 192 Status Monitor...
... E-mail ...183 Supported file types...183 File ...184 CUSTOM SCAN ...185 User-defined button ...185 Scan to Image ...186 Scan to OCR ...187 Scan to E-mail ...188 Scan to File...189 COPY / PC-FAX (PC-FAX is MFC-9440CN and MFC-9840CDW only 190 DEVICE SETTINGS ...191 Remote Setup (MFC-9440CN and MFC-9840CDW only 191 Quick-Dial (MFC-9440CN and MFC-9840CDW only 192 Status Monitor...
Software Users Manual - English
Page 7
11 Network Scanning 193 Before using Network Scanning ...193 Configuring network scanning ...193 Using the Scan key...195 Scan to E-mail (PC)...196 Scan to E-mail (E-mail server, MFC-9840CDW 197 Scan to Image ...198 Scan to OCR ...199 Scan to File...200 Scan to FTP...201 Scan to FTP Manual Method...205 12 Remote Setup 207 Remote Setup (MFC-9440CN and MFC-9840CDW only 207 A Index 209 vi
11 Network Scanning 193 Before using Network Scanning ...193 Configuring network scanning ...193 Using the Scan key...195 Scan to E-mail (PC)...196 Scan to E-mail (E-mail server, MFC-9840CDW 197 Scan to Image ...198 Scan to OCR ...199 Scan to File...200 Scan to FTP...201 Scan to FTP Manual Method...205 12 Remote Setup 207 Remote Setup (MFC-9440CN and MFC-9840CDW only 207 A Index 209 vi

Software Users Manual - English
Page 54
...Windows Vista™: Choose WIA-Brother MFC-XXXX (WIA-Brother DCP-XXXX) or WIA-Brother MFC-XXXX LAN (WIA-Brother DCP-XXXX LAN). • For other software applications. The Scan or Get Photo panel appears on the Scan or Get Photo panel. 47 b Click File, then Scan or Get Photo. d Choose...from the machine. Note The instructions for scanning in this Guide are for scanning images from the Available Scanners list. The scanning steps may vary when using other operating systems: Choose Brother MFC-XXXX (Brother DCP-XXXX) or Brother MFC-XXXX LAN (Brother DCP-XXXX LAN). (Where XXXX is ...
...Windows Vista™: Choose WIA-Brother MFC-XXXX (WIA-Brother DCP-XXXX) or WIA-Brother MFC-XXXX LAN (WIA-Brother DCP-XXXX LAN). • For other software applications. The Scan or Get Photo panel appears on the Scan or Get Photo panel. 47 b Click File, then Scan or Get Photo. d Choose...from the machine. Note The instructions for scanning in this Guide are for scanning images from the Available Scanners list. The scanning steps may vary when using other operating systems: Choose Brother MFC-XXXX (Brother DCP-XXXX) or Brother MFC-XXXX LAN (Brother DCP-XXXX LAN). (Where XXXX is ...

Software Users Manual - English
Page 58
...lose your file. 51 Note If you scan the document at a resolution of the document appears in the PaperPort™ 11SE window (or your model name)/ Scanner Settings/Scanner Utility. Click OK after you choose a setting. 2 g Click the Scan button in the Start/All Programs/Brother/MFC-XXXX (or...then your PC may be very large. Scanning f If you need advanced settings, click Adjust the quality of the file you are trying to scan. You must restart your PC for the size of the scanned picture (3). Brother Scanner Utility 2 The Brother Scanner Utility is your application window). If...
...lose your file. 51 Note If you scan the document at a resolution of the document appears in the PaperPort™ 11SE window (or your model name)/ Scanner Settings/Scanner Utility. Click OK after you choose a setting. 2 g Click the Scan button in the Start/All Programs/Brother/MFC-XXXX (or...then your PC may be very large. Scanning f If you need advanced settings, click Adjust the quality of the file you are trying to scan. You must restart your PC for the size of the scanned picture (3). Brother Scanner Utility 2 The Brother Scanner Utility is your application window). If...

Software Users Manual - English
Page 60
b Do one of the following: „ For Windows Photo Gallery Click File, then Import from Camera or Scanner. „ For Windows Fax and Scan Click File, New, then Scan. c Choose the scanner you want to Scanning a document into the PC on page 54. 53 The Scan dialog box appears: Go to use. Scanning Scanning a document using the WIA driver (For Windows Photo Gallery and Windows Fax and Scan users) 2 2 Accessing the scanner 2 a Open your software application to scan the document. d Click Import. Note Duplex scan is supported by the MFC-9840CDW and DCP-9045CDN only.
b Do one of the following: „ For Windows Photo Gallery Click File, then Import from Camera or Scanner. „ For Windows Fax and Scan Click File, New, then Scan. c Choose the scanner you want to Scanning a document into the PC on page 54. 53 The Scan dialog box appears: Go to use. Scanning Scanning a document using the WIA driver (For Windows Photo Gallery and Windows Fax and Scan users) 2 2 Accessing the scanner 2 a Open your software application to scan the document. d Click Import. Note Duplex scan is supported by the MFC-9840CDW and DCP-9045CDN only.
Software Users Manual - English
Page 61
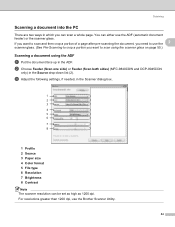
... 2 scanner glass. (See Pre-Scanning to crop a portion you want to scan using the scanner glass on page 55.) Scanning a document using the ADF 2 a Put the document face up in which you can scan a whole page. You can be...Scanning Scanning a document into the PC 2 There are two ways in the ADF. b Choose Feeder (Scan one side) or Feeder (Scan both sides) (MFC-9840CDW and DCP-9045CDN only) in the Scanner dialog box. 1 2 3 4 5 6 7 8 1 Profile 2 Source 3 Paper size 4 Color format 5 File type 6 Resolution 7 Brightness 8 Contrast Note The scanner resolution can either use the Brother...
... 2 scanner glass. (See Pre-Scanning to crop a portion you want to scan using the scanner glass on page 55.) Scanning a document using the ADF 2 a Put the document face up in which you can scan a whole page. You can be...Scanning Scanning a document into the PC 2 There are two ways in the ADF. b Choose Feeder (Scan one side) or Feeder (Scan both sides) (MFC-9840CDW and DCP-9045CDN only) in the Scanner dialog box. 1 2 3 4 5 6 7 8 1 Profile 2 Source 3 Paper size 4 Color format 5 File type 6 Resolution 7 Brightness 8 Contrast Note The scanner resolution can either use the Brother...

Software Users Manual - English
Page 65
... Color 150 dpi Color 300 dpi Color 600 dpi B&W 200 dpi B&W 200x100 dpi JPEG / PDF JPEG / PDF JPEG / PDF TIFF / PDF TIFF / PDF For MFC-9440CN 2 a Put a USB flash memory drive into your document in the PDF (*.PDF) or TIFF file formats (*.TIF). c Press the (Scan) key. b Load your machine. Scanning • Duplex scan is supported by the MFC-9840CDW...
... Color 150 dpi Color 300 dpi Color 600 dpi B&W 200 dpi B&W 200x100 dpi JPEG / PDF JPEG / PDF JPEG / PDF TIFF / PDF TIFF / PDF For MFC-9440CN 2 a Put a USB flash memory drive into your document in the PDF (*.PDF) or TIFF file formats (*.TIF). c Press the (Scan) key. b Load your machine. Scanning • Duplex scan is supported by the MFC-9840CDW...
Software Users Manual - English
Page 66
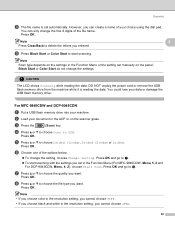
...choice using the dial pad. f Choose one of the options below. „ To change the settings. Press OK and go to delete the letters you set in the Function Menu or the setting set automatically. Note • If you choose color in the resolution setting, you cannot choose... i Press Black Start or Color Start to choose the file type you can only change the first 6 digits of your document in the resolution setting, you cannot choose JPEG. 59 Press OK. Note Scan type depends on the scanner glass. c Press the (Scan) key. For MFC-9840CDW and DCP-9045CDN 2 a ...
...choice using the dial pad. f Choose one of the options below. „ To change the settings. Press OK and go to delete the letters you set in the Function Menu or the setting set automatically. Note • If you choose color in the resolution setting, you cannot choose... i Press Black Start or Color Start to choose the file type you can only change the first 6 digits of your document in the resolution setting, you cannot choose JPEG. 59 Press OK. Note Scan type depends on the scanner glass. c Press the (Scan) key. For MFC-9840CDW and DCP-9045CDN 2 a ...
Software Users Manual - English
Page 67
.... Press OK. For DCP-9045CDN, press Menu, 4, 2, 1. CAUTION The LCD shows Scanning while reading the data. Note 2 Press Clear/Back to start scanning. Changing the default setting 2 a For MFC-9440CN and MFC-9840CDW, press Menu, 5, 2, 1. c Do one of the file name. j Press Black Start or Color Start to delete the letters you can only change the settings. Note...
.... Press OK. For DCP-9045CDN, press Menu, 4, 2, 1. CAUTION The LCD shows Scanning while reading the data. Note 2 Press Clear/Back to start scanning. Changing the default setting 2 a For MFC-9440CN and MFC-9840CDW, press Menu, 5, 2, 1. c Do one of the file name. j Press Black Start or Color Start to delete the letters you can only change the settings. Note...

Software Users Manual - English
Page 68
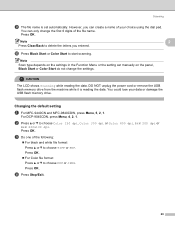
... drive. „ Unusable Device This message will appear if your USB flash memory drive is not supported by your Brother machine. 61 c Press Stop/Exit. 2 2 Understanding the Error Messages 2 Once you are trying to 6 characters.) Press OK. For DCP-9045CDN, press Menu, 4, 2, 2. Scanning Changing the default file name a For MFC-9440CN and MFC-9840CDW, press Menu, 5, 2, 2.
... drive. „ Unusable Device This message will appear if your USB flash memory drive is not supported by your Brother machine. 61 c Press Stop/Exit. 2 2 Understanding the Error Messages 2 Once you are trying to 6 characters.) Press OK. For DCP-9045CDN, press Menu, 4, 2, 2. Scanning Changing the default file name a For MFC-9440CN and MFC-9840CDW, press Menu, 5, 2, 2.

Software Users Manual - English
Page 69
... a black and white or color document into your E-mail application as a file attachment. Press OK. The machine starts scanning the document, creates a file attachment, and launches your machine is an MFC-9840CDW or DCP-9045CDN, go to Step e. Press OK. d Press a or b to E-mail. e Press Black Start or Color Start. Note • Scan type depends on the settings...
... a black and white or color document into your E-mail application as a file attachment. Press OK. The machine starts scanning the document, creates a file attachment, and launches your machine is an MFC-9840CDW or DCP-9045CDN, go to Step e. Press OK. d Press a or b to E-mail. e Press Black Start or Color Start. Note • Scan type depends on the settings...

Software Users Manual - English
Page 71
Press OK. If your machine is an MFC-9840CDW or DCP-9045CDN, go to Step e. If you want the scanned data in color, choose color in scan type on the Device Button tab of the ControlCenter3 configuration. (See SCAN on page 73.) 64 Note • Scan type depends on the settings on the Device Button tab... can have it converted by ScanSoft™ PaperPort™ 11SE OCR to an editable text file and then have the result displayed in your word processing application for viewing and editing. If your machine is an MFC-9440CN or DCP-9040CN, go to Step d. d Press a or b to OCR....
Press OK. If your machine is an MFC-9840CDW or DCP-9045CDN, go to Step e. If you want the scanned data in color, choose color in scan type on the Device Button tab of the ControlCenter3 configuration. (See SCAN on page 73.) 64 Note • Scan type depends on the settings on the Device Button tab... can have it converted by ScanSoft™ PaperPort™ 11SE OCR to an editable text file and then have the result displayed in your word processing application for viewing and editing. If your machine is an MFC-9440CN or DCP-9040CN, go to Step d. d Press a or b to OCR....

Software Users Manual - English
Page 72
... Button tab of your machine is an MFC-9840CDW or DCP-9045CDN, go to put the document in the ADF, or face down on the settings you need to Step e. e Press Black Start or Color Start. To change the file name of scanned documents, enter the file name in scan type on page 73.) • If you...
... Button tab of your machine is an MFC-9840CDW or DCP-9045CDN, go to put the document in the ADF, or face down on the settings you need to Step e. e Press Black Start or Color Start. To change the file name of scanned documents, enter the file name in scan type on page 73.) • If you...

Software Users Manual - English
Page 83
You can add an application to scan a duplex document, check Duplex (two-sided) Scanning and choose Long-edge binding or Short-edge binding. (MFC-9840CDW and DCP-9045CDN only) 3 Change the other settings, if needed. You can also find the application location by clicking the Delete ... application, choose the correct application from the drop-down list. Note This function is also available for Scan to E-mail and Scan to 30 characters) and the Application Location. Choose File Type from the Target Application dropdown list. You can delete an application that you want to the list...
You can add an application to scan a duplex document, check Duplex (two-sided) Scanning and choose Long-edge binding or Short-edge binding. (MFC-9840CDW and DCP-9045CDN only) 3 Change the other settings, if needed. You can also find the application location by clicking the Delete ... application, choose the correct application from the drop-down list. Note This function is also available for Scan to E-mail and Scan to 30 characters) and the Application Location. Choose File Type from the Target Application dropdown list. You can delete an application that you want to the list...

Software Users Manual - English
Page 85
... (MFC-9840CDW and DCP-9045CDN only) You can send the scanned job as an attachment. If you want to scan and then crop a portion of a page after pre-scanning the document, check the Show Scanner Interface box. Uncompressed (*.tif) „ TIFF - ControlCenter3 E-mail 3 Scan to E-mail lets you scan ...(*.png) „ PDF (*.pdf) 78 Uncompressed (*.tif) „ TIFF Multi-Page - To change the default E-mail application or attachment file type, right-click the E-mail button, click ControlCenter Configuration and click the Software Button tab. 3 To change the other settings used to create ...
... (MFC-9840CDW and DCP-9045CDN only) You can send the scanned job as an attachment. If you want to scan and then crop a portion of a page after pre-scanning the document, check the Show Scanner Interface box. Uncompressed (*.tif) „ TIFF - ControlCenter3 E-mail 3 Scan to E-mail lets you scan ...(*.png) „ PDF (*.pdf) 78 Uncompressed (*.tif) „ TIFF Multi-Page - To change the default E-mail application or attachment file type, right-click the E-mail button, click ControlCenter Configuration and click the Software Button tab. 3 To change the other settings used to create ...
Software Users Manual - English
Page 86
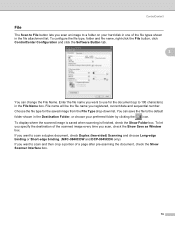
To display where the scanned image is saved when scanning is finished, check the Show Folder box. ControlCenter3 File 3 The Scan to File button lets you scan an image to a folder on your hard disk in one of the file types shown in the Destination Folder, or choose your preferred folder by ...File Name. If you want to scan a duplex document, check Duplex (two-sided) Scanning and choose Long-edge binding or Short-edge binding. (MFC-9840CDW and DCP-9045CDN only) If you want to 100 characters) in the File Name box. To configure the file type, folder and file name, right-click the File ...
To display where the scanned image is saved when scanning is finished, check the Show Folder box. ControlCenter3 File 3 The Scan to File button lets you scan an image to a folder on your hard disk in one of the file types shown in the Destination Folder, or choose your preferred folder by ...File Name. If you want to scan a duplex document, check Duplex (two-sided) Scanning and choose Long-edge binding or Short-edge binding. (MFC-9840CDW and DCP-9045CDN only) If you want to 100 characters) in the File Name box. To configure the file type, folder and file name, right-click the File ...

Software Users Manual - English
Page 107
... scanned data in color, choose color in ControlCenter3. Press OK. The machine starts the scanning process. Note • Scan type depends on the settings on the Device Button tab, Black Start or Color Start do not change the file name of scanned documents, enter the file name in scan type...2sided (L)edge or 2sided (S)edge depending on your machine is an MFC-9840CDW or DCP-9045CDN, go to Step e. Network Scanning Scan to File 4 When you choose Scan to File, you can change the machine's Scan key settings, right-click each Control Center button, click ControlCenter Configuration...
... scanned data in color, choose color in ControlCenter3. Press OK. The machine starts the scanning process. Note • Scan type depends on the settings on the Device Button tab, Black Start or Color Start do not change the file name of scanned documents, enter the file name in scan type...2sided (L)edge or 2sided (S)edge depending on your machine is an MFC-9840CDW or DCP-9045CDN, go to Step e. Network Scanning Scan to File 4 When you choose Scan to File, you can change the machine's Scan key settings, right-click each Control Center button, click ControlCenter Configuration...

Software Users Manual - English
Page 111
Press OK. k Do one of the options below: „ Press a or b to choose Color 150 dpi, Color 300 dpi or Color 600 dpi. Press Black Start or Color Start and go to Step i. b Press (Scan). Press OK. „ If the Scan to FTP profile is complete, you will be prompted to enter ... TIFF. l Press a or b to choose a file name you want to Step e. If your document layout. Press OK. Network Scanning Scan to FTP using the duplex scanning feature, you will automatically go to Step k. „ If the Scan to FTP profile is an MFC-9840CDW or DCP-9045CDN, go to step m 104 Press...
Press OK. k Do one of the options below: „ Press a or b to choose Color 150 dpi, Color 300 dpi or Color 600 dpi. Press Black Start or Color Start and go to Step i. b Press (Scan). Press OK. „ If the Scan to FTP profile is complete, you will be prompted to enter ... TIFF. l Press a or b to choose a file name you want to Step e. If your document layout. Press OK. Network Scanning Scan to FTP using the duplex scanning feature, you will automatically go to Step k. „ If the Scan to FTP profile is an MFC-9840CDW or DCP-9045CDN, go to step m 104 Press...


