
Users Manual - English and Spanish
Page 2
... plug (one blade wider than the other user servicing adjustments mentioned in a polarized outlet only one way. The sewing machine should never be used as threading needle, changing needle, or changing presser foot, and the like. 15. Close attention is necessary when the sewing machine is required...without supervision. 17. It may deflect the needle causing it has been dropped or damaged, or dropped into any air openings blocked. Use only accessories recommended by pulling on cord. Never operate the sewing machine with same type rated 15 watts. The wrong plate can cause...
... plug (one blade wider than the other user servicing adjustments mentioned in a polarized outlet only one way. The sewing machine should never be used as threading needle, changing needle, or changing presser foot, and the like. 15. Close attention is necessary when the sewing machine is required...without supervision. 17. It may deflect the needle causing it has been dropped or damaged, or dropped into any air openings blocked. Use only accessories recommended by pulling on cord. Never operate the sewing machine with same type rated 15 watts. The wrong plate can cause...
Users Manual - English and Spanish
Page 3
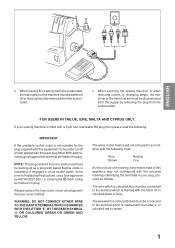
...must be fitted in this appliance may not correspond with the letter 'L' or coloured red or brown. 1 In the event of replacing the plug fuse, use plugs with bared flexible cords is fitted with a 3 pin non rewireable BS plug then please read the following code: Blue Brown Neutral Live As the... with the letter 'N' or coloured black or blue. FOR USERS IN THE UK, EIRE, MALTA AND CYPRUS ONLY. Always replace the fuse cover, never use a fuse approved by removing the plug from the mains lead must be connected to the terminal which is marked with the following .
...must be fitted in this appliance may not correspond with the letter 'L' or coloured red or brown. 1 In the event of replacing the plug fuse, use plugs with bared flexible cords is fitted with a 3 pin non rewireable BS plug then please read the following code: Blue Brown Neutral Live As the... with the letter 'N' or coloured black or blue. FOR USERS IN THE UK, EIRE, MALTA AND CYPRUS ONLY. Always replace the fuse cover, never use a fuse approved by removing the plug from the mains lead must be connected to the terminal which is marked with the following .
Users Manual - English and Spanish
Page 4
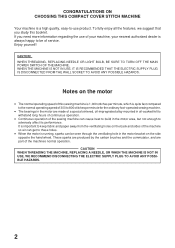
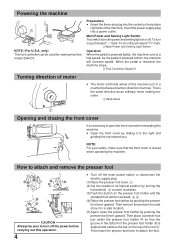
... ventilating hole in the motor bracket on the motor • The normal operating speed of this booklet. WHEN THE MACHINE IS NOT IN USE, IT IS RECOMMENDED THAT THE ELECTRIC SUPPLY PLUG IS DISCONNECTED FROM THE WALL SOCKET TO AVOID ANY POSSIBLE HAZARDS. CAUTION WHEN THREADING THE MACHINE..., REPLACING A NEEDLE, OR WHEN THE MACHINE IS NOT IN USE, WE RECOMMEND DISCONNECTING THE ELECTRIC SUPPLY PLUG TO AVOID ANY POSSIBLE HAZARDS. 2 If you study this sewing machine is 1,000 stitches per minute ...
... ventilating hole in the motor bracket on the motor • The normal operating speed of this booklet. WHEN THE MACHINE IS NOT IN USE, IT IS RECOMMENDED THAT THE ELECTRIC SUPPLY PLUG IS DISCONNECTED FROM THE WALL SOCKET TO AVOID ANY POSSIBLE HAZARDS. CAUTION WHEN THREADING THE MACHINE..., REPLACING A NEEDLE, OR WHEN THE MACHINE IS NOT IN USE, WE RECOMMEND DISCONNECTING THE ELECTRIC SUPPLY PLUG TO AVOID ANY POSSIBLE HAZARDS. 2 If you study this sewing machine is 1,000 stitches per minute ...
Users Manual - English and Spanish
Page 5
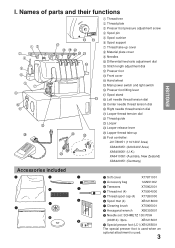
... and light switch F Presser foot lifting lever G Spool stand H Left needle thread tension dial I . XB1216001 0 Special presser foot (LC1) XB1265001 The special presser foot is used when an optional attachment is...
... and light switch F Presser foot lifting lever G Spool stand H Left needle thread tension dial I . XB1216001 0 Special presser foot (LC1) XB1265001 The special presser foot is used when an optional attachment is...
Users Manual - English and Spanish
Page 6
... direction as an ordinary home sewing machine. 1 Hand wheel 1 Opening and closing the front cover It is pressed further, the machine will be used for sewing machine model 2340CV. Then remove the presser foot and store it to its highest position by pushing the presser foot lever upward. Then place a presser foot...
... direction as an ordinary home sewing machine. 1 Hand wheel 1 Opening and closing the front cover It is pressed further, the machine will be used for sewing machine model 2340CV. Then remove the presser foot and store it to its highest position by pushing the presser foot lever upward. Then place a presser foot...
Users Manual - English and Spanish
Page 8
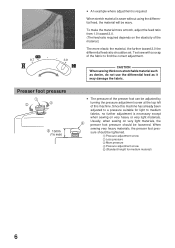
Since this machine. CAUTION When sewing thick non-stretchable material such as denim, do not use the differential feed as it may damage the fabric. • The pressure of this machine has already been adjusted to a pressure suitable for medium ... the feed ratio from 1.0 toward 2.0. (The feed ratio required depends on the elasticity of the fabric to medium fabrics, no further adjustment is sewn without using the differential feed, the material will be loosened. Presser foot pressure 1 2 3 5 10mm (3/8 inch) • An example where adjustment is required When stretch material...
Since this machine. CAUTION When sewing thick non-stretchable material such as denim, do not use the differential feed as it may damage the fabric. • The pressure of this machine has already been adjusted to a pressure suitable for medium ... the feed ratio from 1.0 toward 2.0. (The feed ratio required depends on the elasticity of the fabric to medium fabrics, no further adjustment is sewn without using the differential feed, the material will be loosened. Presser foot pressure 1 2 3 5 10mm (3/8 inch) • An example where adjustment is required When stretch material...
Users Manual - English and Spanish
Page 9
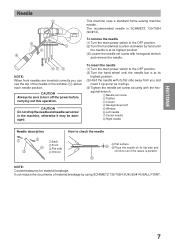
...needle position. agonal wrench. 1 Needle set screw securely with its flat side and check to the OFF position. (2) Turn the hand wheel counter-clockwise by using SCHIMETZ 130/705H SUK (90/#14) BALL POINT. 7 It can reduce the occurrence of the needle in the machine, otherwise it will go. (4) ... the needle on its flat side away from you can see if the space is SCHMETZ 130/705H (90/#14). ENGLISH Needle 5 3 1 2 4 This machine uses a standard home sewing machine needle. To remove the needle (1) Turn the main power switch to see the top of material breakage by hand until the...
...needle position. agonal wrench. 1 Needle set screw securely with its flat side and check to the OFF position. (2) Turn the hand wheel counter-clockwise by using SCHIMETZ 130/705H SUK (90/#14) BALL POINT. 7 It can reduce the occurrence of the needle in the machine, otherwise it will go. (4) ... the needle on its flat side away from you can see if the space is SCHMETZ 130/705H (90/#14). ENGLISH Needle 5 3 1 2 4 This machine uses a standard home sewing machine needle. To remove the needle (1) Turn the main power switch to see the top of material breakage by hand until the...
Users Manual - English and Spanish
Page 12
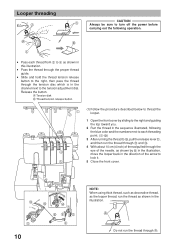
... pulled through the eye of the arrow to the tension adjustment dial. Release the button. A Do not run the thread through A. C A 10 B D 7 08 6 9 NOTE: When using thick thread, such as decorative thread, as the looper thread, run the thread as shown by D in the illustration, move the looper back in the...
... pulled through the eye of the arrow to the tension adjustment dial. Release the button. A Do not run the thread through A. C A 10 B D 7 08 6 9 NOTE: When using thick thread, such as decorative thread, as the looper thread, run the thread as shown by D in the illustration, move the looper back in the...
Users Manual - English and Spanish
Page 13
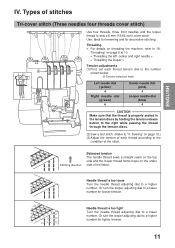
...a higher number. Types of the fabric. Needle thread is too tight Turn the needle thread adjusting dial to sew a 6 mm (15/64 inch) cover stitch. Use: Ideal for hemming and for looser tension. Sewing" on the under side of stitches Tri-cover stitch (Three needles four threads cover stitch...) Use four threads, three front needles and the looper thread to a lower number. Threading • For details on page 9 to 10. < Threading the left, center ...
...a higher number. Types of the fabric. Needle thread is too tight Turn the needle thread adjusting dial to sew a 6 mm (15/64 inch) cover stitch. Use: Ideal for hemming and for looser tension. Sewing" on the under side of stitches Tri-cover stitch (Three needles four threads cover stitch...) Use four threads, three front needles and the looper thread to a lower number. Threading • For details on page 9 to 10. < Threading the left, center ...
Users Manual - English and Spanish
Page 14
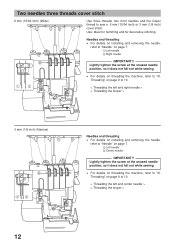
... fall out while sewing. • For details on threading the machine, refer to "III. Two needles three threads cover stitch 6 mm (15/64 inch) (Wide) Use three threads, two front needles and the looper thread to "Needle" on page 7. 3 Left needle 4 Center needle IMPORTANT!! Threading" on page 9 to 10. < Threading the...
... fall out while sewing. • For details on threading the machine, refer to "III. Two needles three threads cover stitch 6 mm (15/64 inch) (Wide) Use three threads, two front needles and the looper thread to "Needle" on page 7. 3 Left needle 4 Center needle IMPORTANT!! Threading" on page 9 to 10. < Threading the...
Users Manual - English and Spanish
Page 16
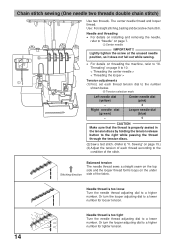
...of the stitch. Or turn the looper adjusting dial to the number shown below. Chain stitch sewing (One needle two threads double chain stitch) A 1 Use two threads. A Tension selection mark Left needle dial (yellow) - Stitching direction Balanced tension The needle thread sews a straight seam on the top side ... looper adjusting dial to a higher number for looser tension. 14 Needle thread is too tight Turn the needle thread adjusting dial to "V. Use: For straight stitching, basting and decorative chain stitch. Sewing" on installing and removing the needle, refer to "III.
...of the stitch. Or turn the looper adjusting dial to the number shown below. Chain stitch sewing (One needle two threads double chain stitch) A 1 Use two threads. A Tension selection mark Left needle dial (yellow) - Stitching direction Balanced tension The needle thread sews a straight seam on the top side ... looper adjusting dial to a higher number for looser tension. 14 Needle thread is too tight Turn the needle thread adjusting dial to "V. Use: For straight stitching, basting and decorative chain stitch. Sewing" on installing and removing the needle, refer to "III.
Users Manual - English and Spanish
Page 18
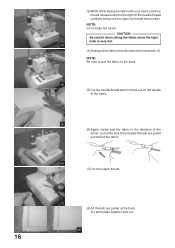
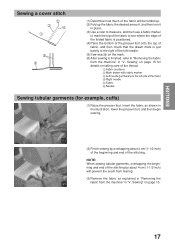
... arrow, so that the end of the arrow with your hand, push the thread release button to the right for the needle thread currently being used to open the thread tension disc. NOTE: Be sure to pull the fabric to the back. (4) (5) Cut the needle thread which comes out on the...
... arrow, so that the end of the arrow with your hand, push the thread release button to the right for the needle thread currently being used to open the thread tension disc. NOTE: Be sure to pull the fabric to the back. (4) (5) Cut the needle thread which comes out on the...
Users Manual - English and Spanish
Page 19
... by overlapping about 4 cm (1-1/2 inch) will be folded up. (2) Fold up the fabric the desired amount, and then iron it in place. (3) Use a ruler to measure, and then use a fabric marker to mark the top of the fabric to see where the edge of the folded fabric is positioned. (4) Place the bottom...
... by overlapping about 4 cm (1-1/2 inch) will be folded up. (2) Fold up the fabric the desired amount, and then iron it in place. (3) Use a ruler to measure, and then use a fabric marker to mark the top of the fabric to see where the edge of the folded fabric is positioned. (4) Place the bottom...
Users Manual - English and Spanish
Page 21
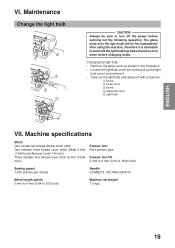
... the light bulb will be sure to turn off the power before changing bulbs. Maintenance Change the light bulb 2 1 4 3 5 CAUTION Always be hot immediately after using the machine, therefore it with a new one. 1 Screw 2 Lamp cover 3 Screw 4 Light bulb cover 5 Light bulb 4 VII. Changing the light bulb. • Remove the lamp...
... the light bulb will be sure to turn off the power before changing bulbs. Maintenance Change the light bulb 2 1 4 3 5 CAUTION Always be hot immediately after using the machine, therefore it with a new one. 1 Screw 2 Lamp cover 3 Screw 4 Light bulb cover 5 Light bulb 4 VII. Changing the light bulb. • Remove the lamp...


