
Users Manual - English and Spanish
Page 2
...are being used by young children or infirm persons without supervision. 17. Special care is being administered. 8. Do not use the proper needle plate. Switch the sewing machine to the symbol "O" position when making any air openings blocked. If it to break. 14. Contact a...removing covers, lubricating, or when making any openings. 6. Always unplug before cleaning. 2. Do not use as described in the needle area, such as threading needle, changing needle, or changing presser foot, and the like. 15. To reduce the risk of electric shock. 1. Young children should be...
...are being used by young children or infirm persons without supervision. 17. Special care is being administered. 8. Do not use the proper needle plate. Switch the sewing machine to the symbol "O" position when making any air openings blocked. If it to break. 14. Contact a...removing covers, lubricating, or when making any openings. 6. Always unplug before cleaning. 2. Do not use as described in the needle area, such as threading needle, changing needle, or changing presser foot, and the like. 15. To reduce the risk of electric shock. 1. Young children should be...
Users Manual - English and Spanish
Page 4
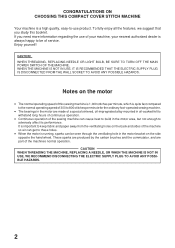
Enjoy yourself! CAUTION! WHEN THREADING, REPLACING NEEDLE OR LIGHT BULB, BE SURE TO TURN OFF THE MAIN POWER SWITCH OF THE MACHINE. Notes on the motor • The normal operating speed of ... hand wheel. To fully enjoy all the features, we suggest that you need more information regarding the use product. CAUTION WHEN THREADING THE MACHINE, REPLACING A NEEDLE, OR WHEN THE MACHINE IS NOT IN USE, WE RECOMMEND DISCONNECTING THE ELECTRIC SUPPLY PLUG TO AVOID ANY POSSIBLE HAZARDS. 2
Enjoy yourself! CAUTION! WHEN THREADING, REPLACING NEEDLE OR LIGHT BULB, BE SURE TO TURN OFF THE MAIN POWER SWITCH OF THE MACHINE. Notes on the motor • The normal operating speed of ... hand wheel. To fully enjoy all the features, we suggest that you need more information regarding the use product. CAUTION WHEN THREADING THE MACHINE, REPLACING A NEEDLE, OR WHEN THE MACHINE IS NOT IN USE, WE RECOMMEND DISCONNECTING THE ELECTRIC SUPPLY PLUG TO AVOID ANY POSSIBLE HAZARDS. 2
Users Manual - English and Spanish
Page 5
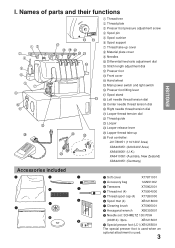
... Thread tree 2 Thread plate 3 Presser foot pressure adjustment screw 4 Spool pin 5 Spool cushion 6 Spool support 7 Thread take up cover 8 Material plate cover 9 Needles 0 Differential feed raito adjustment dial A Stitch length adjustment dial B Presser foot C Front cover D Hand wheel E Main power switch and light switch F Presser foot ...lifting lever G Spool stand H Left needle thread tension dial I . ENGLISH I Center needle thread tension dial J Right needle thread tension dial K Looper thread tension dial L Thread guide M Looper N Looper ...
... Thread tree 2 Thread plate 3 Presser foot pressure adjustment screw 4 Spool pin 5 Spool cushion 6 Spool support 7 Thread take up cover 8 Material plate cover 9 Needles 0 Differential feed raito adjustment dial A Stitch length adjustment dial B Presser foot C Front cover D Hand wheel E Main power switch and light switch F Presser foot ...lifting lever G Spool stand H Left needle thread tension dial I . ENGLISH I Center needle thread tension dial J Right needle thread tension dial K Looper thread tension dial L Thread guide M Looper N Looper ...
Users Manual - English and Spanish
Page 6
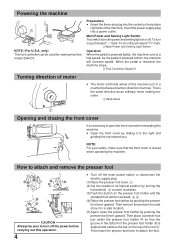
To turn off the main power switch or disconnect the electric supply plug. (1) Raise the presser foot lever. 1 (2) Set the needle to open the front cover when threading this machine. • Open the front cover by pushing the presser foot lever upward. This is the same ... and the standard foot will increase speed. How to attach and remove the presser foot 41 2 1 2 3 A B C4 CAUTION Always be used for sewing machine model 2340CV. When the pedal is aligned and catches the bar on or off push toward " " mark. 1 Main Power and Sewing Light Switch Operation When the pedal...
To turn off the main power switch or disconnect the electric supply plug. (1) Raise the presser foot lever. 1 (2) Set the needle to open the front cover when threading this machine. • Open the front cover by pushing the presser foot lever upward. This is the same ... and the standard foot will increase speed. How to attach and remove the presser foot 41 2 1 2 3 A B C4 CAUTION Always be used for sewing machine model 2340CV. When the pedal is aligned and catches the bar on or off push toward " " mark. 1 Main Power and Sewing Light Switch Operation When the pedal...
Users Manual - English and Spanish
Page 9
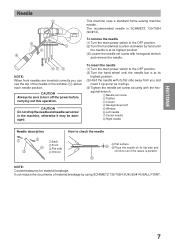
... before carrying out this operation. CAUTION Always be damaged. agonal wrench. 1 Needle set screw in the window (5) above each needle position. ENGLISH Needle 5 3 1 2 4 This machine uses a standard home sewing machine needle. The recommended needle is parallel. 5 NOTE: Countermeasures for material breakage. To remove the needle (1) Turn the main power switch to the OFF position. (2) Turn the...
... before carrying out this operation. CAUTION Always be damaged. agonal wrench. 1 Needle set screw in the window (5) above each needle position. ENGLISH Needle 5 3 1 2 4 This machine uses a standard home sewing machine needle. The recommended needle is parallel. 5 NOTE: Countermeasures for material breakage. To remove the needle (1) Turn the main power switch to the OFF position. (2) Turn the...

Users Manual - English and Spanish
Page 10
...holders are sewing with the net supplied to prevent 2 the thread from slipping off the main power switch for safety. (2) (2) Set the needle bar in alignment above the spool pins as illustrated left. 1 Thread holder on thread tree 2 Spool pin 3 Spool cushion 4 Correct position.... 8 Turn the handwheel to the shape of the spool. 1 Spool support 2 Spool cushion 3 Net 3 1 Spool support 2 Spool mat 3 Spool cap 2 Needle position (1) (1) Turn off the spool. 1 Adapt the net to the shape of the spool. Preparation before threading Thread tree 4 1 2 3 Raise the telescoping ...
...holders are sewing with the net supplied to prevent 2 the thread from slipping off the main power switch for safety. (2) (2) Set the needle bar in alignment above the spool pins as illustrated left. 1 Thread holder on thread tree 2 Spool pin 3 Spool cushion 4 Correct position.... 8 Turn the handwheel to the shape of the spool. 1 Spool support 2 Spool cushion 3 Net 3 1 Spool support 2 Spool mat 3 Spool cap 2 Needle position (1) (1) Turn off the spool. 1 Adapt the net to the shape of the spool. Preparation before threading Thread tree 4 1 2 3 Raise the telescoping ...
Users Manual - English and Spanish
Page 11
... green color and the numbers next to back A D 3 33 666 4 4 4 BC 777 5 55 888 E 999 9 A To left needle • Run the thread in the sequence illustrated, following the yellow color and the numbers next to each threading point. (1-9) Threading the center...procedure described below to the tension adjustment dial. ton. Threading the left needle B To center needle C To right needle D Branching plate E Pull about 6 cm (about 2-1/2 inches) of the needle. 999 Front to each threading point. (1-9) Threading the right needle • Run the thread in this illustration. • Pass the...
... green color and the numbers next to back A D 3 33 666 4 4 4 BC 777 5 55 888 E 999 9 A To left needle • Run the thread in the sequence illustrated, following the yellow color and the numbers next to each threading point. (1-9) Threading the center...procedure described below to the tension adjustment dial. ton. Threading the left needle B To center needle C To right needle D Branching plate E Pull about 6 cm (about 2-1/2 inches) of the needle. 999 Front to each threading point. (1-9) Threading the right needle • Run the thread in this illustration. • Pass the...
Users Manual - English and Spanish
Page 12
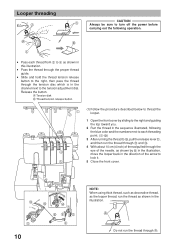
... the procedure described below to thread the looper. 1 Open the front cover by D in the illustration, move the looper back in the direction of the needle, as shown by sliding to the right and guiding the top toward you. 2 Run the thread in the sequence illustrated, following operation. 6 A 5 4 B 4 • Pass each...
... the procedure described below to thread the looper. 1 Open the front cover by D in the illustration, move the looper back in the direction of the needle, as shown by sliding to the right and guiding the top toward you. 2 Run the thread in the sequence illustrated, following operation. 6 A 5 4 B 4 • Pass each...
Users Manual - English and Spanish
Page 13
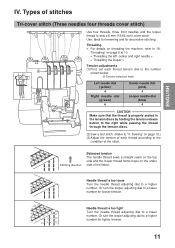
...Or turn the looper adjusting dial to "V. A Tension selection mark Left needle dial (yellow) 4 Right needle dial (green) 4 Center needle dial (pink) 4 Looper needle dial (blue) 4 CAUTION Make sure that the thread is too loose Turn the needle thread adjusting dial to the condition of the fabric. Or turn the ... dial to sew a 6 mm (15/64 inch) cover stitch. Use: Ideal for hemming and for tighter tension. 11 ENGLISH IV. Needle thread is properly seated in the tension discs by holding the tension release button to the right while passing the thread through the tension discs...
...Or turn the looper adjusting dial to "V. A Tension selection mark Left needle dial (yellow) 4 Right needle dial (green) 4 Center needle dial (pink) 4 Looper needle dial (blue) 4 CAUTION Make sure that the thread is too loose Turn the needle thread adjusting dial to the condition of the fabric. Or turn the ... dial to sew a 6 mm (15/64 inch) cover stitch. Use: Ideal for hemming and for tighter tension. 11 ENGLISH IV. Needle thread is properly seated in the tension discs by holding the tension release button to the right while passing the thread through the tension discs...
Users Manual - English and Spanish
Page 14
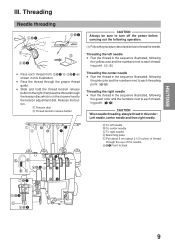
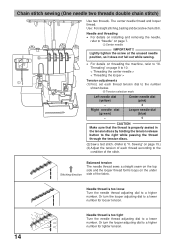
... threading • For details on installing and removing the needle, refer to 10. < Threading the left and center needle > < Threading the looper > 12 Threading" on page 9 to "Needle" on page 7. 3 Left needle 4 Center needle IMPORTANT!! Lightly tighten the screw at the unused needle position, so it does not fall out while sewing. • For details on...
... threading • For details on installing and removing the needle, refer to 10. < Threading the left and center needle > < Threading the looper > 12 Threading" on page 9 to "Needle" on page 7. 3 Left needle 4 Center needle IMPORTANT!! Lightly tighten the screw at the unused needle position, so it does not fall out while sewing. • For details on...
Users Manual - English and Spanish
Page 15
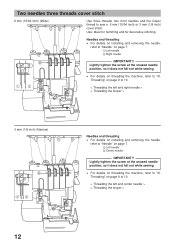
...mark 6 mm (15/64 inch) (Wide) Left needle dial (yellow) 4 Right needle dial (green) 4 Center needle dial (pink) - Looper needle dial (blue) 4 3 mm (1/8 inch) (Narrow) Left needle dial (yellow) 4 Right needle dial (green) - Needle thread is too loose Turn the needle thread adjusting dial to a higher number for looser ... tension discs. (2) Sew a test stitch. (Refer to a lower number. Center needle dial (pink) 4 Looper needle dial (blue) 4 CAUTION Make sure that the thread is too tight Turn the needle thread adjusting dial to "V. Or turn the looper adjusting dial to a higher number....
...mark 6 mm (15/64 inch) (Wide) Left needle dial (yellow) 4 Right needle dial (green) 4 Center needle dial (pink) - Looper needle dial (blue) 4 3 mm (1/8 inch) (Narrow) Left needle dial (yellow) 4 Right needle dial (green) - Needle thread is too loose Turn the needle thread adjusting dial to a higher number for looser ... tension discs. (2) Sew a test stitch. (Refer to a lower number. Center needle dial (pink) 4 Looper needle dial (blue) 4 CAUTION Make sure that the thread is too tight Turn the needle thread adjusting dial to "V. Or turn the looper adjusting dial to a higher number....
Users Manual - English and Spanish
Page 16
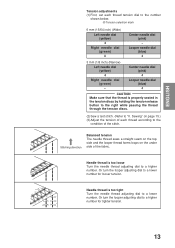
... adjusting dial to a higher number for looser tension. 14 Needle thread is too tight Turn the needle thread adjusting dial to "III. The center needle thread and looper thread. Center needle dial (pink) 2 Looper needle dial (blue) 5 CAUTION Make sure that the thread is... a lower number for tighter tension. Sewing" on page 7. 1 Center needle IMPORTANT!! Or turn the looper adjusting dial to "V. A Tension selection mark Left needle dial (yellow) - Stitching direction Balanced tension The needle thread sews a straight seam on the top side and the looper thread forms...
... adjusting dial to a higher number for looser tension. 14 Needle thread is too tight Turn the needle thread adjusting dial to "III. The center needle thread and looper thread. Center needle dial (pink) 2 Looper needle dial (blue) 5 CAUTION Make sure that the thread is... a lower number for tighter tension. Sewing" on page 7. 1 Center needle IMPORTANT!! Or turn the looper adjusting dial to "V. A Tension selection mark Left needle dial (yellow) - Stitching direction Balanced tension The needle thread sews a straight seam on the top side and the looper thread forms...
Users Manual - English and Spanish
Page 17
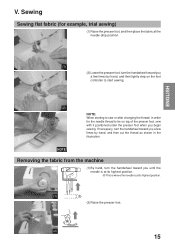
If necessary, turn the handwheel toward you begin sewing. A This is where the needle is at its highest position. (1) A (2) Raise the presser foot. (2) 15 ENGLISH (1) (2) Lower the presser foot, turn the handwheel toward you a few times by hand, and ... at its highest position. NOTE Removing the fabric from the machine (1) By hand, turn the handwheel toward you until the needle is at the needle drop position. Sewing Sewing flat fabric (for the needle thread to be on the foot controller to start sewing. (2) NOTE: When starting to sew or after changing the...
If necessary, turn the handwheel toward you begin sewing. A This is where the needle is at its highest position. (1) A (2) Raise the presser foot. (2) 15 ENGLISH (1) (2) Lower the presser foot, turn the handwheel toward you a few times by hand, and ... at its highest position. NOTE Removing the fabric from the machine (1) By hand, turn the handwheel toward you until the needle is at the needle drop position. Sewing Sewing flat fabric (for the needle thread to be on the foot controller to start sewing. (2) NOTE: When starting to sew or after changing the...
Users Manual - English and Spanish
Page 18
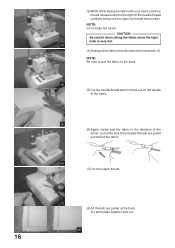
... the fabric in the direction of the arrow with your hand, push the thread release button to the right for the needle thread currently being used to the back. (4) (5) Cut the needle thread which comes out on the upside of the fabric. (5) (6) Again, slowly pull the fabric in the direction of the... arrow, so that the end of the needle threads are pulled out behind the fabric. (6) (7) Cut the looper thread. (7) (8) All threads are pulled at the back. NOTE: Do not take the seam. NOTE...
... the fabric in the direction of the arrow with your hand, push the thread release button to the right for the needle thread currently being used to the back. (4) (5) Cut the needle thread which comes out on the upside of the fabric. (5) (6) Again, slowly pull the fabric in the direction of the... arrow, so that the end of the needle threads are pulled out behind the fabric. (6) (7) Cut the looper thread. (7) (8) All threads are pulled at the back. NOTE: Do not take the seam. NOTE...
Users Manual - English and Spanish
Page 19
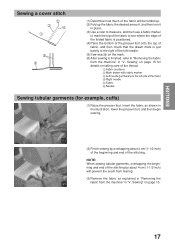
... the top of fabric, and then check that the drawn mark is just barely to the right of the left side of the mark) 4 Right needle 5 Fabric 6 Needle Sewing tubular garments (for details on taking care of the stitching. ENGLISH Sewing a cover stitch 2 3 4 1 6 5 (1) Determine how much of... by about 4 cm (1-1/2 inch) of the beginning and end of the thread. 1 Fabric (surface) 2 Mark drawn with fabric marker 3 Left needle (just barely on the left needle. (5) Sew exactly on the mark. (6) After sewing is finished, refer to "Removing the fabric from the machine" in "V. Sewing" on page 15...
... the top of fabric, and then check that the drawn mark is just barely to the right of the left side of the mark) 4 Right needle 5 Fabric 6 Needle Sewing tubular garments (for details on taking care of the stitching. ENGLISH Sewing a cover stitch 2 3 4 1 6 5 (1) Determine how much of... by about 4 cm (1-1/2 inch) of the beginning and end of the thread. 1 Fabric (surface) 2 Mark drawn with fabric marker 3 Left needle (just barely on the left needle. (5) Sew exactly on the mark. (6) After sewing is finished, refer to "Removing the fabric from the machine" in "V. Sewing" on page 15...
Users Manual - English and Spanish
Page 20
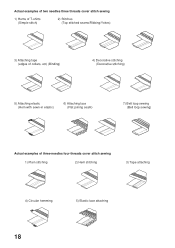
Actual examples of two needles three threads cover stitch sewing 1) Hems of T-shirts (Simple stitch) 2) Stitches (Top stitched seams/Ribbing/Yokes) 3) Attaching tape (edges of collars, etc) (Binding) 4) Decorative stitching (Decorative stitching) 5) Attaching elastic (Hem with sewn-in elastic) 6) Attaching lace (Flat joining seam) 7) Belt loop sewing (Belt loop sewing) Actual examples of three-needles four-threads cover stitch sewing 1) Plain stitching 2) Hem stitching 3) Tape attaching 4) Circular hemming 5) Elastic lace attaching 18
Actual examples of two needles three threads cover stitch sewing 1) Hems of T-shirts (Simple stitch) 2) Stitches (Top stitched seams/Ribbing/Yokes) 3) Attaching tape (edges of collars, etc) (Binding) 4) Decorative stitching (Decorative stitching) 5) Attaching elastic (Hem with sewn-in elastic) 6) Attaching lace (Flat joining seam) 7) Belt loop sewing (Belt loop sewing) Actual examples of three-needles four-threads cover stitch sewing 1) Plain stitching 2) Hem stitching 3) Tape attaching 4) Circular hemming 5) Elastic lace attaching 18
Users Manual - English and Spanish
Page 21
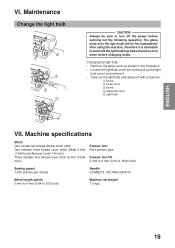
... sure to 5/32 inch) Machine net weight 7.0 kgs. 19 Machine specifications Stitch One needle two thread double chain stitch Two needles three thread cover stitch (Wide 6 mm (15/64 inch)/Narrow 3 mm(1/8 inch)) Three needles four thread cover stitch (6 mm (15/64 inch)) Presser foot Free presser type Presser... foot lift 5 mm to 6 mm (3/16 to 15/64 inch) Sewing speed 1,000 stitches per minute Needle SCHMETZ 130/705H (90/#14) Stitch length (pitch) 2 mm to 4 mm (5/64 to turn off the power before changing bulbs. ENGLISH VI. Maintenance...
... sure to 5/32 inch) Machine net weight 7.0 kgs. 19 Machine specifications Stitch One needle two thread double chain stitch Two needles three thread cover stitch (Wide 6 mm (15/64 inch)/Narrow 3 mm(1/8 inch)) Three needles four thread cover stitch (6 mm (15/64 inch)) Presser foot Free presser type Presser... foot lift 5 mm to 6 mm (3/16 to 15/64 inch) Sewing speed 1,000 stitches per minute Needle SCHMETZ 130/705H (90/#14) Stitch length (pitch) 2 mm to 4 mm (5/64 to turn off the power before changing bulbs. ENGLISH VI. Maintenance...


