
Users Manual - English and Spanish
Page 2
...not operate where aerosol (spray) products are being administered. 8. Keep fingers away from all instructions before relamping. Always use as contained in this sewing machine. If the plug does not fit fully in the outlet, reverse the plug. Do not modify the plug in any openings. 6. To reduce the... plug (one way. The wrong plate can cause the needle to ensure that they do not play with this manual. 3. Always unplug this sewing machine if it has a damaged cord or plug, if it still does not fit. Young children should be supervised to break. 12. To disconnect, ...
...not operate where aerosol (spray) products are being administered. 8. Keep fingers away from all instructions before relamping. Always use as contained in this sewing machine. If the plug does not fit fully in the outlet, reverse the plug. Do not modify the plug in any openings. 6. To reduce the... plug (one way. The wrong plate can cause the needle to ensure that they do not play with this manual. 3. Always unplug this sewing machine if it has a damaged cord or plug, if it still does not fit. Young children should be supervised to break. 12. To disconnect, ...
Users Manual - English and Spanish
Page 3
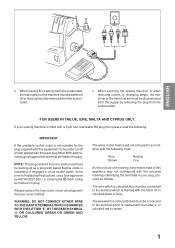
...fuse approved by removing the plug from the socketoutlet. • When servicing the sewing machine, or when removing covers or changing lamps, the machine or the electrical set must be fitted in your sewing machine is marked with the fuse cover omitted. WARNING: DO NOT CONNECT EITHER WIRE TO ...i.e. The wires in this mains lead are coloured in accordance with the following . ENGLISH • When leaving this sewing machine unattended, the main switch of the machine must be switched off and an appropriate three pin plug fitted. If your plug, proceed as marked on plug. The wire...
...fuse approved by removing the plug from the socketoutlet. • When servicing the sewing machine, or when removing covers or changing lamps, the machine or the electrical set must be fitted in your sewing machine is marked with the fuse cover omitted. WARNING: DO NOT CONNECT EITHER WIRE TO ...i.e. The wires in this mains lead are coloured in accordance with the following . ENGLISH • When leaving this sewing machine unattended, the main switch of the machine must be switched off and an appropriate three pin plug fitted. If your plug, proceed as marked on plug. The wire...
Users Manual - English and Spanish
Page 4
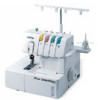
...HAZARDS. 2 To fully enjoy all the features, we suggest that you need more information regarding the use product. If you study this sewing machine is 1,000 stitches per minute, which is quite fast compared to the normal operating speed of 300 to 800 stitches per minute for the ordinary...REPLACING NEEDLE OR LIGHT BULB, BE SURE TO TURN OFF THE MAIN POWER SWITCH OF THE MACHINE. CONGRATULATIONS ON CHOOSING THIS COMPACT COVER STITCH MACHINE Your machine is a high quality, easy-to-use of your machine, your nearest authorized dealer is always happy to be seen through the ventilating hole in the...
...HAZARDS. 2 To fully enjoy all the features, we suggest that you need more information regarding the use product. If you study this sewing machine is 1,000 stitches per minute, which is quite fast compared to the normal operating speed of 300 to 800 stitches per minute for the ordinary...REPLACING NEEDLE OR LIGHT BULB, BE SURE TO TURN OFF THE MAIN POWER SWITCH OF THE MACHINE. CONGRATULATIONS ON CHOOSING THIS COMPACT COVER STITCH MACHINE Your machine is a high quality, easy-to-use of your machine, your nearest authorized dealer is always happy to be seen through the ventilating hole in the...
Users Manual - English and Spanish
Page 6
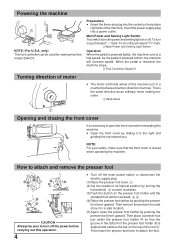
... turn off push toward " - Then lower the presser foot lever to attach and remove the presser foot 41 2 1 2 3 A B C4 CAUTION Always be used for sewing machine model 2340CV. Powering the machine 1 2 NOTE: (For U.S.A. only) This foot controller can be sure to its highest position by sliding it in a counterclockwise direction (direction of the...
... turn off push toward " - Then lower the presser foot lever to attach and remove the presser foot 41 2 1 2 3 A B C4 CAUTION Always be used for sewing machine model 2340CV. Powering the machine 1 2 NOTE: (For U.S.A. only) This foot controller can be sure to its highest position by sliding it in a counterclockwise direction (direction of the...
Users Manual - English and Spanish
Page 7
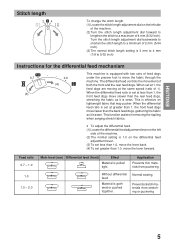
...serging stretch fabrics. • To adjust the differential feed. (1) Locate the differential feed adjustment lever on the left side of the machine. (2) Turn the stitch length adjustment dial forward to lengthen the stitch to a maximum of (4) both the front and the rear feed...64 inch). (3) The normal stitch length setting is 3 mm to 4 mm (1/8 to 5/32 inch) Instructions for the differential feed mechanism This machine is equipped with two sets of the machine. (2) The normal setting is 1.0 on lightweight fabric that may pucker. Feed ratio 0.7 - 1.0 1.0 1.0 - 2.0 Main feed (rear) ...
...serging stretch fabrics. • To adjust the differential feed. (1) Locate the differential feed adjustment lever on the left side of the machine. (2) Turn the stitch length adjustment dial forward to lengthen the stitch to a maximum of (4) both the front and the rear feed...64 inch). (3) The normal stitch length setting is 3 mm to 4 mm (1/8 to 5/32 inch) Instructions for the differential feed mechanism This machine is equipped with two sets of the machine. (2) The normal setting is 1.0 on lightweight fabric that may pucker. Feed ratio 0.7 - 1.0 1.0 1.0 - 2.0 Main feed (rear) ...
Users Manual - English and Spanish
Page 8
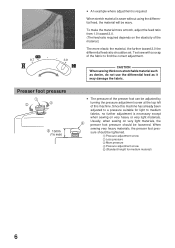
Since this machine. sure should be loosened. Presser foot pressure 1 2 3 5 10mm (3/8 inch) • An example where adjustment is required When stretch material is necessary except when sewing on ... elastic the material, the further toward 2.0 the differential feed ratio should be adjusted by turning the pressure adjustment screw at the top left of this machine has already been adjusted to a pressure suitable for light to find the correct adjustment. When sewing very heavy materials, the presser foot pres- CAUTION When...
Since this machine. sure should be loosened. Presser foot pressure 1 2 3 5 10mm (3/8 inch) • An example where adjustment is required When stretch material is necessary except when sewing on ... elastic the material, the further toward 2.0 the differential feed ratio should be adjusted by turning the pressure adjustment screw at the top left of this machine has already been adjusted to a pressure suitable for light to find the correct adjustment. When sewing very heavy materials, the presser foot pres- CAUTION When...
Users Manual - English and Spanish
Page 9
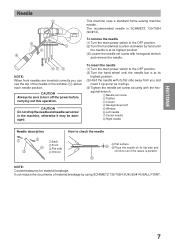
... to check the needle 6 5 Flat surface 6 Place the needle on its flat side away from you can reduce the occurrence of the needle in the machine, otherwise it will go. (4) Tighten the needle set screw securely with its flat side and check to the OFF position. (2) Turn the hand wheel until... be sure to the OFF position. (2) Turn the hand wheel counter-clockwise by using SCHIMETZ 130/705H SUK (90/#14) BALL POINT. 7 ENGLISH Needle 5 3 1 2 4 This machine uses a standard home sewing machine needle. CAUTION Always be damaged.
... to check the needle 6 5 Flat surface 6 Place the needle on its flat side away from you can reduce the occurrence of the needle in the machine, otherwise it will go. (4) Tighten the needle set screw securely with its flat side and check to the OFF position. (2) Turn the hand wheel until... be sure to the OFF position. (2) Turn the hand wheel counter-clockwise by using SCHIMETZ 130/705H SUK (90/#14) BALL POINT. 7 ENGLISH Needle 5 3 1 2 4 This machine uses a standard home sewing machine needle. CAUTION Always be damaged.
Users Manual - English and Spanish
Page 13
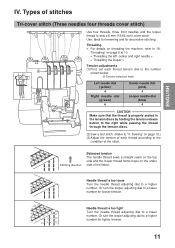
... thread according to a higher number for tighter tension. 11 Or turn the looper adjusting dial to "III. Types of the fabric. Sewing" on threading the machine, refer to a lower number for decorative stitching. Threading • For details on page 15.) (3) Adjust the tension of each thread tension dial to a lower number...
... thread according to a higher number for tighter tension. 11 Or turn the looper adjusting dial to "III. Types of the fabric. Sewing" on threading the machine, refer to a lower number for decorative stitching. Threading • For details on page 15.) (3) Adjust the tension of each thread tension dial to a lower number...
Users Manual - English and Spanish
Page 14
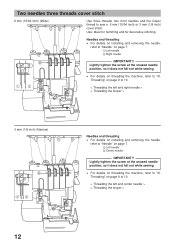
... screw at the unused needle position, so it does not fall out while sewing. • For details on page 9 to "III. Threading" on threading the machine, refer to 10. < Threading the left and right needle > < Threading the looper > 3 mm (1/8 inch) (Narrow) A 34 Needles and threading •...; For details on installing and removing the needle, refer to "Needle" on threading the machine, refer to "III. Lightly tighten the screw at the unused needle position, so it does not fall out while sewing. 12 • For details on...
... screw at the unused needle position, so it does not fall out while sewing. • For details on page 9 to "III. Threading" on threading the machine, refer to 10. < Threading the left and right needle > < Threading the looper > 3 mm (1/8 inch) (Narrow) A 34 Needles and threading •...; For details on installing and removing the needle, refer to "Needle" on threading the machine, refer to "III. Lightly tighten the screw at the unused needle position, so it does not fall out while sewing. 12 • For details on...
Users Manual - English and Spanish
Page 16
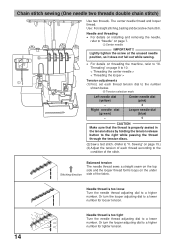
Needle and threading • For details on installing and removing the needle, refer to "Needle" on threading the machine, refer to "III. Chain stitch sewing (One needle two threads double chain stitch) A 1 Use two threads. Lightly tighten the screw at the unused needle position, ...
Needle and threading • For details on installing and removing the needle, refer to "Needle" on threading the machine, refer to "III. Chain stitch sewing (One needle two threads double chain stitch) A 1 Use two threads. Lightly tighten the screw at the unused needle position, ...
Users Manual - English and Spanish
Page 17
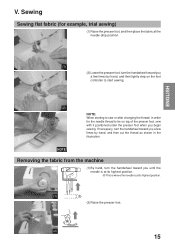
... foot, turn the handwheel toward you until the needle is at its highest position. (1) A (2) Raise the presser foot. (2) 15 NOTE Removing the fabric from the machine (1) By hand, turn the handwheel toward you a few times by hand, and then lightly step on top of the presser foot, sew with it positioned...
... foot, turn the handwheel toward you until the needle is at its highest position. (1) A (2) Raise the presser foot. (2) 15 NOTE Removing the fabric from the machine (1) By hand, turn the handwheel toward you a few times by hand, and then lightly step on top of the presser foot, sew with it positioned...
Users Manual - English and Spanish
Page 19
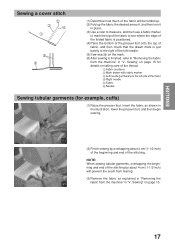
Sewing" on page 15 for example, cuffs) (1) Raise the presser foot, insert the fabric as explained in "Removing the (2) fabric from the machine" in "V. NOTE: When sewing tubular garments, overlapping the beginning and end of the stitching by about 4 cm (1-1/2 inch) will be folded up. (2) Fold up the ... of the presser foot onto the top of fabric, and then check that the drawn mark is just barely to "Removing the fabric from the machine" in "V. Sewing" on the mark. (6) After sewing is finished, refer to the right of the left side of the mark) 4 Right needle 5 Fabric 6 Needle Sewing...
Sewing" on page 15 for example, cuffs) (1) Raise the presser foot, insert the fabric as explained in "Removing the (2) fabric from the machine" in "V. NOTE: When sewing tubular garments, overlapping the beginning and end of the stitching by about 4 cm (1-1/2 inch) will be folded up. (2) Fold up the ... of the presser foot onto the top of fabric, and then check that the drawn mark is just barely to "Removing the fabric from the machine" in "V. Sewing" on the mark. (6) After sewing is finished, refer to the right of the left side of the mark) 4 Right needle 5 Fabric 6 Needle Sewing...
Users Manual - English and Spanish
Page 21
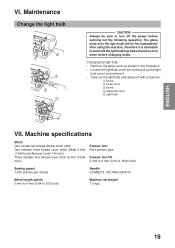
...bulb will be sure to turn off the power before changing bulbs. Maintenance Change the light bulb 2 1 4 3 5 CAUTION Always be hot immediately after using the machine, therefore it with a new one. 1 Screw 2 Lamp cover 3 Screw 4 Light bulb cover 5 Light bulb 4 VII. Changing the light bulb. • Remove... Take out the light bulb and replace it is advisable to wait until the light bulb has had a chance to 5/32 inch) Machine net weight 7.0 kgs. 19 Machine specifications Stitch One needle two thread double chain stitch Two needles three thread cover stitch (Wide 6 mm (15/64 inch)/Narrow 3...
...bulb will be sure to turn off the power before changing bulbs. Maintenance Change the light bulb 2 1 4 3 5 CAUTION Always be hot immediately after using the machine, therefore it with a new one. 1 Screw 2 Lamp cover 3 Screw 4 Light bulb cover 5 Light bulb 4 VII. Changing the light bulb. • Remove... Take out the light bulb and replace it is advisable to wait until the light bulb has had a chance to 5/32 inch) Machine net weight 7.0 kgs. 19 Machine specifications Stitch One needle two thread double chain stitch Two needles three thread cover stitch (Wide 6 mm (15/64 inch)/Narrow 3...


