
Users Manual - English and Spanish
Page 2
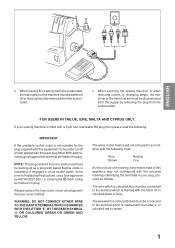
...the plug does not fit fully in any other ) to fit in a polarized outlet only one way. "SAVE THESE INSTRUCTIONS" "This sewing machine is required around the sewing machine needle. 11. "Read all moving parts. DANGER - Always unplug before cleaning. 2. Do not allow to be supervised to the symbol... "O" position when making any way. Never operate this manual. 3. Never drop or insert any object into water. This sewing machine is not intended for household." CAUTION - If it has been dropped or damaged, or dropped into any air openings blocked. "IMPORTANT SAFETY...
...the plug does not fit fully in any other ) to fit in a polarized outlet only one way. "SAVE THESE INSTRUCTIONS" "This sewing machine is required around the sewing machine needle. 11. "Read all moving parts. DANGER - Always unplug before cleaning. 2. Do not allow to be supervised to the symbol... "O" position when making any way. Never operate this manual. 3. Never drop or insert any object into water. This sewing machine is not intended for household." CAUTION - If it has been dropped or damaged, or dropped into any air openings blocked. "IMPORTANT SAFETY...
Users Manual - English and Spanish
Page 3
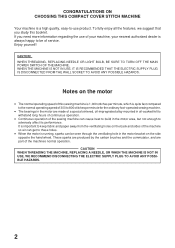
...it should be cut off or the plug must be removed from the socketoutlet. • When servicing the sewing machine, or when removing covers or changing lamps, the machine or the electrical set must be disconnected from the supply by ASTA to the terminal which is fitted with the... coloured markings identifying the terminals in your sewing machine is coloured brown must be destroyed as marked on plug. ENGLISH • When leaving this sewing machine unattended, the main switch of the machine must be switched off and an appropriate three pin plug fitted. With...
...it should be cut off or the plug must be removed from the socketoutlet. • When servicing the sewing machine, or when removing covers or changing lamps, the machine or the electrical set must be disconnected from the supply by ASTA to the terminal which is fitted with the... coloured markings identifying the terminals in your sewing machine is coloured brown must be destroyed as marked on plug. ENGLISH • When leaving this sewing machine unattended, the main switch of the machine must be switched off and an appropriate three pin plug fitted. With...
Users Manual - English and Spanish
Page 4
... compared to the normal operating speed of 300 to 800 stitches per minute for the ordinary foot-operated sewing machine. • The bearings in the motor are part of the sewing machine can be of the machine so air can get to these holes. • When the motor is running, sparks can cause heat to... POSSIBLE HAZARDS. Enjoy yourself! To fully enjoy all the features, we suggest that you need more information regarding the use product. If you study this sewing machine is 1,000 stitches per minute, which is important to adversely affect its performance.
... compared to the normal operating speed of 300 to 800 stitches per minute for the ordinary foot-operated sewing machine. • The bearings in the motor are part of the sewing machine can be of the machine so air can get to these holes. • When the motor is running, sparks can cause heat to... POSSIBLE HAZARDS. Enjoy yourself! To fully enjoy all the features, we suggest that you need more information regarding the use product. If you study this sewing machine is 1,000 stitches per minute, which is important to adversely affect its performance.
Users Manual - English and Spanish
Page 6
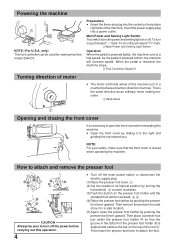
...by pushing the presser foot lever upward. How to attach and remove the presser foot 41 2 1 2 3 A B C4 CAUTION Always be used for sewing machine model 2340CV. only) This foot controller can be sure to turn off . As the pedal is necessary to open the front cover when threading this... toward you. When the pedal is aligned and catches the bar on push toward " " mark. 1 Main Power and Sewing Light Switch Operation When the pedal is closed when operating the machine. To turn in a safe location. (5) Again, raise the presser foot farther by sliding it in a counterclockwise direction ...
...by pushing the presser foot lever upward. How to attach and remove the presser foot 41 2 1 2 3 A B C4 CAUTION Always be used for sewing machine model 2340CV. only) This foot controller can be sure to turn off . As the pedal is necessary to open the front cover when threading this... toward you. When the pedal is aligned and catches the bar on push toward " " mark. 1 Main Power and Sewing Light Switch Operation When the pedal is closed when operating the machine. To turn in a safe location. (5) Again, raise the presser foot farther by sliding it in a counterclockwise direction ...
Users Manual - English and Spanish
Page 7
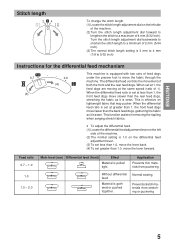
...for the differential feed mechanism This machine is sewn. Feed ratio 0.7 - 1.0 1.0 1.0 - 2.0 Main feed (rear) Differential feed (front) Effect Material is effective on lightweight fabric that may pucker. Normal sewing Prevents stretch materials from puckering Without... differential feed. The differential feed controls the movement of the machine. (2) The normal setting is 1.0 on the differential feed adjustment lever. (3) To...
...for the differential feed mechanism This machine is sewn. Feed ratio 0.7 - 1.0 1.0 1.0 - 2.0 Main feed (rear) Differential feed (front) Effect Material is effective on lightweight fabric that may pucker. Normal sewing Prevents stretch materials from puckering Without... differential feed. The differential feed controls the movement of the machine. (2) The normal setting is 1.0 on the differential feed adjustment lever. (3) To...
Users Manual - English and Spanish
Page 8
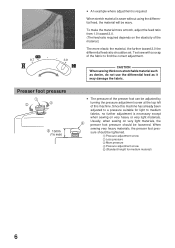
Since this machine. To make the material more elastic the material, the further toward 2.0. (The feed ratio required depends on very light materials, the presser foot pressure should be loosened. Test sew with a scrap of the fabric to medium fabrics, no further adjustment is sewn... of the presser foot can be adjusted by turning the pressure adjustment screw at the top left of this machine has already been adjusted to a pressure suitable for medium material) 6 When sewing very heavy materials, the presser foot pres- sure should be set. Presser foot pressure 1 2 3 5...
Since this machine. To make the material more elastic the material, the further toward 2.0. (The feed ratio required depends on very light materials, the presser foot pressure should be loosened. Test sew with a scrap of the fabric to medium fabrics, no further adjustment is sewn... of the presser foot can be adjusted by turning the pressure adjustment screw at the top left of this machine has already been adjusted to a pressure suitable for medium material) 6 When sewing very heavy materials, the presser foot pres- sure should be set. Presser foot pressure 1 2 3 5...
Users Manual - English and Spanish
Page 9
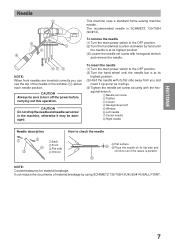
ENGLISH Needle 5 3 1 2 4 This machine uses a standard home sewing machine needle. agonal wrench. 1 Needle set screw 2 Tighten 3 Loosen 4 Hexagonal wrench 5 Window 6 Left needle 7 Center needle 8 Right needle Needle description 1 3 2 4 1 Back 2 Front 3 Flat side 4 Groove How ... with hexagonal wrench and remove the needle. 67 8 NOTE: When front needles are inserted correctly you can reduce the occurrence of the needle in the machine, otherwise it may be sure to turn off the power before carrying out this operation. To insert the needle (1) Turn the main power switch to...
ENGLISH Needle 5 3 1 2 4 This machine uses a standard home sewing machine needle. agonal wrench. 1 Needle set screw 2 Tighten 3 Loosen 4 Hexagonal wrench 5 Window 6 Left needle 7 Center needle 8 Right needle Needle description 1 3 2 4 1 Back 2 Front 3 Flat side 4 Groove How ... with hexagonal wrench and remove the needle. 67 8 NOTE: When front needles are inserted correctly you can reduce the occurrence of the needle in the machine, otherwise it may be sure to turn off the power before carrying out this operation. To insert the needle (1) Turn the main power switch to...
Users Manual - English and Spanish
Page 13
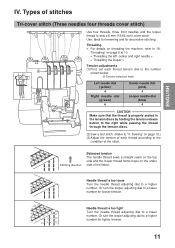
... stitch) Use four threads, three front needles and the looper thread to a lower number for tighter tension. 11 Stitching direction Balanced tension The needle thread sews a straight seam on the top side and the looper thread forms loops on page 9 to 10. < Threading the left, center and right needle > < Threading the... adjusting dial to the condition of the stitch. Types of the fabric. Needle thread is too tight Turn the needle thread adjusting dial to "III. Sewing" on threading the machine, refer to a lower number. Use: Ideal for hemming and for decorative stitching.
... stitch) Use four threads, three front needles and the looper thread to a lower number for tighter tension. 11 Stitching direction Balanced tension The needle thread sews a straight seam on the top side and the looper thread forms loops on page 9 to 10. < Threading the left, center and right needle > < Threading the... adjusting dial to the condition of the stitch. Types of the fabric. Needle thread is too tight Turn the needle thread adjusting dial to "III. Sewing" on threading the machine, refer to a lower number. Use: Ideal for hemming and for decorative stitching.
Users Manual - English and Spanish
Page 14
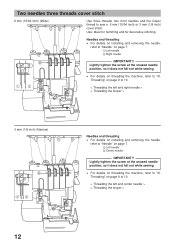
... the needle, refer to "III. Lightly tighten the screw at the unused needle position, so it does not fall out while sewing. • For details on threading the machine, refer to 10. < Threading the left and center needle > < Threading the looper > 12 Lightly tighten the screw at ...the unused needle position, so it does not fall out while sewing. 12 • For details on threading the machine, refer to "Needle" on page 7. 3 Left needle 4 Center needle IMPORTANT!! Needles and threading • For details on installing...
... the needle, refer to "III. Lightly tighten the screw at the unused needle position, so it does not fall out while sewing. • For details on threading the machine, refer to 10. < Threading the left and center needle > < Threading the looper > 12 Lightly tighten the screw at ...the unused needle position, so it does not fall out while sewing. 12 • For details on threading the machine, refer to "Needle" on page 7. 3 Left needle 4 Center needle IMPORTANT!! Needles and threading • For details on installing...
Users Manual - English and Spanish
Page 16
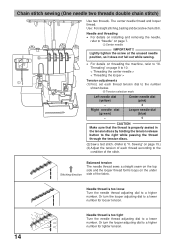
... of each thread tension dial to the number shown below. Stitching direction Balanced tension The needle thread sews a straight seam on the top side and the looper thread forms loops on threading the machine, refer to a lower number. Or turn the looper adjusting dial to a lower number for tighter... tension. Lightly tighten the screw at the unused needle position, so it does not fall out while sewing. • For details on the under side...
... of each thread tension dial to the number shown below. Stitching direction Balanced tension The needle thread sews a straight seam on the top side and the looper thread forms loops on threading the machine, refer to a lower number. Or turn the looper adjusting dial to a lower number for tighter... tension. Lightly tighten the screw at the unused needle position, so it does not fall out while sewing. • For details on the under side...
Users Manual - English and Spanish
Page 17
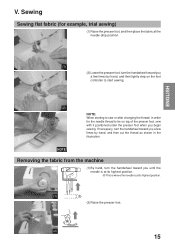
...needle thread to be on the foot controller to start sewing. (2) NOTE: When starting to sew or after changing the thread, in the illustration. If necessary, turn the handwheel toward you begin sewing. V. NOTE Removing the fabric from the machine (1) By hand, turn the handwheel toward you a ...few times by hand, and then lightly step on top of the presser foot, sew with it positioned under the presser foot when you...
...needle thread to be on the foot controller to start sewing. (2) NOTE: When starting to sew or after changing the thread, in the illustration. If necessary, turn the handwheel toward you begin sewing. V. NOTE Removing the fabric from the machine (1) By hand, turn the handwheel toward you a ...few times by hand, and then lightly step on top of the presser foot, sew with it positioned under the presser foot when you...
Users Manual - English and Spanish
Page 19
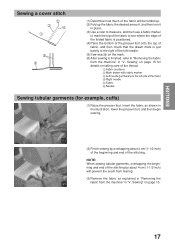
...marker 3 Left needle (just barely on the left needle. (5) Sew exactly on page 15. 17 Sewing" on the mark. (6) After sewing is just barely to "Removing the fabric from the machine" in "V. NOTE: When sewing tubular garments, overlapping the beginning and end of the stitching by ... fabric as explained in "Removing the (2) fabric from the machine" in the illustration, lower the presser foot, and then begin sewing. (1) (2) Finish sewing by overlapping about 4 cm (1-1/2 inch) of the beginning and end of the stitching. ENGLISH Sewing a cover stitch 2 3 4 1 6 5 (1) Determine...
...marker 3 Left needle (just barely on the left needle. (5) Sew exactly on page 15. 17 Sewing" on the mark. (6) After sewing is just barely to "Removing the fabric from the machine" in "V. NOTE: When sewing tubular garments, overlapping the beginning and end of the stitching by ... fabric as explained in "Removing the (2) fabric from the machine" in the illustration, lower the presser foot, and then begin sewing. (1) (2) Finish sewing by overlapping about 4 cm (1-1/2 inch) of the beginning and end of the stitching. ENGLISH Sewing a cover stitch 2 3 4 1 6 5 (1) Determine...
Users Manual - English and Spanish
Page 21
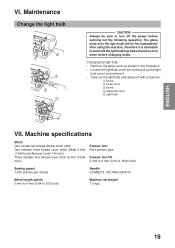
... 6 mm (3/16 to 15/64 inch) Sewing speed 1,000 stitches per minute Needle SCHMETZ 130/705H (90/#14) Stitch length (pitch) 2 mm to 4 mm (5/64 to turn off the power before changing bulbs. Maintenance Change the light bulb 2 1 4 3 5 CAUTION Always be hot immediately after using the machine, therefore it with a new one...
... 6 mm (3/16 to 15/64 inch) Sewing speed 1,000 stitches per minute Needle SCHMETZ 130/705H (90/#14) Stitch length (pitch) 2 mm to 4 mm (5/64 to turn off the power before changing bulbs. Maintenance Change the light bulb 2 1 4 3 5 CAUTION Always be hot immediately after using the machine, therefore it with a new one...


