
Quick Setup Guide - English
Page 3
Print a Test Page 10 Installing the Driver For USB Interface Cable Users 12 1. Installing the Driver and Connecting the Printer to your Macintosh ■ For Mac® OS X 10.1 to 10.2 Users 17 Installing the Driver & Connecting the Printer to Your PC 2. Table of the Printer 19 Options ...20 &#...Only) For Parallel Interface Cable Users 14 Connecting the Printer to Your PC and Installing the Driver For USB Interface Cable Users 16 ■ For Mac® OS 8.6 to 9.2 Users 16 Installing the Driver & Connecting the Printer to your Macintosh ■ Other Information Shipment of ...
Print a Test Page 10 Installing the Driver For USB Interface Cable Users 12 1. Installing the Driver and Connecting the Printer to your Macintosh ■ For Mac® OS X 10.1 to 10.2 Users 17 Installing the Driver & Connecting the Printer to Your PC 2. Table of the Printer 19 Options ...20 &#...Only) For Parallel Interface Cable Users 14 Connecting the Printer to Your PC and Installing the Driver For USB Interface Cable Users 16 ■ For Mac® OS 8.6 to 9.2 Users 16 Installing the Driver & Connecting the Printer to your Macintosh ■ Other Information Shipment of ...
Quick Setup Guide - English
Page 12
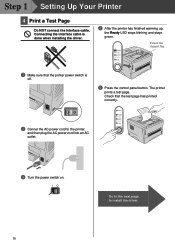
Ready Paper Alarm Toner Data Extend the Support flap. 1 Make sure that the test page has printed correctly. The printer prints a test page. I O 10 Go to the next page to the printer, and then plug the AC power cord into an AC outlet. 3 Turn the power switch on. Drum Ready Paper ...Alarm Toner Data 2 Connet the AC power cord to install the driver. Step 1 Setting Up Your Printer 4 Print a Test Page Do NOT connect the interface cable. Connecting the interface cable is off. 5 Press the control panel button. Check that...
Ready Paper Alarm Toner Data Extend the Support flap. 1 Make sure that the test page has printed correctly. The printer prints a test page. I O 10 Go to the next page to the printer, and then plug the AC power cord into an AC outlet. 3 Turn the power switch on. Drum Ready Paper ...Alarm Toner Data 2 Connet the AC power cord to install the driver. Step 1 Setting Up Your Printer 4 Print a Test Page Do NOT connect the interface cable. Connecting the interface cable is off. 5 Press the control panel button. Check that...

Quick Setup Guide - English
Page 20
button. 9 Select USB. A Select Quit Printer Center from the Printer Center menu. 8 Click the Add Printer... Step 2 Installing the Driver For USB Interface Cable Users 7 Open the Print Center icon. The setup is now complete. 0 Select HL-14XX series, and then click the Add button. 18
button. 9 Select USB. A Select Quit Printer Center from the Printer Center menu. 8 Click the Add Printer... Step 2 Installing the Driver For USB Interface Cable Users 7 Open the Print Center icon. The setup is now complete. 0 Select HL-14XX series, and then click the Add button. 18
Users Manual - English
Page 1
...printed copy in a convenient place so you can use the printer. Keep the CD-ROM in the box or view it quickly if you use it on the supplied CD-ROM. Please read them with Screen Reader 'text-to Frequently Asked Questions (FAQs), Product Support and Technical Questions, and the latest Driver... Updates and Utilities. Please use the printer. Please visit our web site at http://solutions.brother.com where you can get answers to -speech' software. You can read this User's Guide thoroughly before you can use the Quick Setup Guide to . Brother Laser Printer HL-1435 ...
...printed copy in a convenient place so you can use the printer. Keep the CD-ROM in the box or view it quickly if you use it on the supplied CD-ROM. Please read them with Screen Reader 'text-to Frequently Asked Questions (FAQs), Product Support and Technical Questions, and the latest Driver... Updates and Utilities. Please use the printer. Please visit our web site at http://solutions.brother.com where you can get answers to -speech' software. You can read this User's Guide thoroughly before you can use the Quick Setup Guide to . Brother Laser Printer HL-1435 ...
Users Manual - English
Page 12
... printing from the manual feed slot 1-29 Guidelines for printing on both sides of Conformity (For USA vi Industry Canada Compliance Statement (For Canada vii Radio interference (220 to 240 volt model only vii International ENERGY STAR® Compliance Statement vii Laser ... (USA only iv Service center locations (Canada only iv Brother fax back system (USA only iv Internet addresses ...-v Important information: Regulations vi Federal Communications Commission (FCC) Declaration of the paper 1-31 2 Driver and software ...2-1 Printer driver ...2-1 For Windows® 95/98/Me, Windows NT&#...
... printing from the manual feed slot 1-29 Guidelines for printing on both sides of Conformity (For USA vi Industry Canada Compliance Statement (For Canada vii Radio interference (220 to 240 volt model only vii International ENERGY STAR® Compliance Statement vii Laser ... (USA only iv Service center locations (Canada only iv Brother fax back system (USA only iv Internet addresses ...-v Important information: Regulations vi Federal Communications Commission (FCC) Declaration of the paper 1-31 2 Driver and software ...2-1 Printer driver ...2-1 For Windows® 95/98/Me, Windows NT&#...

Users Manual - English
Page 13
...; OS 8.6 to 9.2 and Mac® OS X 10.1 to 10.2 2-1 For Windows® ...2-2 Features in the Brother printer driver 2-2 For Macintosh® ...2-9 3 Control panel ...3-1 Service call indications ...3-5 Control panel buttons ...3-7 Print a test page ...3-8 Using Control panel button 3-8 Using the printer driver ...3-8 4 Options ...4-1 Print server (NC-2100p) (For Windows® only 4-1 Ir-DA Interface (IR-1000) ...4-2 5 Routine maintenance ...5-1 Toner...
...; OS 8.6 to 9.2 and Mac® OS X 10.1 to 10.2 2-1 For Windows® ...2-2 Features in the Brother printer driver 2-2 For Macintosh® ...2-9 3 Control panel ...3-1 Service call indications ...3-5 Control panel buttons ...3-7 Print a test page ...3-8 Using Control panel button 3-8 Using the printer driver ...3-8 4 Options ...4-1 Print server (NC-2100p) (For Windows® only 4-1 Ir-DA Interface (IR-1000) ...4-2 5 Routine maintenance ...5-1 Toner...

Users Manual - English
Page 18
... Thick paper or Thicker paper Paper size Number of paper can jump to the page for each printing method by clicking L in .) Single sheet ABOUT THIS PRINTER 1 - 5 The names for the paper trays in the printer driver and this Guide are as follows: Paper tray Manual feed slot Tray 1 Manual While looking at this...
... Thick paper or Thicker paper Paper size Number of paper can jump to the page for each printing method by clicking L in .) Single sheet ABOUT THIS PRINTER 1 - 5 The names for the paper trays in the printer driver and this Guide are as follows: Paper tray Manual feed slot Tray 1 Manual While looking at this...

Users Manual - English
Page 20
Printable area When using Brother GDI printer driver emulation, the edges of the paper that cannot be printed on are shown below. Portrait 1 2 4 3 Figure 1-3 A4 1 4.2 mm (0.17 in.) 2 6.01 mm (0.24 in.) 3 4.2 mm (0.17 in.) 4 6.01 mm (0.24 in.) Landscape Letter 4.2 mm (0.17 ....) 5.0 mm (0.19 in.) 4.2 mm (0.17 in.) 5.0 mm (0.19 in.) B6 (ISO) 4.2 mm (0.17 in.) 5.0 mm (0.19 in.) 4.2 mm (0.17 in.) 5.0 mm (0.19 in.) ABOUT THIS PRINTER 1 - 7
Printable area When using Brother GDI printer driver emulation, the edges of the paper that cannot be printed on are shown below. Portrait 1 2 4 3 Figure 1-3 A4 1 4.2 mm (0.17 in.) 2 6.01 mm (0.24 in.) 3 4.2 mm (0.17 in.) 4 6.01 mm (0.24 in.) Landscape Letter 4.2 mm (0.17 ....) 5.0 mm (0.19 in.) 4.2 mm (0.17 in.) 5.0 mm (0.19 in.) B6 (ISO) 4.2 mm (0.17 in.) 5.0 mm (0.19 in.) 4.2 mm (0.17 in.) 5.0 mm (0.19 in.) ABOUT THIS PRINTER 1 - 7

Users Manual - English
Page 21
Printing methods Printing on plain paper You can I use , please see What kind of the printer. in the printer driver. Printing on plain paper from the paper tray 1 Select the Paper Size, Media Type, Paper Source, and other settings in this chapter. Figure 1-5 1 - 8 ABOUT THIS PRINTER Media Type: Plain Paper Paper Source: Tray1 2 Pull the paper tray completely out of paper can print on plain paper from the paper tray or manual feed slot. For the paper you want to use ?
Printing methods Printing on plain paper You can I use , please see What kind of the printer. in the printer driver. Printing on plain paper from the paper tray 1 Select the Paper Size, Media Type, Paper Source, and other settings in this chapter. Figure 1-5 1 - 8 ABOUT THIS PRINTER Media Type: Plain Paper Paper Source: Tray1 2 Pull the paper tray completely out of paper can print on plain paper from the paper tray or manual feed slot. For the paper you want to use ?

Users Manual - English
Page 24
A NO PAPER message is shown in the Status Monitor and indicated by the control panel LEDs until you put a sheet of paper in the printer driver. Drum Ready Paper Alarm Toner Data Figure 1-10 ABOUT THIS PRINTER 1 - 11 Media Type: Plain Paper Paper Source: Manual 2 Send the print data to the printer. Printing on plain paper from the manual feed slot The printer automatically turns on the Manual Feed mode when you put paper into manual feed slot. 1 Select the Paper Size, Media Type, Paper Source, and other settings in the manual feed slot.
A NO PAPER message is shown in the Status Monitor and indicated by the control panel LEDs until you put a sheet of paper in the printer driver. Drum Ready Paper Alarm Toner Data Figure 1-10 ABOUT THIS PRINTER 1 - 11 Media Type: Plain Paper Paper Source: Manual 2 Send the print data to the printer. Printing on plain paper from the manual feed slot The printer automatically turns on the Manual Feed mode when you put paper into manual feed slot. 1 Select the Paper Size, Media Type, Paper Source, and other settings in the manual feed slot.

Users Manual - English
Page 27
Printing on thicker paper or card stock. Figure 1-14 1 - 14 ABOUT THIS PRINTER When you select the paper you want to the back of paper can I use , please see What kind of the printer. in the printer driver. Media Type: Thick paper or Thicker paper Paper Source: Manual 2 Open the rear cover.... Use this chapter. 1 Select the Paper Size, Media Type, Paper Source, and other settings in this paper feed and output method when you want to print on thicker...
Printing on thicker paper or card stock. Figure 1-14 1 - 14 ABOUT THIS PRINTER When you select the paper you want to the back of paper can I use , please see What kind of the printer. in the printer driver. Media Type: Thick paper or Thicker paper Paper Source: Manual 2 Open the rear cover.... Use this chapter. 1 Select the Paper Size, Media Type, Paper Source, and other settings in this paper feed and output method when you want to print on thicker...

Users Manual - English
Page 31
Media Type: Thicker paper Paper Source: Manual 2 Open the rear cover. Figure 1-20 1 - 18 ABOUT THIS PRINTER Use this paper feed and output method when you put paper in the manual feed slot. 1 Select the Paper Size, Media Type, Paper Source, and other settings in the printer driver. The printer automatically turns on envelopes from the manual feed slot When the rear cover is lifted up, the printer has a straight paper path from the manual feed slot to print envelopes. Printing on the Manual Feed mode when you want to the back of the printer.
Media Type: Thicker paper Paper Source: Manual 2 Open the rear cover. Figure 1-20 1 - 18 ABOUT THIS PRINTER Use this paper feed and output method when you put paper in the manual feed slot. 1 Select the Paper Size, Media Type, Paper Source, and other settings in the printer driver. The printer automatically turns on envelopes from the manual feed slot When the rear cover is lifted up, the printer has a straight paper path from the manual feed slot to print envelopes. Printing on the Manual Feed mode when you want to the back of the printer.

Users Manual - English
Page 34
Media Type: Transparencies Paper Source: Tray1 2 Pull the paper tray completely out of the printer. Printing on transparencies You can print on transparencies from the paper tray, manual feed slot. Printing on transparencies from the paper tray ■ Do not put more than 10 transparencies in the paper tray. 1 Select the Paper Size, Media Type, Paper Source, and other settings in the printer driver. Figure 1-24 ABOUT THIS PRINTER 1 - 21
Media Type: Transparencies Paper Source: Tray1 2 Pull the paper tray completely out of the printer. Printing on transparencies You can print on transparencies from the paper tray, manual feed slot. Printing on transparencies from the paper tray ■ Do not put more than 10 transparencies in the paper tray. 1 Select the Paper Size, Media Type, Paper Source, and other settings in the printer driver. Figure 1-24 ABOUT THIS PRINTER 1 - 21

Users Manual - English
Page 37
Printing on transparencies from the manual feed slot When the rear cover is lifted up, the printer has a straight paper path from the manual feed slot to the back of the printer. 1 Select the Paper Size, Media Type, Paper Source, and other settings in the printer driver. Figure 1-28 Figure 1-29 1 - 24 ABOUT THIS PRINTER Media Type: Transparencies Paper Source: Manual 2 Open the rear cover.
Printing on transparencies from the manual feed slot When the rear cover is lifted up, the printer has a straight paper path from the manual feed slot to the back of the printer. 1 Select the Paper Size, Media Type, Paper Source, and other settings in the printer driver. Figure 1-28 Figure 1-29 1 - 24 ABOUT THIS PRINTER Media Type: Transparencies Paper Source: Manual 2 Open the rear cover.

Users Manual - English
Page 40
Figure 1-33 2 Select the Paper Size, Media Type, Paper Source, and other settings in the printer driver. Printing on one side of the paper (Manual duplex printing) The supplied printer drivers for Windows® 95/98/Me, Windows NT® 4.0, Windows® 2000/XP, Mac® OS 8.6 to ...choose the settings, see the Help text in the printer driver. Manual duplex printing from the paper tray 1 Choose the Duplex printing mode from the Advanced tab in the printer driver. 3 The printer will automatically print all the even-numbered pages on both sides of the paper first. For...
Figure 1-33 2 Select the Paper Size, Media Type, Paper Source, and other settings in the printer driver. Printing on one side of the paper (Manual duplex printing) The supplied printer drivers for Windows® 95/98/Me, Windows NT® 4.0, Windows® 2000/XP, Mac® OS 8.6 to ...choose the settings, see the Help text in the printer driver. Manual duplex printing from the paper tray 1 Choose the Duplex printing mode from the Advanced tab in the printer driver. 3 The printer will automatically print all the even-numbered pages on both sides of the paper first. For...

Users Manual - English
Page 42
If there is possible that there may be printed on first facing up. Follow the instructions on page 6-5. 1 Choose the Duplex printing mode from the manual feed slot ■ Before you put the sheets back in the printer driver. Repeat this step until you have to straighten them on ...the computer screen. Figure 1-37 ABOUT THIS PRINTER 1 - 29 Figure 1-36 2 Select the Paper...
If there is possible that there may be printed on first facing up. Follow the instructions on page 6-5. 1 Choose the Duplex printing mode from the manual feed slot ■ Before you put the sheets back in the printer driver. Repeat this step until you have to straighten them on ...the computer screen. Figure 1-37 ABOUT THIS PRINTER 1 - 29 Figure 1-36 2 Select the Paper...

Users Manual - English
Page 46
... change settings by clicking Printing Preferences... in the Properties dialog box. The screens on your Operating System. For Windows® Features in the Brother printer driver You can access the Basic tab by clicking the illustration on the left side of the Basic tab in the General tab of the Brother HL-1435 series Properties screen. 1 2 1 Select...
... change settings by clicking Printing Preferences... in the Properties dialog box. The screens on your Operating System. For Windows® Features in the Brother printer driver You can access the Basic tab by clicking the illustration on the left side of the Basic tab in the General tab of the Brother HL-1435 series Properties screen. 1 2 1 Select...

Users Manual - English
Page 47
Advanced tab If you are using Windows NT® 4.0, Windows® 2000 or XP, you can access the Advanced tab by clicking the following icons: 1 Print Quality 2 Duplex 3 Watermark 4 Page Setting 5 Device Options 2 - 3 DRIVER AND SOFTWARE in the General tab of the Brother HL-1435 series Properties screen. 12 3 45 Change the tab settings by clicking Printing Preferences...
Advanced tab If you are using Windows NT® 4.0, Windows® 2000 or XP, you can access the Advanced tab by clicking the following icons: 1 Print Quality 2 Duplex 3 Watermark 4 Page Setting 5 Device Options 2 - 3 DRIVER AND SOFTWARE in the General tab of the Brother HL-1435 series Properties screen. 12 3 45 Change the tab settings by clicking Printing Preferences...

Users Manual - English
Page 48
... dpi ■ 300 dpi Toner Save Mode You can manually change the print image scaling and select Mirror / Reverse print options. DRIVER AND SOFTWARE 2 - 4 Print Setting (For Windows® 95/98/Me users only) You can save and print settings or gray printing setting. When you select the Duplex button, the dialog box for each orientation...
... dpi ■ 300 dpi Toner Save Mode You can manually change the print image scaling and select Mirror / Reverse print options. DRIVER AND SOFTWARE 2 - 4 Print Setting (For Windows® 95/98/Me users only) You can save and print settings or gray printing setting. When you select the Duplex button, the dialog box for each orientation...

Users Manual - English
Page 49
5 Device Options You can set the following Printer Function modes in this tab: (You can jump to the page for each Printer Function by clicking the function name in the list below.) ■ Job Spooling ■ Quick Print Setup ■ Sleep Time ■ Status Monitor ■ Page Protection ■ Print Date & Time 2 - 5 DRIVER AND SOFTWARE
5 Device Options You can set the following Printer Function modes in this tab: (You can jump to the page for each Printer Function by clicking the function name in the list below.) ■ Job Spooling ■ Quick Print Setup ■ Sleep Time ■ Status Monitor ■ Page Protection ■ Print Date & Time 2 - 5 DRIVER AND SOFTWARE


