
Quick Setup Guide - English
Page 2
.... Warning Note Indicates cautions that must be observed to use the printer properly or prevent damage to the printer. User's Guide Indicates reference to remember when using the printer. When you open the front cover or rear cover of the printer are high voltage electrodes inside the printer. There are extremely hot. Before replacing internal parts, cleaning the printer or clearing a paper jam, make sure you have turned OFF the power switch and unplugged the power...
.... Warning Note Indicates cautions that must be observed to use the printer properly or prevent damage to the printer. User's Guide Indicates reference to remember when using the printer. When you open the front cover or rear cover of the printer are high voltage electrodes inside the printer. There are extremely hot. Before replacing internal parts, cleaning the printer or clearing a paper jam, make sure you have turned OFF the power switch and unplugged the power...

Quick Setup Guide - English
Page 3
... Carton Components 4 Control Panel ...5 Supplied CD-ROM 6 Step 1 Setting Up Your Printer Step 2 1. Insert the CD-ROM into the CD-ROM Drive 7 2. Table of the Printer 19 Options ...20 ■ Troubleshooting User's Guide Chapter 6 1 Install the Drum Unit Assembly 8 3. Print a Test Page 10 Installing the Driver For USB Interface Cable Users 12 1. Installing the Driver and Connecting the Printer to your Macintosh ■ For Mac® OS X 10.1 to 10.2 Users 17 Installing the Driver & Connecting the Printer to Your PC 2. Load Paper in the Paper Tray 9 4.
... Carton Components 4 Control Panel ...5 Supplied CD-ROM 6 Step 1 Setting Up Your Printer Step 2 1. Insert the CD-ROM into the CD-ROM Drive 7 2. Table of the Printer 19 Options ...20 ■ Troubleshooting User's Guide Chapter 6 1 Install the Drum Unit Assembly 8 3. Print a Test Page 10 Installing the Driver For USB Interface Cable Users 12 1. Installing the Driver and Connecting the Printer to your Macintosh ■ For Mac® OS X 10.1 to 10.2 Users 17 Installing the Driver & Connecting the Printer to Your PC 2. Load Paper in the Paper Tray 9 4.
Quick Setup Guide - English
Page 4
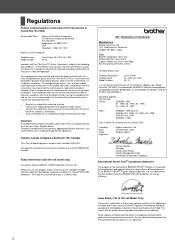
... for a Class B digital device. Important A shielded interface cable should be determined by turning the equipment off and on a circuit different from the machine during any interference received, including interference that : Products description: Product Name: Model Number: Laser Printer HL-1430, HL-1435 HL-14 is to the following measures: - Changes or modifications not expressly approved by : Date: Place: Signature: Brother Industries, Ltd. 25 December...
... for a Class B digital device. Important A shielded interface cable should be determined by turning the equipment off and on a circuit different from the machine during any interference received, including interference that : Products description: Product Name: Model Number: Laser Printer HL-1430, HL-1435 HL-14 is to the following measures: - Changes or modifications not expressly approved by : Date: Place: Signature: Brother Industries, Ltd. 25 December...
Quick Setup Guide - English
Page 5
... product is also designed for your plug socket, remove the plug from the power outlet to laser products marketed in the scanner unit. This printer must be inserted only into a standard three-pin power outlet that is coloured brown, must be secured inside . MANUFACTURED: Brother Corporation (Asia) Ltd. Always replace the fuse cover. Laitteen käyttäminen muulla kuin...
... product is also designed for your plug socket, remove the plug from the power outlet to laser products marketed in the scanner unit. This printer must be inserted only into a standard three-pin power outlet that is coloured brown, must be secured inside . MANUFACTURED: Brother Corporation (Asia) Ltd. Always replace the fuse cover. Laitteen käyttäminen muulla kuin...
Quick Setup Guide - English
Page 12
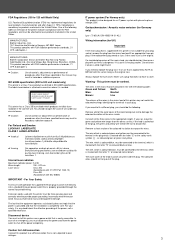
... green. The printer prints a test page. Drum Ready Paper Alarm Toner Data 2 Connet the AC power cord to install the driver. I O 10 Go to the next page to the printer, and then plug the AC power cord into an AC outlet. 3 Turn the power switch on. Connecting the interface cable is off. 5 Press the control panel button. Ready Paper Alarm Toner Data Extend the Support flap. 1 Make sure that the test page has printed correctly. Step 1 Setting Up Your Printer 4 Print a Test Page Do NOT connect the interface cable.
... green. The printer prints a test page. Drum Ready Paper Alarm Toner Data 2 Connet the AC power cord to install the driver. I O 10 Go to the next page to the printer, and then plug the AC power cord into an AC outlet. 3 Turn the power switch on. Connecting the interface cable is off. 5 Press the control panel button. Ready Paper Alarm Toner Data Extend the Support flap. 1 Make sure that the test page has printed correctly. Step 1 Setting Up Your Printer 4 Print a Test Page Do NOT connect the interface cable.
Quick Setup Guide - English
Page 14
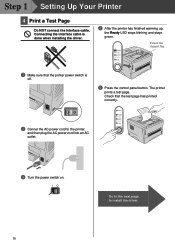
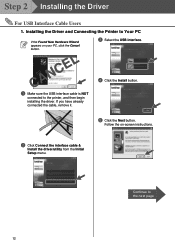
... to the printer, and then begin installing the driver. Follow the on your PC, click the Cancel button. 3 Select the USB interface. If you have already connected the cable, remove it. 4 Click the Install button. 5 Click the Next button. Installing the Driver and Connecting the Printer to Your PC If the Found New Hardware Wizard appears on -screen instructions. 2 Click Connect the interface cable & Install the driver/utility from the Initial Setup menu. Step 2 Installing the Driver For USB Interface Cable Users 1.
... to the printer, and then begin installing the driver. Follow the on your PC, click the Cancel button. 3 Select the USB interface. If you have already connected the cable, remove it. 4 Click the Install button. 5 Click the Next button. Installing the Driver and Connecting the Printer to Your PC If the Found New Hardware Wizard appears on -screen instructions. 2 Click Connect the interface cable & Install the driver/utility from the Initial Setup menu. Step 2 Installing the Driver For USB Interface Cable Users 1.

Quick Setup Guide - English
Page 21
... the specifications and materials contained herein and shall not be responsible for use the original packaging. When shipping the Printer, the DRUM UNIT assembly and TONER CARTRIDGE must ship your Printer, carefully package the Printer in the foil bag during transit. The contents of this User's Guide are subject to change without notice in the U.S and other errors relating to make changes without notice. Brother reserves...
... the specifications and materials contained herein and shall not be responsible for use the original packaging. When shipping the Printer, the DRUM UNIT assembly and TONER CARTRIDGE must ship your Printer, carefully package the Printer in the foil bag during transit. The contents of this User's Guide are subject to change without notice in the U.S and other errors relating to make changes without notice. Brother reserves...

Users Manual - English
Page 7
...tested and found to comply with the limits for a Class B digital device, pursuant to Part 15 of Conformity (For USA) Responsible Party: Brother International Corporation 100 Somerset Corporate Boulevard P.O. Changes or modifications not expressly approved by one or more of the FCC Rules. could void the user... and receiver. ■ Connect the equipment into an outlet on , the user is no guarantee that the products Product name: Model number: Laser Printer HL-1435 HL-14 complies with Part 15 of the following two conditions: (1) This device may not cause harmful interference...
...tested and found to comply with the limits for a Class B digital device, pursuant to Part 15 of Conformity (For USA) Responsible Party: Brother International Corporation 100 Somerset Corporate Boulevard P.O. Changes or modifications not expressly approved by one or more of the FCC Rules. could void the user... and receiver. ■ Connect the equipment into an outlet on , the user is no guarantee that the products Product name: Model number: Laser Printer HL-1435 HL-14 complies with Part 15 of the following two conditions: (1) This device may not cause harmful interference...

Users Manual - English
Page 8
...; la norme NMB-003 du Canada. Before you use a double-shielded interface cable with Canadian ICES-003. Radio interference (220 to 120 volt model only) This printer is certified as a Class I laser product under the U.S. vii The cable must not be more than 2 metres long. Laser Safety (100 to 240 volt model only) This printer follows EN55022 (CISPR Publication 22)/Class B.
...; la norme NMB-003 du Canada. Before you use a double-shielded interface cable with Canadian ICES-003. Radio interference (220 to 120 volt model only) This printer is certified as a Class I laser product under the U.S. vii The cable must not be more than 2 metres long. Laser Safety (100 to 240 volt model only) This printer follows EN55022 (CISPR Publication 22)/Class B.
Users Manual - English
Page 12
... International ENERGY STAR® Compliance Statement vii Laser Safety (100 to 120 volt model only vii FDA Regulations (100 to 120 volt model only viii IEC 60825 specification (220 to avoid 1-17 Printing on envelopes from the manual feed slot 1-18 Printing on transparencies ...1-21 Printing on transparencies from the paper tray 1-21 Printing on transparencies from the manual feed slot 1-24 Printing on both sides of the paper (Manual duplex printing...
... International ENERGY STAR® Compliance Statement vii Laser Safety (100 to 120 volt model only vii FDA Regulations (100 to 120 volt model only viii IEC 60825 specification (220 to avoid 1-17 Printing on envelopes from the manual feed slot 1-18 Printing on transparencies ...1-21 Printing on transparencies from the paper tray 1-21 Printing on transparencies from the manual feed slot 1-24 Printing on both sides of the paper (Manual duplex printing...

Users Manual - English
Page 13
...Control panel buttons ...3-7 Print a test page ...3-8 Using Control panel button 3-8 Using the printer driver ...3-8 4 Options ...4-1 Print server (NC-2100p) (For Windows® only 4-1 Ir-DA Interface (IR-1000) ...4-2 5 Routine maintenance ...5-1 Toner cartridge ...5-2 Toner Low message ...5-2 Toner Empty message ...5-3 Replacing the toner cartridge 5-3 Drum unit ...5-8 Change Drum message ...5-8 Replacing the drum unit ...5-9 Cleaning ...5-12 Replacing maintenance parts ...5-13 6 Troubleshooting ...6-1 Identifying your problem ...6-1 Error messages in the status monitor 6-2 Error message...
...Control panel buttons ...3-7 Print a test page ...3-8 Using Control panel button 3-8 Using the printer driver ...3-8 4 Options ...4-1 Print server (NC-2100p) (For Windows® only 4-1 Ir-DA Interface (IR-1000) ...4-2 5 Routine maintenance ...5-1 Toner cartridge ...5-2 Toner Low message ...5-2 Toner Empty message ...5-3 Replacing the toner cartridge 5-3 Drum unit ...5-8 Change Drum message ...5-8 Replacing the drum unit ...5-9 Cleaning ...5-12 Replacing maintenance parts ...5-13 6 Troubleshooting ...6-1 Identifying your problem ...6-1 Error messages in the status monitor 6-2 Error message...

Users Manual - English
Page 31
Printing on the Manual Feed mode when you want to the back of the printer. Media Type: Thicker paper Paper Source: Manual 2 Open the rear cover. Figure 1-20 1 - 18 ABOUT THIS PRINTER The printer automatically turns on envelopes from the manual feed slot When the rear cover is lifted up, the printer has a straight paper path from the manual feed slot to print envelopes. Use this paper feed and output method when you put paper in the manual feed slot. 1 Select the Paper Size, Media Type, Paper Source, and other settings in the printer driver.
Printing on the Manual Feed mode when you want to the back of the printer. Media Type: Thicker paper Paper Source: Manual 2 Open the rear cover. Figure 1-20 1 - 18 ABOUT THIS PRINTER The printer automatically turns on envelopes from the manual feed slot When the rear cover is lifted up, the printer has a straight paper path from the manual feed slot to print envelopes. Use this paper feed and output method when you put paper in the manual feed slot. 1 Select the Paper Size, Media Type, Paper Source, and other settings in the printer driver.

Users Manual - English
Page 50
... the Control Panel button. DRIVER AND SOFTWARE 2 - 6 You can turn the status monitor on, go the Advanced tab, select Device options and then select Status monitor. Quick Print Setup You can reprint a document without sending the data again from the computer. The page protection feature allows the printer to create the full page image to the settings of the following functions: ■ Multiple Page ■ Manual Duplex ■ Toner Save Mode ■ Paper Source ■ Media Type Sleep Time...
... the Control Panel button. DRIVER AND SOFTWARE 2 - 6 You can turn the status monitor on, go the Advanced tab, select Device options and then select Status monitor. Quick Print Setup You can reprint a document without sending the data again from the computer. The page protection feature allows the printer to create the full page image to the settings of the following functions: ■ Multiple Page ■ Manual Duplex ■ Toner Save Mode ■ Paper Source ■ Media Type Sleep Time...
Users Manual - English
Page 78
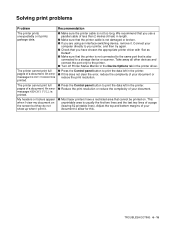
... listed: Printer LED is blinking See Control panel buttons on page 3-7. Printout is incorrect See Solving print problems on page 6-10. Pages are printed, however there are installed properly. ■ The front cover is fully closed. ■ Paper is inserted properly in the status monitor on page 6-2. Status Monitor Error Message appears See Error messages in the paper tray. ■ The interface cable is securely connected to the printer and the computer. ■ The correct driver for the printer is installed...
... listed: Printer LED is blinking See Control panel buttons on page 3-7. Printout is incorrect See Solving print problems on page 6-10. Pages are printed, however there are installed properly. ■ The front cover is fully closed. ■ Paper is inserted properly in the status monitor on page 6-2. Status Monitor Error Message appears See Error messages in the paper tray. ■ The interface cable is securely connected to the printer and the computer. ■ The correct driver for the printer is installed...

Users Manual - English
Page 79
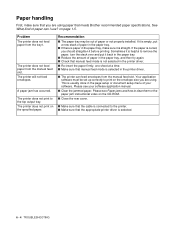
... printer. ■ Press the Control panel button to remove the paper, turn the Printer Status on page 2-5. Sometimes it ready for when the Toner Empty status is helpful to print the data remaining in the Device Options of your document before printing. on page 5-3. ■ Purchase a new toner cartridge and have it is indicated. 6 - 2 TROUBLESHOOTING Error messages in the following table for the error message that meets Brother's recommended paper specifications. See What kind of paper can change the setting of the Status...
... printer. ■ Press the Control panel button to remove the paper, turn the Printer Status on page 2-5. Sometimes it ready for when the Toner Empty status is helpful to print the data remaining in the Device Options of your document before printing. on page 5-3. ■ Purchase a new toner cartridge and have it is indicated. 6 - 2 TROUBLESHOOTING Error messages in the following table for the error message that meets Brother's recommended paper specifications. See What kind of paper can change the setting of the Status...
Users Manual - English
Page 81
... in the page setup or document setup menu of paper can feed envelopes from the manual feed slot. This is straight. Please see Paper jams and how to clear them or the paper jam instructional video on the CD-ROM. ■ Close the rear cover. ■ Make sure that the cable is connected to print on the envelope size you are using . Problem The printer does not feed paper from the manual feed slot. The printer does not feed paper from the...
... in the page setup or document setup menu of paper can feed envelopes from the manual feed slot. This is straight. Please see Paper jams and how to clear them or the paper jam instructional video on the CD-ROM. ■ Close the rear cover. ■ Make sure that the cable is connected to print on the envelope size you are using . Problem The printer does not feed paper from the manual feed slot. The printer does not feed paper from the...

Users Manual - English
Page 87
... an interface-switching device, make sure the correct printer is selected with USB Problem HL-1435 does not appear in the System Folder and that it is selected. See Replacing the drum unit on . See Positioning the printer on page 5-3. ■ Use a new drum unit. Other problems Problem The printer cannot print. Recommendation ■ Check that the printer is turned on page 5-3. ■ Try installing a new drum unit. See Replacing the toner cartridge on page 1-4. ■ Use a new toner cartridge. See Replacing the drum unit on your PC. There was an error...
... an interface-switching device, make sure the correct printer is selected with USB Problem HL-1435 does not appear in the System Folder and that it is selected. See Replacing the drum unit on . See Positioning the printer on page 5-3. ■ Use a new drum unit. Other problems Problem The printer cannot print. Recommendation ■ Check that the printer is turned on page 5-3. ■ Try installing a new drum unit. See Replacing the toner cartridge on page 1-4. ■ Use a new toner cartridge. See Replacing the drum unit on your PC. There was an error...

Users Manual - English
Page 90
... been used for a long time. ■ The drum unit may be damaged. Put in a new drum unit. Lines across the page ABCDEFGH abcdefghijk ABCD abcde 01234 ■ Clean the inside the printer covering the scanner window. ■ The fixing unit may be damaged. Make sure that you select the appropriate media type in the drum unit. Clean the drum unit. See Replacing the drum unit on page 5-12. ■Do not use ? Call Customer Service. Put in a new drum unit. Install a new drum unit. Examples of poor print quality...
... been used for a long time. ■ The drum unit may be damaged. Put in a new drum unit. Lines across the page ABCDEFGH abcdefghijk ABCD abcde 01234 ■ Clean the inside the printer covering the scanner window. ■ The fixing unit may be damaged. Make sure that you select the appropriate media type in the drum unit. Clean the drum unit. See Replacing the drum unit on page 5-12. ■Do not use ? Call Customer Service. Put in a new drum unit. Install a new drum unit. Examples of poor print quality...
Users Manual - English
Page 92
... printer cannot print full pages of a document. This unprintable area is not too long. TROUBLESHOOTING 6 - 15 We recommend that you are using an interface-switching device, remove it . ■ Most laser printers have chosen the appropriate printer driver with 'Set as Default'. ■ Make sure that the printer is not connected to the same port that the printer cable is printed. ■ Press the Control panel button to the printer. ■ Turn off Printer Status Monitor in the Device Options tab...
... printer cannot print full pages of a document. This unprintable area is not too long. TROUBLESHOOTING 6 - 15 We recommend that you are using an interface-switching device, remove it . ■ Most laser printers have chosen the appropriate printer driver with 'Set as Default'. ■ Make sure that the printer is not connected to the same port that the printer cable is printed. ■ Press the Control panel button to the printer. ■ Turn off Printer Status Monitor in the Device Options tab...
Quick Setup Guide - French
Page 4
...) 704-1700 declares, that the printer does not produce hazardous laser radiation. This means that the products Product name: Model number: Laser Printer HL-1430, HL-1435 HL-14 complies with the limits for a Class B digital device, pursuant to provide reasonable protection against harmful interference in a particular installation. This equipment has been tested and found to comply with Part 15 of 1968. Reorient or...
...) 704-1700 declares, that the printer does not produce hazardous laser radiation. This means that the products Product name: Model number: Laser Printer HL-1430, HL-1435 HL-14 complies with the limits for a Class B digital device, pursuant to provide reasonable protection against harmful interference in a particular installation. This equipment has been tested and found to comply with Part 15 of 1968. Reorient or...


