
Operating Guide
Page 2
... APPARAT CAUTION: Use of controls or adjustments or performance of the Canadian Interference-Causing Equipment Regulations. Do not incinerate. It will help you set up and operate your owner's guide for home and other licensing restrictions and protections. Confidential Unpublished Works. ©1992-1997 Dolby Laboratories. The exclamation point within the media center is intended to alert the user to the presence...
... APPARAT CAUTION: Use of controls or adjustments or performance of the Canadian Interference-Causing Equipment Regulations. Do not incinerate. It will help you set up and operate your owner's guide for home and other licensing restrictions and protections. Confidential Unpublished Works. ©1992-1997 Dolby Laboratories. The exclamation point within the media center is intended to alert the user to the presence...
Operating Guide
Page 3
... can play 5 Check for region number compatibility 5 Conventions used in this guide 5 Glossary 5 Controls and Indicators 7 The remote control 7 Media center controls and indicators 10 Media center display window 11 General System Operation 12 Turning your system on and off 12 Making sound adjustments 12 Volume 12 Changing the number of speakers playing 12 Adjusting surround sound 12 Using the headphones jack 12 System settings 12 Using the sleep timer 12 Changing the video output for component video connections 12 Testing the TV on/off detector 13 Playing a Video DVD...
... can play 5 Check for region number compatibility 5 Conventions used in this guide 5 Glossary 5 Controls and Indicators 7 The remote control 7 Media center controls and indicators 10 Media center display window 11 General System Operation 12 Turning your system on and off 12 Making sound adjustments 12 Volume 12 Changing the number of speakers playing 12 Adjusting surround sound 12 Using the headphones jack 12 System settings 12 Using the sleep timer 12 Changing the video output for component video connections 12 Testing the TV on/off detector 13 Playing a Video DVD...

Operating Guide
Page 5
... -use system. Technically called a part of a title. For example, "REPEAT: TRACK appears when the repeat disc track mode is a relatively new technology, please take the time to adjust the sound". • Messages appearing on the media center display are sold. Note: Because DVD is selected". Types of buttons on the remote control and on the media center front panel, and menu items appearing on your TV screen...
... -use system. Technically called a part of a title. For example, "REPEAT: TRACK appears when the repeat disc track mode is a relatively new technology, please take the time to adjust the sound". • Messages appearing on the media center display are sold. Note: Because DVD is selected". Types of buttons on the remote control and on the media center front panel, and menu items appearing on your TV screen...

Operating Guide
Page 7
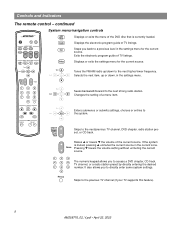
... connected) as the sound source. The top of this button turns your system on and selects your VCR as the sound source. Move the remote a foot or two and try again. Power on/off and mute controls On Off Mute All Mute CD/DVD SOURCE / INPUT FM/AM Tape TV Input TV VCR AUX Power Power Power MENU / NAVIGATION DVD Menu Guide Exit Settings Tune Seek Enter Channel Chapter Preset Track Volume 1 2 3 4 5 6 7 8 9 Previous 0 PLAYBACK Stop Pause Play Shuffle Speakers 2-3-5 Repeat AUDIO Surround...
... connected) as the sound source. The top of this button turns your system on and selects your VCR as the sound source. Move the remote a foot or two and try again. Power on/off and mute controls On Off Mute All Mute CD/DVD SOURCE / INPUT FM/AM Tape TV Input TV VCR AUX Power Power Power MENU / NAVIGATION DVD Menu Guide Exit Settings Tune Seek Enter Channel Chapter Preset Track Volume 1 2 3 4 5 6 7 8 9 Previous 0 PLAYBACK Stop Pause Play Shuffle Speakers 2-3-5 Repeat AUDIO Surround...
Operating Guide
Page 8
... higher/lower frequency. If the system is currently loaded. Skips to the next strong radio station. continued System menu/navigation controls On Off Mute All Mute CD/DVD SOURCE / INPUT FM/AM Tape TV Input TV VCR AUX Power Power Power MENU / NAVIGATION DVD Menu Guide Exit Settings Tune Seek Enter Channel Chapter Preset Track Volume 1 2 3 4 5 6 7 8 9 Previous 0 PLAYBACK Stop Pause Play Shuffle Repeat Speakers 2-3-5 AUDIO Surround -+ DVD Menu Guide Exit Settings Tune Seek Enter Displays or exits the menu of the DVD disc that is...
... higher/lower frequency. If the system is currently loaded. Skips to the next strong radio station. continued System menu/navigation controls On Off Mute All Mute CD/DVD SOURCE / INPUT FM/AM Tape TV Input TV VCR AUX Power Power Power MENU / NAVIGATION DVD Menu Guide Exit Settings Tune Seek Enter Channel Chapter Preset Track Volume 1 2 3 4 5 6 7 8 9 Previous 0 PLAYBACK Stop Pause Play Shuffle Repeat Speakers 2-3-5 AUDIO Surround -+ DVD Menu Guide Exit Settings Tune Seek Enter Displays or exits the menu of the DVD disc that is...

Operating Guide
Page 12
... using the Volume v w buttons on the remote control. Changing the number of speakers playing When you turn on a source, the number of speakers used for that was played last is automatically selected. For example, when you play a DVD video, all ZONE 1 speakers are muted. You can change the number of speakers used . In surround (5-speaker) mode, Surround+ raises the volume; Using the sleep timer Your system includes a sleep timer, which can be changed using the On/Off button on the remote control or the media center button panel. Changing the video output...
... using the Volume v w buttons on the remote control. Changing the number of speakers playing When you turn on a source, the number of speakers used for that was played last is automatically selected. For example, when you play a DVD video, all ZONE 1 speakers are muted. You can change the number of speakers used . In surround (5-speaker) mode, Surround+ raises the volume; Using the sleep timer Your system includes a sleep timer, which can be changed using the On/Off button on the remote control or the media center button panel. Changing the video output...
Operating Guide
Page 14
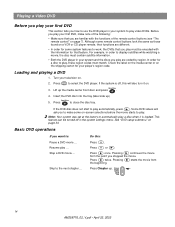
... start to play ... Press or . Channel Chapter Preset Track 14 AM259776_02_V.pdf • April 23, 2002 Playing a Video DVD Before you play your first DVD This section tells you to make note of the remote control buttons (see "The remote control" on -screen selections before the movie starts to play a disc when it on a VCR or CD player remote, their functions are coded by region. Lift up ). Basic DVD operations If you play must be turned off...
... start to play ... Press or . Channel Chapter Preset Track 14 AM259776_02_V.pdf • April 23, 2002 Playing a Video DVD Before you play your first DVD This section tells you to make note of the remote control buttons (see "The remote control" on -screen selections before the movie starts to play a disc when it on a VCR or CD player remote, their functions are coded by region. Lift up ). Basic DVD operations If you play must be turned off...
Operating Guide
Page 19
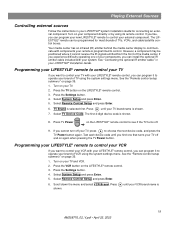
... control your external component. Press TV Power Power on your component directly or by using the system settings menu. Press the VCR button on your TV and VCR. 2. Turn on the LIFESTYLE® remote control. 3. Scroll down the menu and select VCR Brand. Playing External Sources Controlling external sources Follow the instructions in your LIFESTYLE® Installation Guide. If you can program it cannot receive the IR signals emitted from the front of TV using its remote control...
... control your external component. Press TV Power Power on your component directly or by using the system settings menu. Press the VCR button on your TV and VCR. 2. Turn on the LIFESTYLE® remote control. 3. Scroll down the menu and select VCR Brand. Playing External Sources Controlling external sources Follow the instructions in your LIFESTYLE® Installation Guide. If you can program it cannot receive the IR signals emitted from the front of TV using its remote control...
Operating Guide
Page 20
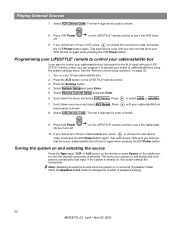
... input. on the LIFESTYLE® remote control to see if the cable/satel- 10. Press the Settings button. 4. Press to change the number of cable/satellite box using the system settings menu. The first 4-digit device code is shown. on the LIFESTYLE® remote control to see if the VCR turns 9. Press the AUX button on and selects the component connected to choose the next device code, and press the AUX Power button again. Press the Speakers 2-3-5 button...
... input. on the LIFESTYLE® remote control to see if the cable/satel- 10. Press the Settings button. 4. Press to change the number of cable/satellite box using the system settings menu. The first 4-digit device code is shown. on the LIFESTYLE® remote control to see if the VCR turns 9. Press the AUX button on and selects the component connected to choose the next device code, and press the AUX Power button again. Press the Speakers 2-3-5 button...
Operating Guide
Page 21
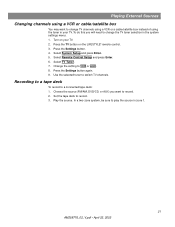
... switch TV channels. Select TV Tuner. 7. Use the selected tuner to play the source in your TV. 2. Set the tape deck to a connected tape deck: 1. Press the Settings button again. 9. Play the source. Turn on the LIFESTYLE® remote control. 3. Recording to a tape deck To record to record. 3. Change the setting to change TV channels using a VCR or a cable/satellite box instead of using a VCR or cable/satellite box You may want to change the TV tuner selection in the system settings menu: 1. Select Remote Control Setup...
... switch TV channels. Select TV Tuner. 7. Use the selected tuner to play the source in your TV. 2. Set the tape deck to a connected tape deck: 1. Press the Settings button again. 9. Play the source. Turn on the LIFESTYLE® remote control. 3. Recording to a tape deck To record to record. 3. Change the setting to change TV channels using a VCR or a cable/satellite box instead of using a VCR or cable/satellite box You may want to change the TV tuner selection in the system settings menu: 1. Select Remote Control Setup...

Operating Guide
Page 24
... CD/DVD SOURCE / INPUT FM/AM Tape TV Input TV VCR AUX Power Power Power MENU / NAVIGATION DVD Menu Guide Exit Settings Tune Seek Enter Channel Chapter Preset Track Volume 1 2 3 4 5 6 7 8 9 Previous 0 PLAYBACK Stop Pause Play Shuffle Repeat Speakers 2-3-5 AUDIO Surround -+ Settings Settings (DVD) DVD Play Options Enter Settings: DVD Play Options Title Chapter Title Time Time Display Motion Control Audio Track Camera Angle Subtitle Subtitle Language AB Repeat Menu Item Settings What each setting does Title: __ of the available sound tracks on -screen DVD...
... CD/DVD SOURCE / INPUT FM/AM Tape TV Input TV VCR AUX Power Power Power MENU / NAVIGATION DVD Menu Guide Exit Settings Tune Seek Enter Channel Chapter Preset Track Volume 1 2 3 4 5 6 7 8 9 Previous 0 PLAYBACK Stop Pause Play Shuffle Repeat Speakers 2-3-5 AUDIO Surround -+ Settings Settings (DVD) DVD Play Options Enter Settings: DVD Play Options Title Chapter Title Time Time Display Motion Control Audio Track Camera Angle Subtitle Subtitle Language AB Repeat Menu Item Settings What each setting does Title: __ of the available sound tracks on -screen DVD...
Operating Guide
Page 29
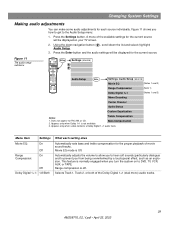
...the Settings button. Figure 11 The audio setup submenu On Off Mute All Mute CD/DVD SOURCE / INPUT FM/AM Tape TV Input TV VCR AUX Power Power Power MENU / NAVIGATION DVD Menu Guide Exit Settings Tune Seek Enter Channel Chapter Preset Track Volume 1 2 3 4 5 6 7 8 9 Previous 0 PLAYBACK Stop Pause Play Shuffle Repeat Speakers 2-3-5 AUDIO Surround -+ Settings Settings (source) Audio Setup Enter Settings: Audio Setup (source) Movie EQ (Notes 1 and 2) Range Compression (Note 1) Dolby Digital 1+1 (Notes 1 and 3) Mono Decoding Center Channel Audio...
...the Settings button. Figure 11 The audio setup submenu On Off Mute All Mute CD/DVD SOURCE / INPUT FM/AM Tape TV Input TV VCR AUX Power Power Power MENU / NAVIGATION DVD Menu Guide Exit Settings Tune Seek Enter Channel Chapter Preset Track Volume 1 2 3 4 5 6 7 8 9 Previous 0 PLAYBACK Stop Pause Play Shuffle Repeat Speakers 2-3-5 AUDIO Surround -+ Settings Settings (source) Audio Setup Enter Settings: Audio Setup (source) Movie EQ (Notes 1 and 2) Range Compression (Note 1) Dolby Digital 1+1 (Notes 1 and 3) Mono Decoding Center Channel Audio...
Operating Guide
Page 30
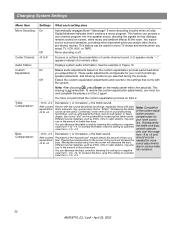
... bass sound by increasing the treble sound. Different source materials, such as DVDs, CDs or radio stations, may also vary in the amount of bass you select TV, VCR, AUX, or TAPE. To increase the bass, raise this setting to -14. Subsequently, the treble and bass controls operate only over the range from +1 to -wall carpet, or heavy drapes, can process a one-channel program into five-speaker sound, directing the signals...
... bass sound by increasing the treble sound. Different source materials, such as DVDs, CDs or radio stations, may also vary in the amount of bass you select TV, VCR, AUX, or TAPE. To increase the bass, raise this setting to -14. Subsequently, the treble and bass controls operate only over the range from +1 to -wall carpet, or heavy drapes, can process a one-channel program into five-speaker sound, directing the signals...
Operating Guide
Page 33
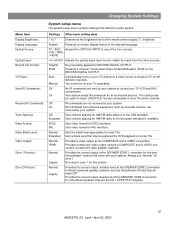
... 2-channel, mixed-down Pulse Coded Modulation (PCM) on -screen display menus in zone 1 for AM/FM radio stations to the European standard (if available). Off IR commands are received by your TV, VCR and AUX components. Auto Manual Automatically turns on your TV separately. Normal YPbPr Provides a video output at the SPEAKER ZONE 2 connector for Bose® powered speaker systems, such as universal remotes, are not received by your system. Sets video format for RECORD DIGITAL OUTPUT. Provides the correct output...
... 2-channel, mixed-down Pulse Coded Modulation (PCM) on -screen display menus in zone 1 for AM/FM radio stations to the European standard (if available). Off IR commands are received by your TV, VCR and AUX components. Auto Manual Automatically turns on your TV separately. Normal YPbPr Provides a video output at the SPEAKER ZONE 2 connector for Bose® powered speaker systems, such as universal remotes, are not received by your system. Sets video format for RECORD DIGITAL OUTPUT. Provides the correct output...

Operating Guide
Page 36
... Changing the house code settings Each LIFESTYLE® remote control uses a system of matching house codes to confirm recognition of the new code: NEW HOUSE CODE: New house code = 1 0 1 0 (Switch 1 up, 2 down, 3 up, and 4 down.) 7. Open the remote control battery cover and locate the miniature switches (Figure 14). 2. Lift the media center door and press the All Off button. 5. The display will appear in the media center display...
... Changing the house code settings Each LIFESTYLE® remote control uses a system of matching house codes to confirm recognition of the new code: NEW HOUSE CODE: New house code = 1 0 1 0 (Switch 1 up, 2 down, 3 up, and 4 down.) 7. Open the remote control battery cover and locate the miniature switches (Figure 14). 2. Lift the media center door and press the All Off button. 5. The display will appear in the media center display...
Operating Guide
Page 37
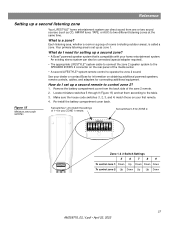
... tuner, TAPE, or AUX) to two different listening zones at the same time. Make sure the house code switches (1, 2, 3, and 4) match those on your dealer or contact Bose for information on the rear panel of the media center. • A second LIFESTYLE® system remote control to match the settings of 1-4 in your home entertainment system. See your first remote. 4. Figure 15 Miniature zone code switches Set switches 1-4 to operate the zone 2 sound. Set switches...
... tuner, TAPE, or AUX) to two different listening zones at the same time. Make sure the house code switches (1, 2, 3, and 4) match those on your dealer or contact Bose for information on the rear panel of the media center. • A second LIFESTYLE® system remote control to match the settings of 1-4 in your home entertainment system. See your first remote. 4. Figure 15 Miniature zone code switches Set switches 1-4 to operate the zone 2 sound. Set switches...
Operating Guide
Page 39
Alkaline batteries are plugged fully into operating AC wall outlets. • Be sure to select a source (CD/DVD, AM/FM, etc.). • Unplug the media center power supply for 60 seconds, then reconnect it is, press the Mute button on the remote control to unmute the sound. • Make sure the audio input cable is firmly seated in the media center SPEAKER ZONE 1 jack and the multi-pin connector on the other...
Alkaline batteries are plugged fully into operating AC wall outlets. • Be sure to select a source (CD/DVD, AM/FM, etc.). • Unplug the media center power supply for 60 seconds, then reconnect it is, press the Mute button on the remote control to unmute the sound. • Make sure the audio input cable is firmly seated in the media center SPEAKER ZONE 1 jack and the multi-pin connector on the other...
Operating Guide
Page 40
... Audio Setup menu. or 5-speaker mode. See "Making audio adjustments" on page 36. See "Replacing the remote control batteries" on page 38. • The CD may be upright. • Move antennas farther from surround speakers • Select 5-speaker mode. • Press Surround + • Make sure the video sound source is stereo and surround-encoded, and the component used (TV, VCR, etc.) is connected at least 20 inches (50 cm) from the media center. • Adjust antenna position to the media center...
... Audio Setup menu. or 5-speaker mode. See "Making audio adjustments" on page 36. See "Replacing the remote control batteries" on page 38. • The CD may be upright. • Move antennas farther from surround speakers • Select 5-speaker mode. • Press Surround + • Make sure the video sound source is stereo and surround-encoded, and the component used (TV, VCR, etc.) is connected at least 20 inches (50 cm) from the media center. • Adjust antenna position to the media center...
Operating Guide
Page 41
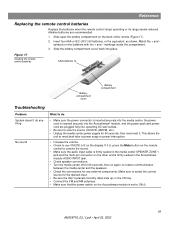
... on your LIFESTYLE® Installation Guide. See "Connecting the optional IR emitter cable" in the media center NOT CONNECTED SPEAKER ZONE 1 jack. Reference Problem What to do FM sound is distorted • Make sure speaker cables are not damaged and the connections are secure. • Reduce the output level from any external components connected to the media center. Sound is distorted • Adjust antenna position to the IR EMITTER jack on page 19. You...
... on your LIFESTYLE® Installation Guide. See "Connecting the optional IR emitter cable" in the media center NOT CONNECTED SPEAKER ZONE 1 jack. Reference Problem What to do FM sound is distorted • Make sure speaker cables are not damaged and the connections are secure. • Reduce the output level from any external components connected to the media center. Sound is distorted • Adjust antenna position to the IR EMITTER jack on page 19. You...
Operating Guide
Page 42
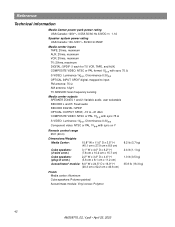
..., and AUX) COMPOSITE VIDEO: NTSC or PAL format 1Vp-p with sync 75 Ω S-VIDEO: Luminance 1Vp-p, Chrominance 0.3Vp-p OPTICAL INPUT: SPDIF digital, mapped to input FM antenna: 75 Ω AM antenna: 12µH TV SENSOR: Scan frequency sensing Media center outputs SPEAKER ZONES 1 and 2: Variable audio, user selectable RECORD L and R: Fixed audio RECORD DIGITAL: SPDIF OPTICAL OUTPUT: SPDIF, -15 to -21 dbm COMPOSITE VIDEO: NTSC or PAL 1Vp-p with sync 75 Ω S-VIDEO: Luminance 1Vp-p, Chrominance 0.3Vp-p Component video...
..., and AUX) COMPOSITE VIDEO: NTSC or PAL format 1Vp-p with sync 75 Ω S-VIDEO: Luminance 1Vp-p, Chrominance 0.3Vp-p OPTICAL INPUT: SPDIF digital, mapped to input FM antenna: 75 Ω AM antenna: 12µH TV SENSOR: Scan frequency sensing Media center outputs SPEAKER ZONES 1 and 2: Variable audio, user selectable RECORD L and R: Fixed audio RECORD DIGITAL: SPDIF OPTICAL OUTPUT: SPDIF, -15 to -21 dbm COMPOSITE VIDEO: NTSC or PAL 1Vp-p with sync 75 Ω S-VIDEO: Luminance 1Vp-p, Chrominance 0.3Vp-p Component video...

