
Owner's guide
Page 2
...;1 home entertainment system media center and the rear panel of the media center. Additional safety information See the additional instructions on the bottom of the Acoustimass module: The lightning flash with this work may be reproduced, modified, distributed or otherwise used without prior written per- Safety Information The AV3-2-1 media center is to be used batteries properly, following any local regulations. Class 1 laser product The DVD player...
...;1 home entertainment system media center and the rear panel of the media center. Additional safety information See the additional instructions on the bottom of the Acoustimass module: The lightning flash with this work may be reproduced, modified, distributed or otherwise used without prior written per- Safety Information The AV3-2-1 media center is to be used batteries properly, following any local regulations. Class 1 laser product The DVD player...
Owner's guide
Page 3
... system 16 Attaching the supplied antennas 17 Connecting cable FM radio 18 Make the power connection after all the others 18 Turning off the internal speakers in your TV 18 Installing remote control batteries 19 Other choices 19 Connecting recording equipment 20 Connecting other playback equipment 21 Connecting digital audio components 21 Controls, Display, Menus 22 On/Off controls 22 The remote control 22 POWER and MUTE controls 22 SOURCE controls 22 SOURCE and MENU controls 23 PLAYBACK controls 23 The media center 24 Control panel and buttons 24 Display...
... system 16 Attaching the supplied antennas 17 Connecting cable FM radio 18 Make the power connection after all the others 18 Turning off the internal speakers in your TV 18 Installing remote control batteries 19 Other choices 19 Connecting recording equipment 20 Connecting other playback equipment 21 Connecting digital audio components 21 Controls, Display, Menus 22 On/Off controls 22 The remote control 22 POWER and MUTE controls 22 SOURCE controls 22 SOURCE and MENU controls 23 PLAYBACK controls 23 The media center 24 Control panel and buttons 24 Display...
Owner's guide
Page 4
...31 Selecting a preset station 31 Changing FM settings 31 Changing AM settings 32 Playing other sources 32 Changing settings for the other sources 32 System settings 32 Sound Adjustments 33 Locating Audio Setup 33 Audio Setup menu 33 System Adjustments 35 Locating system settings 35 System Setup menu 36 DVD Setup submenu 36 Parental Control submenu 37 Reference 38 Taking care of your 3•2•1 home entertainment system 38 Cleaning the media center 38 Cleaning the speakers 38 Cleaning discs 38 Replacing the remote batteries 38 Troubleshooting 39 Customer service 40...
...31 Selecting a preset station 31 Changing FM settings 31 Changing AM settings 32 Playing other sources 32 Changing settings for the other sources 32 System settings 32 Sound Adjustments 33 Locating Audio Setup 33 Audio Setup menu 33 System Adjustments 35 Locating system settings 35 System Setup menu 36 DVD Setup submenu 36 Parental Control submenu 37 Reference 38 Taking care of your 3•2•1 home entertainment system 38 Cleaning the media center 38 Cleaning the speakers 38 Cleaning discs 38 Replacing the remote batteries 38 Troubleshooting 39 Customer service 40...
Owner's guide
Page 5
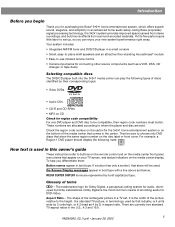
... buttons on the remote control and on the media center front panel, menu items that show the same region number on the media center display. Our standard TV picture, in terminology used in this owner's guide These instructions refer to -use infrared remote control • Console input jacks for connecting other source components (such as 4 by bold capitalized type. Yet its few parts require little labor to be compatible, their corresponding logos: • Video DVDs • Audio CDs • CD...
... buttons on the remote control and on the media center front panel, menu items that show the same region number on the media center display. Our standard TV picture, in terminology used in this owner's guide These instructions refer to -use infrared remote control • Console input jacks for connecting other source components (such as 4 by bold capitalized type. Yet its few parts require little labor to be compatible, their corresponding logos: • Video DVDs • Audio CDs • CD...
Owner's guide
Page 13
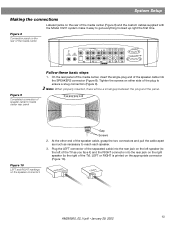
... ANTENNA ANTENNA OPTICAL R AUDIO INPUT VIDEO 2 L D R D AUX L VIDEO INPUT C VIDEO OUTPUT C AUDIO OUTPUT L R S S R SPEAKERS ACOUSTIMASS MODULE Figure 9 Completed connection of speaker cable to media center rear panel Stop/Eject Skip/Scan Source Volume Power Follow these basic steps 1. At the other end of the speaker cable, grasp the two connectors and pull the cable apart as much as you face it easy to reach each speaker. 3. On the rear panel of the media center, insert the single-plug end of the speaker cable into the rear jack on the right speaker...
... ANTENNA ANTENNA OPTICAL R AUDIO INPUT VIDEO 2 L D R D AUX L VIDEO INPUT C VIDEO OUTPUT C AUDIO OUTPUT L R S S R SPEAKERS ACOUSTIMASS MODULE Figure 9 Completed connection of speaker cable to media center rear panel Stop/Eject Skip/Scan Source Volume Power Follow these basic steps 1. At the other end of the speaker cable, grasp the two connectors and pull the cable apart as much as you face it easy to reach each speaker. 3. On the rear panel of the media center, insert the single-plug end of the speaker cable into the rear jack on the right speaker...
Owner's guide
Page 14
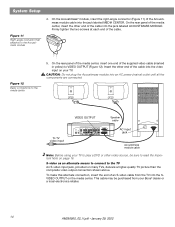
... 12). On the rear panel of the media center, insert the other end of the Acoustimass module cable into an AC power (mains) outlet until all the components are connected. RIGHT LEFT To TV video input VIDEO OUTPUT Speaker cable VIDEO D L 75 Ω FM AM LOOP ANTENNA ANTENNA OPTICAL R AUDIO INPUT IDEO 2 L D R D AUX L VIDEO INPUT C VIDEO OUTPUT C AUDIO OUTPUT L SPEAKERS R S ACOUSTIMASS MODULE S R AC input jack AC INPUT MUSIC CENTER Acoustimass module cable Note: Before using your Bose® dealer or a local electronics retailer. 14 AM256950_02_V.pdf •...
... 12). On the rear panel of the media center, insert the other end of the Acoustimass module cable into an AC power (mains) outlet until all the components are connected. RIGHT LEFT To TV video input VIDEO OUTPUT Speaker cable VIDEO D L 75 Ω FM AM LOOP ANTENNA ANTENNA OPTICAL R AUDIO INPUT IDEO 2 L D R D AUX L VIDEO INPUT C VIDEO OUTPUT C AUDIO OUTPUT L SPEAKERS R S ACOUSTIMASS MODULE S R AC input jack AC INPUT MUSIC CENTER Acoustimass module cable Note: Before using your Bose® dealer or a local electronics retailer. 14 AM256950_02_V.pdf •...
Owner's guide
Page 15
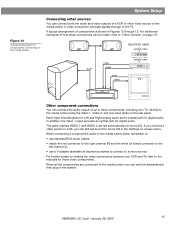
...optical jack for digital audio. If you connect a video source to AUX, you can add the antennas and then plug in the system. AM256950_02_V.pdf • January 29, 2002 15 audio video audio audio video Input from cable audio & video Cable/sat audio & video VCR TV Other component connections You can be made, refer to "Other choices" on making the video connections between your TV, directly to the media center using the Video 1, Video 2, and Aux input jacks on -screen menu. Each input includes jacks for Left and Right analog audio and a coaxial jack for digital audio. A video...
...optical jack for digital audio. If you connect a video source to AUX, you can add the antennas and then plug in the system. AM256950_02_V.pdf • January 29, 2002 15 audio video audio audio video Input from cable audio & video Cable/sat audio & video VCR TV Other component connections You can be made, refer to "Other choices" on making the video connections between your TV, directly to the media center using the Video 1, Video 2, and Aux input jacks on -screen menu. Each input includes jacks for Left and Right analog audio and a coaxial jack for digital audio. A video...
Owner's guide
Page 16
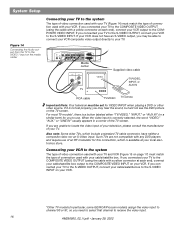
...button labeled either "TV/VIDEO," "INPUT," or "AUX IN" (or a similar term) for you may hear the sound, but will not see the DVD picture on the media center Connecting your TV to the system The type of an RF modulator for VIDEO INPUT when playing a DVD or other video source. VIDEO 1 D L 75 Ω FM AM LOOP ANTENNA ANTENNA OPTICAL R AUDIO INPUT VIDEO 2 L D R D AUX L VIDEO INPUT C VIDEO OUTPUT C AUDIO OUTPUT L SPEAKERS R S ACOUSTIMASS MODULE S R Media center VIDEO IN AUDIO OUT L R TV Supplied video cable TV/VIDEO, INPUT, or AUX IN RCA cable TV/VIDEO TV remote...
...button labeled either "TV/VIDEO," "INPUT," or "AUX IN" (or a similar term) for you may hear the sound, but will not see the DVD picture on the media center Connecting your TV to the system The type of an RF modulator for VIDEO INPUT when playing a DVD or other video source. VIDEO 1 D L 75 Ω FM AM LOOP ANTENNA ANTENNA OPTICAL R AUDIO INPUT VIDEO 2 L D R D AUX L VIDEO INPUT C VIDEO OUTPUT C AUDIO OUTPUT L SPEAKERS R S ACOUSTIMASS MODULE S R Media center VIDEO IN AUDIO OUT L R TV Supplied video cable TV/VIDEO, INPUT, or AUX IN RCA cable TV/VIDEO TV remote...

Owner's guide
Page 17
... ANTENNA ANTENNA OPTICAL R AUDIO INPUT IDEO 2 L D R D AUX L VIDEO INPUT C VIDEO AUDIO OUTPUT OUTPUT C L SPEAKERS R S S R ACOUSTIMASS MODULE FM antenna Plug the connector into the AM antenna jack on the media center. 2. AM antenna 1. AM256950_02_V.pdf • January 29, 2002 17 playing copy-protected DVDs may be used in poor picture quality. Extend the antenna as far from the media center and other end and move them around to a wall. Plug the connector into the FM antenna jack on the media center rear panel. Follow all safety instructions supplied with...
... ANTENNA ANTENNA OPTICAL R AUDIO INPUT IDEO 2 L D R D AUX L VIDEO INPUT C VIDEO AUDIO OUTPUT OUTPUT C L SPEAKERS R S S R ACOUSTIMASS MODULE FM antenna Plug the connector into the AM antenna jack on the media center. 2. AM antenna 1. AM256950_02_V.pdf • January 29, 2002 17 playing copy-protected DVDs may be used in poor picture quality. Extend the antenna as far from the media center and other end and move them around to a wall. Plug the connector into the FM antenna jack on the media center rear panel. Follow all safety instructions supplied with...
Owner's guide
Page 18
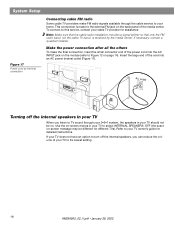
... to turn off the internal speakers in your TV When you can reduce the volume of the media center. System Setup Figure 17 Power cord as the final connection Connecting cable FM radio Some cable TV providers make the final connection, insert the small connector end of the cord into the AC INPUT jack on the module (refer to your TV owner's guide for detailed instructions. If necessary, contact a qualified installer...
... to turn off the internal speakers in your TV When you can reduce the volume of the media center. System Setup Figure 17 Power cord as the final connection Connecting cable FM radio Some cable TV providers make the final connection, insert the small connector end of the cord into the AC INPUT jack on the module (refer to your TV owner's guide for detailed instructions. If necessary, contact a qualified installer...
Owner's guide
Page 20
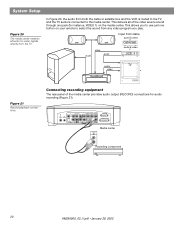
... all audio-for instance, VIDEO 1) on your remote to select the sound from both the cable or satellite box and the VCR is routed to the TV, and the TV audio is connected to use just one jack (for -video signals directly from the TV In Figure 20, the audio from any video program you play. VIDEO I D L 75 Ω AM FM LOOP ANTENNA ANTENNA OPTICAL R AUDIO INPUT VIDEO 2 L D AUX L VIDEO INPUT C VIDEO OUTPUT C AUDIO OUTPUT L SPEAKERS R D R S S R ACOUSTIMASS MODULE RECORD INPUT Media center L R Recording component 20 AM256950_02_V.pdf...
... all audio-for instance, VIDEO 1) on your remote to select the sound from both the cable or satellite box and the VCR is routed to the TV, and the TV audio is connected to use just one jack (for -video signals directly from the TV In Figure 20, the audio from any video program you play. VIDEO I D L 75 Ω AM FM LOOP ANTENNA ANTENNA OPTICAL R AUDIO INPUT VIDEO 2 L D AUX L VIDEO INPUT C VIDEO OUTPUT C AUDIO OUTPUT L SPEAKERS R D R S S R ACOUSTIMASS MODULE RECORD INPUT Media center L R Recording component 20 AM256950_02_V.pdf...
Owner's guide
Page 21
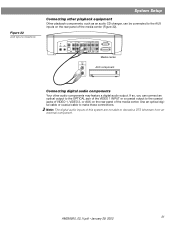
... ANTENNA OPTICAL R AUDIO INPUT VIDEO 2 L D R D AUX L VIDEO INPUT C VIDEO AUDIO OUTPUT OUTPUT C L R S S R SPEAKERS ACOUSTIMASS MODULE Media center AUDIO OUT AUX component L R Connecting digital audio components Your other playback equipment Other playback components, such as an audio CD changer, can connect an optical output to the OPTICAL jack of the VIDEO 1 INPUT or a coaxial output to the coaxial jacks of VIDEO 1, VIDEO 2, or AUX on the rear panel of this system are not able to make these connections. AM256950_02_V.pdf • January 29, 2002 21 Use an optical...
... ANTENNA OPTICAL R AUDIO INPUT VIDEO 2 L D R D AUX L VIDEO INPUT C VIDEO AUDIO OUTPUT OUTPUT C L R S S R SPEAKERS ACOUSTIMASS MODULE Media center AUDIO OUT AUX component L R Connecting digital audio components Your other playback equipment Other playback components, such as an audio CD changer, can connect an optical output to the OPTICAL jack of the VIDEO 1 INPUT or a coaxial output to the coaxial jacks of VIDEO 1, VIDEO 2, or AUX on the rear panel of this system are not able to make these connections. AM256950_02_V.pdf • January 29, 2002 21 Use an optical...
Owner's guide
Page 22
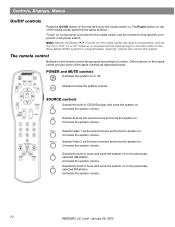
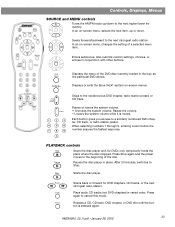
... system on to the previouslyselected FM station. Note: Neither the Model 3•2•1 remote nor the media center can control this system. Controls, Displays, Menus On/Off controls Press the On/Off button on the remote to turn on components connected to the media center, use the remote for the Bose Model 3•2•1 system) or programmable "learning" remote can switch components, such as the sound source and turns the system on. SOURCE controls Selects the built-in CD/DVD player and turns the system on the remote control...
... system on to the previouslyselected FM station. Note: Neither the Model 3•2•1 remote nor the media center can control this system. Controls, Displays, Menus On/Off controls Press the On/Off button on the remote to turn on components connected to the media center, use the remote for the Bose Model 3•2•1 system) or programmable "learning" remote can switch components, such as the sound source and turns the system on. SOURCE controls Selects the built-in CD/DVD player and turns the system on the remote control...
Owner's guide
Page 23
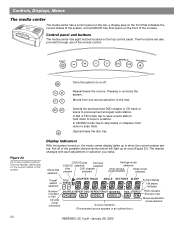
... system volume. + Unmutes the system volume. Enters submenus. Press again to a similarly numbered DVD chapter, CD track, or radio station preset. Raises the volume. - Each button gives you access to cancel this mode. PLAYBACK controls Stops the disc player and, for DVD chapters, CD tracks, or the next strongest radio station. Starts the disc player. Scans back or forward for DVDs only, temporarily holds the place where the disc stopped. Controls, Displays, Menus SOURCE and MENU controls Tunes the AM/FM radio...
... system volume. + Unmutes the system volume. Enters submenus. Press again to a similarly numbered DVD chapter, CD track, or radio station preset. Raises the volume. - Each button gives you access to cancel this mode. PLAYBACK controls Stops the disc player and, for DVD chapters, CD tracks, or the next strongest radio station. Starts the disc player. Scans back or forward for DVDs only, temporarily holds the place where the disc stopped. Controls, Displays, Menus SOURCE and MENU controls Tunes the AM/FM radio...
Owner's guide
Page 24
... previous/next strongest radio station. hold down to a station. Opens/closes the disc tray. Not all of preset or title CD play DVD chapter paused selected Settings mode selected DVD camera angle selected Sleep mode selected Preset station selected TITLE PRESET CHAPTER TRACK ANGLE SETTINGS SLEEP 8-digit display FM stereo indicator Number of the possible choices shown below will light up to show the current system status. Control panel and buttons The media center has eight buttons located on or...
... previous/next strongest radio station. hold down to a station. Opens/closes the disc tray. Not all of preset or title CD play DVD chapter paused selected Settings mode selected DVD camera angle selected Sleep mode selected Preset station selected TITLE PRESET CHAPTER TRACK ANGLE SETTINGS SLEEP 8-digit display FM stereo indicator Number of the possible choices shown below will light up to show the current system status. Control panel and buttons The media center has eight buttons located on or...
Owner's guide
Page 30
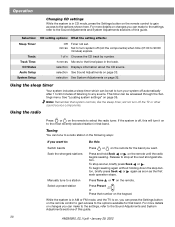
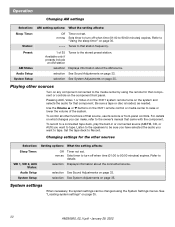
... remote to the Sound Adjustments and System Adjustments sections of this guide. Operation Changing CD settings While the system is off the TV or other sound source components. For more details on changes you can make to the settings, refer to stop sooner, briefly press Seek or . Selection: CD setting options: What the setting affects: Sleep Timer: Track: Track Time: CD Status Audio Setup System Setup Off Timer not set to turn system off automatically after 1 to a radio station in the track. Using...
... remote to the Sound Adjustments and System Adjustments sections of this guide. Operation Changing CD settings While the system is off the TV or other sound source components. For more details on changes you can make to the settings, refer to stop sooner, briefly press Seek or . Selection: CD setting options: What the setting affects: Sleep Timer: Track: Track Time: CD Status Audio Setup System Setup Off Timer not set to turn system off automatically after 1 to a radio station in the track. Using...
Owner's guide
Page 31
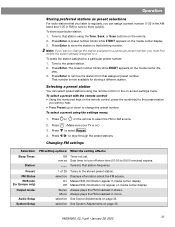
... remote to that blinking number. Press 3. See Sound Adjustments on the media center display. 3. Tune to that station using the remote control or the on-screen settings menu. Press Enter to store the station to select the FM or AM source. 2. Selecting a preset station You can assign a preset number (1-25 in the AM band and 1-25 in mono. Press 4. Changing FM settings Selection: Sleep Timer: Station: Preset: FM Status RDS info: (for storing a different station. Tunes to a particular preset number: 1. AM256950_02_V.pdf...
... remote to that blinking number. Press 3. See Sound Adjustments on the media center display. 3. Tune to that station using the remote control or the on-screen settings menu. Press Enter to store the station to select the FM or AM source. 2. Selecting a preset station You can assign a preset number (1-25 in the AM band and 1-25 in mono. Press 4. Changing FM settings Selection: Sleep Timer: Station: Preset: FM Status RDS info: (for storing a different station. Tunes to a particular preset number: 1. AM256950_02_V.pdf...
Owner's guide
Page 32
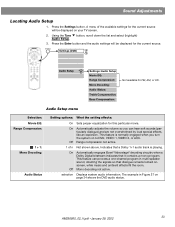
... AM station Tunes to the owner's manual that came with the component. For details on the component front panel. Listen to the speakers to be changed using the remote for that component. Set the tape deck to tape. AM Status selection Displays information about the connected source. Pressing AUX, Video 1 or Video 2 on the 3•2•1 system remote turns on page 30. ---- Be sure a tape or disc is loaded, as needed. Refer to tape. Audio Setup selection See Sound Adjustments on...
... AM station Tunes to the owner's manual that came with the component. For details on the component front panel. Listen to the speakers to be changed using the remote for that component. Set the tape deck to tape. AM Status selection Displays information about the connected source. Pressing AUX, Video 1 or Video 2 on the 3•2•1 system remote turns on page 30. ---- Be sure a tape or disc is loaded, as needed. Refer to tape. Audio Setup selection See Sound Adjustments on...
Owner's guide
Page 33
... you turn the system on to DVD, VIDEO 1, VIDEO 2, or AUX. Off Mono decoding not active. The example in multi-speaker sound, directing the signals so that dialogue remains locked onscreen, while music and ambient effects fill the room. Press the Enter button and the audio settings will be displayed for the current source. This feature is playing. Settings (DVD) Audio Setup Settings: Audio Setup Movie EQ: Range Compression: Mono Decoding: Audio Status: Treble Compensation: Bass...
... you turn the system on to DVD, VIDEO 1, VIDEO 2, or AUX. Off Mono decoding not active. The example in multi-speaker sound, directing the signals so that dialogue remains locked onscreen, while music and ambient effects fill the room. Press the Enter button and the audio settings will be displayed for the current source. This feature is playing. Settings (DVD) Audio Setup Settings: Audio Setup Movie EQ: Range Compression: Mono Decoding: Audio Status: Treble Compensation: Bass...
Owner's guide
Page 39
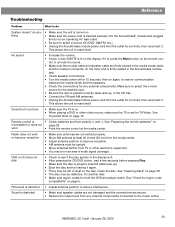
... to reset itself . DVD or CD does not play symbol in the Acoustimass module jack. • Check speaker connections. • Turn the media center off for 10 seconds, then on the remote con- work or has poor reception • Make sure antennas are secure. • Reduce the output level from the outlet for the desired input. • Be sure the disc is turned on the disc. Radio does not work • Point the remote control...
... to reset itself . DVD or CD does not play symbol in the Acoustimass module jack. • Check speaker connections. • Turn the media center off for 10 seconds, then on the remote con- work or has poor reception • Make sure antennas are secure. • Reduce the output level from the outlet for the desired input. • Be sure the disc is turned on the disc. Radio does not work • Point the remote control...


