User Manual
Page 3
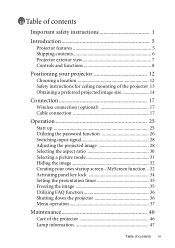
... lock 34 Setting the presentation timer 35 Freezing the image 35 Utilizing FAQ function 36 Shutting down the projector 36 Menu operation 37 Maintenance 46 Care of the projector 46 Lamp information 47 Table of the projector 13 Obtaining a preferred projected image size 14 Connection 17 Wireless connection (optional 17 Cable connection 17 Operation...
... lock 34 Setting the presentation timer 35 Freezing the image 35 Utilizing FAQ function 36 Shutting down the projector 36 Menu operation 37 Maintenance 46 Care of the projector 46 Lamp information 47 Table of the projector 13 Obtaining a preferred projected image size 14 Connection 17 Wireless connection (optional 17 Cable connection 17 Operation...
User Manual
Page 5
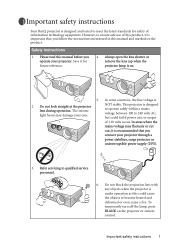
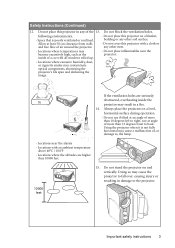
...safety instructions Your BenQ projector is designed and tested to meet the latest standards for future reference. 4. Safety Instructions 1. In some countries, the line voltage is recommended that you operate your projector. This projector is important that you connect your eyes. To temporarily turn off the lamp, press BLANK... a fire. Important safety instructions 1 Always open the lens shutter or remove the lens cap when the projector lamp is under operation as this manual and marked on the product. Do not block the projection lens with any objects when ...
...safety instructions Your BenQ projector is designed and tested to meet the latest standards for future reference. 4. Safety Instructions 1. In some countries, the line voltage is recommended that you operate your projector. This projector is important that you connect your eyes. To temporarily turn off the lamp, press BLANK... a fire. Important safety instructions 1 Always open the lens shutter or remove the lens cap when the projector lamp is under operation as this manual and marked on the product. Do not block the projection lens with any objects when ...
User Manual
Page 6
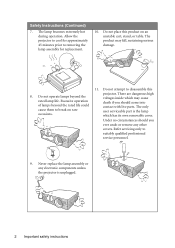
... may cause death if you should you ever undo or remove any electronic components unless the projector is the lamp which may fall, sustaining serious damage. 11. projector. There are dangerous high voltages inside which has its own removable cover. Refer servicing only ...occasions. Do not attempt to suitably qualified professional service personnel. 9. Excessive operation of lamps beyond the rated lamp life. Allow the projector to cool for replacement. 10. The lamp becomes extremely hot during operation. Under no circumstances should come into contact with live parts...
... may cause death if you should you ever undo or remove any electronic components unless the projector is the lamp which may fall, sustaining serious damage. 11. projector. There are dangerous high voltages inside which has its own removable cover. Refer servicing only ...occasions. Do not attempt to suitably qualified professional service personnel. 9. Excessive operation of lamps beyond the rated lamp life. Allow the projector to cool for replacement. 10. The lamp becomes extremely hot during operation. Under no circumstances should come into contact with live parts...
User Manual
Page 7
... least 50 cm clearance from walls and free flow of air around the projector. - If the ventilation holes are higher than 15 degrees front to , the lamp. - Always place the projector on end vertically. Using the projector when it is poorly ventilated or confined. following environments. - Locations where ...cause a malfunction of more than 10000 feet. 10000 feet 15. Space that is not fully horizontal may cause the projector to the projector. Do not place inflammables near fire alarms - Locations where temperatures may become excessively high, such as the inside the...
... least 50 cm clearance from walls and free flow of air around the projector. - If the ventilation holes are higher than 15 degrees front to , the lamp. - Always place the projector on end vertically. Using the projector when it is poorly ventilated or confined. following environments. - Locations where ...cause a malfunction of more than 10000 feet. 10000 feet 15. Space that is not fully horizontal may cause the projector to the projector. Do not place inflammables near fire alarms - Locations where temperatures may become excessively high, such as the inside the...
User Manual
Page 9
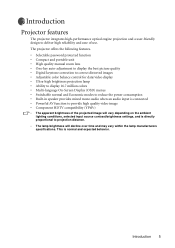
...decline over time and may vary within the lamp manufacturers specifications. Introduction Projector features The projector integrates high-performance optical engine projection and a user-friendly design to projection distance. • The lamp brightness will vary depending on the ambient lighting ...conditions, selected input source contrast/brightness settings, and is normal and expected behavior. The projector offers the following features. • Selectable password ...
...decline over time and may vary within the lamp manufacturers specifications. Introduction Projector features The projector integrates high-performance optical engine projection and a user-friendly design to projection distance. • The lamp brightness will vary depending on the ambient lighting ...conditions, selected input source contrast/brightness settings, and is normal and expected behavior. The projector offers the following features. • Selectable password ...
User Manual
Page 10
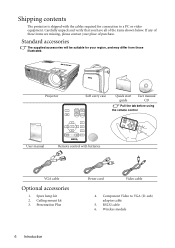
...missing, please contact your region, and may differ from those illustrated. Spare lamp kit 2. RS232 cable 6. Presentation Plus Power cord Video cable 4. Component Video to a PC or video equipment. Projector Soft carry case Quick start User manual guide CD Pull the tab before using...manual Remote control with the cables required for your place of the items shown below. Ceiling mount kit 3. Shipping contents The projector is shipped with batteries VGA cable Optional accessories 1. Wireless module 6 Introduction Carefully unpack and verify that you have all of ...
...missing, please contact your region, and may differ from those illustrated. Spare lamp kit 2. RS232 cable 6. Presentation Plus Power cord Video cable 4. Component Video to a PC or video equipment. Projector Soft carry case Quick start User manual guide CD Pull the tab before using...manual Remote control with the cables required for your place of the items shown below. Ceiling mount kit 3. Shipping contents The projector is shipped with batteries VGA cable Optional accessories 1. Wireless module 6 Introduction Carefully unpack and verify that you have all of ...
User Manual
Page 12
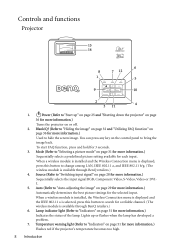
... a, and IEEE 802.11 b/g. (The wireless module is available through BenQ retailers.) 4. Lamp indicator light (Refer to "Switching input signal" on page 28 for more information.) Turns the projector on page 51 for more information.) Used to "Start up or flashes when the lamp has developed a problem. 7. To start FAQ function, press and hold...
... a, and IEEE 802.11 b/g. (The wireless module is available through BenQ retailers.) 4. Lamp indicator light (Refer to "Switching input signal" on page 28 for more information.) Turns the projector on page 51 for more information.) Used to "Start up or flashes when the lamp has developed a problem. 7. To start FAQ function, press and hold...
User Manual
Page 29
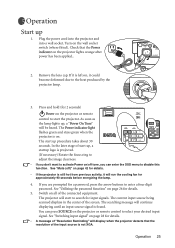
...remote control to the heat produced by the projector lamp. 3. Switch on . Remove the lens cap. Plug the power cord into the projector and into a wall socket. As soon as the lamp lights up , a startup logo is still hot from previous activity, it is not XGA. The Power indicator light flashes green and... stays green when the projector is found. You can enter the OSD ...
...remote control to the heat produced by the projector lamp. 3. Switch on . Remove the lens cap. Plug the power cord into the projector and into a wall socket. As soon as the lamp lights up , a startup logo is still hot from previous activity, it is not XGA. The Power indicator light flashes green and... stays green when the projector is found. You can enter the OSD ...

User Manual
Page 32
... direction. However, it can only display one at the lower right corner of the projected image will drop into the lens while the lamp is on the projector control panel or the remote control is equipped with 1 quick-release adjuster foot and 1 rear adjuster foot. Data (graphic) "PC"...height and projection angle. The strong light from the lamp may cause damage to your desired signal is activated if you switch between different input signals. Screw the rear adjuster foot to display a source selection bar. To adjust the projector: 1. Do not look into position and be locked...
... direction. However, it can only display one at the lower right corner of the projected image will drop into the lens while the lamp is on the projector control panel or the remote control is equipped with 1 quick-release adjuster foot and 1 rear adjuster foot. Data (graphic) "PC"...height and projection angle. The strong light from the lamp may cause damage to your desired signal is activated if you switch between different input signals. Screw the rear adjuster foot to display a source selection bar. To adjust the projector: 1. Do not look into position and be locked...

User Manual
Page 36
...corner of the screen while the image is pressed, the projector enters Economic mode automatically. Plug AC power, and POWER, TEMP and LAMP LEDs on Windows XP. 32 Operation ii. When this could cause the blocking object to the projector. 1. Insert the bundled CD into the CD drive of...not be compatible with video/S-video signal connected, the audio can use BLANK to selecting the projector preset startup screen from among BenQ logo, Black or Blue screen, you can still be sure the projector has entered Standby Mode. Creating your computer. Press any key on the blank screen. ...
...corner of the screen while the image is pressed, the projector enters Economic mode automatically. Plug AC power, and POWER, TEMP and LAMP LEDs on Windows XP. 32 Operation ii. When this could cause the blocking object to the projector. 1. Insert the bundled CD into the CD drive of...not be compatible with video/S-video signal connected, the audio can use BLANK to selecting the projector preset startup screen from among BenQ logo, Black or Blue screen, you can still be sure the projector has entered Standby Mode. Creating your computer. Press any key on the blank screen. ...

User Manual
Page 40
...to Power Off? Press Power a second time to any commands during the 30-second cooling down the projector. Press "Power" Again to Power Off To protect the lamp, the projector will be heard. Possible solutions to problems encountered by users regarding image quality, installation, special feature operation... and service information are available to cool down , to protect the lamp, when you attempt to re-start the projector after the fans stop and the Power indicator light turns orange. 36 Operation Then press 3Left/4Right for more...
...to Power Off? Press Power a second time to any commands during the 30-second cooling down the projector. Press "Power" Again to Power Off To protect the lamp, the projector will be heard. Possible solutions to problems encountered by users regarding image quality, installation, special feature operation... and service information are available to cool down , to protect the lamp, when you attempt to re-start the projector after the fans stop and the Power indicator light turns orange. 36 Operation Then press 3Left/4Right for more...

User Manual
Page 41
...Scan Language Splash Screen High Altitude Mode Auto Off Economic Mode Presentation Timer FAQ Source Resolution Picture Mode Equivalent Lamp Hour Video / S-Video Picture Mode Color Temp Brightness Contrast Color Tint* Sharpness Keystone Auto Resize Aspect Ratio Source System ...Picture Mode Equivalent Lamp Hour Component Video Source Resolution Picture Mode Equivalent Lamp Hour *When a Video or S-Video signal is connected, the function is only available with NTSC system selected...
...Scan Language Splash Screen High Altitude Mode Auto Off Economic Mode Presentation Timer FAQ Source Resolution Picture Mode Equivalent Lamp Hour Video / S-Video Picture Mode Color Temp Brightness Contrast Color Tint* Sharpness Keystone Auto Resize Aspect Ratio Source System ...Picture Mode Equivalent Lamp Hour Component Video Source Resolution Picture Mode Equivalent Lamp Hour *When a Video or S-Video signal is connected, the function is only available with NTSC system selected...

User Manual
Page 48
...may cause high fan speed. Press Left 3/Right 4on the projector or remote control to protect your environment is higher than 40°C, or whenever the projector will be reduced and result in Economic mode extends the lamp timer automatic shutdown feature. We recommend you use the High ... higher than 3000 feet above , it will be used for more information on the projector, it may cause a higher decibel operating noise level because of lamp hour" on page 35 for protecting projector from over-heating. We recommend you should switch to High Altitude mode to solve these...
...may cause high fan speed. Press Left 3/Right 4on the projector or remote control to protect your environment is higher than 40°C, or whenever the projector will be reduced and result in Economic mode extends the lamp timer automatic shutdown feature. We recommend you use the High ... higher than 3000 feet above , it will be used for more information on the projector, it may cause a higher decibel operating noise level because of lamp hour" on page 35 for protecting projector from over-heating. We recommend you should switch to High Altitude mode to solve these...

User Manual
Page 49
Equivalent Lamp Hour Displays the equivalent lamp hour calculated by the built-in the Picture menu. FUNCTION Source Resolution DESCRIPTION Shows the current signal source. System Shows the Video input system format, NTSC, SECAM or PAL. Picture Mode Shows the selected mode in timer. Unavailable adjustments are in use. Shows the resolution of the projector. Operation 45 Information menu This menu shows you the current operating status of the input signal. Some picture adjustments are available only when certain input sources are not shown on the screen.
Equivalent Lamp Hour Displays the equivalent lamp hour calculated by the built-in the Picture menu. FUNCTION Source Resolution DESCRIPTION Shows the current signal source. System Shows the Video input system format, NTSC, SECAM or PAL. Picture Mode Shows the selected mode in timer. Unavailable adjustments are in use. Shows the resolution of the projector. Operation 45 Information menu This menu shows you the current operating status of the input signal. Some picture adjustments are available only when certain input sources are not shown on the screen.

User Manual
Page 50
... the lens clean. Storing the projector If you ship the projector with abrasive materials. Never rub the lens with its original packing or equivalent. Maintenance Care of the projector except the lamp. Please refer to store the projector for the projector. Never use the original box ...or provided soft carry case. 46 Maintenance Transporting the projector It is dirt or smears, use lens-cleaning paper or...
... the lens clean. Storing the projector If you ship the projector with abrasive materials. Never rub the lens with its original packing or equivalent. Maintenance Care of the projector except the lamp. Please refer to store the projector for the projector. Never use the original box ...or provided soft carry case. 46 Maintenance Transporting the projector It is dirt or smears, use lens-cleaning paper or...
User Manual
Page 51
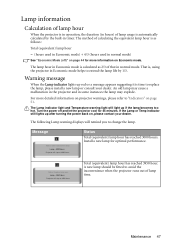
... a message appears suggesting it is time to replace the lamp, please install a new lamp or consult your dealer. Notice: Replace lamp soon Lamp > 3950 Hours Projector will stop at 4000 hours Status Total (equivalent) lamp hour has reached 3000 hours. A new lamp should be fitted to extend the lamp life by the built-in timer. Turn the power...
... a message appears suggesting it is time to replace the lamp, please install a new lamp or consult your dealer. Notice: Replace lamp soon Lamp > 3950 Hours Projector will stop at 4000 hours Status Total (equivalent) lamp hour has reached 3000 hours. A new lamp should be fitted to extend the lamp life by the built-in timer. Turn the power...

User Manual
Page 52
...about 30 seconds together with the Lamp indicator lighting up red for 40 seconds. Replacing the lamp • To reduce the risk of electrical shock, always turn the projector off and disconnect the projector from the wall socket. If the lamp is normal lamp behaviour. This message will flash ...in 40 seconds. You can replace the lamp whenever you replace the lamp at least 45 minutes before replacing the lamp. • To reduce ...
...about 30 seconds together with the Lamp indicator lighting up red for 40 seconds. Replacing the lamp • To reduce the risk of electrical shock, always turn the projector off and disconnect the projector from the wall socket. If the lamp is normal lamp behaviour. This message will flash ...in 40 seconds. You can replace the lamp whenever you replace the lamp at least 45 minutes before replacing the lamp. • To reduce ...

User Manual
Page 53
... can reach it too quickly may cause the lamp to break and scatter broken glass in the projector. • Do not place the lamp in the figure, lower the new lamp first and align the two holes on the lamp with the lamp cover removed. 4. Use the handle to slowly... materials. • Do not insert your hands into the projector after the lamp is removed. Disconnect the lamp connector by pushing it against the projector while pulling it stands up . 6. Remove the lamp cords from the projector. 3. Loosen the screw that it up . Remove the lamp cover from the slots. 5. Maintenance 49
... can reach it too quickly may cause the lamp to break and scatter broken glass in the projector. • Do not place the lamp in the figure, lower the new lamp first and align the two holes on the lamp with the lamp cover removed. 4. Use the handle to slowly... materials. • Do not insert your hands into the projector after the lamp is removed. Disconnect the lamp connector by pushing it against the projector while pulling it stands up . 6. Remove the lamp cords from the projector. 3. Loosen the screw that it up . Remove the lamp cover from the slots. 5. Maintenance 49

User Manual
Page 54
... page 51. 50 Maintenance iii. Turn the projector off and contact qualified service personnel for 5 seconds to the projector. 11. Connect the lamp connector to display the total used lamp time. Resetting the lamp counter Do not reset if the lamp is not replaced as this could result in malfunction.... • Do not over tighten the screw. 10. Replace the lamp cover on with the lamp cover removed. 15. ii. Wait about 5 seconds to "Indicators" on the projector for further help. Lamp usage timer reset 0 Hours Press "Auto" To Reset Temperature information When the...
... page 51. 50 Maintenance iii. Turn the projector off and contact qualified service personnel for 5 seconds to the projector. 11. Connect the lamp connector to display the total used lamp time. Resetting the lamp counter Do not reset if the lamp is not replaced as this could result in malfunction.... • Do not over tighten the screw. 10. Replace the lamp cover on with the lamp cover removed. 15. ii. Wait about 5 seconds to "Indicators" on the projector for further help. Lamp usage timer reset 0 Hours Press "Auto" To Reset Temperature information When the...

User Manual
Page 55
... • O: Orange light • R: Red light • G: Green light Light Status & Description Power Temp Lamp Power events O O O The projector has just been connected to cool down as it will shutdown again. process. The projector has shutdown automatically. Or R 2. G - - O Lamp events O - - - - Please contact your dealer for assistance. Please contact your dealer for assistance. Stand-by...
... • O: Orange light • R: Red light • G: Green light Light Status & Description Power Temp Lamp Power events O O O The projector has just been connected to cool down as it will shutdown again. process. The projector has shutdown automatically. Or R 2. G - - O Lamp events O - - - - Please contact your dealer for assistance. Please contact your dealer for assistance. Stand-by...

