
User Manual
Page 3
Table of contents Important safety instructions 1 Introduction 5 Projector features 5 Shipping contents 6 Optional accessories 6 Projector exterior view 7 Front / upper side 7 Rear side ...7 Lower side ...7 Controls and functions 8 External control panel 8 Remote control 9 Remote control effective range 10 Replacing the remote control battery 10 Positioning your projector 11 Choosing a location 11 Obtaining a preferred projected image size 12 How to determine the position of the...
Table of contents Important safety instructions 1 Introduction 5 Projector features 5 Shipping contents 6 Optional accessories 6 Projector exterior view 7 Front / upper side 7 Rear side ...7 Lower side ...7 Controls and functions 8 External control panel 8 Remote control 9 Remote control effective range 10 Replacing the remote control battery 10 Positioning your projector 11 Choosing a location 11 Obtaining a preferred projected image size 12 How to determine the position of the...
User Manual
Page 10
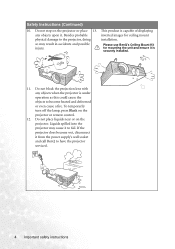
... from the power supply's wall socket and call BenQ to the projector, doing installation. Do not place liquids near or on the projector or remote control. 12. Besides probable inverted images for mounting the unit and ensure it . To temporarily turn off the lamp, press Blank on the projector. Safety Instructions (Continued) 10. Do not step...
... from the power supply's wall socket and call BenQ to the projector, doing installation. Do not place liquids near or on the projector or remote control. 12. Besides probable inverted images for mounting the unit and ensure it . To temporarily turn off the lamp, press Blank on the projector. Safety Instructions (Continued) 10. Do not step...

User Manual
Page 12
...these items are missing, please contact your region, and may differ from those illustrated. Projector Soft carry case User's manual User's manual CD Pull the tab before using the remote control. Component Video to video equipment. RS232 connector 6 Introduction Macintosh adapter 2. 200W lamp ...verify that you have all of purchase. Quick start Remote control guide with the cables required for your place of the items shown below. Ceiling mount kit Power cord Cleaning cloth 4. Shipping contents The projector is shipped with battery VGA cable USB cable Optional...
...these items are missing, please contact your region, and may differ from those illustrated. Projector Soft carry case User's manual User's manual CD Pull the tab before using the remote control. Component Video to video equipment. RS232 connector 6 Introduction Macintosh adapter 2. 200W lamp ...verify that you have all of purchase. Quick start Remote control guide with the cables required for your place of the items shown below. Ceiling mount kit Power cord Cleaning cloth 4. Shipping contents The projector is shipped with battery VGA cable USB cable Optional...
User Manual
Page 13
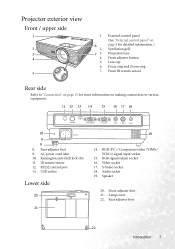
Projector exterior view Front / upper side 1 2 3 4 5 1. 6 2. 7 3. 4. 5. 6. 7. IR remote sensor 12. Video socket 17. Speaker 20. RGB (PC) / Component video (YPbPr/ YCbCr) signal input socket 15. Audio socket 19. S-Video socket 18. Front adjuster.... AC power cord inlet 10. Kensington anti-theft lock slot 11. External control panel (See "External control panel" on page 8 for detailed information.) Ventilation grill Projection lens Front adjuster button Lens cap Focus ring and Zoom ring Front IR remote sensor Rear side Refer to "Connection" on page 15 for more information on...
Projector exterior view Front / upper side 1 2 3 4 5 1. 6 2. 7 3. 4. 5. 6. 7. IR remote sensor 12. Video socket 17. Speaker 20. RGB (PC) / Component video (YPbPr/ YCbCr) signal input socket 15. Audio socket 19. S-Video socket 18. Front adjuster.... AC power cord inlet 10. Kensington anti-theft lock slot 11. External control panel (See "External control panel" on page 8 for detailed information.) Ventilation grill Projection lens Front adjuster button Lens cap Focus ring and Zoom ring Front IR remote sensor Rear side Refer to "Connection" on page 15 for more information on...

User Manual
Page 15
II/ Freeze The image is frozen when Freeze is pressed. Keystone (Refer to reduce the image size. Remote control 1 7 2 3 8 4 9 5 3 10 11 6 1. An icon " " will display in the lower right corner of the projected image. 14. To release the function, press Freeze again. 3. 5Up, 6 Down 4. ... 21 and "Shutdown" on or off. 2. II Power (Refer to "Fine-tuning the image size and clarity" on page 23 for more information.) Turns the projector on page 26 for more information.) Introduction 9
II/ Freeze The image is frozen when Freeze is pressed. Keystone (Refer to reduce the image size. Remote control 1 7 2 3 8 4 9 5 3 10 11 6 1. An icon " " will display in the lower right corner of the projected image. 14. To release the function, press Freeze again. 3. 5Up, 6 Down 4. ... 21 and "Shutdown" on or off. 2. II Power (Refer to "Fine-tuning the image size and clarity" on page 23 for more information.) Turns the projector on page 26 for more information.) Introduction 9
User Manual
Page 16
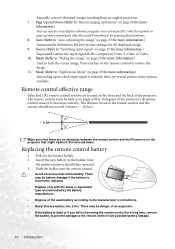
...to "Switching input signal" on the projector that might obstruct the infra-red beam. Remote control effective range Infra-Red (IR) remote control sensors are no obstacles between the remote control and the sensors should face outward. 3. The distance between the remote control and the IR sensors on page 25...image. 9. Insert the new battery in the holder. There may be danger of the projector's IR remote control sensors to restore the image. 11. There may be using the remote control for more information.) Sequentially selects the input signal RGB, Component Video, S-Video or Video...
...to "Switching input signal" on the projector that might obstruct the infra-red beam. Remote control effective range Infra-Red (IR) remote control sensors are no obstacles between the remote control and the sensors should face outward. 3. The distance between the remote control and the IR sensors on page 25...image. 9. Insert the new battery in the holder. There may be danger of the projector's IR remote control sensors to restore the image. 11. There may be using the remote control for more information.) Sequentially selects the input signal RGB, Component Video, S-Video or Video...

User Manual
Page 27
The search will be set , the projector cannot be used in this manual, and keep the manual in a safe place for information. If the frequency/ resolution of start up , a default BenQ logo is started. 1. Utilizing the password function For security purposes and to "Utilizing the password function" on ... menu. Turn on -screen menu and go to select the four password digits, then press Auto. Check that the Power indicator on the remote control or projector to start to search for a password, press the arrow buttons to Left 3or Right4. Press and hold (for 2 seconds) the Power ...
The search will be set , the projector cannot be used in this manual, and keep the manual in a safe place for information. If the frequency/ resolution of start up , a default BenQ logo is started. 1. Utilizing the password function For security purposes and to "Utilizing the password function" on ... menu. Turn on -screen menu and go to select the four password digits, then press Auto. Check that the Power indicator on the remote control or projector to start to search for a password, press the arrow buttons to Left 3or Right4. Press and hold (for 2 seconds) the Power ...
User Manual
Page 29
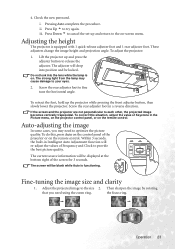
... foot. Operation 23 4. To retract the foot, hold up and press the adjuster button to the on the remote control. iii. Check the new password. Adjusting the height The projector is on the remote control. Do not look into position and be displayed at the bottom right of the... projector or on -screen menu. To correct this , press Auto on the control panel of the screen for 3 seconds. Auto-...
... foot. Operation 23 4. To retract the foot, hold up and press the adjuster button to the on the remote control. iii. Check the new password. Adjusting the height The projector is on the remote control. Do not look into position and be displayed at the bottom right of the... projector or on -screen menu. To correct this , press Auto on the control panel of the screen for 3 seconds. Auto-...

User Manual
Page 30
.... Press Right 4 on the projector or 4 on the remote control when you will need to manually correct it following ONE of the projector, you are in Picture --> Keystone menu. For example, 1. Press Left 3on the projector or 3 on the remote control when you are in Picture -... -> Keystone menu. Keystone 0 Keystone +6 24 Operation Press / on the control panel of the image. 3. Press on the remote control or 3. Correcting keystone Keystoning refers to the...
.... Press Right 4 on the projector or 4 on the remote control when you will need to manually correct it following ONE of the projector, you are in Picture --> Keystone menu. For example, 1. Press Left 3on the projector or 3 on the remote control when you are in Picture -... -> Keystone menu. Keystone 0 Keystone +6 24 Operation Press / on the control panel of the image. 3. Press on the remote control or 3. Correcting keystone Keystoning refers to the...

User Manual
Page 31
... cause the blocking object to hide the screen image. The picture modes available for details. Press any key on the projector control panel or the remote control. Do not block the projection lens from projecting as this function is no action taken on the blank screen. The ... Input Brightest (default) Presentation sRGB/Photo YPbPr / S-Video / Video Signal Input Movie (default) Cinema Gaming Gaming Switching input signal The projector can only display one to restore the image. See "Selecting an application mode" on page 29 for the Application Mode. Hiding the image...
... cause the blocking object to hide the screen image. The picture modes available for details. Press any key on the projector control panel or the remote control. Do not block the projection lens from projecting as this function is no action taken on the blank screen. The ... Input Brightest (default) Presentation sRGB/Photo YPbPr / S-Video / Video Signal Input Movie (default) Cinema Gaming Gaming Switching input signal The projector can only display one to restore the image. See "Selecting an application mode" on page 29 for the Application Mode. Hiding the image...
User Manual
Page 32
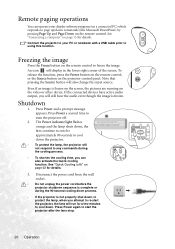
... the cooling time, you will run for a few minutes to page up/down . Freezing the image Press the Freeze button on the remote control to start the projector, the fans will still hear the audio even though the image is frozen on the screen, the pictures are running on the... remote control. See "Quick Cooling (off . 2. Connect the projector to your display software program (on a connected PC) which responds to cool down commands (like Microsoft PowerPoint) by pressing...
... the cooling time, you will run for a few minutes to page up/down . Freezing the image Press the Freeze button on the remote control to start the projector, the fans will still hear the audio even though the image is frozen on the screen, the pictures are running on the... remote control. See "Quick Cooling (off . 2. Connect the projector to your display software program (on a connected PC) which responds to cool down commands (like Microsoft PowerPoint) by pressing...

User Manual
Page 34
...the second press closes Keystone. Press5Exit on the projector or Left 3/ Right 4on the remote control press Menu twice* on the projector or 5. Press 6 Menu on page 33 for making various adjustments and settings. Advance menu" on the projector or Menu 4. pressing Left 3/ Right 4on ...following example describes the adjustment of the keystone. 1. Using the menus The projector is equipped with on the remote control. 2. Adjust keystone values by on the remote control to turn the on the remote control to select *The first press leads you back to select the Picture menu....
...the second press closes Keystone. Press5Exit on the projector or Left 3/ Right 4on the remote control press Menu twice* on the projector or 5. Press 6 Menu on page 33 for making various adjustments and settings. Advance menu" on the projector or Menu 4. pressing Left 3/ Right 4on ...following example describes the adjustment of the keystone. 1. Using the menus The projector is equipped with on the remote control. 2. Adjust keystone values by on the remote control to turn the on the remote control to select *The first press leads you back to select the Picture menu....

User Manual
Page 35
... playing movies, video clips from digital cameras or DVs through the PC input for best viewing in use the remote control 'Mode' button to suit your projector image set-up to select a predefined application mode. The color saturation and brightness are provided so you can ... any keystoning of the projected image. Operation 29 Gaming Mode: Is suitable for viewing PC graphic and drawing applications such as using the projector in a blackened (little light) home cinema or lounge room environment. 3. FUNCTION (default setting DESCRIPTION / value) Pre-defined application modes...
... playing movies, video clips from digital cameras or DVs through the PC input for best viewing in use the remote control 'Mode' button to suit your projector image set-up to select a predefined application mode. The color saturation and brightness are provided so you can ... any keystoning of the projected image. Operation 29 Gaming Mode: Is suitable for viewing PC graphic and drawing applications such as using the projector in a blackened (little light) home cinema or lounge room environment. 3. FUNCTION (default setting DESCRIPTION / value) Pre-defined application modes...
User Manual
Page 38
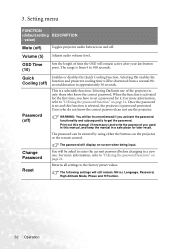
...you activate the password functionality and subsequently forget the password. WARNING: You will be entered by using either the buttons on the projector or the remote control. Change Password Reset The password will still remain: Mirror, Language, Password, High Altitude Mode, Phase and H Position. 32 .../ value) Mute (off ) Enables or disables the Quick Cooling function. The range is a selectable function. Selecting On limits use the projector. The password can not use of time the OSD will be inconvenienced if you used in a safe place for it. 3. Returns all ...
...you activate the password functionality and subsequently forget the password. WARNING: You will be entered by using either the buttons on the projector or the remote control. Change Password Reset The password will still remain: Mirror, Language, Password, High Altitude Mode, Phase and H Position. 32 .../ value) Mute (off ) Enables or disables the Quick Cooling function. The range is a selectable function. Selecting On limits use the projector. The password can not use of time the OSD will be inconvenienced if you used in a safe place for it. 3. Returns all ...

User Manual
Page 39
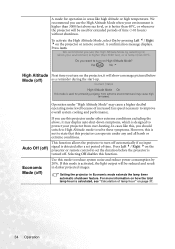
... bracket (optional accessory) if you to select which logo screen will display during projector startup. Use Left 3/ Right 4on the projector or Left 3/ Right 4on the remote control to "Choosing a location" on ) Language (English) Splash Screen (BenQ logo) Sets whether the projector searches automatically for more mirrors. Sets the image blank time when the Blank feature...
... bracket (optional accessory) if you to select which logo screen will display during projector startup. Use Left 3/ Right 4on the projector or Left 3/ Right 4on the remote control to "Choosing a location" on ) Language (English) Splash Screen (BenQ logo) Sets whether the projector searches automatically for more mirrors. Sets the image blank time when the Blank feature...
User Manual
Page 40
... Altitude Mode" may cause high fan speed. Setting the projector in darker projected images. Do you use this projector under any and all harsh or extreme conditions. This function allows the projector to set period of time. Press Left 3/ Right 4on the projector or remote control to turn on page 37. 34 Operation For more information...
... Altitude Mode" may cause high fan speed. Setting the projector in darker projected images. Do you use this projector under any and all harsh or extreme conditions. This function allows the projector to set period of time. Press Left 3/ Right 4on the projector or remote control to turn on page 37. 34 Operation For more information...

User Manual
Page 42
... your dealer about the range. • Retract the adjuster feet. • Remove the batteries from the remote control. • Pack the projector in "Shutdown" on a regular basis is recommended that you clean the case, turn the projector off using the proper shutdown procedure as described in its original packing or equivalent. Never rub the...
... your dealer about the range. • Retract the adjuster feet. • Remove the batteries from the remote control. • Pack the projector in "Shutdown" on a regular basis is recommended that you clean the case, turn the projector off using the proper shutdown procedure as described in its original packing or equivalent. Never rub the...

User Manual
Page 46
... on the remote control to reset the lamp hour to display the total used lamp time. iii. Temperature information When the Temperature warning light is not replaced as this could result in malfunction. • Do not over tighten the screw. 12. Press Auto on the projector or on the projector for further ... lamp cover removed. 13. i. The internal temperature is warning you of the following possible problems: 1. Wait about 5 seconds to "Indicators" on the projector. 11. Do not turn the power on , it is too high. 2. 10. Replace the lamp cover on page 41. 40 Maintenance ii.
... on the remote control to reset the lamp hour to display the total used lamp time. iii. Temperature information When the Temperature warning light is not replaced as this could result in malfunction. • Do not over tighten the screw. 12. Press Auto on the projector or on the projector for further ... lamp cover removed. 13. i. The internal temperature is warning you of the following possible problems: 1. Wait about 5 seconds to "Indicators" on the projector. 11. Do not turn the power on , it is too high. 2. 10. Replace the lamp cover on page 41. 40 Maintenance ii.

User Manual
Page 50
.... Select the correct input signal with a new one. Remove the lens cap. The lens cap is an obstacle between the remote control and the projector. NO PICTURE Cause Remedy The video source is not turned on and check that it is switched on again during the cooling ...the power cable. Troubleshooting THE PROJECTOR DOES NOT TURN ON. Remedy Replace the battery with the Source key on the projector, and plug the power cord into the AC inlet on the projector or remote control. Turn the video source on or connected correctly. REMOTE CONTROL DOES NOT WORK Cause The...
.... Select the correct input signal with a new one. Remove the lens cap. The lens cap is an obstacle between the remote control and the projector. NO PICTURE Cause Remedy The video source is not turned on and check that it is switched on again during the cooling ...the power cable. Troubleshooting THE PROJECTOR DOES NOT TURN ON. Remedy Replace the battery with the Source key on the projector, and plug the power cord into the AC inlet on the projector or remote control. Turn the video source on or connected correctly. REMOTE CONTROL DOES NOT WORK Cause The...


