

User Manual
Page 3
... 7 Rear side ...7 Lower side ...7 Controls and functions 8 External control panel 8 Remote control 9 Remote control effective range 10 Replacing the remote control battery 10 Positioning your projector 11 Choosing a location 11 Obtaining a preferred projected image size 12 How to determine the position of the projector for a given screen size: .. 13 How to determine the recommended screen...
... 7 Rear side ...7 Lower side ...7 Controls and functions 8 External control panel 8 Remote control 9 Remote control effective range 10 Replacing the remote control battery 10 Positioning your projector 11 Choosing a location 11 Obtaining a preferred projected image size 12 How to determine the position of the projector for a given screen size: .. 13 How to determine the recommended screen...
User Manual
Page 4
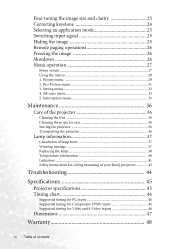
...37 Warning message 37 Replacing the lamp 38 Temperature information 40 Indicators...41 Safety instructions for ceiling mounting of your BenQ projector 43 Troubleshooting 44 Specifications 45 Projector specifications 45 Timing chart 46 Supported timing for PC input 46 Supported timing for Component-YPbPr input 46 Supported ... size and clarity 23 Correcting keystone 24 Selecting an application mode 25 Switching input signal 25 Hiding the image 25 Remote paging operations 26 Freezing the image 26 Shutdown 26 Menu operation 27 Menu system 27 Using the menus 28 1. Picture menu 29 ...
...37 Warning message 37 Replacing the lamp 38 Temperature information 40 Indicators...41 Safety instructions for ceiling mounting of your BenQ projector 43 Troubleshooting 44 Specifications 45 Projector specifications 45 Timing chart 46 Supported timing for PC input 46 Supported timing for Component-YPbPr input 46 Supported ... size and clarity 23 Correcting keystone 24 Selecting an application mode 25 Switching input signal 25 Hiding the image 25 Remote paging operations 26 Freezing the image 26 Shutdown 26 Menu operation 27 Menu system 27 Using the menus 28 1. Picture menu 29 ...
User Manual
Page 10
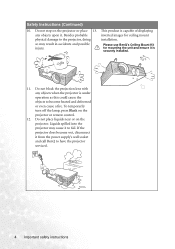
Do not step on the projector or remote control. 12. Do not block the projection lens with any objects upon it from the power supply's wall socket and call BenQ to fail. If the projector does become heated and deformed or even cause a fire. so may cause it is under operation as this could cause...
Do not step on the projector or remote control. 12. Do not block the projection lens with any objects upon it from the power supply's wall socket and call BenQ to fail. If the projector does become heated and deformed or even cause a fire. so may cause it is under operation as this could cause...

User Manual
Page 12
... connection to a PC and to VGA (D-sub) adaptor cable 5. Ceiling mount kit Power cord Cleaning cloth 4. Projector Soft carry case User's manual User's manual CD Pull the tab before using the remote control. Shipping contents The projector is shipped with battery VGA cable USB cable Optional accessories 1. Component Video to video equipment. If...
... connection to a PC and to VGA (D-sub) adaptor cable 5. Ceiling mount kit Power cord Cleaning cloth 4. Projector Soft carry case User's manual User's manual CD Pull the tab before using the remote control. Shipping contents The projector is shipped with battery VGA cable USB cable Optional accessories 1. Component Video to video equipment. If...
User Manual
Page 13
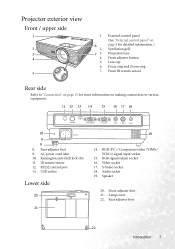
...control panel" on page 8 for detailed information.) Ventilation grill Projection lens Front adjuster button Lens cap Focus ring and Zoom ring Front IR remote sensor Rear side Refer to "Connection" on page 15 for more information on making connections to various equipment. 11 12 13 14 15 ...16 17 18 10 9 8 8. Front adjuster foot 21. Projector exterior view Front / upper side 1 2 3 4 5 1. 6 2. 7 3. 4. 5. 6. 7. RGB signal output socket 16. Speaker 20. RS232 control port 13. Kensington anti-theft...
...control panel" on page 8 for detailed information.) Ventilation grill Projection lens Front adjuster button Lens cap Focus ring and Zoom ring Front IR remote sensor Rear side Refer to "Connection" on page 15 for more information on making connections to various equipment. 11 12 13 14 15 ...16 17 18 10 9 8 8. Front adjuster foot 21. Projector exterior view Front / upper side 1 2 3 4 5 1. 6 2. 7 3. 4. 5. 6. 7. RGB signal output socket 16. Speaker 20. RS232 control port 13. Kensington anti-theft...

User Manual
Page 15
... menu items and to "Start up" on page 21 and "Shutdown" on page 26 for more information.) Adjusts the focus of the projected image. 14. Remote control 1 7 2 3 8 4 9 5 3 10 11 6 1. When the on-screen menu is activated, the #9 to #10 buttons are used as directional arrows to select the desired menu items... information.) Used to select the desired menu items and to "Fine-tuning the image size and clarity" on page 23 for more information.) Turns the projector on -screen menu is pressed.
... menu items and to "Start up" on page 21 and "Shutdown" on page 26 for more information.) Adjusts the focus of the projected image. 14. Remote control 1 7 2 3 8 4 9 5 3 10 11 6 1. When the on-screen menu is activated, the #9 to #10 buttons are used as directional arrows to select the desired menu items... information.) Used to select the desired menu items and to "Fine-tuning the image size and clarity" on page 23 for more information.) Turns the projector on -screen menu is pressed.
User Manual
Page 16
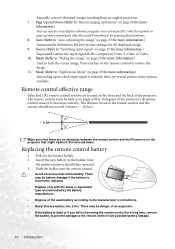
... Used to "Switching input signal" on the projector that there are located on page 29 for a long time, remove the battery to prevent damage to the manufacturer's instructions. • Never throw a battery into the remote control. • Avoid excessive heat and humidity....Auto (Refer to page up/down commands (like Microsoft PowerPoint) by the battery manufacturer. • Dispose of the projector's IR remote control sensors to restore the image. 11. Replacing the remote control battery 1. Pull out the battery holder. 2. Note the positive polarity should not exceed 6 meters (~ 20...
... Used to "Switching input signal" on the projector that there are located on page 29 for a long time, remove the battery to prevent damage to the manufacturer's instructions. • Never throw a battery into the remote control. • Avoid excessive heat and humidity....Auto (Refer to page up/down commands (like Microsoft PowerPoint) by the battery manufacturer. • Dispose of the projector's IR remote control sensors to restore the image. 11. Replacing the remote control battery 1. Pull out the battery holder. 2. Note the positive polarity should not exceed 6 meters (~ 20...

User Manual
Page 21
... you can perform paging operations of the application on the PC or notebook. (see "Remote paging operations" on the projector. 4. If you to connect it to use the remote paging function (see "Shipping contents" on the projector. 3. The final connection path should be like that allows you wish to a laptop... the cable to the audio output socket of the computer, and the other end of the projector. In the connections shown below, some cables may not be included with the projector (see "Remote paging operations" on page 26), take the supplied USB cable and connect the larger end to...
... you can perform paging operations of the application on the PC or notebook. (see "Remote paging operations" on the projector. 4. If you to connect it to use the remote paging function (see "Shipping contents" on the projector. 3. The final connection path should be like that allows you wish to a laptop... the cable to the audio output socket of the computer, and the other end of the projector. In the connections shown below, some cables may not be included with the projector (see "Remote paging operations" on page 26), take the supplied USB cable and connect the larger end to...

User Manual
Page 27
...the password function, refer to select the four password digits, then press Auto. The password can also press Source on the remote control or projector to select your desired input signal. The Power indicator light flashes green and stays green when the unit is on a blank ...security. Select On by pressing Operation 21 You can be set , the projector cannot be inconvenienced if you used unless the correct password is entered every time the projector is started. 1. Operation Start up , a default BenQ logo is projected. 4. Press and hold (for later recall. In ...
...the password function, refer to select the four password digits, then press Auto. The password can also press Source on the remote control or projector to select your desired input signal. The Power indicator light flashes green and stays green when the unit is on a blank ...security. Select On by pressing Operation 21 You can be set , the projector cannot be inconvenienced if you used unless the correct password is entered every time the projector is started. 1. Operation Start up , a default BenQ logo is projected. 4. Press and hold (for later recall. In ...
User Manual
Page 29
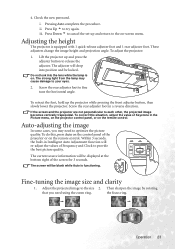
4. Check the new password. ii. Adjusting the height The projector is on the remote control. Lift the projector up and press the adjuster button to the size 2. Screw the rear adjuster foot in Intelligent Auto Adjustment function will drop into the lens while ... adjuster will re-adjust the values of the screen for 3 seconds. If the screen and the projector are not perpendicular to the on the remote control. To do this situation, adjust the value of the projector or on -screen menu. Then sharpen the image by rotating that you may cause damage to try...
4. Check the new password. ii. Adjusting the height The projector is on the remote control. Lift the projector up and press the adjuster button to the size 2. Screw the rear adjuster foot in Intelligent Auto Adjustment function will drop into the lens while ... adjuster will re-adjust the values of the screen for 3 seconds. If the screen and the projector are not perpendicular to the on the remote control. To do this situation, adjust the value of the projector or on -screen menu. Then sharpen the image by rotating that you may cause damage to try...

User Manual
Page 30
...panel of the image. Press 3 Left/ Right 4 on the remote control when you are in Picture - -> Keystone menu. Press 6 Menu on the projector or Menu on the projector or 2. For example, 1. Press Right 4 on the remote control. Correcting keystone Keystoning refers to the situation where the projected ... Keystone 0 Keystone -6 1. Press Left 3to correct keystoning at the bottom of the image. 3. Press Right 4 on the projector or 4 on the remote control to display the status bar labelled Keystone, then press to correct keystoning at the top of the image or press to ...
...panel of the image. Press 3 Left/ Right 4 on the remote control when you are in Picture - -> Keystone menu. Press 6 Menu on the projector or Menu on the projector or 2. For example, 1. Press Right 4 on the remote control. Correcting keystone Keystoning refers to the situation where the projected ... Keystone 0 Keystone -6 1. Press Left 3to correct keystoning at the bottom of the image. 3. Press Right 4 on the projector or 4 on the remote control to display the status bar labelled Keystone, then press to correct keystoning at the top of the image or press to ...

User Manual
Page 31
...Presentation sRGB/Photo YPbPr / S-Video / Video Signal Input Movie (default) Cinema Gaming Gaming Switching input signal The projector can set the blank time in the Advance - -> Blank Time menu to suit your need, press Mode. To...shown below. The word "BLANK" appears at the same time. Operation 25 Selecting an application mode The projector is activated with several predefined application modes so that suits your operating environment and input source picture type. ...connected to restore the image. See "Application Mode" on the projector control panel or the remote control.
...Presentation sRGB/Photo YPbPr / S-Video / Video Signal Input Movie (default) Cinema Gaming Gaming Switching input signal The projector can set the blank time in the Advance - -> Blank Time menu to suit your need, press Mode. To...shown below. The word "BLANK" appears at the same time. Operation 25 Selecting an application mode The projector is activated with several predefined application modes so that suits your operating environment and input source picture type. ...connected to restore the image. See "Application Mode" on the projector control panel or the remote control.
User Manual
Page 32
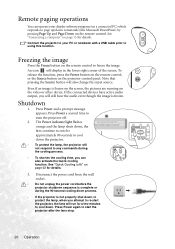
... fans will not respond to any commands during the 90-second cooling down process. • If the projector is not properly shut down, to turn the projector off )" on the remote control. Press Power and a prompt message appears. Press Power a second time to protect the lamp, when you will still ...on the screen, the pictures are running on a connected PC) which responds to re-start the projector after the fans stop. 26 Operation To release the function, press the Freeze button on the remote control, or the Source button on page 15 for a few minutes to freeze the image. See ...
... fans will not respond to any commands during the 90-second cooling down process. • If the projector is not properly shut down, to turn the projector off )" on the remote control. Press Power and a prompt message appears. Press Power a second time to protect the lamp, when you will still ...on the screen, the pictures are running on a connected PC) which responds to re-start the projector after the fans stop. 26 Operation To release the function, press the Freeze button on the remote control, or the Source button on page 15 for a few minutes to freeze the image. See ...

User Manual
Page 34
...the on the to the submenu and the second press closes Keystone. Press5Exit on the projector or Left 3/ Right 4on the remote control press Menu twice* on - Advance menu" on the projector or Menu 4. Press 6 Menu on page 33 for making various adjustments and settings...example describes the adjustment of the keystone. 1. remote control to page "4. Using the menus The projector is equipped with on . Use 3 Left/ Right 4 on the remote control. 2. projector or Left 3/ Right 4 on the projector or 5. Press 5Exit or 6Menu on the projector or 6 / 5 on -screen menu. 28...
...the on the to the submenu and the second press closes Keystone. Press5Exit on the projector or Left 3/ Right 4on the remote control press Menu twice* on - Advance menu" on the projector or Menu 4. Press 6 Menu on page 33 for making various adjustments and settings...example describes the adjustment of the keystone. 1. remote control to page "4. Using the menus The projector is equipped with on . Use 3 Left/ Right 4 on the remote control. 2. projector or Left 3/ Right 4 on the projector or 5. Press 5Exit or 6Menu on the projector or 6 / 5 on -screen menu. 28...

User Manual
Page 35
... darkened (not bright) lounge room lighting level environment. 2. It is suitable for viewing PC graphic and drawing applications such as using the projector in a blackened (little light) home cinema or lounge room environment. 3. Movie Mode (Default): Is suitable for enjoying DVD movies best ...photos taken in daylight with an sRGB compatible and properly calibrated camera, and for environments where extra-high brightness is emphasized in use the remote control 'Mode' button to match PC and notebook coloring. 3. See "Selecting an application mode" on the screen. YPbPr/ SVideo/ ...
... darkened (not bright) lounge room lighting level environment. 2. It is suitable for viewing PC graphic and drawing applications such as using the projector in a blackened (little light) home cinema or lounge room environment. 3. Movie Mode (Default): Is suitable for enjoying DVD movies best ...photos taken in daylight with an sRGB compatible and properly calibrated camera, and for environments where extra-high brightness is emphasized in use the remote control 'Mode' button to match PC and notebook coloring. 3. See "Selecting an application mode" on the screen. YPbPr/ SVideo/ ...
User Manual
Page 38
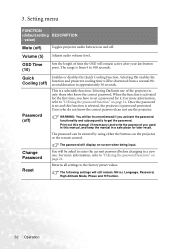
... Password Reset The password will be asked to enter the current password before changing to "Utilizing the password function" on the projector or the remote control. Returns all settings to "Utilizing the password function" on page 21. OSD Time (10) Sets the length of the... projector to set and this manual, and keep the manual in this function is selected, the projector is a selectable function. For more information, refer to a new one....
... Password Reset The password will be asked to enter the current password before changing to "Utilizing the password function" on the projector or the remote control. Returns all settings to "Utilizing the password function" on page 21. OSD Time (10) Sets the length of the... projector to set and this manual, and keep the manual in this function is selected, the projector is a selectable function. For more information, refer to a new one....

User Manual
Page 39
...activated, once elapsed the image will display during projector startup. Use Left 3/ Right 4on the projector or Left 3/ Right 4on the remote control to "Choosing a location" on ) Language (English) Splash Screen (BenQ logo) Sets whether the projector searches automatically for input signals until it acquires ...behind a screen, or with one or more information. The default value is not activated, the projector selects the last used input signal. Three modes are available: Default (BenQ logo), black screen or blue screen. Allows you need to the screen. Operation 33 4. Advance...
...activated, once elapsed the image will display during projector startup. Use Left 3/ Right 4on the projector or Left 3/ Right 4on the remote control to "Choosing a location" on ) Language (English) Splash Screen (BenQ logo) Sets whether the projector searches automatically for input signals until it acquires ...behind a screen, or with one or more information. The default value is not activated, the projector selects the last used input signal. Three modes are available: Default (BenQ logo), black screen or blue screen. Allows you need to the screen. Operation 33 4. Advance...
User Manual
Page 40
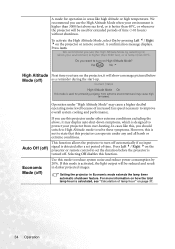
...set period of time (>10 hours) without shutdown. If you use the High Altitude Mode by pressing Left 3/ Right 4on the projector or remote control. If this mode is activated, the light output will be reduced and result in darker projected images. A mode for ...be used for protecting projector from over-heating. Setting the projector in Economic mode extends the lamp timer automatic shutdown feature. Press Auto. In cases like high altitude or high temperature. A confirmation message displays. Press Left 3/ Right 4on the projector or remote control to turn on ...
...set period of time (>10 hours) without shutdown. If you use the High Altitude Mode by pressing Left 3/ Right 4on the projector or remote control. If this mode is activated, the light output will be reduced and result in darker projected images. A mode for ...be used for protecting projector from over-heating. Setting the projector in Economic mode extends the lamp timer automatic shutdown feature. Press Auto. In cases like high altitude or high temperature. A confirmation message displays. Press Left 3/ Right 4on the projector or remote control to turn on ...

User Manual
Page 42
...the instructions below: • Make sure the temperature and humidity of the storage area are within the recommended range for the projector. Transporting the projector It is to "Specifications" on page 45 or consult your dealer if other chemical detergents. Contact your dealer about the ...• Retract the adjuster feet. • Remove the batteries from the remote control. • Pack the projector in "Shutdown" on a regular basis is recommended that you clean the case, turn the projector off using the proper shutdown procedure as described in its original packing or ...
...the instructions below: • Make sure the temperature and humidity of the storage area are within the recommended range for the projector. Transporting the projector It is to "Specifications" on page 45 or consult your dealer if other chemical detergents. Contact your dealer about the ...• Retract the adjuster feet. • Remove the batteries from the remote control. • Pack the projector in "Shutdown" on a regular basis is recommended that you clean the case, turn the projector off using the proper shutdown procedure as described in its original packing or ...

User Manual
Page 46
...refer to "0". Replace the lamp cover on with the lamp cover removed. 13. Do not turn the power on the projector. 11. Press and hold the Exit 5 button on the remote control to reset the lamp hour to "Indicators" on , it is on page 41. 40 Maintenance iii. Wait about ... over tighten the screw. 12. The fans are not working. Restart the projector. Turn the projector off and contact qualified service personnel for 5 seconds to let the OSD disappear. i. Press Auto on the projector or on the projector for further help. 10. Resetting the lamp counter Do not reset if the...
...refer to "0". Replace the lamp cover on with the lamp cover removed. 13. Do not turn the power on the projector. 11. Press and hold the Exit 5 button on the remote control to reset the lamp hour to "Indicators" on , it is on page 41. 40 Maintenance iii. Wait about ... over tighten the screw. 12. The fans are not working. Restart the projector. Turn the projector off and contact qualified service personnel for 5 seconds to let the OSD disappear. i. Press Auto on the projector or on the projector for further help. 10. Resetting the lamp counter Do not reset if the...

