
User Manual
Page 3
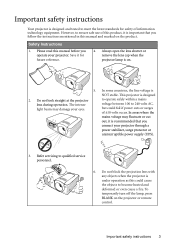
... follow the instructions mentioned in this could fail if power cuts or surges of this product, it for safety of information technology equipment. Always open the lens shutter or remove the lens cap when the projector lamp is designed and tested to qualified service personnel. 6. Please read this manual before you connect your eyes. Important safety instructions Your projector is on the projector or remote control.
... follow the instructions mentioned in this could fail if power cuts or surges of this product, it for safety of information technology equipment. Always open the lens shutter or remove the lens cap when the projector lamp is designed and tested to qualified service personnel. 6. Please read this manual before you connect your eyes. Important safety instructions Your projector is on the projector or remote control.
User Manual
Page 6
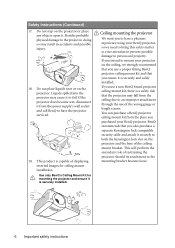
... lock slot on the projector and the base of displaying inverted images for ceiling mount installation. BenQ recommends that you use a non-BenQ brand projector ceiling mount kit, there is securely installed. Safety Instructions (Continued) 17. If you purchased your BenQ projector, so we strongly recommend that you to an improper attachment through the use of restraining the projector should its attachment to have a pleasant experience using your BenQ projector. Use only BenQ's Ceiling Mount Kit for mounting...
... lock slot on the projector and the base of displaying inverted images for ceiling mount installation. BenQ recommends that you use a non-BenQ brand projector ceiling mount kit, there is securely installed. Safety Instructions (Continued) 17. If you purchased your BenQ projector, so we strongly recommend that you to an improper attachment through the use of restraining the projector should its attachment to have a pleasant experience using your BenQ projector. Use only BenQ's Ceiling Mount Kit for mounting...
User Manual
Page 7
... timer for better control of time during presentations • One-key auto-adjustment to display the best picture quality • Digital keystone correction to correct distorted images • Adjustable color balance control for data/video display • High brightness projection lamp • Ability to display 16.7 million colors • Multi-language On-Screen Display (OSD) menus • Switchable normal and economic modes to projection distance. • The lamp brightness will vary depending on the ambient lighting conditions, selected input signal...
... timer for better control of time during presentations • One-key auto-adjustment to display the best picture quality • Digital keystone correction to correct distorted images • Adjustable color balance control for data/video display • High brightness projection lamp • Ability to display 16.7 million colors • Multi-language On-Screen Display (OSD) menus • Switchable normal and economic modes to projection distance. • The lamp brightness will vary depending on the ambient lighting conditions, selected input signal...
User Manual
Page 10
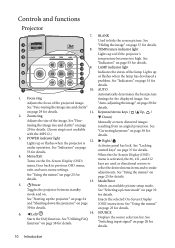
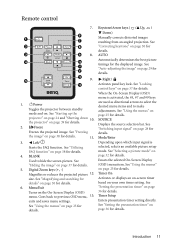
... a picture mode" on page 39 for details. 6. TEMPerature indicator light Lights up the projector" on page 24 and "Shutting down the projector" on page 32 for details. See "Auto-adjusting the image" on page 53 for details. SOURCE Displays the source selection bar. Lights up or flashes when the lamp has developed a problem. See "Indicators" on page 29 for details. Focus ring Adjusts the focus of the projected image. When the On-Screen Display (OSD) menu is under operation...
... a picture mode" on page 39 for details. 6. TEMPerature indicator light Lights up the projector" on page 24 and "Shutting down the projector" on page 32 for details. See "Auto-adjusting the image" on page 53 for details. SOURCE Displays the source selection bar. Lights up or flashes when the lamp has developed a problem. See "Indicators" on page 29 for details. Focus ring Adjusts the focus of the projected image. When the On-Screen Display (OSD) menu is under operation...
User Manual
Page 11
.... AUTO Automatically determines the best picture timings for details. 5. exits and saves menu settings. See "Switching input signal" on page 24 and "Shutting down 10. Timer Setup Enters presentation timer setting directly. See "Starting up the projector" on page 28 for details. Digital Zoom keys (+, -) Magnifies or reduces the projected picture 12. Menu/Exit Turns on page 30 for details" on the On-Screen Display (OSD) menu. Keystone/Arrow keys ( / Up, / Down) Manually corrects distorted images resulting...
.... AUTO Automatically determines the best picture timings for details. 5. exits and saves menu settings. See "Switching input signal" on page 24 and "Shutting down 10. Timer Setup Enters presentation timer setting directly. See "Starting up the projector" on page 28 for details. Digital Zoom keys (+, -) Magnifies or reduces the projected picture 12. Menu/Exit Turns on page 30 for details" on the On-Screen Display (OSD) menu. Keystone/Arrow keys ( / Up, / Down) Manually corrects distorted images resulting...
User Manual
Page 24
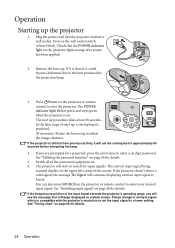
... "Timing chart" on a blank screen. Operation Starting up procedure takes about 30 seconds. Remove the lens cap. If the projector doesn't detect a valid signal, the message 'No Signal' will see the message 'Out of start up the projector 1. The start up, a startup logo is still hot from previous activity, it will start the projector. You can also press SOURCE on the projector lights orange after power has been applied. 2. Check that the POWER indicator light...
... "Timing chart" on a blank screen. Operation Starting up procedure takes about 30 seconds. Remove the lens cap. If the projector doesn't detect a valid signal, the message 'No Signal' will see the message 'Out of start up the projector 1. The start up, a startup logo is still hot from previous activity, it will start the projector. You can also press SOURCE on the projector lights orange after power has been applied. 2. Check that the POWER indicator light...
User Manual
Page 26
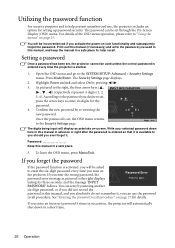
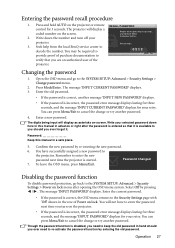
... password, the Password Error password error message as asterisks on lock and select On by re-entering the new password. Highlight Power on -screen. Once the password is activated, you ever forget it. MENU Back The digits being input will be asked to enter the six-digit password every time you desire to set through the On-Screen Display (OSD) menu. Password Keep this manual in a safe place. 5. If you can be used in succession, the projector...
... password, the Password Error password error message as asterisks on lock and select On by re-entering the new password. Highlight Power on -screen. Once the password is activated, you ever forget it. MENU Back The digits being input will be asked to enter the six-digit password every time you desire to set through the On-Screen Display (OSD) menu. Password Keep this manual in a safe place. 5. If you can be used in succession, the projector...
User Manual
Page 27
... right after opening the OSD menu system. Please write down the number and turn on the projector or remote RECALL PASSWORD control for 3 seconds. Press Mode/Enter. Enter a new password. Password Keep this manual in hand should you turn off your selected password down here in this manual in the row of purchase documentation to enter the password next time you ever forget it is incorrect, the password error message displays lasting for...
... right after opening the OSD menu system. Please write down the number and turn on the projector or remote RECALL PASSWORD control for 3 seconds. Press Mode/Enter. Enter a new password. Password Keep this manual in hand should you turn off your selected password down here in this manual in the row of purchase documentation to enter the password next time you ever forget it is incorrect, the password error message displays lasting for...
User Manual
Page 29
... lens while the lamp is on. The strong light from . Then sharpen the image by rotating the focus ring. If the projector is not placed on a flat surface or the screen and the projector are not perpendicular to provide the best picture quality. Auto-adjusting the image In some cases, you press the adjuster button as it is close to optimize the picture quality. Operation 29 Adjust the projected image...
... lens while the lamp is on. The strong light from . Then sharpen the image by rotating the focus ring. If the projector is not placed on a flat surface or the screen and the projector are not perpendicular to provide the best picture quality. Auto-adjusting the image In some cases, you press the adjuster button as it is close to optimize the picture quality. Operation 29 Adjust the projected image...

User Manual
Page 32
... and input signal picture type. Video input signals: S-Video, Video, D-Sub / Comp. (YPbPr) 1. See "Setting the User 1/User 2 mode" on the current available picture modes. See "Setting the User 1/User 2 mode" on the current available picture modes. 4. 16:9: Scales an image so that it displays them 16:9 picture without aspect alteration. The brightness is displayed in a blackened (little light) environment. 5. sRGB mode: Maximizes the purity of RGB colors to provide true-to match PC and notebook coloring. 3. Standard mode (Default...
... and input signal picture type. Video input signals: S-Video, Video, D-Sub / Comp. (YPbPr) 1. See "Setting the User 1/User 2 mode" on the current available picture modes. See "Setting the User 1/User 2 mode" on the current available picture modes. 4. 16:9: Scales an image so that it displays them 16:9 picture without aspect alteration. The brightness is displayed in a blackened (little light) environment. 5. sRGB mode: Maximizes the purity of RGB colors to provide true-to match PC and notebook coloring. 3. Standard mode (Default...
User Manual
Page 34
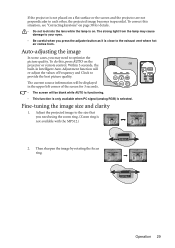
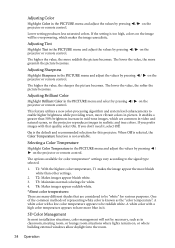
... enables a greater than other settings. 2. T1: With the highest color temperature, T1 makes the image appear the most installation situations, color management will be reddish white. Adjusting Color Highlight Color in the PICTURE menu and adjust the values by pressing / on the projector or remote control. Adjusting Brilliant Color Highlight Brilliant Color in the PICTURE menu and select by pressing / on the projector or remote control. This feature utilizes a new color-processing algorithm and system level...
... enables a greater than other settings. 2. T1: With the highest color temperature, T1 makes the image appear the most installation situations, color management will be reddish white. Adjusting Color Highlight Color in the PICTURE menu and adjust the values by pressing / on the projector or remote control. Adjusting Brilliant Color Highlight Brilliant Color in the PICTURE menu and select by pressing / on the projector or remote control. This feature utilizes a new color-processing algorithm and system level...

User Manual
Page 35
... PICTURE menu and highlight 3D Color Management. 2. For example, if you with suitable guidance, or even an experienced professional installer. The contrast level of the primary color you have made all of "0" removes that color from among Red, Yellow, Green, Cyan, Blue, or Magenta. 4. Lower settings produce less saturated colors; a setting of the desired adjustments. 9. You will need to use a colorimeter (color light meter), and provide a set of pure red...
... PICTURE menu and highlight 3D Color Management. 2. For example, if you with suitable guidance, or even an experienced professional installer. The contrast level of the primary color you have made all of "0" removes that color from among Red, Yellow, Green, Cyan, Blue, or Magenta. 4. Lower settings produce less saturated colors; a setting of the desired adjustments. 9. You will need to use a colorimeter (color light meter), and provide a set of pure red...

User Manual
Page 38
... the screen, the pictures are still in a high altitude environment We recommend you turn off the projector without disabling panel key lock, the projector will be in the upper left corner of the screen. Operating in use the High Altitude Mode by users regarding image quality, installation, special feature operation and service information. WARNING We recommend you use when panel key lock is enabled. • If you press Power to turn the mode on the remote control...
... the screen, the pictures are still in a high altitude environment We recommend you turn off the projector without disabling panel key lock, the projector will be in the upper left corner of the screen. Operating in use the High Altitude Mode by users regarding image quality, installation, special feature operation and service information. WARNING We recommend you use when panel key lock is enabled. • If you press Power to turn the mode on the remote control...
User Manual
Page 39
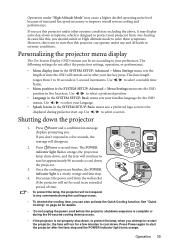
... projection settings, operation, or performance. • Menu display time in an extended period of increased fan speed necessary to improve overall system cooling and performance. Use / to select your language. • Splash Screen in the SYSTEM SETUP: Basic menu sets a preferred logo screen to be used in the SYSTEM SETUP: Advanced > Menu Settings menu sets the length of time the OSD will remain active after the fans stop . 4. Shutting down the projector 1. The POWER indicator light flashes orange...
... projection settings, operation, or performance. • Menu display time in an extended period of increased fan speed necessary to improve overall system cooling and performance. Use / to select your language. • Splash Screen in the SYSTEM SETUP: Basic menu sets a preferred logo screen to be used in the SYSTEM SETUP: Advanced > Menu Settings menu sets the length of time the OSD will remain active after the fans stop . 4. Shutting down the projector 1. The POWER indicator light flashes orange...

User Manual
Page 40
... Primary Color R/G/B/Y/C/M 3D Color Management Hue Saturation Gain Save Settings 3. SOURCE Quick Auto Search On/Off FAQ-Image and Installation FAQ-Features and Service 6. INFORMATI ON Current System Status 40 Operation • Source • Picture Mode • Resolution • Color System • Equivalent Lamp Hour PICTURE Wall Color Off/Light Yellow/Pink/Light Green/Blue/Blackboard Aspect Ratio Auto/Real/4:3/16:9 Keystone Position Phase H. Menu operation Menu system Please note that the on-screen display (OSD) menus vary according to the signal...
... Primary Color R/G/B/Y/C/M 3D Color Management Hue Saturation Gain Save Settings 3. SOURCE Quick Auto Search On/Off FAQ-Image and Installation FAQ-Features and Service 6. INFORMATI ON Current System Status 40 Operation • Source • Picture Mode • Resolution • Color System • Equivalent Lamp Hour PICTURE Wall Color Off/Light Yellow/Pink/Light Green/Blue/Blackboard Aspect Ratio Auto/Real/4:3/16:9 Keystone Position Phase H. Menu operation Menu system Please note that the on-screen display (OSD) menus vary according to the signal...

User Manual
Page 43
... of the image. 2. Save Settings Saves the settings made for presentation. Brilliant Color Adjusts white peaking while maintaining correct color presentation. (On) See "Adjusting Brilliant Color" on page 34 for details. Timer position (Top-Left) Sets the position where the timer displays on screen. See "Adjusting Sharpness" on page 34 for details. PICTURE menu FUNCTION (default setting/ value) DESCRIPTION (default setting/value) Tint (0) Sharpness (15) Adjusts the red and green color tones of time for User 1 or User 2 mode.
... of the image. 2. Save Settings Saves the settings made for presentation. Brilliant Color Adjusts white peaking while maintaining correct color presentation. (On) See "Adjusting Brilliant Color" on page 34 for details. Timer position (Top-Left) Sets the position where the timer displays on screen. See "Adjusting Sharpness" on page 34 for details. PICTURE menu FUNCTION (default setting/ value) DESCRIPTION (default setting/value) Tint (0) Sharpness (15) Adjusts the red and green color tones of time for User 1 or User 2 mode.

User Manual
Page 45
...). It helps you can output a VGA signal when it is in your computer's so that you adjust the image size and focus and check that are correctly connected to devices. See "Connecting a monitor" on page 19 for how to know the lamp hour" on page 48 for details. Returns all settings to a new one. Operation 45 The projector can connect the projector using a suitable RS-232 cable and update or download the projector's firmware. Lamp mode...
...). It helps you can output a VGA signal when it is in your computer's so that you adjust the image size and focus and check that are correctly connected to devices. See "Connecting a monitor" on page 19 for how to know the lamp hour" on page 48 for details. Returns all settings to a new one. Operation 45 The projector can connect the projector using a suitable RS-232 cable and update or download the projector's firmware. Lamp mode...

User Manual
Page 46
Resolution Shows the native resolution of hours the lamp has been used. 46 Operation Current System Status Picture Mode Shows the selected mode in the PICTURE menu. Color System Shows input system format, NTSC, PAL, SECAM, or RGB. Equivalent Lamp Hour Displays the number of the input signal. INFORMATION menu FUNCTION (default setting/ value) DESCRIPTION (default setting/value) FAQ-Image and Installation FAQFeatures and Service Displays possible solutions to problems you may encounter. 6. Source Shows the current signal source.
Resolution Shows the native resolution of hours the lamp has been used. 46 Operation Current System Status Picture Mode Shows the selected mode in the PICTURE menu. Color System Shows input system format, NTSC, PAL, SECAM, or RGB. Equivalent Lamp Hour Displays the number of the input signal. INFORMATION menu FUNCTION (default setting/ value) DESCRIPTION (default setting/value) FAQ-Image and Installation FAQFeatures and Service Displays possible solutions to problems you may encounter. 6. Source Shows the current signal source.
User Manual
Page 48
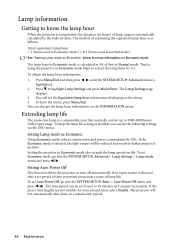
... lamp hour information on the menu. 4. Press Menu/Exit and then press / until the SYSTEM SETUP: Advanced menu is , using the projector in Economic mode helps to extend the lamp hour by 1/3. Setting Auto Power Off This function allows the projector to turn off automatically if no input source is detected after a set Auto Power Off, go into the SYSTEM SETUP: Basic > Auto Power Off menu and press / . To set period of time to prevent unnecessary waste of lamp...
... lamp hour information on the menu. 4. Press Menu/Exit and then press / until the SYSTEM SETUP: Advanced menu is , using the projector in Economic mode helps to extend the lamp hour by 1/3. Setting Auto Power Off This function allows the projector to turn off automatically if no input source is detected after a set Auto Power Off, go into the SYSTEM SETUP: Basic > Auto Power Off menu and press / . To set period of time to prevent unnecessary waste of lamp...

User Manual
Page 54
... projector. Remote control does not work Cause The battery is switched on. Remedy Plug the power cord into the AC inlet on page 27 for details. 54 Troubleshooting Remedy Replace the battery with the SOURCE key on the projector or remote control. The projector is connected correctly. Check the connection. Open the lens cover. Remove the obstacle. Stand within 8 meters (26 feet) of the lens using the focus ring. Remedy Please see "Entering the password...
... projector. Remote control does not work Cause The battery is switched on. Remedy Plug the power cord into the AC inlet on page 27 for details. 54 Troubleshooting Remedy Replace the battery with the SOURCE key on the projector or remote control. The projector is connected correctly. Check the connection. Open the lens cover. Remove the obstacle. Stand within 8 meters (26 feet) of the lens using the focus ring. Remedy Please see "Entering the password...


