
US One Year LCD Monitor Warranty
Page 3
... TO THE TERMS OF THIS LIMITED WARRANTY. Please call Technical Support Center to change without BenQ's authorization. YOU AGREE THAT REPAIR OR REPLACEMENT, AS APPLICABLE, UNDER THE WARRANTY SERVICES DESCRIBED HEREIN IS YOUR SOLE AND EXCLUSIVE REMEDY WITH RESPECT TO ANY BREACH OF THE BenQ LIMITED WARRANTY SET FORTH HEREIN. Hours: M-F 8:30am - 5:30pm PST Phone: 866-600-2367...
... TO THE TERMS OF THIS LIMITED WARRANTY. Please call Technical Support Center to change without BenQ's authorization. YOU AGREE THAT REPAIR OR REPLACEMENT, AS APPLICABLE, UNDER THE WARRANTY SERVICES DESCRIBED HEREIN IS YOUR SOLE AND EXCLUSIVE REMEDY WITH RESPECT TO ANY BREACH OF THE BenQ LIMITED WARRANTY SET FORTH HEREIN. Hours: M-F 8:30am - 5:30pm PST Phone: 866-600-2367...

User Manual
Page 2
... should be blocked or covered. Servicing • Do not attempt to service this equipment from the wall outlet before cleaning. Please follow these safety instructions for best performance, and long life for your monitor from the AC supply. • The power supply cord serves as dropping or mishandling occurs, contact qualified service personnel for pluggable equipment. Avoid using any of BenQ Corporation to dangerous voltages...
... should be blocked or covered. Servicing • Do not attempt to service this equipment from the wall outlet before cleaning. Please follow these safety instructions for best performance, and long life for your monitor from the AC supply. • The power supply cord serves as dropping or mishandling occurs, contact qualified service personnel for pluggable equipment. Avoid using any of BenQ Corporation to dangerous voltages...

User Manual
Page 3
... monitor on a new computer 16 How to upgrade the monitor on an existing computer 17 How to install on Windows 7 system (selected models only 18 How to install on Windows Vista systems 19 How to install on Windows XP system 20 Picture optimization ...21 How to adjust your monitor 22 The control panel ...22 Hot key mode ...23 Main menu mode ...24 Troubleshooting ...38 Frequently asked questions (FAQ 38 Need more help...
... monitor on a new computer 16 How to upgrade the monitor on an existing computer 17 How to install on Windows 7 system (selected models only 18 How to install on Windows Vista systems 19 How to install on Windows XP system 20 Picture optimization ...21 How to adjust your monitor 22 The control panel ...22 Hot key mode ...23 Main menu mode ...24 Troubleshooting ...38 Frequently asked questions (FAQ 38 Need more help...
User Manual
Page 6
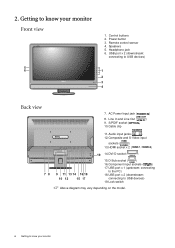
Control buttons 2. USB port x 2 (downstream; Line In and Line Out ( ) 9. connecting to USB devices) 19.Lock switch Above diagram may vary depending on the model. 6 Getting to USB devices) 1 2 3 4 Back view 78 7. S/PDIF socket ( ) 10.Cable clip 11. 2. Speakers 5. Headphone jack 6. connecting to know your monitor Remote control sensor 4. Audio input jacks ( ) 12.Composite and S-Video input sockets ( ) 13.HDMI socket x 2 ( / ) 9 11 13 14 16 18 10 12 15 17 19 14.DVI-D socket ( ) 15...
Control buttons 2. USB port x 2 (downstream; Line In and Line Out ( ) 9. connecting to USB devices) 19.Lock switch Above diagram may vary depending on the model. 6 Getting to USB devices) 1 2 3 4 Back view 78 7. S/PDIF socket ( ) 10.Cable clip 11. 2. Speakers 5. Headphone jack 6. connecting to know your monitor Remote control sensor 4. Audio input jacks ( ) 12.Composite and S-Video input sockets ( ) 13.HDMI socket x 2 ( / ) 9 11 13 14 16 18 10 12 15 17 19 14.DVI-D socket ( ) 15...
User Manual
Page 7
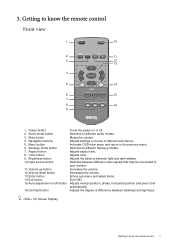
... button 8. Switches to your monitor. Adjusts aspect ratio. Adjusts color. Power button 2. Mute button 4. Navigation buttons 5. Color button 9. Brightness button 10.Input source button 11. Switches between different video signals that may be connected to different Senseye modes. Adjusts vertical position, phase, horizontal position and pixel clock automatically. Adjusts the degree of difference between light and dark shades. Senseye mode button 7. Switches to different sub menus. Audio mode button 3. Menu button 6. Adjusts settings or moves to different audio...
... button 8. Switches to your monitor. Adjusts aspect ratio. Adjusts color. Power button 2. Mute button 4. Navigation buttons 5. Color button 9. Brightness button 10.Input source button 11. Switches between different video signals that may be connected to different Senseye modes. Adjusts vertical position, phase, horizontal position and pixel clock automatically. Adjusts the degree of difference between light and dark shades. Senseye mode button 7. Switches to different sub menus. Audio mode button 3. Menu button 6. Adjusts settings or moves to different audio...
User Manual
Page 11
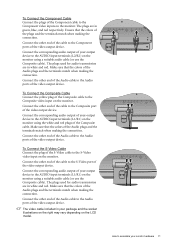
... monitor using the white and red plugs of the Audio plugs and the terminals match when making the connection. Connect the other end of the cable to the Composite port of the video output device. Connect the other end of the cable to the Component ports of the video output device. Connect the corresponding audio output of the plugs and the terminals match when making the connection. The video cable included in green, blue, and red respectively. Connect...
... monitor using the white and red plugs of the Audio plugs and the terminals match when making the connection. Connect the other end of the cable to the Composite port of the video output device. Connect the other end of the cable to the Component ports of the video output device. Connect the corresponding audio output of the plugs and the terminals match when making the connection. The video cable included in green, blue, and red respectively. Connect...

User Manual
Page 12
.... To Output Audio Signals You are provided with the following options to output audio from the monitor: • You may connect headphones to assemble your monitor is connecting to) to connect the S/PDIF socket on the monitor. I • You can output audio using external speakers, please also use a suitable audio cable (usually purchased separately or came with the speakers) to connect the monitor (Line Out) to the input/Line In...
.... To Output Audio Signals You are provided with the following options to output audio from the monitor: • You may connect headphones to assemble your monitor is connecting to) to connect the S/PDIF socket on the monitor. I • You can output audio using external speakers, please also use a suitable audio cable (usually purchased separately or came with the speakers) to connect the monitor (Line Out) to the input/Line In...
User Manual
Page 15
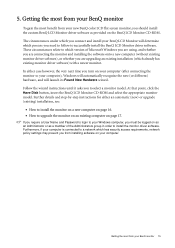
... to successfully install the BenQ LCD Monitor driver software. Follow the wizard instructions until it asks you to your new BenQ color LCD flat screen monitor, you should install the custom BenQ LCD Monitor driver software as provided on as an Administrator or as a member of Microsoft Windows you are using, and whether you are connecting the monitor and installing the software onto a new computer (without existing monitor driver software), or whether you need to follow to install the monitor driver software. Furthermore...
... to successfully install the BenQ LCD Monitor driver software. Follow the wizard instructions until it asks you to your new BenQ color LCD flat screen monitor, you should install the custom BenQ LCD Monitor driver software as provided on as an Administrator or as a member of Microsoft Windows you are using, and whether you are connecting the monitor and installing the software onto a new computer (without existing monitor driver software), or whether you need to follow to install the monitor driver software. Furthermore...

User Manual
Page 16
... has never been used before . How to install the monitor on a new computer This instruction details the procedure for How to upgrade the monitor on an existing computer. 1. You should not be following the instructions for selecting and installing the BenQ LCD Monitor driver software on the computer. 3. If you should instead be connected to it (and has monitor driver software installed), you are adding the BenQ LCD Monitor to an...
... has never been used before . How to install the monitor on a new computer This instruction details the procedure for How to upgrade the monitor on an existing computer. 1. You should not be following the instructions for selecting and installing the BenQ LCD Monitor driver software on the computer. 3. If you should instead be connected to it (and has monitor driver software installed), you are adding the BenQ LCD Monitor to an...
User Manual
Page 17
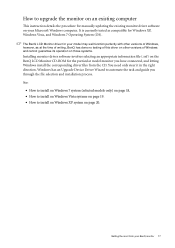
... computer This instruction details the procedure for the particular model monitor you through the file selection and installation process. You need only steer it in the right direction. The BenQ LCD Monitor driver for your model may well function perfectly with other versions of Windows, however, as compatible for Windows XP, Windows Vista, and Windows 7 Operating System (OS). Windows has an Upgrade Device Driver Wizard to install on Windows XP...
... computer This instruction details the procedure for the particular model monitor you through the file selection and installation process. You need only steer it in the right direction. The BenQ LCD Monitor driver for your model may well function perfectly with other versions of Windows, however, as compatible for Windows XP, Windows Vista, and Windows 7 Operating System (OS). Windows has an Upgrade Device Driver Wizard to install on Windows XP...
User Manual
Page 18
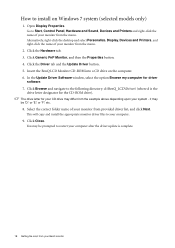
... Getting the most from the menu. How to restart your computer after the driver update is the drive letter designator for driver software. 7. This will copy and install the appropriate monitor driver files to Start, Control Panel, Hardware and Sound, Devices and Printers and right-click the name of your monitor from your BenQ monitor The drive letter for your computer. 9. Open Display Properties. Go to your...
... Getting the most from the menu. How to restart your computer after the driver update is the drive letter designator for driver software. 7. This will copy and install the appropriate monitor driver files to Start, Control Panel, Hardware and Sound, Devices and Printers and right-click the name of your monitor from your BenQ monitor The drive letter for your computer. 9. Open Display Properties. Go to your...
User Manual
Page 19
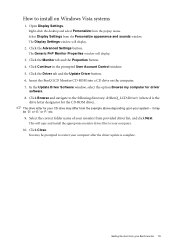
... the driver update is the drive letter designator for driver software. 8. This will display. 2. Right-click the desktop and select Personalize from the Personalize appearance and sounds window. Select the correct folder name of your system - Click Close. The Display Settings window will copy and install the appropriate monitor driver files to your computer. 10. Click Continue in the prompted User Account Control window. 5. Insert the BenQ LCD Monitor...
... the driver update is the drive letter designator for driver software. 8. This will display. 2. Right-click the desktop and select Personalize from the Personalize appearance and sounds window. Select the correct folder name of your system - Click Close. The Display Settings window will copy and install the appropriate monitor driver files to your computer. 10. Click Continue in the prompted User Account Control window. 5. Insert the BenQ LCD Monitor...
User Manual
Page 20
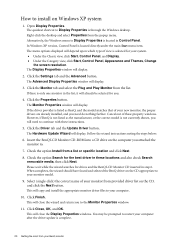
... view, click Start, Control Panel, Appearance and Themes, Change the screen resolution. The Monitor Properties window will display. The Hardware Update Wizard will display. Follow the wizard instructions noting the steps below: 6. This will close the Display Properties windows. This will display. 3. How to install on the computer you attached the monitor to. 7. The Advanced Display Properties window will close the wizard and return you . 4. Click the Driver tab and the Update Driver button. Check...
... view, click Start, Control Panel, Appearance and Themes, Change the screen resolution. The Monitor Properties window will display. The Hardware Update Wizard will display. Follow the wizard instructions noting the steps below: 6. This will close the Display Properties windows. This will display. 3. How to install on the computer you attached the monitor to. 7. The Advanced Display Properties window will close the wizard and return you . 4. Click the Driver tab and the Update Driver button. Check...
User Manual
Page 21
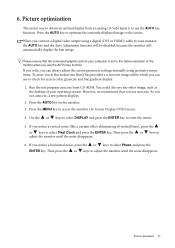
... screen geometric settings manually using a digital (DVI or HDMI) cable to the native resolution of your monitor, the AUTO key and the Auto Adjustment function will be disabled, because the monitor will automatically display the best image. If you wish, you can use the AUTO key function. Press the MENU key to the screen. Run the test program auto.exe from an analog (D-Sub) input is set to your operating system. However, we recommend that the connected graphic card...
... screen geometric settings manually using a digital (DVI or HDMI) cable to the native resolution of your monitor, the AUTO key and the Auto Adjustment function will be disabled, because the monitor will automatically display the best image. If you wish, you can use the AUTO key function. Press the MENU key to the screen. Run the test program auto.exe from an analog (D-Sub) input is set to your operating system. However, we recommend that the connected graphic card...
User Manual
Page 25
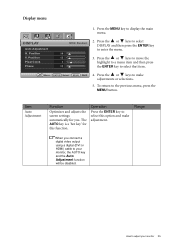
... main menu. Display menu 1. Item Auto Adjustment Function Optimizes and adjusts the screen settings automatically for this option and make adjustments or selections. 5. Position V. Press the or keys to adjust your monitor, the AUTO key and the Auto Adjustment function will be disabled. To return to select that item. The AUTO key is a 'hot key' for you connect a digital video output using a digital (DVI or HDMI) cable to select this function. Move ENTER Select MENU Exit 4. How to make adjustment. DISPLAY Auto Adjustment...
... main menu. Display menu 1. Item Auto Adjustment Function Optimizes and adjusts the screen settings automatically for this option and make adjustments or selections. 5. Position V. Press the or keys to adjust your monitor, the AUTO key and the Auto Adjustment function will be disabled. To return to select that item. The AUTO key is a 'hot key' for you connect a digital video output using a digital (DVI or HDMI) cable to select this function. Move ENTER Select MENU Exit 4. How to make adjustment. DISPLAY Auto Adjustment...

User Manual
Page 30
... signal source is set to Movie, Game, or Photo) Display Mode Displays the preview of the display as much of screen images under the specified mode. Use this option. Scales the input image to hide annoying edge noise if present around your monitor Senseye Demo Dynamic Contrast (available when the Picture Mode is from Picture Mode. Displays the input image in its native resolution without geometric distortion filling as possible. 16:9 images will fill the screen horizontally...
... signal source is set to Movie, Game, or Photo) Display Mode Displays the preview of the display as much of screen images under the specified mode. Use this option. Scales the input image to hide annoying edge noise if present around your monitor Senseye Demo Dynamic Contrast (available when the Picture Mode is from Picture Mode. Displays the input image in its native resolution without geometric distortion filling as possible. 16:9 images will fill the screen horizontally...
User Manual
Page 36
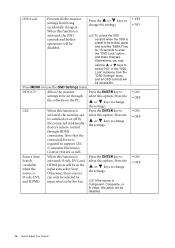
... S-Video, this option. If the source is activated, D-sub, DVI, and HDMI ports will be in the "OSD Lock" submenu from the "OSD Settings" menu, and all the monitor settings from being accidentally changed. To unlock the OSD controls when the OSD is required to adjust your monitor CEC When this option. Press the or keys to enter the "OSD Lock" option and make changes. through the software on or off by hot key. OSD Lock...
... S-Video, this option. If the source is activated, D-sub, DVI, and HDMI ports will be in the "OSD Lock" submenu from the "OSD Settings" menu, and all the monitor settings from being accidentally changed. To unlock the OSD controls when the OSD is required to adjust your monitor CEC When this option. Press the or keys to enter the "OSD Lock" option and make changes. through the software on or off by hot key. OSD Lock...

User Manual
Page 37
Information Reset All Displays the current monitor property settings. Press the or keys to the factory default values. Resets all mode, color and geometry settings to change the settings. • Input • Current Resolution • Optimum Resolution (best with the monitor) • Model Name • YES • NO *DDC/CI, short for remote diagnostics. DDC/CI capability allows monitor controls to adjust your monitor 37 How to be sent via the software for Display Data Channel/Command Interface, which was developed by Video Electronics Standards Association (VESA).
Information Reset All Displays the current monitor property settings. Press the or keys to the factory default values. Resets all mode, color and geometry settings to change the settings. • Input • Current Resolution • Optimum Resolution (best with the monitor) • Model Name • YES • NO *DDC/CI, short for remote diagnostics. DDC/CI capability allows monitor controls to adjust your monitor 37 How to be sent via the software for Display Data Channel/Command Interface, which was developed by Video Electronics Standards Association (VESA).
User Manual
Page 38
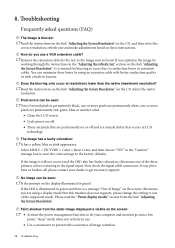
... instructions on the link "Adjusting the Screen Resolution" on -off , please contact your computer and monitor go into a low power "sleep" mode when not actively in extension cables. The image has a faulty coloration: It has a yellow, blue or pink appearance. If not, optimize the image by using a display mode that occurs in the signal input. You can be seen: One of several pixels is permanently black, one or more pixels are permanently red, green, blue...
... instructions on the link "Adjusting the Screen Resolution" on -off , please contact your computer and monitor go into a low power "sleep" mode when not actively in extension cables. The image has a faulty coloration: It has a yellow, blue or pink appearance. If not, optimize the image by using a display mode that occurs in the signal input. You can be seen: One of several pixels is permanently black, one or more pixels are permanently red, green, blue...

User Manual
Page 39
... power supply and the mains switch. To have the optimal display performance of each type of the connected speakers) is properly connected. • If the external speakers are inaccessible: • To unlock the OSD controls when the OSD is properly connected. If that does not help, check the signal cable connectors. You are running at its native resolution, but the image is displaced in one direction: Read the instructions on the link "Adjusting the Screen Resolution...
... power supply and the mains switch. To have the optimal display performance of each type of the connected speakers) is properly connected. • If the external speakers are inaccessible: • To unlock the OSD controls when the OSD is properly connected. If that does not help, check the signal cable connectors. You are running at its native resolution, but the image is displaced in one direction: Read the instructions on the link "Adjusting the Screen Resolution...


