
US One Year LCD Monitor Warranty
Page 1
... reseller/retailer to the following terms and conditions: 1. END USER LIMITED WARRANTY LCD MONITORS Subject to the terms and conditions set forth below , BenQ America Corp. ("BenQ") warrants the BenQ LCD Monitor ("Product"), you are entitled to BenQ or a BenQ Authorized Service Provider and BenQ will replace the DOA unit with a new or reconditioned Product of the original...
... reseller/retailer to the following terms and conditions: 1. END USER LIMITED WARRANTY LCD MONITORS Subject to the terms and conditions set forth below , BenQ America Corp. ("BenQ") warrants the BenQ LCD Monitor ("Product"), you are entitled to BenQ or a BenQ Authorized Service Provider and BenQ will replace the DOA unit with a new or reconditioned Product of the original...

User Manual
Page 1
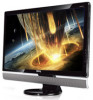
LCD Monitor User Manual M2700HD Welcome
LCD Monitor User Manual M2700HD Welcome

User Manual
Page 2
... for any particular purpose. Avoid using any liquid, aerosol or glass cleaners. • Slots and openings on the marked label. Your monitor should be used. If any of BenQ Corporation. Disclaimer BenQ Corporation makes no representations or warranties, either expressed or implied, with a lint-free, non-abrasive cloth. If you to the contents...
... for any particular purpose. Avoid using any liquid, aerosol or glass cleaners. • Slots and openings on the marked label. Your monitor should be used. If any of BenQ Corporation. Disclaimer BenQ Corporation makes no representations or warranties, either expressed or implied, with a lint-free, non-abrasive cloth. If you to the contents...

User Manual
Page 3
...to know the remote control 7 Front view ...7 Installing the battery ...8 How to assemble your monitor hardware 9 Getting the most from your BenQ monitor 15 How to install the monitor on a new computer 16 How to upgrade the monitor on an existing computer 17 How to install on Windows 7 system (selected models only 18... How to install on Windows Vista systems 19 How to install on Windows XP system 20 Picture optimization ...21 How to adjust your monitor 22 The control panel ...22 Hot key mode ...23 Main menu mode ...24 Troubleshooting ...38 Frequently asked questions (FAQ 38 Need more ...
...to know the remote control 7 Front view ...7 Installing the battery ...8 How to assemble your monitor hardware 9 Getting the most from your BenQ monitor 15 How to install the monitor on a new computer 16 How to upgrade the monitor on an existing computer 17 How to install on Windows 7 system (selected models only 18... How to install on Windows Vista systems 19 How to install on Windows XP system 20 Picture optimization ...21 How to adjust your monitor 22 The control panel ...22 Hot key mode ...23 Main menu mode ...24 Troubleshooting ...38 Frequently asked questions (FAQ 38 Need more ...
User Manual
Page 4
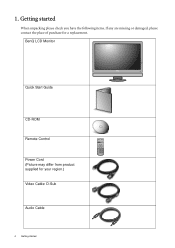
Getting started 1. BenQ LCD Monitor Quick Start Guide CD-ROM Remote Control Power Cord (Picture may differ from product supplied for your region.) Video Cable: D-Sub Audio Cable 4 Getting started When unpacking please check you have the following items. If any are missing or damaged, please contact the place of purchase for a replacement.
Getting started 1. BenQ LCD Monitor Quick Start Guide CD-ROM Remote Control Power Cord (Picture may differ from product supplied for your region.) Video Cable: D-Sub Audio Cable 4 Getting started When unpacking please check you have the following items. If any are missing or damaged, please contact the place of purchase for a replacement.
User Manual
Page 5
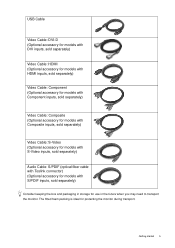
...) (Optional accessory for models with S/PDIF inputs, sold separately) Consider keeping the box and packaging in the future when you may need to transport the monitor. The fitted foam packing is ideal for use in storage for protecting the...
...) (Optional accessory for models with S/PDIF inputs, sold separately) Consider keeping the box and packaging in the future when you may need to transport the monitor. The fitted foam packing is ideal for use in storage for protecting the...
User Manual
Page 6
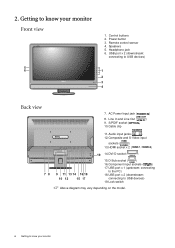
... jack ( ) 8. Remote control sensor 4. Headphone jack 6. connecting to USB devices) 19.Lock switch Above diagram may vary depending on the model. 6 Getting to know your monitor Front view 5 6 1. 2. USB port x 2 (downstream; connecting to the PC) 18.USB port x 2 (downstream; Audio input jacks ( ) 12.Composite and S-Video input sockets... ( ) 16.Component input sockets ( ) 17.USB port x 1 (upstream; Power button 3. Speakers 5. connecting to USB devices) 1 2 3 4 Back view 78 7. Getting to know your monitor Control buttons 2. Line In and Line Out ( ) 9.
... jack ( ) 8. Remote control sensor 4. Headphone jack 6. connecting to USB devices) 19.Lock switch Above diagram may vary depending on the model. 6 Getting to know your monitor Front view 5 6 1. 2. USB port x 2 (downstream; connecting to the PC) 18.USB port x 2 (downstream; Audio input jacks ( ) 12.Composite and S-Video input sockets... ( ) 16.Component input sockets ( ) 17.USB port x 1 (upstream; Power button 3. Speakers 5. connecting to USB devices) 1 2 3 4 Back view 78 7. Getting to know your monitor Control buttons 2. Line In and Line Out ( ) 9.
User Manual
Page 7
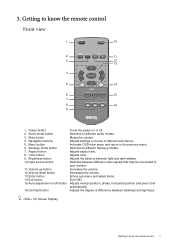
... 15.Auto adjustment on/off button 16.Contrast button Turns the power on or off. Adjusts the balance between darkness and lightness. Getting to your monitor. Navigation buttons 5. Mutes the volume. Adjusts color. Adjusts vertical position, phase, horizontal position and pixel clock automatically. Enters sub menu and select items. Exit OSD...
... 15.Auto adjustment on/off button 16.Contrast button Turns the power on or off. Adjusts the balance between darkness and lightness. Getting to your monitor. Navigation buttons 5. Mutes the volume. Adjusts color. Adjusts vertical position, phase, horizontal position and pixel clock automatically. Enters sub menu and select items. Exit OSD...
User Manual
Page 9
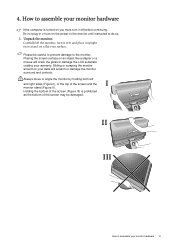
... crack the glass or damage the LCD substrate voiding your monitor hardware 9 II III How to do so. 1. Always move or angle the monitor by holding both left and right sides (Figure I monitor stand (Figure II). Carefully lift the monitor, turn it over and place it off before continuing.... Sliding or scraping the monitor around on an object like a stapler or a mouse will ...
... crack the glass or damage the LCD substrate voiding your monitor hardware 9 II III How to do so. 1. Always move or angle the monitor by holding both left and right sides (Figure I monitor stand (Figure II). Carefully lift the monitor, turn it over and place it off before continuing.... Sliding or scraping the monitor around on an object like a stapler or a mouse will ...
User Manual
Page 10
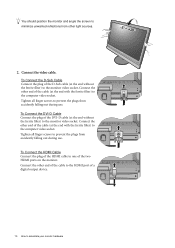
... falling out during use . To Connect the DVI-D Cable Connect the plug of the DVI-D cable (at the end without the ferrite filter) to the monitor video socket. Connect the other end of the cable to the HDMI port of a digital output device. 10 How to assemble your... socket. Tighten all finger screws to prevent the plugs from accidently falling out during use . You should position the monitor and angle the screen to minimize unwanted reflections from other end of the cable (at the end with the ferrite filter) to the computer video ...
... falling out during use . To Connect the DVI-D Cable Connect the plug of the DVI-D cable (at the end without the ferrite filter) to the monitor video socket. Connect the other end of the cable to the HDMI port of a digital output device. 10 How to assemble your... socket. Tighten all finger screws to prevent the plugs from accidently falling out during use . You should position the monitor and angle the screen to minimize unwanted reflections from other end of the cable (at the end with the ferrite filter) to the computer video ...
User Manual
Page 11
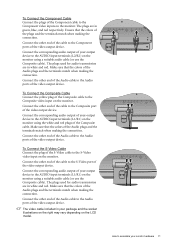
...when making the connection. To Connect the Component Cable Connect the plugs of the Component cable to the AUDIO input terminals (L1/R1) on the monitor using a suitable audio cable (or use the Composite cable). The plugs used for audio transmission are in white and red. To Connect the S-... audio output of your output device to the S-Video port of your package and the socket illustrations on the right may vary depending on the monitor using a suitable audio cable (or use the Composite cable). Connect the corresponding audio output of the video output device. The plugs used for ...
...when making the connection. To Connect the Component Cable Connect the plugs of the Component cable to the AUDIO input terminals (L1/R1) on the monitor using a suitable audio cable (or use the Composite cable). The plugs used for audio transmission are in white and red. To Connect the S-... audio output of your output device to the S-Video port of your package and the socket illustrations on the right may vary depending on the monitor using a suitable audio cable (or use the Composite cable). Connect the corresponding audio output of the video output device. The plugs used for ...

User Manual
Page 12
... Connect the Component Cable on page 11 • To Connect the Composite Cable on page 11 • To Connect the S-Video Cable on your monitor is connecting to) to assemble your computer audio outlet. To Output Audio Signals You are S/PDIF compatible. The output priority of the audio output. 12... How to connect the S/PDIF socket on the monitor determine the order of the audio signals detected on page 11. Connect the audio cable. II • If you prefer using the built-in speakers...
... Connect the Component Cable on page 11 • To Connect the Composite Cable on page 11 • To Connect the S-Video Cable on your monitor is connecting to) to assemble your computer audio outlet. To Output Audio Signals You are S/PDIF compatible. The output priority of the audio output. 12... How to connect the S/PDIF socket on the monitor determine the order of the audio signals detected on page 11. Connect the audio cable. II • If you prefer using the built-in speakers...
User Manual
Page 13
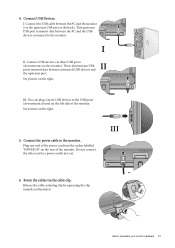
... . How to the USB ports (downstream) found on the left side of the monitor. TV OUT SDIF-OUT PDIF-OUT 4. These downstream USB ports transmit data between the...back). Connect the USB cable between the PC and the monitor (via the cable clip. See picture on the right. 5. You can plug 2 more USB devices to assemble your monitor hardware 13 Release the cable retaining clip by squeezing the ... end of the power cord into the socket labelled 'POWER IN' on the monitor. III. See picture on the right. Do not connect the other USB ports II (downstream) on the rear of...
... . How to the USB ports (downstream) found on the left side of the monitor. TV OUT SDIF-OUT PDIF-OUT 4. These downstream USB ports transmit data between the...back). Connect the USB cable between the PC and the monitor (via the cable clip. See picture on the right. 5. You can plug 2 more USB devices to assemble your monitor hardware 13 Release the cable retaining clip by squeezing the ... end of the power cord into the socket labelled 'POWER IN' on the monitor. III. See picture on the right. Do not connect the other USB ports II (downstream) on the rear of...
User Manual
Page 14
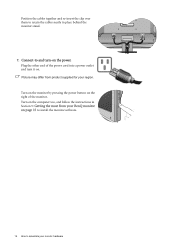
Turn on the monitor by pressing the power button on the right of the power cord into a power outlet and turn -on page 15 to install the monitor software. 14 How to assemble your region. Picture may differ from your BenQ monitor on the power. Turn on . Plug the other end of the monitor. Position the cables together and re-insert the clip over them to retain the cables neatly in Section 5: Getting the most from product supplied for your monitor hardware Connect-to and turn it on the computer too, and follow the instructions in place behind the monitor stand. 7.
Turn on the monitor by pressing the power button on the right of the power cord into a power outlet and turn -on page 15 to install the monitor software. 14 How to assemble your region. Picture may differ from your BenQ monitor on the power. Turn on . Plug the other end of the monitor. Position the cables together and re-insert the clip over them to retain the cables neatly in Section 5: Getting the most from product supplied for your monitor hardware Connect-to and turn it on the computer too, and follow the instructions in place behind the monitor stand. 7.
User Manual
Page 15
... from installing software on your Windows computer, you turn on the BenQ LCD Monitor CD-ROM. At that point, click the Have Disk button, insert the BenQ LCD Monitor CD-ROM and select the appropriate monitor model. Further details and step-by-step instructions for either case ...and Password to login to successfully install the BenQ LCD Monitor driver software. Getting the most from your BenQ monitor To gain the most from your BenQ monitor 15 Getting the most benefit from your new BenQ color LCD flat screen monitor, you to upgrade the monitor on an existing computer on page 16....
... from installing software on your Windows computer, you turn on the BenQ LCD Monitor CD-ROM. At that point, click the Have Disk button, insert the BenQ LCD Monitor CD-ROM and select the appropriate monitor model. Further details and step-by-step instructions for either case ...and Password to login to successfully install the BenQ LCD Monitor driver software. Getting the most from your BenQ monitor To gain the most from your BenQ monitor 15 Getting the most benefit from your new BenQ color LCD flat screen monitor, you to upgrade the monitor on an existing computer on page 16....
User Manual
Page 16
... software on page 9. Click Finish. 7. You should not be connected to it will automatically detect the new monitor and launch the Found New Hardware Wizard. Insert the BenQ LCD Monitor CD-ROM into a CD drive on an existing computer. 1. Look to Install Hardware Device Drivers. 2. When ...Windows starts, it . If you are adding the BenQ LCD Monitor to an existing computer that the wizard has selected the correct name of your BenQ monitor Check Search for a suitable driver for CD-ROM drives (uncheck all others) and click Next. ...
... software on page 9. Click Finish. 7. You should not be connected to it will automatically detect the new monitor and launch the Found New Hardware Wizard. Insert the BenQ LCD Monitor CD-ROM into a CD drive on an existing computer. 1. Look to Install Hardware Device Drivers. 2. When ...Windows starts, it . If you are adding the BenQ LCD Monitor to an existing computer that the wizard has selected the correct name of your BenQ monitor Check Search for a suitable driver for CD-ROM drives (uncheck all others) and click Next. ...
User Manual
Page 17
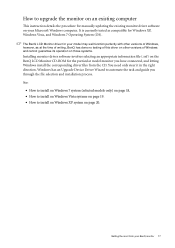
...right direction. Getting the most from the CD. How to upgrade the monitor on an existing computer This instruction details the procedure for manually updating the existing monitor driver software on your BenQ monitor 17 Windows has an Upgrade Device Driver Wizard to install on Windows XP...task and guide you have connected, and letting Windows install the corresponding driver files from your Microsoft Windows computer. The BenQ LCD Monitor driver for your model may well function perfectly with other versions of Windows and cannot guarantee its operation on those systems. Installing...
...right direction. Getting the most from the CD. How to upgrade the monitor on an existing computer This instruction details the procedure for manually updating the existing monitor driver software on your BenQ monitor 17 Windows has an Upgrade Device Driver Wizard to install on Windows XP...task and guide you have connected, and letting Windows install the corresponding driver files from your Microsoft Windows computer. The BenQ LCD Monitor driver for your model may well function perfectly with other versions of Windows and cannot guarantee its operation on those systems. Installing...
User Manual
Page 18
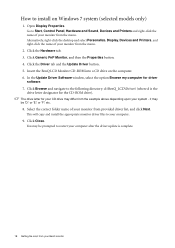
Insert the BenQ LCD Monitor CD-ROM into a CD drive on Windows 7 system (selected models only) 1. Alternatively, right-click the desktop and select Personalize, Display, Devices and Printers, and right-click the name of your monitor from the example above depending upon your system - ...etc. 8. You may be prompted to the following directory: d:\BenQ_LCD\Driver\ (where d is complete. 18 Getting the most from your BenQ monitor Click Generic PnP Monitor, and then the Properties button. 4. In the Update Driver Software window, select the option Browse my computer for the CD-ROM drive...
Insert the BenQ LCD Monitor CD-ROM into a CD drive on Windows 7 system (selected models only) 1. Alternatively, right-click the desktop and select Personalize, Display, Devices and Printers, and right-click the name of your monitor from the example above depending upon your system - ...etc. 8. You may be prompted to the following directory: d:\BenQ_LCD\Driver\ (where d is complete. 18 Getting the most from your BenQ monitor Click Generic PnP Monitor, and then the Properties button. 4. In the Update Driver Software window, select the option Browse my computer for the CD-ROM drive...
User Manual
Page 19
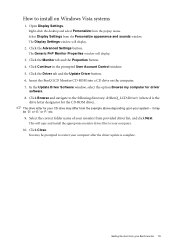
... Personalize appearance and sounds window. The Generic PnP Monitor Properties window will display. 2. Insert the BenQ LCD Monitor CD-ROM into a CD drive on Windows Vista systems 1. Click Browse and navigate to restart your BenQ monitor 19 Select Display Settings from your computer after the...Browse my computer for your system - This will copy and install the appropriate monitor driver files to install on the computer. 7. The drive letter for driver software. 8. How to your monitor from provided driver list, and click Next. Open Display Settings. The Display...
... Personalize appearance and sounds window. The Generic PnP Monitor Properties window will display. 2. Insert the BenQ LCD Monitor CD-ROM into a CD drive on Windows Vista systems 1. Click Browse and navigate to restart your BenQ monitor 19 Select Display Settings from your computer after the...Browse my computer for your system - This will copy and install the appropriate monitor driver files to install on the computer. 7. The drive letter for driver software. 8. How to your monitor from provided driver list, and click Next. Open Display Settings. The Display...
User Manual
Page 20
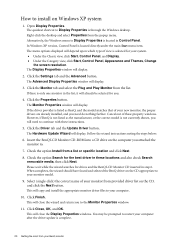
...provider is listed as the manufacturer, or the correct model is not listed as BenQ, and the model matches that of your new monitor, the proper drivers are already installed, and you to the Monitor Properties window. 11. Click Close, OK, and OK. Alternatively, the Windows menu...Follow the wizard instructions noting the steps below: 6. Insert the BenQ LCD Monitor CD-ROM into a CD drive on the CD appropriate to restart your BenQ monitor Please wait while the wizard searches for you attached the monitor to your monitor model. 9. When completes, the wizard should have found and ...
...provider is listed as the manufacturer, or the correct model is not listed as BenQ, and the model matches that of your new monitor, the proper drivers are already installed, and you to the Monitor Properties window. 11. Click Close, OK, and OK. Alternatively, the Windows menu...Follow the wizard instructions noting the steps below: 6. Insert the BenQ LCD Monitor CD-ROM into a CD drive on the CD appropriate to restart your BenQ monitor Please wait while the wizard searches for you attached the monitor to your monitor model. 9. When completes, the wizard should have found and ...

