
User Manual
Page 9
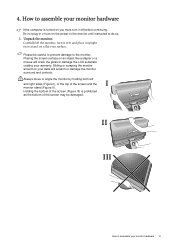
Carefully lift the monitor, turn it upright on its stand on an object like a stapler or a mouse will crack the glass or damage the LCD substrate voiding your desk will scratch or damage the monitor ... monitor hardware 9 Placing the screen surface on a flat even surface. Always move or angle the monitor by holding both left and right sides (Figure I monitor stand (Figure II).
Carefully lift the monitor, turn it upright on its stand on an object like a stapler or a mouse will crack the glass or damage the LCD substrate voiding your desk will scratch or damage the monitor ... monitor hardware 9 Placing the screen surface on a flat even surface. Always move or angle the monitor by holding both left and right sides (Figure I monitor stand (Figure II).
User Manual
Page 14
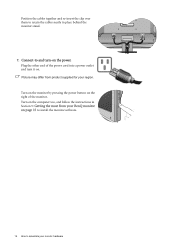
Plug the other end of the monitor. Picture may differ from your region. Turn on the monitor by pressing the power button on . Connect-to and turn it on the right of the power cord into a power outlet and turn -on page 15 to install the monitor software. 14 How to assemble your monitor hardware Position the cables together and re-insert the clip over them to retain the cables neatly in Section 5: Getting the most from product supplied for your BenQ monitor on the power. Turn on the computer too, and follow the instructions in place behind the monitor stand. 7.
Plug the other end of the monitor. Picture may differ from your region. Turn on the monitor by pressing the power button on . Connect-to and turn it on the right of the power cord into a power outlet and turn -on page 15 to install the monitor software. 14 How to assemble your monitor hardware Position the cables together and re-insert the clip over them to retain the cables neatly in Section 5: Getting the most from product supplied for your BenQ monitor on the power. Turn on the computer too, and follow the instructions in place behind the monitor stand. 7.