User Manual
Page 5
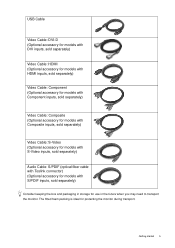
Getting started 5 The fitted foam packing is ideal for use in storage for protecting the monitor during transport. USB Cable Video Cable: DVI-D (Optional accessory for models with DVI inputs, sold separately) Video Cable: HDMI (Optional accessory for models with HDMI inputs, sold separately) ...
Getting started 5 The fitted foam packing is ideal for use in storage for protecting the monitor during transport. USB Cable Video Cable: DVI-D (Optional accessory for models with DVI inputs, sold separately) Video Cable: HDMI (Optional accessory for models with HDMI inputs, sold separately) ...
User Manual
Page 6
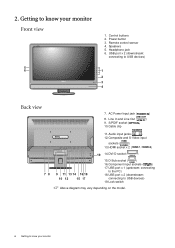
...) 19.Lock switch Above diagram may vary depending on the model. 6 Getting to know your monitor Front view 5 6 1. USB port x 2 (downstream; Control buttons 2. 2. Remote control sensor 4. Line In and Line Out ( ) 9. Audio input jacks ( ) 12.Composite and S-Video input sockets ( ) 13.HDMI socket x 2 ( / ) 9 11... 13 14 16 18 10 12 15 17 19 14.DVI-D socket ( ) 15.D-Sub socket ( ) 16.Component input sockets ( ) 17.USB port x 1 (upstream; Power button 3. AC Power Input jack ( ) 8. Getting to know your monitor
...) 19.Lock switch Above diagram may vary depending on the model. 6 Getting to know your monitor Front view 5 6 1. USB port x 2 (downstream; Control buttons 2. 2. Remote control sensor 4. Line In and Line Out ( ) 9. Audio input jacks ( ) 12.Composite and S-Video input sockets ( ) 13.HDMI socket x 2 ( / ) 9 11... 13 14 16 18 10 12 15 17 19 14.DVI-D socket ( ) 15.D-Sub socket ( ) 16.Component input sockets ( ) 17.USB port x 1 (upstream; Power button 3. AC Power Input jack ( ) 8. Getting to know your monitor
User Manual
Page 13
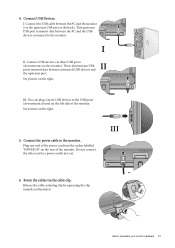
.... TV OUT SDIF-OUT PDIF-OUT 4. I . See picture on the left side of the monitor. Do not connect the other USB ports II (downstream) on the monitor. See picture on the rear of the power cord into the socket labelled 'POWER IN' on the right. 5. Plug ...one end of the monitor. Connect USB devices via other end to the USB ports (downstream) found on the right. Release the cable retaining clip by squeezing the clip inwards as illustrated. III 6. I II.
.... TV OUT SDIF-OUT PDIF-OUT 4. I . See picture on the left side of the monitor. Do not connect the other USB ports II (downstream) on the monitor. See picture on the rear of the power cord into the socket labelled 'POWER IN' on the right. 5. Plug ...one end of the monitor. Connect USB devices via other end to the USB ports (downstream) found on the right. Release the cable retaining clip by squeezing the clip inwards as illustrated. III 6. I II.

User Manual
Page 39
... connected. To have the optimal display performance of each type of the connected speakers) is properly connected. • If the external speakers are USB-powered, check whether the USB connection is OK. • Increase the volume (volume may be heard from the connected external speakers: • Remove your headphone and/or external...
... connected. To have the optimal display performance of each type of the connected speakers) is properly connected. • If the external speakers are USB-powered, check whether the USB connection is OK. • Increase the volume (volume may be heard from the connected external speakers: • Remove your headphone and/or external...

User Manual
Page 40
If your problems remain after checking this manual, please contact your place of purchase or e-mail us at: Support@BenQ.com. 40 Troubleshooting Need more help? USB devices are not working: • Check whether upstream and downstream USB are properly connected. • Install a corresponding USB device driver if available.
If your problems remain after checking this manual, please contact your place of purchase or e-mail us at: Support@BenQ.com. 40 Troubleshooting Need more help? USB devices are not working: • Check whether upstream and downstream USB are properly connected. • Install a corresponding USB device driver if available.
