
Operating Guide
Page 1
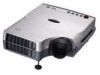
... (6) Mouse emulation (7) Complies with VESA DDC1/2B specifications English I Outline This DLP™ Technology Projector can display various computer signals and NTSC/PAL/SECAM video signals. Features (1) High brightness (2) High resolution (3) Compact size, light weight for future reference. Digital Multimedia Projector PalmPro 7763PA/65PA OPERATING GUIDE Thank you very much for purchasing this operating guide...
... (6) Mouse emulation (7) Complies with VESA DDC1/2B specifications English I Outline This DLP™ Technology Projector can display various computer signals and NTSC/PAL/SECAM video signals. Features (1) High brightness (2) High resolution (3) Compact size, light weight for future reference. Digital Multimedia Projector PalmPro 7763PA/65PA OPERATING GUIDE Thank you very much for purchasing this operating guide...
Operating Guide
Page 2
... SAVE THESE INSTRUCTIONS FOR FUTURE REFERENCE . Read all of such revision or changes. All rights reserved. Monitor Information Product Name: 7763PA/65PA Serial Number: record the The serial following number is in the space below. Never replace lamp assembly or any means, electronic...and specifically disclaims any warranties, merchantability or fitness for replacement. The product may damage the components inside and will void your projector and save for approximately 45 minutes prior to the product. makes no representations or warranties, either expressed or implied, with...
... SAVE THESE INSTRUCTIONS FOR FUTURE REFERENCE . Read all of such revision or changes. All rights reserved. Monitor Information Product Name: 7763PA/65PA Serial Number: record the The serial following number is in the space below. Never replace lamp assembly or any means, electronic...and specifically disclaims any warranties, merchantability or fitness for replacement. The product may damage the components inside and will void your projector and save for approximately 45 minutes prior to the product. makes no representations or warranties, either expressed or implied, with...

Operating Guide
Page 3
6. The light beam may injure your eyes. Please use suitable equipment for about 1 minute after the projector has been powered off. Please do not unplug the power cord until the fan stops. 10. For ventilation reasons, the fan continues to operate ... 7. Do not look straight at two sides are for ceiling mount configurations. English III This product is securely installed. 8. Openings in front or at the projector lens during presentations. They must not be blocked or covered. 9. The Standard Remote Control contains a low-power laser that acts as a pointing device during ...
6. The light beam may injure your eyes. Please use suitable equipment for about 1 minute after the projector has been powered off. Please do not unplug the power cord until the fan stops. 10. For ventilation reasons, the fan continues to operate ... 7. Do not look straight at two sides are for ceiling mount configurations. English III This product is securely installed. 8. Openings in front or at the projector lens during presentations. They must not be blocked or covered. 9. The Standard Remote Control contains a low-power laser that acts as a pointing device during ...
Operating Guide
Page 4
.../Power Book .... 8 Operation 9 Turn On/Off Procedure 9 A Power on 9 B Standby 9 External Control 10 A Control Pad 10 B Remote Control 12 Usage and Replacement of Contents Introduction 1 Projector Features 1 Description 2 A FRONT (figure 2 B REAR (figure 2 C BOTTOM (figure 4 Installation 4 A. Positioning 4 B. Table of Lamp 14 A Lamp/temperature Status LED Indicator 15 B Replacing the Lamp 17 OSD...
.../Power Book .... 8 Operation 9 Turn On/Off Procedure 9 A Power on 9 B Standby 9 External Control 10 A Control Pad 10 B Remote Control 12 Usage and Replacement of Contents Introduction 1 Projector Features 1 Description 2 A FRONT (figure 2 B REAR (figure 2 C BOTTOM (figure 4 Installation 4 A. Positioning 4 B. Table of Lamp 14 A Lamp/temperature Status LED Indicator 15 B Replacing the Lamp 17 OSD...

Operating Guide
Page 5
... not require complicated adjustments in order to present clear compression SVGA/XGA images without line omission. It helps you go with a geometric effect that increases light usage efficiency. English 1 1 Introduction Projector Features A Image Resolution Fully compatible with OSD operation in ... light usage efficiency we can detect display signals from PCs. C Portability This projector has a sophisticated shape, like that is extremely compact and lightweight. F Auto Detect System This projector can better reproduce the three basic colors (RGB) required for color reproduction on...
... not require complicated adjustments in order to present clear compression SVGA/XGA images without line omission. It helps you go with a geometric effect that increases light usage efficiency. English 1 1 Introduction Projector Features A Image Resolution Fully compatible with OSD operation in ... light usage efficiency we can detect display signals from PCs. C Portability This projector has a sophisticated shape, like that is extremely compact and lightweight. F Auto Detect System This projector can better reproduce the three basic colors (RGB) required for color reproduction on...
Operating Guide
Page 6
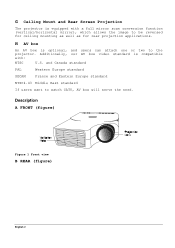
and Canada standard PAL Western Europe standard SECAM France and Eastern Europe standard NTSC4.43 Middle East standard If users want to the projector. H AV box An AV box is optional, and users can attach one or two to watch CATV, AV box will serve the need. ...Description A FRONT (figure) Figure 1 Front view B REAR (figure) English 2 G Ceiling Mount and Rear Screen Projection The projector is compatible with a full mirror scan conversion function (vertical/horizontal mirror), which allows the image to be reversed for ceiling mounting as well as for...
and Canada standard PAL Western Europe standard SECAM France and Eastern Europe standard NTSC4.43 Middle East standard If users want to the projector. H AV box An AV box is optional, and users can attach one or two to watch CATV, AV box will serve the need. ...Description A FRONT (figure) Figure 1 Front view B REAR (figure) English 2 G Ceiling Mount and Rear Screen Projection The projector is compatible with a full mirror scan conversion function (vertical/horizontal mirror), which allows the image to be reversed for ceiling mounting as well as for...
Operating Guide
Page 8
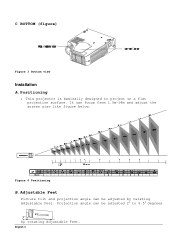
Projection angle can be adjusted by rotating Adjustable Feet. English 4 It can be adjusted 2 to project on a flat projection surface. Adjustable Feet Picture tilt and projection angle can focus from 1.5m-14m and adjust the screen size like figure below. Figure 4 Positioning B. Positioning • This projector is basically designed to 8.5 degrees by twisting Adjustable Feet. C BOTTOM (figure) Figure 3 Bottom view Installation A.
Projection angle can be adjusted by rotating Adjustable Feet. English 4 It can be adjusted 2 to project on a flat projection surface. Adjustable Feet Picture tilt and projection angle can focus from 1.5m-14m and adjust the screen size like figure below. Figure 4 Positioning B. Positioning • This projector is basically designed to 8.5 degrees by twisting Adjustable Feet. C BOTTOM (figure) Figure 3 Bottom view Installation A.
Operating Guide
Page 9
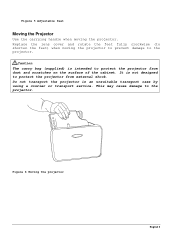
... external shock. This may cause damage to shorten the feet) when moving the projector. Figure 5 Adjustable feet Moving the Projector Use the carrying handle when moving the projector to prevent damage to the projector. Do not transport the projector in an unsuitable transport case by using a courier or transport service. Replace the lens cover and...
... external shock. This may cause damage to shorten the feet) when moving the projector. Figure 5 Adjustable feet Moving the Projector Use the carrying handle when moving the projector to prevent damage to the projector. Do not transport the projector in an unsuitable transport case by using a courier or transport service. Replace the lens cover and...

Operating Guide
Page 11
Connection A Connecting the Projector to Computer/Notebook 2 Figure 8 Connection to PC Figure 9 Connection to notebook English 7
Connection A Connecting the Projector to Computer/Notebook 2 Figure 8 Connection to PC Figure 9 Connection to notebook English 7

Operating Guide
Page 12
B Connecting the Projector to Macintosh/Power Book Figure 10 Connection to Macintosh Figure 11 Connection to Power Book English 8
B Connecting the Projector to Macintosh/Power Book Figure 10 Connection to Macintosh Figure 11 Connection to Power Book English 8

Operating Guide
Page 13
... *Lamp Protection Procedure: If you try to turn on the screen if there is blinking, the projector will ignore the command until it has cooled down , but the fan will be displayed on the ...screen if the horizontal frequency of the input signal exceeds the range of the projector. "INPUT SIGNAL DETECTED, ACTIVATING AUTO IMAGE" will continue to run for about 1 minute to cool the... one minute. "SYNC IS OUT OF RANGE" message will be displayed on the screen after the projector has identified the input signal; The LED will shut down for 2 seconds to turn on the ...
... *Lamp Protection Procedure: If you try to turn on the screen if there is blinking, the projector will ignore the command until it has cooled down , but the fan will be displayed on the ...screen if the horizontal frequency of the input signal exceeds the range of the projector. "INPUT SIGNAL DETECTED, ACTIVATING AUTO IMAGE" will continue to run for about 1 minute to cool the... one minute. "SYNC IS OUT OF RANGE" message will be displayed on the screen after the projector has identified the input signal; The LED will shut down for 2 seconds to turn on the ...

Operating Guide
Page 17
... you to operate the function keys on -screen menus are not active, it registers Click a right mouse click. When the on the projector and to emulate mouse function when the projector is displayed by pressing the "+" or "-" button. To enter sub pages. To select items. Blank The blank screen is connected to...
... you to operate the function keys on -screen menus are not active, it registers Click a right mouse click. When the on the projector and to emulate mouse function when the projector is displayed by pressing the "+" or "-" button. To enter sub pages. To select items. Blank The blank screen is connected to...

Operating Guide
Page 20
...too hot to operate safely, the LED will light when the lamp becomes too hot. Turn off , it means the lamp and temperature inside the projector are normal. If the indicator is not attached properly. 3. Caution: The lamp indicator will blink slowly for 45 minutes, then turn off automatically. 4.... Lamp is not well attached If the LED blinks rapidly, it on again. Temperature is too high If the projector's internal temperature is off the power and let the projector cool for one minute and then the lamp will turn it indicates that the lamp is still shining, contact your dealer....
...too hot to operate safely, the LED will light when the lamp becomes too hot. Turn off , it means the lamp and temperature inside the projector are normal. If the indicator is not attached properly. 3. Caution: The lamp indicator will blink slowly for 45 minutes, then turn off automatically. 4.... Lamp is not well attached If the LED blinks rapidly, it on again. Temperature is too high If the projector's internal temperature is off the power and let the projector cool for one minute and then the lamp will turn it indicates that the lamp is still shining, contact your dealer....

Operating Guide
Page 21
...power cord from the outlet and ask your hand into the box after the lamp has been removed. (There are optical parts inside of the projector may explode if improperly handled. Wait for example, an explosive sound is replaced, reset the total operation time of the lamp. English 17 iii.... Turn the main power switch off the projector and unplug the AC cord. Loose screws could result in color unevenness, etc.) Replace the lamp with local authorities. • As the lamp is...
...power cord from the outlet and ask your hand into the box after the lamp has been removed. (There are optical parts inside of the projector may explode if improperly handled. Wait for example, an explosive sound is replaced, reset the total operation time of the lamp. English 17 iii.... Turn the main power switch off the projector and unplug the AC cord. Loose screws could result in color unevenness, etc.) Replace the lamp with local authorities. • As the lamp is...
Operating Guide
Page 26
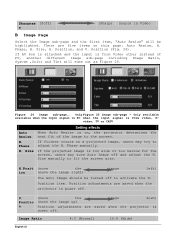
... flicker occurs on a projected image, users may turn Auto Image off . Phase manually. Size manually to activate the H. Position adjustments are saved when the projector is power off and adjust the H. Image Ratio 4:3 (Normal) 16:9 (Wide) English 22 If AV box is attached and the input is from video... H. Positio n (move the (move the image right) image left) The Auto Image should be highlighted. There are five items on , the projector determines the best fit of PC, another different Image sub-page including Image Ratio, System ,Color and Tint will be turned off . Figure 24 ...
... flicker occurs on a projected image, users may turn Auto Image off . Phase manually. Size manually to activate the H. Position adjustments are saved when the projector is power off and adjust the H. Image Ratio 4:3 (Normal) 16:9 (Wide) English 22 If AV box is attached and the input is from video... H. Positio n (move the (move the image right) image left) The Auto Image should be highlighted. There are five items on , the projector determines the best fit of PC, another different Image sub-page including Image Ratio, System ,Color and Tint will be turned off . Figure 24 ...
Operating Guide
Page 27
... Setting effects To reset display, image and control settings to turn the power off after you can select desired video systems. When selecting system, the projector will detect the selected system simultaneously, and the OSD will automatically detect the video system. To select, use "3" (KEYSTONE-) or "4" (KEYSTONE+)... time of lamp from this item after the start up screen is displayed and no signal is detected or sync is attached, the projector will still exit on this item. The default setting of range. System Color Tint To select the input video system standard. When an...
... Setting effects To reset display, image and control settings to turn the power off after you can select desired video systems. When selecting system, the projector will detect the selected system simultaneously, and the OSD will automatically detect the video system. To select, use "3" (KEYSTONE-) or "4" (KEYSTONE+)... time of lamp from this item after the start up screen is displayed and no signal is detected or sync is attached, the projector will still exit on this item. The default setting of range. System Color Tint To select the input video system standard. When an...
Operating Guide
Page 28
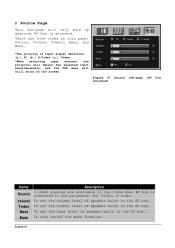
... five items on this page: Source, Volume, Treble, Bass, and Mute. *The priority of input signal detection: (a.) PC (b.) S-Video (c.) Video *When selecting input sources, the projector will detect the selected input simultaneously, and the OSD menu will only show up whenever AV box is connected to the... projector: PC, Video, S-video To set the treble level of speaker built in the items when AV box is attached. To turn on/off the mute ...
... five items on this page: Source, Volume, Treble, Bass, and Mute. *The priority of input signal detection: (a.) PC (b.) S-Video (c.) Video *When selecting input sources, the projector will detect the selected input simultaneously, and the OSD menu will only show up whenever AV box is connected to the... projector: PC, Video, S-video To set the treble level of speaker built in the items when AV box is attached. To turn on/off the mute ...
Operating Guide
Page 29
... lower right of the screen for 3 seconds during the freeze function. The OSD message below . If users connect the PS2 (ADB) mouse cable on the projector with the PC/Notebook (Macintosh/ Powerbook) mouse port, the disk pad will be an OSD message as a PC/Notebook (Macintosh/ Powerbook) mouse. Other Correspondent Remote...
... lower right of the screen for 3 seconds during the freeze function. The OSD message below . If users connect the PS2 (ADB) mouse cable on the projector with the PC/Notebook (Macintosh/ Powerbook) mouse port, the disk pad will be an OSD message as a PC/Notebook (Macintosh/ Powerbook) mouse. Other Correspondent Remote...
Operating Guide
Page 31
Wait two minutes after the projector has been turned off before turning the projector back on the screen. Adjust the brightness and contrast. Reposition the unit to improve its angle on . Select the correct video system. English 27 ... 3. Apply a non-abrasive camera lens cleaner to clean the projection lens: 1. Lightly wipe the clean cloth over the lens. 4. Affix the lens cover whenever the projector is within 4 meters (13 feet) of the lens. Adjust brightness, contrast, or saturation. Reposition the unit to improve its screen angle. Ensure the distance between...
Wait two minutes after the projector has been turned off before turning the projector back on the screen. Adjust the brightness and contrast. Reposition the unit to improve its angle on . Select the correct video system. English 27 ... 3. Apply a non-abrasive camera lens cleaner to clean the projection lens: 1. Lightly wipe the clean cloth over the lens. 4. Affix the lens cover whenever the projector is within 4 meters (13 feet) of the lens. Adjust brightness, contrast, or saturation. Reposition the unit to improve its screen angle. Ensure the distance between...

Operating Guide
Page 35
... attach the AV box to fit the unit and, meanwhile, insert the box plug into the correspondent jack or port to perform 4. Plug in the projector. 2. Select inputs by pressing "Source" key, and select channel by the channel up or down keys. Figure31 Connecting the Box English 31
... attach the AV box to fit the unit and, meanwhile, insert the box plug into the correspondent jack or port to perform 4. Plug in the projector. 2. Select inputs by pressing "Source" key, and select channel by the channel up or down keys. Figure31 Connecting the Box English 31


