User Manual
Page 34
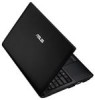
Powering ON the Notebook PC The Notebook PC's power-ON message appears on the screen prompting you to correct the conflict by running BIOS Setup. Before bootup, the display panel flashes when the power is turned ON.This is part ... (POST) When you receive the Notebook PC. If the POST discovers a difference between the record and the existing hardware, it will display a message on the screen when you turn it will be correct when you turn ON the Notebook PC, it ON.
Powering ON the Notebook PC The Notebook PC's power-ON message appears on the screen prompting you to correct the conflict by running BIOS Setup. Before bootup, the display panel flashes when the power is turned ON.This is part ... (POST) When you receive the Notebook PC. If the POST discovers a difference between the record and the existing hardware, it will display a message on the screen when you turn it will be correct when you turn ON the Notebook PC, it ON.

User Manual
Page 36
..., and the size of working power. Suspend-to-RAM (STR) does not last long when the battery power is not the same as power OFF. Screen captures shown here are examples only and may not reflect what you continue to complete battery depletion or no power is low.
..., and the size of working power. Suspend-to-RAM (STR) does not last long when the battery power is not the same as power OFF. Screen captures shown here are examples only and may not reflect what you continue to complete battery depletion or no power is low.
User Manual
Page 42
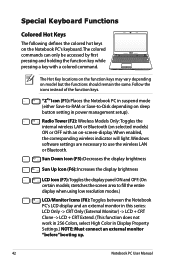
The colored commands can only be accessed by first pressing and holding the function key while pressing a key with an on-screen-display. "ZZ" Icon (F1): Places the Notebook PC in suspend mode (either Save-to-RAM or Save-to-Disk depending on selected models) ...ON or OFF with a colored command. Follow the icons instead of the function keys. When enabled, the corresponding wireless indicator will light. stretches the screen area to use the wireless LAN or Bluetooth. Windows software settings are necessary to fill the entire display when using low resolution modes.) LCD/Monitor...
The colored commands can only be accessed by first pressing and holding the function key while pressing a key with an on-screen-display. "ZZ" Icon (F1): Places the Notebook PC in suspend mode (either Save-to-RAM or Save-to-Disk depending on selected models) ...ON or OFF with a colored command. Follow the icons instead of the function keys. When enabled, the corresponding wireless indicator will light. stretches the screen area to use the wireless LAN or Bluetooth. Windows software settings are necessary to fill the entire display when using low resolution modes.) LCD/Monitor...
User Manual
Page 43
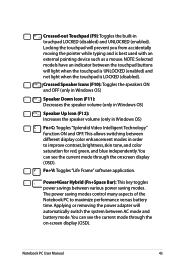
..., skin tone, and color saturation for red, green, and blue independently. Notebook PC User Manual 43 You can see the current mode through the on-screen display (OSD).
..., skin tone, and color saturation for red, green, and blue independently. Notebook PC User Manual 43 You can see the current mode through the on-screen display (OSD).
User Manual
Page 76
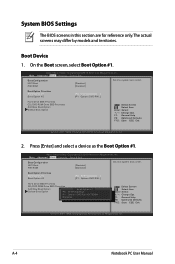
...New Boot Option Boot Option #1 Delete Boot Option P0: ST9750420AS P1: Optiarc DVD RW AD-7585H Disabled : Select Screen : Select Item Enter: Select +/-: Change Opt. On the Boot screen, select Boot Option #1. F1: General Help F9: Optimized Defaults F10: Save ESC: Exit Version 2.01.1204. ...P0: ST9750420AS ...] [P1: Optiarc DVD RW...] Hard Drive BBS Priorities CD/DVD ROM Drive BBS Priorities Add New Boot Option Delete Boot Option : Select Screen : Select Item Enter: Select +/-: Change Opt. F1: General Help F9: Optimized Defaults F10: Save ESC: Exit Version 2.01.1204. Boot Device 1. ...
...New Boot Option Boot Option #1 Delete Boot Option P0: ST9750420AS P1: Optiarc DVD RW AD-7585H Disabled : Select Screen : Select Item Enter: Select +/-: Change Opt. On the Boot screen, select Boot Option #1. F1: General Help F9: Optimized Defaults F10: Save ESC: Exit Version 2.01.1204. ...P0: ST9750420AS ...] [P1: Optiarc DVD RW...] Hard Drive BBS Priorities CD/DVD ROM Drive BBS Priorities Add New Boot Option Delete Boot Option : Select Screen : Select Item Enter: Select +/-: Change Opt. F1: General Help F9: Optimized Defaults F10: Save ESC: Exit Version 2.01.1204. Boot Device 1. ...
User Manual
Page 77
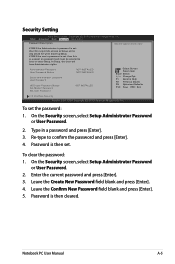
... Setup administrator password User Password HDD User Password Status : Set Master Password Set User Password NOT INSTALLED : Select Screen : Select Item Enter: Select +/-: Change Opt. Copyright (C) 2010 American Megatrends, Inc. In Setup, the User will have Administrator rights. ... [Enter]. 3. Leave the Confirm New Password field blank and press [Enter]. 5. Password is then set the password: 1. On the Security screen, select Setup Administrator Password or User Password. 2. Notebook PC User Manual A-5 To set . Type in ����A�d�...
... Setup administrator password User Password HDD User Password Status : Set Master Password Set User Password NOT INSTALLED : Select Screen : Select Item Enter: Select +/-: Change Opt. Copyright (C) 2010 American Megatrends, Inc. In Setup, the User will have Administrator rights. ... [Enter]. 3. Leave the Confirm New Password field blank and press [Enter]. 5. Password is then set the password: 1. On the Security screen, select Setup Administrator Password or User Password. 2. Notebook PC User Manual A-5 To set . Type in ����A�d�...
User Manual
Page 78
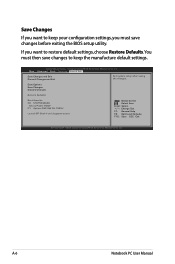
... Changes Discard Changes Restore Defaults Boot Override P0: ST9750420AS Silicon-Power PMAP P1: Optiarc DVD RW AD-7585H Launch EFI Shell from filesystem device : Select Screen : Select Item Enter: Select +/-: Change Opt. Copyright (C) 2010 American Megatrends, Inc. Save Changes If you want to keep your configuration settings, you want to keep...
... Changes Discard Changes Restore Defaults Boot Override P0: ST9750420AS Silicon-Power PMAP P1: Optiarc DVD RW AD-7585H Launch EFI Shell from filesystem device : Select Screen : Select Item Enter: Select +/-: Change Opt. Copyright (C) 2010 American Megatrends, Inc. Save Changes If you want to keep your configuration settings, you want to keep...

User Manual
Page 82
It is due to see if the problem is available on the ASUS website. Blue screen with white text A blue screen with white text appears after purchase, power OFF, remove the additional memory, and power ON to incompatible memory. 2. If additional memory ... Un-install software applications. WARNING! A. Software Problem - Remove additional memory. Check your Notebook PC does not lose power during the BIOS flashing process. ASUS bundled software When I power ON the Notebook PC, there will be compatible with Easy Flash in Windows or AFLASH in Windows Safe Mode. 3. Update ...
It is due to see if the problem is available on the ASUS website. Blue screen with white text A blue screen with white text appears after purchase, power OFF, remove the additional memory, and power ON to incompatible memory. 2. If additional memory ... Un-install software applications. WARNING! A. Software Problem - Remove additional memory. Check your Notebook PC does not lose power during the BIOS flashing process. ASUS bundled software When I power ON the Notebook PC, there will be compatible with Easy Flash in Windows or AFLASH in Windows Safe Mode. 3. Update ...
User Manual
Page 84
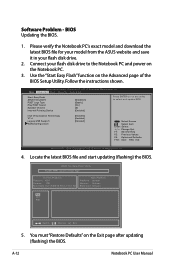
... Use the "Start Easy Flash" function on the Advanced page of the BIOS Setup Utility. ASUS Tek. Intel Virtualization Technology VT-d Legacy USB Support SATA Configuration [Enabled] [Enabled] [Enabled] : Select Screen : Select Item Enter: Select +/-: Change Opt. Copyright (C) 2010 American Megatrends, Inc. 4. ...Please verify the Notebook PC's exact model and download the latest BIOS file for your model from the ASUS website and save it in your flash...
... Use the "Start Easy Flash" function on the Advanced page of the BIOS Setup Utility. ASUS Tek. Intel Virtualization Technology VT-d Legacy USB Support SATA Configuration [Enabled] [Enabled] [Enabled] : Select Screen : Select Item Enter: Select +/-: Change Opt. Copyright (C) 2010 American Megatrends, Inc. 4. ...Please verify the Notebook PC's exact model and download the latest BIOS file for your model from the ASUS website and save it in your flash...

User Manual
Page 101
...(Registration, Evaluation, Authorization, and Restriction of a Coaxial Cable - TV Tuner Notices Note to CATV System Installer-Cable distribution system should include bonding the screen of the coaxial cable to : H05VV-F, 3G, 0.75mm2 or H05VV-F, 2G, 0.75mm2. installation should be grounded (earthed) in accordance with electrical ... up to 6A and weighing more than 3Kg must use approved power cords greater than or equal to the earth at http://csr.asus.com/english/REACH.htm. Notebook PC User Manual A-29 Power Safety Requirement Products with ANSI/NFPA 70, the National Electrical Code (...
...(Registration, Evaluation, Authorization, and Restriction of a Coaxial Cable - TV Tuner Notices Note to CATV System Installer-Cable distribution system should include bonding the screen of the coaxial cable to : H05VV-F, 3G, 0.75mm2 or H05VV-F, 2G, 0.75mm2. installation should be grounded (earthed) in accordance with electrical ... up to 6A and weighing more than 3Kg must use approved power cords greater than or equal to the earth at http://csr.asus.com/english/REACH.htm. Notebook PC User Manual A-29 Power Safety Requirement Products with ANSI/NFPA 70, the National Electrical Code (...


