User Manual
Page 34
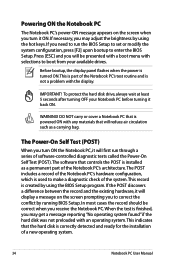
... is not a problem with an operating system. This record is installed as a carrying bag. In most cases the record should be presented with a boot menu with any materials that controls the POST is created by using the hot keys. WARNING! If the POST discovers a difference between the record and... system found" if the hard disk was not preloaded with the display. This indicates that the hard disk is powered ON with selections to boot from your Notebook PC before turning it back ON. Powering ON the Notebook PC The Notebook PC's power-ON message appears on the screen...
... is not a problem with an operating system. This record is installed as a carrying bag. In most cases the record should be presented with a boot menu with any materials that controls the POST is created by using the hot keys. WARNING! If the POST discovers a difference between the record and... system found" if the hard disk was not preloaded with the display. This indicates that the hard disk is powered ON with selections to boot from your Notebook PC before turning it back ON. Powering ON the Notebook PC The Notebook PC's power-ON message appears on the screen...
User Manual
Page 42
...-Disk depending on the Notebook PC's keyboard. "ZZ" Icon (F1): Places the Notebook PC in Display Property Settings.) NOTE: Must connect an external monitor "before" booting up. 42 Notebook PC User Manual Sun Down Icon (F5): Decreases the display brightness Sun Up Icon (F6): Increases the display brightness LCD Icon (F7...
...-Disk depending on the Notebook PC's keyboard. "ZZ" Icon (F1): Places the Notebook PC in Display Property Settings.) NOTE: Must connect an external monitor "before" booting up. 42 Notebook PC User Manual Sun Down Icon (F5): Decreases the display brightness Sun Up Icon (F6): Increases the display brightness LCD Icon (F7...
User Manual
Page 76
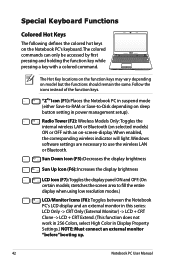
...Enter: Select +/-: Change Opt. F1: General Help F9: Optimized Defaults F10: Save ESC: Exit Version 2.01.1204. On the Boot screen, select Boot Option #1. F1: General Help F9: Optimized Defaults F10: Save ESC: Exit Version 2.01.1204. Copyright (C) 2010 American Megatrends, ...;a�n��c�e�d� Boot Security Save & Exit Boot Configuration UEFI Boot PXE ROM [Disabled] [Disabled] Set the system boot order. A-4 Notebook PC User Manual Press [Enter] and select a device as the Boot Option #1. Boot Device 1. Aptio Setup Utility - System...
...Enter: Select +/-: Change Opt. F1: General Help F9: Optimized Defaults F10: Save ESC: Exit Version 2.01.1204. On the Boot screen, select Boot Option #1. F1: General Help F9: Optimized Defaults F10: Save ESC: Exit Version 2.01.1204. Copyright (C) 2010 American Megatrends, ...;a�n��c�e�d� Boot Security Save & Exit Boot Configuration UEFI Boot PXE ROM [Disabled] [Disabled] Set the system boot order. A-4 Notebook PC User Manual Press [Enter] and select a device as the Boot Option #1. Boot Device 1. Aptio Setup Utility - System...
User Manual
Page 77
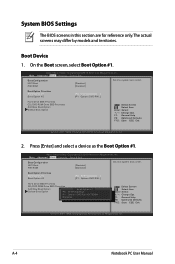
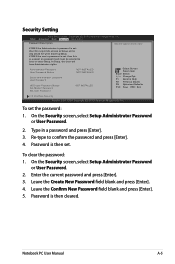
...;�v�a�n�c�e�d����B�o��o�t Security Save & Exit Password Description Set the system boot order. In Setup, the User will have Administrator rights. On the Security screen, select Setup Administrator Password or User Password. 2....Administrator's password is set , then this only limits access to Setup and is then set the password: 1. To set . Re-type to boot or enter Setup. Password is a power on password and must be entered to confirm the password and press [Enter]. 4. On the Security...
...;�v�a�n�c�e�d����B�o��o�t Security Save & Exit Password Description Set the system boot order. In Setup, the User will have Administrator rights. On the Security screen, select Setup Administrator Password or User Password. 2....Administrator's password is set , then this only limits access to Setup and is then set the password: 1. To set . Re-type to boot or enter Setup. Password is a power on password and must be entered to confirm the password and press [Enter]. 4. On the Security...
User Manual
Page 78
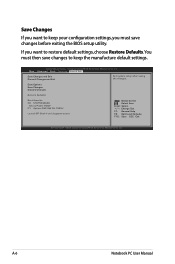
... before exiting the BIOS setup utility. You must save changes to restore default settings, choose Restore Defaults. Save Options Save Changes Discard Changes Restore Defaults Boot Override P0: ST9750420AS Silicon-Power PMAP P1: Optiarc DVD RW AD-7585H Launch EFI Shell from filesystem device : Select Screen : Select Item Enter: Select +/-: Change...
... before exiting the BIOS setup utility. You must save changes to restore default settings, choose Restore Defaults. Save Options Save Changes Discard Changes Restore Defaults Boot Override P0: ST9750420AS Silicon-Power PMAP P1: Optiarc DVD RW AD-7585H Launch EFI Shell from filesystem device : Select Screen : Select Item Enter: Select +/-: Change...
User Manual
Page 84
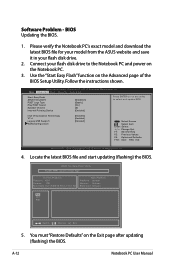
...on the Notebook PC. 3. Copyright (C) 2010 American Megatrends, Inc. �M���a��i�n� Advanced Boot Security Save & Exit Start Easy Flash ASUS FancyStart POST Logo Type Play POST Sound Speaker Volume Internal Pointing Device [Disabled] [Static] [No] [4] [Enabled] Press.... 1. Software Problem - Please verify the Notebook PC's exact model and download the latest BIOS file for your model from the ASUS website and save it in your flash disk drive to select and update BIOS. Connect your flash disk drive. 2. Intel Virtualization ...
...on the Notebook PC. 3. Copyright (C) 2010 American Megatrends, Inc. �M���a��i�n� Advanced Boot Security Save & Exit Start Easy Flash ASUS FancyStart POST Logo Type Play POST Sound Speaker Volume Internal Pointing Device [Disabled] [Static] [No] [4] [Enabled] Press.... 1. Software Problem - Please verify the Notebook PC's exact model and download the latest BIOS file for your model from the ASUS website and save it in your flash disk drive to select and update BIOS. Connect your flash disk drive. 2. Intel Virtualization ...
User Manual
Page 87
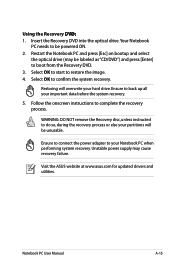
... drive.Your Notebook PC needs to restore the image. 4. Select OK to start to be powered ON. 2. Ensure to connect the power adapter to boot from the Recovery DVD. 3. Restart the Notebook PC and press [Esc] on bootup and select the optical drive (may cause recovery failure. WARNING: ... the system recovery. Select OK to do so, during the recovery process or else your partitions will overwrite your hard drive. Visit the ASUS website at www.asus.com for updated drivers and utilities. Restoring will be labeled as "CD/DVD") and press [Enter] to your important data before the...
... drive.Your Notebook PC needs to restore the image. 4. Select OK to start to be powered ON. 2. Ensure to connect the power adapter to boot from the Recovery DVD. 3. Restart the Notebook PC and press [Esc] on bootup and select the optical drive (may cause recovery failure. WARNING: ... the system recovery. Select OK to do so, during the recovery process or else your partitions will overwrite your hard drive. Visit the ASUS website at www.asus.com for updated drivers and utilities. Restoring will be labeled as "CD/DVD") and press [Enter] to your important data before the...


