User Manual
Page 15
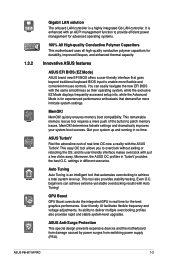
... the new EFI BIOS with Auto Tuning! ASUS P8H67-M PRO 1-3 settings in TurboV provides the best O.C. Its ability to overclock without exiting or rebooting the OS; Get your system boot success. Innovative ASUS features ASUS EFI BIOS (EZ Mode) ASUS brand new EFI BIOS offers a user-friendly... interface that demand far more flexible and convenient mouse controls. quickly ensures memory boot compatibility. Auto Tuning Auto Tuning is ...
... the new EFI BIOS with Auto Tuning! ASUS P8H67-M PRO 1-3 settings in TurboV provides the best O.C. Its ability to overclock without exiting or rebooting the OS; Get your system boot success. Innovative ASUS features ASUS EFI BIOS (EZ Mode) ASUS brand new EFI BIOS offers a user-friendly... interface that demand far more flexible and convenient mouse controls. quickly ensures memory boot compatibility. Auto Tuning Auto Tuning is ...
User Manual
Page 16
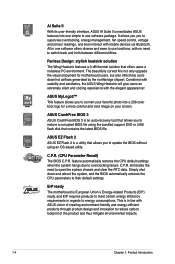
...(CPU Parameter Recall) The BIOS C.P.R. ErP ready The motherboard is an auto-recovery tool that allows you to convert your screen. ASUS CrashFree BIOS 3 ASUS CrashFree BIOS 3 is European Union´s Energy-related Products (ErP) ready, and ErP requires products to meet certain energy efficiency ...sensor readings, and even interact with the elegant appearance! AI Suite II With its user-friendly interface, ASUS AI Suite II consolidates ASUS features into a 256-color boot logo for motherboard users, but also effectively cools down and reboot the system, and the BIOS automatically restores...
...(CPU Parameter Recall) The BIOS C.P.R. ErP ready The motherboard is an auto-recovery tool that allows you to convert your screen. ASUS CrashFree BIOS 3 ASUS CrashFree BIOS 3 is European Union´s Energy-related Products (ErP) ready, and ErP requires products to meet certain energy efficiency ...sensor readings, and even interact with the elegant appearance! AI Suite II With its user-friendly interface, ASUS AI Suite II consolidates ASUS features into a 256-color boot logo for motherboard users, but also effectively cools down and reboot the system, and the BIOS automatically restores...
User Manual
Page 29
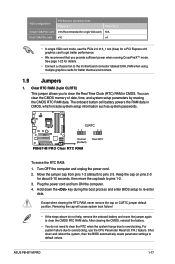
... graphics cards for about 5-10 seconds, then move the jumper again to overclocking. CLRTC 12 23 P8H67-M PRO Normal (Default) P8H67-M PRO Clear RTC RAM Clear RTC To erase the RTC RAM: 1. ASUS P8H67-M PRO 1-17 You can clear the CMOS memory of date, time, and system setup parameters by erasing ...the CMOS RTC RAM data. The onboard button cell battery powers the RAM data in CMOS. Keep the cap on CLRTC jumper default position. Removing the cap will cause system boot failure...
... graphics cards for about 5-10 seconds, then move the jumper again to overclocking. CLRTC 12 23 P8H67-M PRO Normal (Default) P8H67-M PRO Clear RTC RAM Clear RTC To erase the RTC RAM: 1. ASUS P8H67-M PRO 1-17 You can clear the CMOS memory of date, time, and system setup parameters by erasing ...the CMOS RTC RAM data. The onboard button cell battery powers the RAM data in CMOS. Keep the cap on CLRTC jumper default position. Removing the cap will cause system boot failure...
User Manual
Page 34
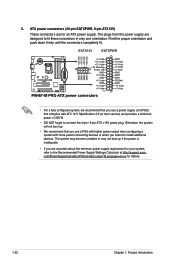
...unstable or may not boot up . • We recommend that complies with more power-consuming devices or when you are designed to the Recommended Power Supply Wattage Calculator at http://support.asus. EATX12V EATXPWR +12V DC +12V DC +12V DC +12V DC P8H67-M PRO GND GND GND GND ...+3 Volts +12 Volts +12 Volts +5V Standby Power OK PIN 1 GND +5 Volts GND +5 Volts GND +3 Volts +3 Volts PIN 1 P8H67-M PRO ATX power connectors GND +5 Volts +5...
...unstable or may not boot up . • We recommend that complies with more power-consuming devices or when you are designed to the Recommended Power Supply Wattage Calculator at http://support.asus. EATX12V EATXPWR +12V DC +12V DC +12V DC +12V DC P8H67-M PRO GND GND GND GND ...+3 Volts +12 Volts +12 Volts +5V Standby Power OK PIN 1 GND +5 Volts GND +5 Volts GND +3 Volts +3 Volts PIN 1 P8H67-M PRO ATX power connectors GND +5 Volts +5...
User Manual
Page 39
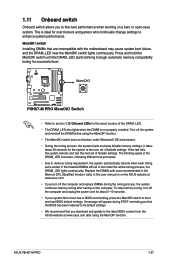
... Vendors Lists) in this user manual or on the ASUS website at www.asus.com after using the MemOK! This is ideal for the system to BIOS overclocking, press the MemOK! MemOK! P8H67-M PRO P8H67-M PRO MemOK! Turn off the computer and unplug the power cord for successful boot. It takes about 5-10 seconds. • If your...
... Vendors Lists) in this user manual or on the ASUS website at www.asus.com after using the MemOK! This is ideal for the system to BIOS overclocking, press the MemOK! MemOK! P8H67-M PRO P8H67-M PRO MemOK! Turn off the computer and unplug the power cord for successful boot. It takes about 5-10 seconds. • If your...
User Manual
Page 40
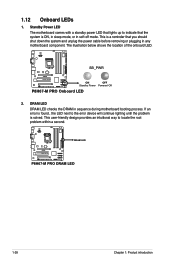
... a second. SB_PWR P8H67-M PRO ON OFF Standby Power Powered Off P8H67-M PRO Onboard LED 2. The illustration below shows the location of the onboard LED. If an error is solved. DRAM LED P8H67-M PRO P8H67-M PRO DRAM LED 1-28 Chapter... 1: Product introduction 1.12 Onboard LEDs 1. Standby Power LED The motherboard comes with a standby power LED that lights up to indicate that the system is a reminder that you should shut down the system and unplug the power cable before removing or plugging in sequence during motherboard booting...
... a second. SB_PWR P8H67-M PRO ON OFF Standby Power Powered Off P8H67-M PRO Onboard LED 2. The illustration below shows the location of the onboard LED. If an error is solved. DRAM LED P8H67-M PRO P8H67-M PRO DRAM LED 1-28 Chapter... 1: Product introduction 1.12 Onboard LEDs 1. Standby Power LED The motherboard comes with a standby power LED that lights up to indicate that the system is a reminder that you should shut down the system and unplug the power cable before removing or plugging in sequence during motherboard booting...
User Manual
Page 45
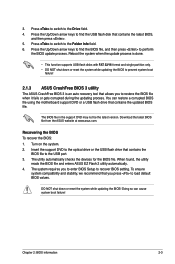
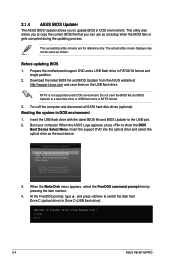
... the BIOS file when it fails or gets corrupted during the updating process. You can cause system boot failure! Download the latest BIOS file from the ASUS website at www.asus.com. To ensure system compatibility and stability, we recommend that you to load default BIOS values. ...NOT shut down or reset the system while updating the BIOS! Turn on the system. 2. Insert the support DVD to prevent system boot failure! 2.1.3 ASUS CrashFree BIOS 3 utility The ASUS CrashFree BIOS 3 is an auto recovery tool that contains the latest BIOS, and then press . 5. Chapter 2: BIOS information 2-3 ...
... the BIOS file when it fails or gets corrupted during the updating process. You can cause system boot failure! Download the latest BIOS file from the ASUS website at www.asus.com. To ensure system compatibility and stability, we recommend that you to load default BIOS values. ...NOT shut down or reset the system while updating the BIOS! Turn on the system. 2. Insert the support DVD to prevent system boot failure! 2.1.3 ASUS CrashFree BIOS 3 utility The ASUS CrashFree BIOS 3 is an auto recovery tool that contains the latest BIOS, and then press . 5. Chapter 2: BIOS information 2-3 ...
User Manual
Page 46
...1. NTFS is not supported under DOS environment. Do not save them on the USB flash drive. Booting the system in FAT32/16 format and single partition. 2. C:\>d: D:\> 2-4 ASUS P8H67-M PRO This utility also allows you to a hard disk drive or USB flash drive in DOS environment. ...The actual utility screen displays may not be same as the boot device. Download the latest BIOS file and BIOS Updater from...
...1. NTFS is not supported under DOS environment. Do not save them on the USB flash drive. Booting the system in FAT32/16 format and single partition. 2. C:\>d: D:\> 2-4 ASUS P8H67-M PRO This utility also allows you to a hard disk drive or USB flash drive in DOS environment. ...The actual utility screen displays may not be same as the boot device. Download the latest BIOS file and BIOS Updater from...
User Manual
Page 48
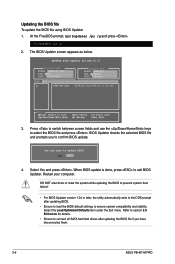
... item under the Exit menu. BIOS Updater checks the selected BIOS file and prompts you have disconnected them. 2-6 ASUS P8H67-M PRO DO NOT shut down or reset the system while updating the BIOS to prevent system boot failure! • For BIOS Updater version 1.04 or later, the utility automatically exits to the DOS prompt...
... item under the Exit menu. BIOS Updater checks the selected BIOS file and prompts you have disconnected them. 2-6 ASUS P8H67-M PRO DO NOT shut down or reset the system while updating the BIOS to prevent system boot failure! • For BIOS Updater version 1.04 or later, the utility automatically exits to the DOS prompt...
User Manual
Page 49
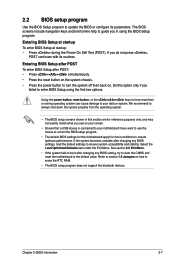
... after changing any BIOS settings, load the default settings to ensure system compatibility and stability. See section 2.9 Exit Menu. • If the system fails to boot after changing any BIOS setting, try to clear the CMOS and reset the motherboard to the default value. 2.2 BIOS setup program Use the BIOS Setup...
... after changing any BIOS settings, load the default settings to ensure system compatibility and stability. See section 2.9 Exit Menu. • If the system fails to boot after changing any BIOS setting, try to clear the CMOS and reset the motherboard to the default value. 2.2 BIOS setup program Use the BIOS Setup...
User Manual
Page 50
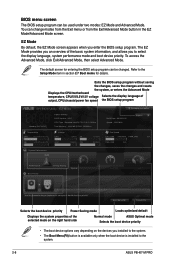
... 4485RPM PWR_FAN N/A MB +75.2ºF/+40.0ºC 3.3V 3.344V 12V 12.248V CHA_FAN N/A System Performance Quiet Performance Boot Priority Energy Saving Normal Use the mouse to drag or keyboard to navigate to the system. 2-8 ASUS P8H67-M PRO The EZ Mode provides you installed to the system. • The... Boot Menu(F8) button is available only when the boot device is installed to decide the boot priority. EZ Mode By default, the EZ Mode screen ...
... 4485RPM PWR_FAN N/A MB +75.2ºF/+40.0ºC 3.3V 3.344V 12V 12.248V CHA_FAN N/A System Performance Quiet Performance Boot Priority Energy Saving Normal Use the mouse to drag or keyboard to navigate to the system. 2-8 ASUS P8H67-M PRO The EZ Mode provides you installed to the system. • The... Boot Menu(F8) button is available only when the boot device is installed to decide the boot priority. EZ Mode By default, the EZ Mode screen ...
User Manual
Page 51
... EIST Supported 3100 MHz 206a5 4 4 Supported 16-31 Intel Adaptive The3rm1 al Monitor Disabled Enabled Auto Enabled Enabled All Disabled Enabled Disabled Enalbed Boot Tool Includes TM1, TM2 and EMTTM. →←: Select Screen ↑↓: Select Item Enter: Select +/-: Change Opt. F1: General... Defaults F10: Save ESC: Exit Menu items Version 2.00.1201. To access the EZ Mode, click Exit, then select ASUS EZ Mode. Advanced Mode The Advanced Mode provides advanced options for experienced end-users to the following main items: Main Ai Tweaker Advanced ...
... EIST Supported 3100 MHz 206a5 4 4 Supported 16-31 Intel Adaptive The3rm1 al Monitor Disabled Enabled Auto Enabled Enabled All Disabled Enabled Disabled Enalbed Boot Tool Includes TM1, TM2 and EMTTM. →←: Select Screen ↑↓: Select Item Enter: Select +/-: Change Opt. F1: General... Defaults F10: Save ESC: Exit Menu items Version 2.00.1201. To access the EZ Mode, click Exit, then select ASUS EZ Mode. Advanced Mode The Advanced Mode provides advanced options for experienced end-users to the following main items: Main Ai Tweaker Advanced ...
User Manual
Page 52
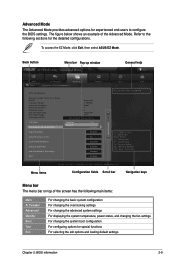
... A greater than sign (>) before each item on any menu screen means that is user-configurable, you can change the value of options. 2-10 ASUS P8H67-M PRO Navigation keys At the bottom right corner of the menu screen are items that menu. You cannot select an item that the item has a submenu.... arrow keys or / keys to display a pop-up window Select a menu item and press to display the other items (Ai Tweaker, Advanced, Monitor, Boot, Tool, and Exit) on the menu bar have their respective menu items. Back button This button appears when entering a submenu. General help At the top...
... A greater than sign (>) before each item on any menu screen means that is user-configurable, you can change the value of options. 2-10 ASUS P8H67-M PRO Navigation keys At the bottom right corner of the menu screen are items that menu. You cannot select an item that the item has a submenu.... arrow keys or / keys to display a pop-up window Select a menu item and press to display the other items (Ai Tweaker, Advanced, Monitor, Boot, Tool, and Exit) on the menu bar have their respective menu items. Back button This button appears when entering a submenu. General help At the top...
User Manual
Page 53
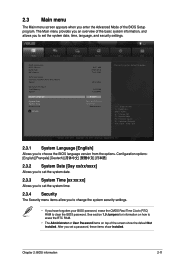
... Total Memory Speed 1024 MB 1333 MHz System Language English System Date System Time Access Level [Mon 09/27/2010] [16:46:15] Administrator > Security Boot Tool Choose the system default language →←: Select Screen ↑↓: Select Item Enter: Select +/-: Change Opt. 2.3 Main menu The Main menu screen appears...
... Total Memory Speed 1024 MB 1333 MHz System Language English System Date System Time Access Level [Mon 09/27/2010] [16:46:15] Administrator > Security Boot Tool Choose the system default language →←: Select Screen ↑↓: Select Item Enter: Select +/-: Change Opt. 2.3 Main menu The Main menu screen appears...
User Manual
Page 55
... Management CPU Offset Mode Sign + CPU Voltage 1.230V Auto IGPU Offset Mode Sign + IGPU Voltage 1.000V Auto DRAM Voltage 1.500V Auto VCCIO Voltage 1.050V Auto Boot Tool [X.M.P.] When XMP is enabled BCLK frequency, CPU ratio and memory parameters will be auto optimized. →←: Select Screen ↑↓: Select Item Enter...
... Management CPU Offset Mode Sign + CPU Voltage 1.230V Auto IGPU Offset Mode Sign + IGPU Voltage 1.000V Auto DRAM Voltage 1.500V Auto VCCIO Voltage 1.050V Auto Boot Tool [X.M.P.] When XMP is enabled BCLK frequency, CPU ratio and memory parameters will be auto optimized. →←: Select Screen ↑↓: Select Item Enter...
User Manual
Page 59
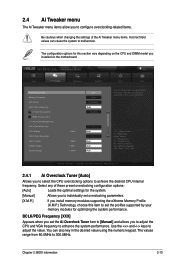
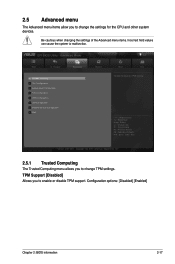
.... Advanced Mode Exit Main Ai Tweaker > Trusted Computing > CPU Configuration > System Agent Configuration > PCH Configuration > SATA Configuration > USB Configuration > Onboard Devices Configuration > APM Advanced Monitor Boot Tool Trusted Computing (TPM) settings →←: Select Screen ↑↓: Select Item Enter: Select +/-: Change Opt. Copyright (C) 2010 American Megatrends, Inc. 2.5.1 Trusted Computing The...
.... Advanced Mode Exit Main Ai Tweaker > Trusted Computing > CPU Configuration > System Agent Configuration > PCH Configuration > SATA Configuration > USB Configuration > Onboard Devices Configuration > APM Advanced Monitor Boot Tool Trusted Computing (TPM) settings →←: Select Screen ↑↓: Select Item Enter: Select +/-: Change Opt. Copyright (C) 2010 American Megatrends, Inc. 2.5.1 Trusted Computing The...
User Manual
Page 60
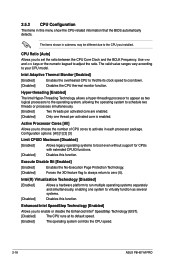
2.5.2 CPU Configuration The items in each processor package. The valid value ranges vary according to boot even without support for CPUs with extended CPUID functions. [Disabled] Disables this function. Configuration options: [All] [1] [2] [3] Limit CPUID ...Monitor [Enabled] [Enabled] Enables the overheated CPU to throttle its default speed. [Enabled] The operating system controls the CPU speed. 2-18 ASUS P8H67-M PRO Active Processor Cores [All] Allows you to zero (0). Hyper-threading [Enabled] The Intel Hyper-Threading Technology allows a hyper-threading processor to...
2.5.2 CPU Configuration The items in each processor package. The valid value ranges vary according to boot even without support for CPUs with extended CPUID functions. [Disabled] Disables this function. Configuration options: [All] [1] [2] [3] Limit CPUID ...Monitor [Enabled] [Enabled] Enables the overheated CPU to throttle its default speed. [Enabled] The operating system controls the CPU speed. 2-18 ASUS P8H67-M PRO Active Processor Cores [All] Allows you to zero (0). Hyper-threading [Enabled] The Intel Hyper-Threading Technology allows a hyper-threading processor to...
User Manual
Page 61
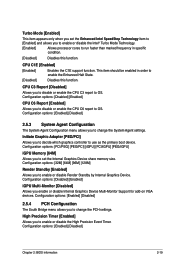
... or disable the Intel® Turbo Mode Technology. [Enabled] Allows processor cores to run faster than marked frequency in order to use as the primary boot device.
... or disable the Intel® Turbo Mode Technology. [Enabled] Allows processor cores to run faster than marked frequency in order to use as the primary boot device.

User Manual
Page 66
... RPM Chassis Fan Profile Standard CPU Voltage +1.184 V 3.3V Voltage +3.312 V Boot CPU Temperature Tool →←: Select Screen ↑↓: Select Item Enter: Select +/-: Change Opt. Select Ignore if you do not wish to display the detected speed. 2-24 ASUS P8H67-M PRO Copyright (C) 2010 American Megatrends, Inc. If the fan is not connected...
... RPM Chassis Fan Profile Standard CPU Voltage +1.184 V 3.3V Voltage +3.312 V Boot CPU Temperature Tool →←: Select Screen ↑↓: Select Item Enter: Select +/-: Change Opt. Select Ignore if you do not wish to display the detected speed. 2-24 ASUS P8H67-M PRO Copyright (C) 2010 American Megatrends, Inc. If the fan is not connected...

User Manual
Page 69
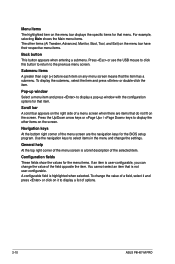
... items allow you to set to [Disabled]. Set this item to [Enabled] to use the ASUS MyLogo 2™ feature. 2.7.3 Post Report [5 sec] Allows you to change the system boot options. Configuration options: [1 sec] [2 sec] [3 sec] [4 sec] [5 sec] [6 sec] [7 sec] [8 sec] [9 sec] [10 sec] [Until Press ESC] Chapter 2: BIOS information 2-27 F1: General...
... items allow you to set to [Disabled]. Set this item to [Enabled] to use the ASUS MyLogo 2™ feature. 2.7.3 Post Report [5 sec] Allows you to change the system boot options. Configuration options: [1 sec] [2 sec] [3 sec] [4 sec] [5 sec] [6 sec] [7 sec] [8 sec] [9 sec] [10 sec] [Until Press ESC] Chapter 2: BIOS information 2-27 F1: General...


