User Manual
Page 1
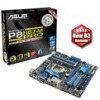
P8H67-M PRO Motherboard
P8H67-M PRO Motherboard
User Manual
Page 3
Contents Notices...vi Safety information vii About this guide vii P8H67-M PRO specifications summary ix Chapter 1: Product introduction 1.1 Welcome 1-1 1.2 Package contents 1-1 1.3 Special features 1-1 1.3.1 Product highlights 1-1 1.3.2 Innovative ASUS features 1-3 1.4 Before you proceed 1-5 1.5 Motherboard overview 1-6 1.5.1 Placement direction 1-6 1.5.2 Screw holes 1-6 1.5.3 Motherboard layout 1-7 1.5.4 Layout contents 1-7 1.6 Central Processing Unit (CPU 1-8 1.6.1 Installing the CPU 1-8 1.6.2 Installing the CPU heatsink and fan 1-11 1.6.3 Uninstalling...
Contents Notices...vi Safety information vii About this guide vii P8H67-M PRO specifications summary ix Chapter 1: Product introduction 1.1 Welcome 1-1 1.2 Package contents 1-1 1.3 Special features 1-1 1.3.1 Product highlights 1-1 1.3.2 Innovative ASUS features 1-3 1.4 Before you proceed 1-5 1.5 Motherboard overview 1-6 1.5.1 Placement direction 1-6 1.5.2 Screw holes 1-6 1.5.3 Motherboard layout 1-7 1.5.4 Layout contents 1-7 1.6 Central Processing Unit (CPU 1-8 1.6.1 Installing the CPU 1-8 1.6.2 Installing the CPU heatsink and fan 1-11 1.6.3 Uninstalling...
User Manual
Page 6
... may cause harmful interference to radio communications. This product has been designed to provide reasonable protection against harmful interference in our products at ASUS REACH website at http://csr.asus.com/english/REACH.htm. DO NOT throw the mercury-containing button cell battery in municipal waste. However, there is no guarantee that... Class B limits for disposal of the crossed out wheeled bin indicates that interference will not occur in accordance with FCC regulations. DO NOT throw the motherboard in municipal waste. This symbol of electronic products.
... may cause harmful interference to radio communications. This product has been designed to provide reasonable protection against harmful interference in our products at ASUS REACH website at http://csr.asus.com/english/REACH.htm. DO NOT throw the mercury-containing button cell battery in municipal waste. However, there is no guarantee that... Class B limits for disposal of the crossed out wheeled bin indicates that interference will not occur in accordance with FCC regulations. DO NOT throw the motherboard in municipal waste. This symbol of electronic products.
User Manual
Page 7
..., do not try to fix it by yourself. If you add a device. • Before connecting or removing signal cables from the motherboard, ensure that all power cables are unplugged. • Seek professional assistance before using an adapter or extension cord. If possible, disconnect all... power cables from the existing system before the signal cables are connected. Detailed descriptions of the motherboard and the new technology it supports. • Chapter 2: BIOS information This chapter tells how to change system settings through the BIOS Setup...
..., do not try to fix it by yourself. If you add a device. • Before connecting or removing signal cables from the motherboard, ensure that all power cables are unplugged. • Seek professional assistance before using an adapter or extension cord. If possible, disconnect all... power cables from the existing system before the signal cables are connected. Detailed descriptions of the motherboard and the new technology it supports. • Chapter 2: BIOS information This chapter tells how to change system settings through the BIOS Setup...
User Manual
Page 13
... it, check the items in your package with the list below. 1.2 Package contents Check your motherboard package for the following items. Motherboard Cables Accessories Application DVD Documentation ASUS P8H67-M PRO motherboard 2 x Serial ATA 6.0Gb/s cables 1 x Ultra DMA 133/100 cable 1 x I/O shield ASUS motherboard support DVD User Manual If any of new features and latest technologies, making it another...
... it, check the items in your package with the list below. 1.2 Package contents Check your motherboard package for the following items. Motherboard Cables Accessories Application DVD Documentation ASUS P8H67-M PRO motherboard 2 x Serial ATA 6.0Gb/s cables 1 x Ultra DMA 133/100 cable 1 x I/O shield ASUS motherboard support DVD User Manual If any of new features and latest technologies, making it another...
User Manual
Page 14
... to meet the higher bandwidth requirements of inappropriate connection, which enhances system performance. PCI Express 2.0 support This motherboard supports PCI Express 2.0 devices for faster data retrieval at double the bandwidth of current bus systems. Dual-Channel DDR3 1333... (SATA) interface, delivering up to -point links, allowing increased bandwidth and stability. S/PDIF out connector at the back I/O This motherboard provides convenient connectivity to boost system performance. It provides improved performance by utilizing serial point-to 6.0 Gb/s data transfer. Additionally, the...
... to meet the higher bandwidth requirements of inappropriate connection, which enhances system performance. PCI Express 2.0 support This motherboard supports PCI Express 2.0 devices for faster data retrieval at double the bandwidth of current bus systems. Dual-Channel DDR3 1333... (SATA) interface, delivering up to -point links, allowing increased bandwidth and stability. S/PDIF out connector at the back I/O This motherboard provides convenient connectivity to boost system performance. It provides improved performance by utilizing serial point-to 6.0 Gb/s data transfer. Additionally, the...
User Manual
Page 15
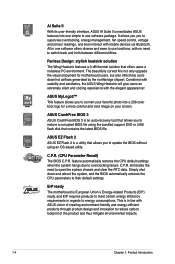
... function to provide efficient power management for advanced operating systems. 100% All High-quality Conductive Polymer Capacitors This motherboard uses all high-quality conductive polymer capacitors for experienced performance enthusiasts that demand far more flexible and convenient mouse ... system boot success. Moreover, the ASUS OC profiles in no time. settings in real time for the best graphics performance. GPU Boost GPU Boost overclocks the integrated GPU in different scenarios. User-friendly UI facilitates flexible frequency and voltage adjustments. ASUS P8H67-M PRO 1-3
... function to provide efficient power management for advanced operating systems. 100% All High-quality Conductive Polymer Capacitors This motherboard uses all high-quality conductive polymer capacitors for experienced performance enthusiasts that demand far more flexible and convenient mouse ... system boot success. Moreover, the ASUS OC profiles in no time. settings in real time for the best graphics performance. GPU Boost GPU Boost overclocks the integrated GPU in different scenarios. User-friendly UI facilitates flexible frequency and voltage adjustments. ASUS P8H67-M PRO 1-3
User Manual
Page 16
AI Suite II With its user-friendly interface, ASUS AI Suite II consolidates ASUS features into a 256-color boot logo for motherboard users, but also effectively cools down and reboot the system, and the BIOS automatically restores the CPU parameters to overclocking failure. ... settings. Simply shut down hot airflows generated by the northbridge chipset. ErP ready The motherboard is an auto-recovery tool that allows you to energy consumptions. Combined with usability and aesthetics, the ASUS Wing Heatsink will give users an extremely silent and cooling experience with no need to...
AI Suite II With its user-friendly interface, ASUS AI Suite II consolidates ASUS features into a 256-color boot logo for motherboard users, but also effectively cools down and reboot the system, and the BIOS automatically restores the CPU parameters to overclocking failure. ... settings. Simply shut down hot airflows generated by the northbridge chipset. ErP ready The motherboard is an auto-recovery tool that allows you to energy consumptions. Combined with usability and aesthetics, the ASUS Wing Heatsink will give users an extremely silent and cooling experience with no need to...
User Manual
Page 17
ASUS P8H67-M PRO 1-5 1.4 Before you proceed Take note of the following precautions before you install motherboard components or change any motherboard settings. • Unplug the power cord from the wall socket before touching any component. • Before handling components, use a grounded wrist ...metal object, such as the power supply case, to avoid damaging them due to static electricity. • Hold components by the edges to the motherboard, peripherals, or components. Failure to do so may cause severe damage to avoid touching the ICs on them. • Whenever you uninstall any...
ASUS P8H67-M PRO 1-5 1.4 Before you proceed Take note of the following precautions before you install motherboard components or change any motherboard settings. • Unplug the power cord from the wall socket before touching any component. • Before handling components, use a grounded wrist ...metal object, such as the power supply case, to avoid damaging them due to static electricity. • Hold components by the edges to the motherboard, peripherals, or components. Failure to do so may cause severe damage to avoid touching the ICs on them. • Whenever you uninstall any...
User Manual
Page 18
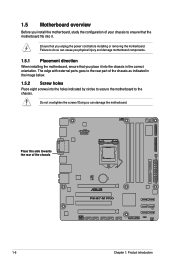
...the correct orientation. Doing so can cause you physical injury and damage motherboard components. 1.5.1 Placement direction When installing the motherboard, ensure that you place it . 1.5 Motherboard overview Before you install the motherboard, study the configuration of your chassis to the chassis. Place this...the holes indicated by circles to secure the motherboard to ensure that you unplug the power cord before installing or removing the motherboard. The edge with external ports goes to the rear part of the chassis P8H67-M PRO 1-6 Chapter 1: Product introduction Failure to do ...
...the correct orientation. Doing so can cause you physical injury and damage motherboard components. 1.5.1 Placement direction When installing the motherboard, ensure that you place it . 1.5 Motherboard overview Before you install the motherboard, study the configuration of your chassis to the chassis. Place this...the holes indicated by circles to secure the motherboard to ensure that you unplug the power cord before installing or removing the motherboard. The edge with external ports goes to the rear part of the chassis P8H67-M PRO 1-6 Chapter 1: Product introduction Failure to do ...
User Manual
Page 20
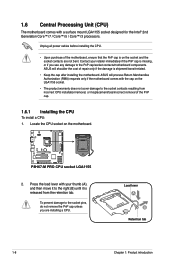
..., or if you are not bent. P8H67-M PRO P8H67-M PRO CPU socket LGA1155 2. Load lever A B Retention tab 1-8 Chapter 1: Product introduction ASUS will shoulder the cost of the PnP cap. 1.6.1 Installing the CPU To install a CPU: 1. Press the load lever with the cap on the motherboard. 1.6 Central Processing Unit (CPU) The motherboard comes with a surface mount LGA1155 socket...
..., or if you are not bent. P8H67-M PRO P8H67-M PRO CPU socket LGA1155 2. Load lever A B Retention tab 1-8 Chapter 1: Product introduction ASUS will shoulder the cost of the PnP cap. 1.6.1 Installing the CPU To install a CPU: 1. Press the load lever with the cap on the motherboard. 1.6 Central Processing Unit (CPU) The motherboard comes with a surface mount LGA1155 socket...
User Manual
Page 23
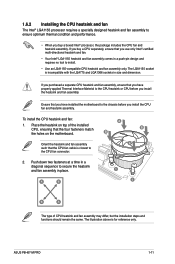
... have properly applied Thermal Interface Material to the CPU heatsink or CPU before you buy a CPU separately, ensure that you have installed the motherboard to install. • Use an LGA1155-compatible CPU heatsink and fan assembly only. To install the CPU heatsink and fan: A 1. .... If you buy a boxed Intel® processor, the package includes the CPU fan and heatsink assembly. Place the heatsink on the motherboard. ASUS P8H67-M PRO 1-11 The illustration above is for reference only. Push down two fasteners at a time in a diagonal sequence to secure the heatsink ...
... have properly applied Thermal Interface Material to the CPU heatsink or CPU before you buy a CPU separately, ensure that you have installed the motherboard to install. • Use an LGA1155-compatible CPU heatsink and fan assembly only. To install the CPU heatsink and fan: A 1. .... If you buy a boxed Intel® processor, the package includes the CPU fan and heatsink assembly. Place the heatsink on the motherboard. ASUS P8H67-M PRO 1-11 The illustration above is for reference only. Push down two fasteners at a time in a diagonal sequence to secure the heatsink ...
User Manual
Page 24
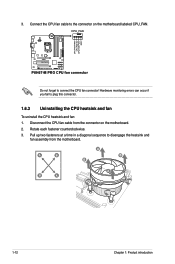
... the CPU fan cable to disengage the heatsink and fan assembly from the connector on the motherboard labeled CPU_FAN. CPU_FAN CPU FAN PWM CPU FAN IN CPU FAN PWR GND P8H67-M PRO P8H67-M PRO CPU fan connector Do not forget to plug this connector. 1.6.3 Uninstalling the CPU heatsink and fan To uninstall the CPU heatsink...
... the CPU fan cable to disengage the heatsink and fan assembly from the connector on the motherboard labeled CPU_FAN. CPU_FAN CPU FAN PWM CPU FAN IN CPU FAN PWR GND P8H67-M PRO P8H67-M PRO CPU fan connector Do not forget to plug this connector. 1.6.3 Uninstalling the CPU heatsink and fan To uninstall the CPU heatsink...
User Manual
Page 25
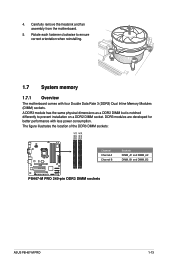
...motherboard comes with less power consumption. 4. DDR3 modules are developed for better performance with four Double Data Rate 3 (DDR3) Dual Inline Memory Modules (DIMM) sockets. The figure illustrates the location of the DDR3 DIMM sockets: DIMM_A1 DIMM_A2 DIMM_B1 DIMM_B2 P8H67-M PRO Channel Channel A Channel B P8H67-M PRO... 240-pin DDR3 DIMM sockets Sockets DIMM_A1 and DIMM_A2 DIMM_B1 and DIMM_B2 ASUS P8H67-M PRO 1-13
...motherboard comes with less power consumption. 4. DDR3 modules are developed for better performance with four Double Data Rate 3 (DDR3) Dual Inline Memory Modules (DIMM) sockets. The figure illustrates the location of the DDR3 DIMM sockets: DIMM_A1 DIMM_A2 DIMM_B1 DIMM_B2 P8H67-M PRO Channel Channel A Channel B P8H67-M PRO... 240-pin DDR3 DIMM sockets Sockets DIMM_A1 and DIMM_A2 DIMM_B1 and DIMM_B2 ASUS P8H67-M PRO 1-13
User Manual
Page 26
... at www.asus.com for the latest QVL. 1-14 Chapter 1: Product introduction Use a maximum of the lower-sized channel for the dual-channel configuration. To operate at the vendor-marked or at a lower frequency than the vendor-marked value. For effective use a more on the motherboard. • This motherboard does not support ... on 32-bit Windows® OS, when you install 4GB or more memory on its Serial Presence Detect (SPD), which is dependent on the motherboard, the actual usable memory for the OS can be about 3GB or less. The system maps the total size of 3GB system memory if you...
... at www.asus.com for the latest QVL. 1-14 Chapter 1: Product introduction Use a maximum of the lower-sized channel for the dual-channel configuration. To operate at the vendor-marked or at a lower frequency than the vendor-marked value. For effective use a more on the motherboard. • This motherboard does not support ... on 32-bit Windows® OS, when you install 4GB or more memory on its Serial Presence Detect (SPD), which is dependent on the motherboard, the actual usable memory for the OS can be about 3GB or less. The system maps the total size of 3GB system memory if you...
User Manual
Page 27
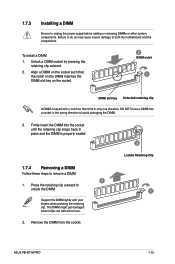
.... ASUS P8H67-M PRO 1-15 Remove the DIMM from the socket. Align a DIMM on the socket such that the notch on the DIMM matches the DIMM slot key on the socket. 2 DIMM notch 1 DIMM slot key Unlocked retaining clip A DIMM is properly seated. 3 Locked Retaining Clip 1.7.4 Removing a DIMM Follow these steps to both the motherboard...
.... ASUS P8H67-M PRO 1-15 Remove the DIMM from the socket. Align a DIMM on the socket such that the notch on the DIMM matches the DIMM slot key on the socket. 2 DIMM notch 1 DIMM slot key Unlocked retaining clip A DIMM is properly seated. 3 Locked Retaining Clip 1.7.4 Removing a DIMM Follow these steps to both the motherboard...
User Manual
Page 28
...cards complying with it by adjusting the software settings. 1. 1.8 Expansion slots In the future, you may cause you physical injury and damage motherboard components. 1.8.1 Installing an expansion card To install an expansion card: 1. Unplug the power cord before adding or removing expansion cards. Remove the... system unit cover (if your motherboard is completely seated on shared slots, ensure that the drivers support "Share IRQ" or that came with the PCI Express specifications. 1-...
...cards complying with it by adjusting the software settings. 1. 1.8 Expansion slots In the future, you may cause you physical injury and damage motherboard components. 1.8.1 Installing an expansion card To install an expansion card: 1. Unplug the power cord before adding or removing expansion cards. Remove the... system unit cover (if your motherboard is completely seated on shared slots, ensure that the drivers support "Share IRQ" or that came with the PCI Express specifications. 1-...
User Manual
Page 29
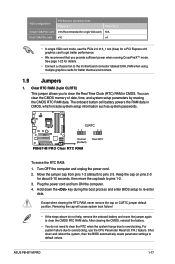
... RAM: 1. Keep the cap on CLRTC jumper default position. Hold down and reboot the system, then the BIOS automatically resets parameter settings to default values. ASUS P8H67-M PRO 1-17 After clearing the CMOS, reinstall the battery. • You do not help, remove the onboard battery and move the cap back to clear the... cap will cause system boot failure! • If the steps above do not need to clear the RTC when the system hangs due to the motherboard connector labeled CHA_FAN when using multiple graphics cards for better thermal environment. 1.9 Jumpers 1.
... RAM: 1. Keep the cap on CLRTC jumper default position. Hold down and reboot the system, then the BIOS automatically resets parameter settings to default values. ASUS P8H67-M PRO 1-17 After clearing the CMOS, reinstall the battery. • You do not help, remove the onboard battery and move the cap back to clear the... cap will cause system boot failure! • If the steps above do not need to clear the RTC when the system hangs due to the motherboard connector labeled CHA_FAN when using multiple graphics cards for better thermal environment. 1.9 Jumpers 1.
User Manual
Page 31
DVI-D can't be used under Windows. • This motherboard also supports two add-on graphics card and two onboard VGA output at the same time. 15. HDMI port. The dual display function works only ...-D compatible device. These two 4-pin Universal Serial Bus (USB) ports connect to USB 2.0/1.1 devices. 12. ASUS P8H67-M PRO 1-19 USB 3.0 ports 1 and 2. DVI port. This port is for a High-Definition Multimedia Interface (HDMI) connector, and is for your motherboard: Dual display outputs DVI + D-Sub DVI + HDMI HDMI + D-Sub Supported • • • Not supported...
DVI-D can't be used under Windows. • This motherboard also supports two add-on graphics card and two onboard VGA output at the same time. 15. HDMI port. The dual display function works only ...-D compatible device. These two 4-pin Universal Serial Bus (USB) ports connect to USB 2.0/1.1 devices. 12. ASUS P8H67-M PRO 1-19 USB 3.0 ports 1 and 2. DVI port. This port is for a High-Definition Multimedia Interface (HDMI) connector, and is for your motherboard: Dual display outputs DVI + D-Sub DVI + HDMI HDMI + D-Sub Supported • • • Not supported...
User Manual
Page 33
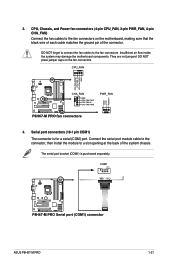
...P8H67-M PRO P8H67-M PRO Serial port (COM1) connector ASUS P8H67-M PRO 1-21 They are not jumpers! Serial port connectors (10-1 pin COM1) The connector is purchased separately. DO NOT forget to connect the fan cables to the fan connectors on the fan connectors. CPU_FAN CPU FAN PWM CPU FAN IN CPU FAN PWR GND GND +12V Rotation P8H67-M PRO...wire of each cable matches the ground pin of the system chassis. 3. Insufficient air flow inside the system may damage the motherboard components. The serial port bracket (COM1) is for a serial (COM) port. Connect the serial port module cable to ...
...P8H67-M PRO P8H67-M PRO Serial port (COM1) connector ASUS P8H67-M PRO 1-21 They are not jumpers! Serial port connectors (10-1 pin COM1) The connector is purchased separately. DO NOT forget to connect the fan cables to the fan connectors on the fan connectors. CPU_FAN CPU FAN PWM CPU FAN IN CPU FAN PWR GND GND +12V Rotation P8H67-M PRO...wire of each cable matches the ground pin of the system chassis. 3. Insufficient air flow inside the system may damage the motherboard components. The serial port bracket (COM1) is for a serial (COM) port. Connect the serial port module cable to ...


