

User Manual
Page 4
Contents 1.11 Software support 1-27 1.11.1 Installing an operating system 1-27 1.11.2 Support DVD information 1-27 Chapter 2: BIOS information 2.1 Managing and updating your BIOS 2-1 2.1.1 ASUS Update utility 2-1 2.1.2 ASUS EZ Flash 2 2-2 2.1.3 ASUS CrashFree BIOS 2-3 2.2 BIOS setup program 2-4 2.2.1 BIOS menu screen 2-5 2.2.2 Menu bar 2-5 2.2.3 Navigation keys 2-6 2.2.4 Menu items 2-6 2.2.5 Submenu items 2-6 2.2.6 Configuration fields 2-6 2.2.7 Pop-up window 2-6 2.2.8 Scroll bar 2-6 2.2.9 General help 2-6 2.3 Main menu 2-7 2.3.1 System Time...
Contents 1.11 Software support 1-27 1.11.1 Installing an operating system 1-27 1.11.2 Support DVD information 1-27 Chapter 2: BIOS information 2.1 Managing and updating your BIOS 2-1 2.1.1 ASUS Update utility 2-1 2.1.2 ASUS EZ Flash 2 2-2 2.1.3 ASUS CrashFree BIOS 2-3 2.2 BIOS setup program 2-4 2.2.1 BIOS menu screen 2-5 2.2.2 Menu bar 2-5 2.2.3 Navigation keys 2-6 2.2.4 Menu items 2-6 2.2.5 Submenu items 2-6 2.2.6 Configuration fields 2-6 2.2.7 Pop-up window 2-6 2.2.8 Scroll bar 2-6 2.2.9 General help 2-6 2.3 Main menu 2-7 2.3.1 System Time...
User Manual
Page 7
...; If the power supply is broken, do not try to fix it by yourself. If you are also provided. Detailed descriptions of the BIOS parameters are using an adapter or extension cord. Safety information Electrical safety • To prevent electric shock hazard, disconnect the power cable from ... any area where it may become wet. • Place the product on it supports. • Chapter 2: BIOS information This chapter tells how to change system settings through the BIOS Setup menus. About this guide is set to the correct voltage in any damage, contact your area. vii If possible...
...; If the power supply is broken, do not try to fix it by yourself. If you are also provided. Detailed descriptions of the BIOS parameters are using an adapter or extension cord. Safety information Electrical safety • To prevent electric shock hazard, disconnect the power cable from ... any area where it may become wet. • Place the product on it supports. • Chapter 2: BIOS information This chapter tells how to change system settings through the BIOS Setup menus. About this guide is set to the correct voltage in any damage, contact your area. vii If possible...
User Manual
Page 27
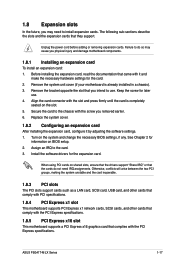
... card. Install the software drivers for later use . Remove the system unit cover (if your motherboard is completely seated on BIOS setup. 2. The following sub‑sections describe the slots and the expansion cards that complies with it by adjusting the software settings...BIOS settings, if any. 1.8 Expansion slots In the future, you may cause you physical injury and damage motherboard components. 1.8.1 Installing an expansion card To install an expansion card: 1. Unplug the power cord before adding or removing expansion cards. Secure the card to the card. 3. ASUS P5G41T-M LX...
... card. Install the software drivers for later use . Remove the system unit cover (if your motherboard is completely seated on BIOS setup. 2. The following sub‑sections describe the slots and the expansion cards that complies with it by adjusting the software settings...BIOS settings, if any. 1.8 Expansion slots In the future, you may cause you physical injury and damage motherboard components. 1.8.1 Installing an expansion card To install an expansion card: 1. Unplug the power cord before adding or removing expansion cards. Secure the card to the card. 3. ASUS P5G41T-M LX...
User Manual
Page 28
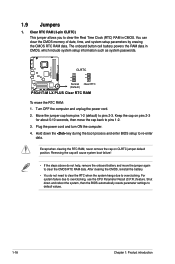
... 1: Product introduction P5G41T-M LX PLUS 1.9 Jumpers 1. You can clear the CMOS memory of date, time, and system setup parameters by erasing the CMOS RTC RAM data. Hold down and reboot the system, then the BIOS automatically resets parameter ... system hangs due to clear the Real Time Clock (RTC) RAM in CMOS, which include system setup information such as system passwords. Except when clearing the RTC RAM, never remove the cap on pins... the key during the boot process and enter BIOS setup to clear the CMOS RTC RAM data. P5G41T-M LX PLUS Clear RTC RAM To erase the RTC RAM: 1.
... 1: Product introduction P5G41T-M LX PLUS 1.9 Jumpers 1. You can clear the CMOS memory of date, time, and system setup parameters by erasing the CMOS RTC RAM data. Hold down and reboot the system, then the BIOS automatically resets parameter ... system hangs due to clear the Real Time Clock (RTC) RAM in CMOS, which include system setup information such as system passwords. Except when clearing the RTC RAM, never remove the cap on pins... the key during the boot process and enter BIOS setup to clear the CMOS RTC RAM data. P5G41T-M LX PLUS Clear RTC RAM To erase the RTC RAM: 1.
User Manual
Page 31
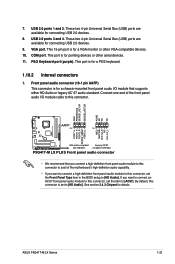
... is for a chassis-mounted front panel audio I /O module cable to this connector, set the Front Panel Type item in the BIOS setup to [AC97]. 7. VGA port. COM port. P5G41T-M LX PLUS ASUS P5G41T-M LX Series 1-21 USB 2.0 ports 1 and 2. USB 2.0 ports 3 and 4. PS/2 Keyboard port (purple). This port is for...of the front panel audio I /O module that you want to connect an AC'97 front panel audio module to [HD Audio]. P5G41T-M LX PLUS Front panel audio connector • We recommend that supports either HD Audio or legacy AC`97 audio standard. By default, this ...
... is for a chassis-mounted front panel audio I /O module cable to this connector, set the Front Panel Type item in the BIOS setup to [AC97]. 7. VGA port. COM port. P5G41T-M LX PLUS ASUS P5G41T-M LX Series 1-21 USB 2.0 ports 1 and 2. USB 2.0 ports 3 and 4. PS/2 Keyboard port (purple). This port is for...of the front panel audio I /O module that you want to connect an AC'97 front panel audio module to [HD Audio]. P5G41T-M LX PLUS Front panel audio connector • We recommend that supports either HD Audio or legacy AC`97 audio standard. By default, this ...
User Manual
Page 40
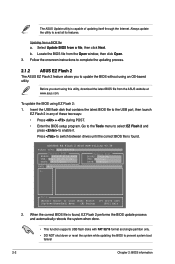
...the system while updating the BIOS to switch between drives until the correct BIOS file is capable of these two ways: • Press + during POST. • Enter the BIOS setup program. b. Locate the BIOS file from a BIOS file a. To update the BIOS using this utility, download the latest BIOS file from a file, ... Always update the utility to enable it. Before you to update the BIOS without using an OS‑based utility. ASUSTek EZ Flash 2 BIOS ROM Utility V3.36 FLASH TYPE: EON 25P/F80 Current ROM BOARD: P5G41T-M LX PLUS VER: 0301 (H:00 B:00) DATE: 09/17/2010 Update ...
...the system while updating the BIOS to switch between drives until the correct BIOS file is capable of these two ways: • Press + during POST. • Enter the BIOS setup program. b. Locate the BIOS file from a BIOS file a. To update the BIOS using this utility, download the latest BIOS file from a file, ... Always update the utility to enable it. Before you to update the BIOS without using an OS‑based utility. ASUSTek EZ Flash 2 BIOS ROM Utility V3.36 FLASH TYPE: EON 25P/F80 Current ROM BOARD: P5G41T-M LX PLUS VER: 0301 (H:00 B:00) DATE: 09/17/2010 Update ...
User Manual
Page 41
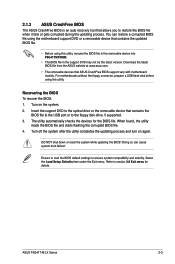
...failure! Recovering the BIOS To recover the BIOS: 1. When found, the utility reads the BIOS file and starts flashing the corrupted BIOS file. 4. Turn off the system after the utility completes the updating process and turn on the system. 2. Select the Load Setup Defaults item under...latest version. 2.1.3 ASUS CrashFree BIOS The ASUS CrashFree BIOS is an auto recovery tool that allows you to section 2.8 Exit menu for the BIOS file. For motherboards without the floppy connector, prepare a USB flash disk before using this utility. Turn on again. ASUS P5G41T-M LX Series 2-3 Insert the...
...failure! Recovering the BIOS To recover the BIOS: 1. When found, the utility reads the BIOS file and starts flashing the corrupted BIOS file. 4. Turn off the system after the utility completes the updating process and turn on the system. 2. Select the Load Setup Defaults item under...latest version. 2.1.3 ASUS CrashFree BIOS The ASUS CrashFree BIOS is an auto recovery tool that allows you to section 2.8 Exit menu for the BIOS file. For motherboards without the floppy connector, prepare a USB flash disk before using this utility. Turn on again. ASUS P5G41T-M LX Series 2-3 Insert the...
User Manual
Page 42
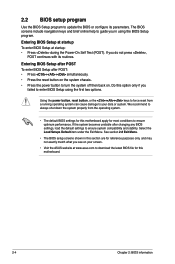
... 2.8 Exit Menu. • The BIOS setup screens shown in using the first two options. Entering BIOS Setup at startup To enter BIOS Setup at www.asus.com to download the latest BIOS file for this motherboard apply for this motherboard. 2-4 Chapter 2: BIOS information Do this option only if you failed to enter BIOS Setup using the BIOS Setup program. If you see on...
... 2.8 Exit Menu. • The BIOS setup screens shown in using the first two options. Entering BIOS Setup at startup To enter BIOS Setup at www.asus.com to download the latest BIOS file for this motherboard apply for this motherboard. 2-4 Chapter 2: BIOS information Do this option only if you failed to enter BIOS Setup using the BIOS Setup program. If you see on...
User Manual
Page 43
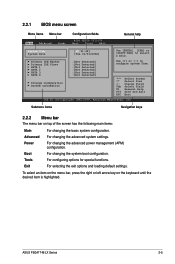
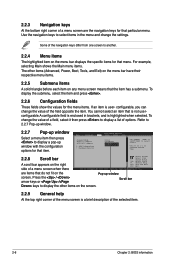
... The menu bar on the keyboard until the desired item is highlighted. Tools For configuring options for special functions. ASUS P5G41T-M LX Series 2-5 2.2.1 BIOS menu screen Menu items Menu bar Main Advanced Power Configuration fields BIOS SETUP UTILITY Boot Tools Exit General help System Time [00:31:48] System Date [Tue 01/01/2002] Use [ENTER...
... The menu bar on the keyboard until the desired item is highlighted. Tools For configuring options for special functions. ASUS P5G41T-M LX Series 2-5 2.2.1 BIOS menu screen Menu items Menu bar Main Advanced Power Configuration fields BIOS SETUP UTILITY Boot Tools Exit General help System Time [00:31:48] System Date [Tue 01/01/2002] Use [ENTER...
User Manual
Page 44
.... are the navigation keys for the menu items. If an item is a brief description of the selected item. 2-6 Chapter 2: BIOS information Use [+] or [-] to another. 2.2.4 Menu items The highlighted item on the screen. 2.2.9 General help At the top right...field opposite the item. Refer to 2.2.7 Pop-up window. 2.2.7 Pop-up window with the configuration options for that item. Main Advanced BIOS SETUP UTILITY Power Boot Tools Exit Suspend Mode ACPI 2.0 Support ACPI APIC support APM Configuration Hardware Monitor [Auto] [Disabled] [EDniOsapabtbilloendesd] Enabled ...
.... are the navigation keys for the menu items. If an item is a brief description of the selected item. 2-6 Chapter 2: BIOS information Use [+] or [-] to another. 2.2.4 Menu items The highlighted item on the screen. 2.2.9 General help At the top right...field opposite the item. Refer to 2.2.7 Pop-up window. 2.2.7 Pop-up window with the configuration options for that item. Main Advanced BIOS SETUP UTILITY Power Boot Tools Exit Suspend Mode ACPI 2.0 Support ACPI APIC support APM Configuration Hardware Monitor [Auto] [Disabled] [EDniOsapabtbilloendesd] Enabled ...
User Manual
Page 45
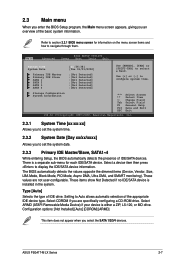
...them. Configuration options: [Not Installed] [Auto] [CDROM] [ARMD] This item does not appear when you are not user-configurable. Main Advanced BIOS SETUP UTILITY Power Boot Tools Exit System Time System Date Primary IDE Master Primary IDE Slave SATA 1 SATA 2 SATA 3 SATA 4 [12:56:38... IDE drive. 2.3 Main menu When you enter the BIOS Setup program, the Main menu screen appears, giving you to set the system time. 2.3.2 System Date [Day xx/xx/xxxx] Allows you an overview of the basic system information. ASUS P5G41T-M LX Series 2-7 Use [+] or [-] to configure system time...
...them. Configuration options: [Not Installed] [Auto] [CDROM] [ARMD] This item does not appear when you are not user-configurable. Main Advanced BIOS SETUP UTILITY Power Boot Tools Exit System Time System Date Primary IDE Master Primary IDE Slave SATA 1 SATA 2 SATA 3 SATA 4 [12:56:38... IDE drive. 2.3 Main menu When you enter the BIOS Setup program, the Main menu screen appears, giving you to set the system time. 2.3.2 System Date [Day xx/xx/xxxx] Allows you an overview of the basic system information. ASUS P5G41T-M LX Series 2-7 Use [+] or [-] to configure system time...
User Manual
Page 47
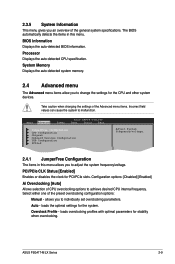
...-detected CPU specification. 2.3.5 System Information This menu gives you to individually set overclocking parameters. Main Advanced Power BIOS SETUP UTILITY Boot Tools Exit JumperFree Configuration CPU Configuration Chipset Onboard Devices Configuration USB Configuration PCIPnP Adjust System frequency/voltage....loads overclocking profiles with optimal parameters for the CPU and other system devices. ASUS P5G41T-M LX Series 2-9 allows you to adjust the system frequency/voltage. The BIOS automatically detects the items in this menu. System Memory Displays the auto-detected...
...-detected CPU specification. 2.3.5 System Information This menu gives you to individually set overclocking parameters. Main Advanced Power BIOS SETUP UTILITY Boot Tools Exit JumperFree Configuration CPU Configuration Chipset Onboard Devices Configuration USB Configuration PCIPnP Adjust System frequency/voltage....loads overclocking profiles with optimal parameters for the CPU and other system devices. ASUS P5G41T-M LX Series 2-9 allows you to adjust the system frequency/voltage. The BIOS automatically detects the items in this menu. System Memory Displays the auto-detected...

User Manual
Page 53
... Only] [S3 Only] [Auto] 2.5.2 ACPI 2.0 Support [Enabled] Allows you to [Yes] and if you to [No], BIOS configures all the devices in the RSDT pointer list. Configuration options: [No] [Yes] 2.5 Power menu The Power menu items allow...either PCI/PnP or legacy ISA devices, and setting the memory size block for system suspend. Main Advanced Power BIOS SETUP UTILITY Boot Tools Exit Suspend Mode ACPI 2.0 Support ACPI APIC Support Anti Surge Support [Auto] [Enabled] ...set to be used for legacy ISA devices. Configuration options: [Disabled] [Enabled] ASUS P5G41T-M LX Series 2-15
... Only] [S3 Only] [Auto] 2.5.2 ACPI 2.0 Support [Enabled] Allows you to [Yes] and if you to [No], BIOS configures all the devices in the RSDT pointer list. Configuration options: [No] [Yes] 2.5 Power menu The Power menu items allow...either PCI/PnP or legacy ISA devices, and setting the memory size block for system suspend. Main Advanced Power BIOS SETUP UTILITY Boot Tools Exit Suspend Mode ACPI 2.0 Support ACPI APIC Support Anti Surge Support [Auto] [Enabled] ...set to be used for legacy ISA devices. Configuration options: [Disabled] [Enabled] ASUS P5G41T-M LX Series 2-15

User Manual
Page 55
... priority sequence from the available devices. Select an item then press to [Disabled], BIOS performs all the POST items. Configuration options: [Disabled] [Enabled] ASUS P5G41T-M LX Series 2-17 Main Advanced Power BIOS SETUP UTILITY Boot Tools Exit Boot Settings Boot Device Priority Boot Settings Configuration Security Specifies the...Removable Dev.] [Hard Drive] [ATAPI CD-ROM] [Disabled] • To select the boot device during system startup, press when ASUS Logo appears. • To access Windows® OS in Safe Mode, do any of the following: • Press when...
... priority sequence from the available devices. Select an item then press to [Disabled], BIOS performs all the POST items. Configuration options: [Disabled] [Enabled] ASUS P5G41T-M LX Series 2-17 Main Advanced Power BIOS SETUP UTILITY Boot Tools Exit Boot Settings Boot Device Priority Boot Settings Configuration Security Specifies the...Removable Dev.] [Hard Drive] [ATAPI CD-ROM] [Disabled] • To select the boot device during system startup, press when ASUS Logo appears. • To access Windows® OS in Safe Mode, do any of the following: • Press when...

User Manual
Page 56
...Select this item to set to [Enabled], the system displays the message Press DEL to run Setup during POST. To change the system security settings. See section 1.9 Jumpers for option ROM. Full Screen ... options. The message Password Installed appears after you to erase the RTC RAM. 2-18 Chapter 2: BIOS information Configuration options: [Force BIOS] [Keep Current] Bootup Num-Lock [On] Allows you can clear it by erasing the CMOS ...prompted. Select an item then press to use the ASUS MyLogo2™ feature. In the password box, key in setting a supervisor password.
...Select this item to set to [Enabled], the system displays the message Press DEL to run Setup during POST. To change the system security settings. See section 1.9 Jumpers for option ROM. Full Screen ... options. The message Password Installed appears after you to erase the RTC RAM. 2-18 Chapter 2: BIOS information Configuration options: [Force BIOS] [Keep Current] Bootup Num-Lock [On] Allows you can clear it by erasing the CMOS ...prompted. Select an item then press to use the ASUS MyLogo2™ feature. In the password box, key in setting a supervisor password.

User Manual
Page 57
... password successfully. Configuration options: [Setup] [Always] ASUS P5G41T-M LX Series 2-19 User Access Level [Full Access] This item allows you to select the access restriction to selected fields, such as Date and Time. [Full Access] - When set a password, this item to [Always], BIOS checks for user password when accessing the Setup utility. Select the Change User...
... password successfully. Configuration options: [Setup] [Always] ASUS P5G41T-M LX Series 2-19 User Access Level [Full Access] This item allows you to select the access restriction to selected fields, such as Date and Time. [Full Access] - When set a password, this item to [Always], BIOS checks for user password when accessing the Setup utility. Select the Change User...
User Manual
Page 58
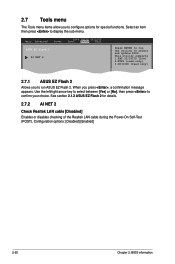
Main Advanced Power BIOS SETUP UTILITY Boot Tools Exit ASUS EZ Flash 2 AI NET 2 Press ENTER to run ASUS EZ Flash 2. When you to run the utility to confirm your choice. See section 2.1.2 ASUS EZ Flash 2 for special functions. 2.7 Tools menu The Tools menu items allow you to ...the Power-On Self‑Test (POST). Configuration options: [Disabled] [Enabled] 2-20 Chapter 2: BIOS information This utility supports 1.FAT 12/16/32 (r/w) 2.NTFS (read only) 3.CD-DISC (read only) 2.7.1 ASUS EZ Flash 2 Allows you press , a confirmation message appears. Use the left/right arrow key to...
Main Advanced Power BIOS SETUP UTILITY Boot Tools Exit ASUS EZ Flash 2 AI NET 2 Press ENTER to run ASUS EZ Flash 2. When you to run the utility to confirm your choice. See section 2.1.2 ASUS EZ Flash 2 for special functions. 2.7 Tools menu The Tools menu items allow you to ...the Power-On Self‑Test (POST). Configuration options: [Disabled] [Enabled] 2-20 Chapter 2: BIOS information This utility supports 1.FAT 12/16/32 (r/w) 2.NTFS (read only) 3.CD-DISC (read only) 2.7.1 ASUS EZ Flash 2 Allows you press , a confirmation message appears. Use the left/right arrow key to...

User Manual
Page 59
... each of the parameters on even when the PC is turned off. Load Setup Defaults This option allows you to fields other changes before exiting. ASUS P5G41T-M LX Series 2-21 Discard Changes This option allows you to Save Changes exit this exit...ensure the values you selected are finished making your changes to the BIOS items. Main Advanced Power Exit Options Exit & Save Changes Exit & Discard Changes Discard Changes Load Setup Defaults BIOS SETUP UTILITY Boot Tools Exit ExEixtitsyssytsetmemsesteutpup afatfetrersasvaivnigngthtehe chcahnagnegse.s. After selecting this option,...
... each of the parameters on even when the PC is turned off. Load Setup Defaults This option allows you to fields other changes before exiting. ASUS P5G41T-M LX Series 2-21 Discard Changes This option allows you to Save Changes exit this exit...ensure the values you selected are finished making your changes to the BIOS items. Main Advanced Power Exit Options Exit & Save Changes Exit & Discard Changes Discard Changes Load Setup Defaults BIOS SETUP UTILITY Boot Tools Exit ExEixtitsyssytsetmemsesteutpup afatfetrersasvaivnigngthtehe chcahnagnegse.s. After selecting this option,...


