
User Manual
Page 16
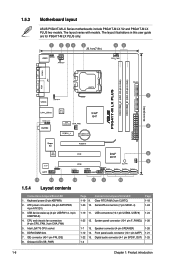
1.5.3 Motherboard layout ASUS P5G41T-M LX Series motherboards include P5G41T-M LX V2 and P5G41T-M LX PLUS two models. ATX power connectors (24-pin EATXPWR, 4-pin ATX12V) 3. The layout varies with models. USB connectors (10-1 pin USB56, USB78) ...pin SPDIF_OUT) 1-25 1-4 1-6 Chapter 1: Product introduction Intel LGA775 CPU socket 6. Onboard LED (SB_PWR) Page 1-19 9. 1-23 10. Connectors/Jumpers/Slots/LED Clear RTC RAM (3-pin CLRTC) Serial ATA connectors (7-pin SATA1-4) Page 1-18 1-24 1-19 11. USB device wake-up (3-pin USBPW1-4, 3-pin USBPW5-8) 4. IDE connector (40-1 ...
1.5.3 Motherboard layout ASUS P5G41T-M LX Series motherboards include P5G41T-M LX V2 and P5G41T-M LX PLUS two models. ATX power connectors (24-pin EATXPWR, 4-pin ATX12V) 3. The layout varies with models. USB connectors (10-1 pin USB56, USB78) ...pin SPDIF_OUT) 1-25 1-4 1-6 Chapter 1: Product introduction Intel LGA775 CPU socket 6. Onboard LED (SB_PWR) Page 1-19 9. 1-23 10. Connectors/Jumpers/Slots/LED Clear RTC RAM (3-pin CLRTC) Serial ATA connectors (7-pin SATA1-4) Page 1-18 1-24 1-19 11. USB device wake-up (3-pin USBPW1-4, 3-pin USBPW5-8) 4. IDE connector (40-1 ...
User Manual
Page 28
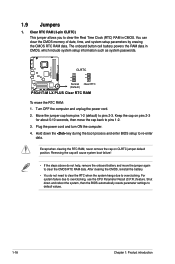
P5G41T-M LX PLUS Clear RTC RAM To erase the RTC RAM: 1. Removing the cap will cause system boot failure! • If the steps above do not need to clear the RTC when the system hangs due to clear the Real Time Clock (RTC) RAM in CMOS, which include system setup information such as system ... default values. 1-18 Chapter 1: Product introduction Plug the power cord and turn ON the computer. 4. Keep the cap on CLRTC jumper default position. P5G41T-M LX PLUS 1.9 Jumpers 1. You can clear the CMOS memory of date, time, and system setup parameters by erasing the CMOS RTC...
P5G41T-M LX PLUS Clear RTC RAM To erase the RTC RAM: 1. Removing the cap will cause system boot failure! • If the steps above do not need to clear the RTC when the system hangs due to clear the Real Time Clock (RTC) RAM in CMOS, which include system setup information such as system ... default values. 1-18 Chapter 1: Product introduction Plug the power cord and turn ON the computer. 4. Keep the cap on CLRTC jumper default position. P5G41T-M LX PLUS 1.9 Jumpers 1. You can clear the CMOS memory of date, time, and system setup parameters by erasing the CMOS RTC...

User Manual
Page 56
... the supervisor password, select the Change Supervisor Password then press twice. Change Supervisor Password Select this item to [Enabled] to erase the RTC RAM. 2-18 Chapter 2: BIOS information Configuration options: [Force BIOS] [Keep Current] Bootup Num-Lock [On] Allows you successfully set to Enabled..., the system waits for information on how to use the ASUS MyLogo2™ feature. The message Password Installed appears after you to be pressed when error occurs. To change the system security settings...
... the supervisor password, select the Change Supervisor Password then press twice. Change Supervisor Password Select this item to [Enabled] to erase the RTC RAM. 2-18 Chapter 2: BIOS information Configuration options: [Force BIOS] [Keep Current] Bootup Num-Lock [On] Allows you successfully set to Enabled..., the system waits for information on how to use the ASUS MyLogo2™ feature. The message Password Installed appears after you to be pressed when error occurs. To change the system security settings...

User Manual
Page 59
... changes to ensure the values you select this option, a confirmation appears. Select OK to discard any changes and load the previously saved values. ASUS P5G41T-M LX Series 2-21 Select Exit & Save Changes or make other than System Date, System Time, and Password, the BIOS asks for a confirmation before... saving the values to the CMOS RAM. Select OK to load the default values for the BIOS items, and save the changes that you to load default values. 2.8 Exit menu...
... changes to ensure the values you select this option, a confirmation appears. Select OK to discard any changes and load the previously saved values. ASUS P5G41T-M LX Series 2-21 Select Exit & Save Changes or make other than System Date, System Time, and Password, the BIOS asks for a confirmation before... saving the values to the CMOS RAM. Select OK to load the default values for the BIOS items, and save the changes that you to load default values. 2.8 Exit menu...


