User Manual
Page 4
... 2-9 2.4.4 Onboard Devices Configuration 2-10 2.4.5 PCI PnP 2-10 2.4.6 USB Configuration 2-10 2.5 Power menu 2-11 2.5.1 Suspend Mode 2-11 2.5.2 ACPI 2.0 Support 2-11 2.5.3 ACPI APIC Support 2-11 2.5.4 APM Configuration 2-12 2.5.5 HW Monitor Configuration 2-12 2.6 Boot menu 2-13 2.6.1 Boot Device Priority 2-13 2.6.2 Boot Settings Configuration 2-13 2.6.3 Security 2-14 2.7 Tools menu 2-15 2.7.1 ASUS EZ Flash 2 2-15 2.7.2 AI NET 2 2-15 2.8 Exit menu...
... 2-9 2.4.4 Onboard Devices Configuration 2-10 2.4.5 PCI PnP 2-10 2.4.6 USB Configuration 2-10 2.5 Power menu 2-11 2.5.1 Suspend Mode 2-11 2.5.2 ACPI 2.0 Support 2-11 2.5.3 ACPI APIC Support 2-11 2.5.4 APM Configuration 2-12 2.5.5 HW Monitor Configuration 2-12 2.6 Boot menu 2-13 2.6.1 Boot Device Priority 2-13 2.6.2 Boot Settings Configuration 2-13 2.6.3 Security 2-14 2.7 Tools menu 2-15 2.7.1 ASUS EZ Flash 2 2-15 2.7.2 AI NET 2 2-15 2.8 Exit menu...

User Manual
Page 16
... power mode). Keep the cap on CLRTC jumper default position. Hold down and reboot the system, then the BIOS automatically resets parameter settings to additional USB ports. 1-7 Chapter 1: Product introduction You can connect to default values. 2. Set to +5VSB to wake up the computer from pins 1-2 (default) to ... setup parameters by erasing the CMOS RTC RAM data. Turn OFF the computer and unplug the power cord. 2. Removing the cap will cause system boot failure! • If the steps above do not need to clear the RTC when the system hangs due to re-enter data. Shut down...
... power mode). Keep the cap on CLRTC jumper default position. Hold down and reboot the system, then the BIOS automatically resets parameter settings to additional USB ports. 1-7 Chapter 1: Product introduction You can connect to default values. 2. Set to +5VSB to wake up the computer from pins 1-2 (default) to ... setup parameters by erasing the CMOS RTC RAM data. Turn OFF the computer and unplug the power cord. 2. Removing the cap will cause system boot failure! • If the steps above do not need to clear the RTC when the system hangs due to re-enter data. Shut down...
User Manual
Page 26
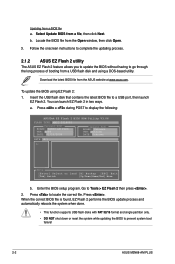
Follow the onscreen instructions to complete the updating process. 2.1.2 ASUS EZ Flash 2 utility The ASUS EZ Flash 2 feature allows you to update the BIOS without having to prevent system boot failure! 2-2 ASUS M2N68-AM PLUS Press + during POST to a USB port, then launch EZ Flash 2. Press . Locate the BIOS file from a USB flash disk and using EZ Flash 2: 1. Updating...
Follow the onscreen instructions to complete the updating process. 2.1.2 ASUS EZ Flash 2 utility The ASUS EZ Flash 2 feature allows you to update the BIOS without having to prevent system boot failure! 2-2 ASUS M2N68-AM PLUS Press + during POST to a USB port, then launch EZ Flash 2. Press . Locate the BIOS file from a USB flash disk and using EZ Flash 2: 1. Updating...
User Manual
Page 27
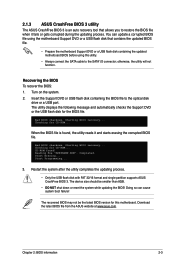
...automatically checks the Support DVD or the USB flash disk for CD-ROM... Bad BIOS checksum. Reading file "M2N68AMP.ROM". Start Erasing... Download the latest BIOS file from the ASUS website at www.asus.com. Starting BIOS recovery... You can cause system boot failure! Recovering the BIOS To recover ...Restart the system after the utility completes the updating process. • Only the USB flash disk with FAT 32/16 format and single partition supports ASUS CrashFree BIOS 3. Insert the Support DVD or USB flash disk containing the BIOS file to restore the BIOS file when it and...
...automatically checks the Support DVD or the USB flash disk for CD-ROM... Bad BIOS checksum. Reading file "M2N68AMP.ROM". Start Erasing... Download the latest BIOS file from the ASUS website at www.asus.com. Starting BIOS recovery... You can cause system boot failure! Recovering the BIOS To recover ...Restart the system after the utility completes the updating process. • Only the USB flash disk with FAT 32/16 format and single partition supports ASUS CrashFree BIOS 3. Insert the Support DVD or USB flash disk containing the BIOS file to restore the BIOS file when it and...
User Manual
Page 30
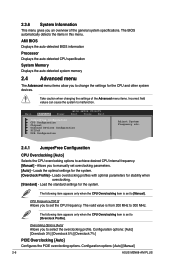
... when the CPU Overclocking item is from 200 MHz to 300 MHz. Configuration options: [Auto] [Manual] 2-6 ASUS M2N68-AM PLUS Main Advanced Power BIOS SETUP UTILITY Boot Tools Exit JumperFree Configuration CPU Configuration Chipset Onboard Devices Configuration PCIPnP USB Configuration Adjust System Frequency etc. 2.4.1 JumperFree Configuration CPU Overclocking [Auto] Selects the CPU overclocking options to...
... when the CPU Overclocking item is from 200 MHz to 300 MHz. Configuration options: [Auto] [Manual] 2-6 ASUS M2N68-AM PLUS Main Advanced Power BIOS SETUP UTILITY Boot Tools Exit JumperFree Configuration CPU Configuration Chipset Onboard Devices Configuration PCIPnP USB Configuration Adjust System Frequency etc. 2.4.1 JumperFree Configuration CPU Overclocking [Auto] Selects the CPU overclocking options to...
User Manual
Page 34
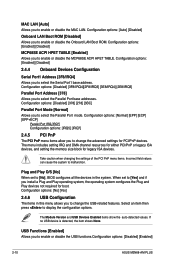
... to [Yes] and if you to change the USB-related features. If no USB device is detected, the item shows None. Configuration options: [Auto] [Disabled] Onboard LAN Boot ROM [Disabled] Allows you to enable or disable the USB functions.Configuration options: [Disabled] [Enabled] 2-10 ASUS M2N68-AM PLUS The menu includes setting IRQ and DMA channel resources...
... to [Yes] and if you to change the USB-related features. If no USB device is detected, the item shows None. Configuration options: [Auto] [Disabled] Onboard LAN Boot ROM [Disabled] Allows you to enable or disable the USB functions.Configuration options: [Disabled] [Enabled] 2-10 ASUS M2N68-AM PLUS The menu includes setting IRQ and DMA channel resources...


