
User Manual
Page 34
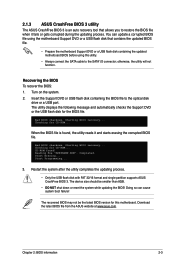
... Pm49FL004T LPC/FWH File Name to Continue Write OK F1 Reset No Update Write Fail 34 BIOS OFE00 OK Write OK No Update Write Fail Warning: Don't Turn Off Power Or Reset System! 在更新 BIOS 9 Flash Complete BIOS F1 AwardBIOS Flash Utility for ASUS V1.14 (C) Phoenix Technologies Ltd. All Rights Reserved For...PMC Pm49FL004T LPC/FWH File Name to Program: M2A-VM HDMI.bin Flashing Complete Press to Program: M2A-VM HDMI.bin Programming Flash Memory - 7 BIOS N BIOS 8 BIOS BIOS AwardBIOS Flash Utility for ASUS V1.14 (C) Phoenix Technologies Ltd.
... Pm49FL004T LPC/FWH File Name to Continue Write OK F1 Reset No Update Write Fail 34 BIOS OFE00 OK Write OK No Update Write Fail Warning: Don't Turn Off Power Or Reset System! 在更新 BIOS 9 Flash Complete BIOS F1 AwardBIOS Flash Utility for ASUS V1.14 (C) Phoenix Technologies Ltd. All Rights Reserved For...PMC Pm49FL004T LPC/FWH File Name to Program: M2A-VM HDMI.bin Flashing Complete Press to Program: M2A-VM HDMI.bin Programming Flash Memory - 7 BIOS N BIOS 8 BIOS BIOS AwardBIOS Flash Utility for ASUS V1.14 (C) Phoenix Technologies Ltd.

User Manual
Page 16
... by erasing the CMOS RTC RAM data. Keep the cap on CLRTC jumper default position. Shut down the key during the boot process and enter BIOS setup to default values. 2. You can connect to pins 1-2. 3. To erase the RTC RAM: 1. The USBPW5-10 jumper is for about... 5-10 seconds, then move the jumper again to pins 2-3. Hold down and reboot the system, then the BIOS automatically resets parameter settings to re-enter data. Set to +5VSB to overclocking, use the CPU Parameter Recall (C.P.R.) feature. 1.6 Jumpers 1. The onboard button cell...
... by erasing the CMOS RTC RAM data. Keep the cap on CLRTC jumper default position. Shut down the key during the boot process and enter BIOS setup to default values. 2. You can connect to pins 1-2. 3. To erase the RTC RAM: 1. The USBPW5-10 jumper is for about... 5-10 seconds, then move the jumper again to pins 2-3. Hold down and reboot the system, then the BIOS automatically resets parameter settings to re-enter data. Set to +5VSB to overclocking, use the CPU Parameter Recall (C.P.R.) feature. 1.6 Jumpers 1. The onboard button cell...
User Manual
Page 22
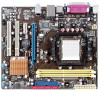
... 2-pin connector is for the HDD Activity LED. The IDE LED lights up when you turn on the BIOS settings. Pressing the power button turns the system ON or puts the system in the BIOS is for a chassis-mounted front panel audio I /O module cable to this connector, ensure that supports either...LED cable to this connector. Pressing the power switch for more than four seconds while the system is ON turns the system OFF. • Reset button (2-pin RESET) This 2-pin connector is for the system power LED. Connect the HDD Activity LED cable to [HD Audio]. Connect one end of the front...
... 2-pin connector is for the HDD Activity LED. The IDE LED lights up when you turn on the BIOS settings. Pressing the power button turns the system ON or puts the system in the BIOS is for a chassis-mounted front panel audio I /O module cable to this connector, ensure that supports either...LED cable to this connector. Pressing the power switch for more than four seconds while the system is ON turns the system OFF. • Reset button (2-pin RESET) This 2-pin connector is for the system power LED. Connect the HDD Activity LED cable to [HD Audio]. Connect one end of the front...
User Manual
Page 26
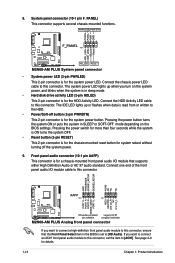
...; DO NOT shut down or reset the system while updating the BIOS to a USB port, then launch EZ Flash 2. Locate the BIOS file from the ASUS website at www.asus.com. Follow the onscreen instructions to complete the updating process. 2.1.2 ASUS EZ Flash 2 utility The ASUS EZ Flash 2 feature allows you... Backup [ESC] Exit [Tab] Switch [Up/Down/Home/End] Move b. Insert the USB flash disk that contains the latest BIOS file to prevent system boot failure! 2-2 ASUS M2N68-AM PLUS Updating from a file, then click Next. You can launch EZ Flash 2 in two ways. a. Go to locate the correct...
...; DO NOT shut down or reset the system while updating the BIOS to a USB port, then launch EZ Flash 2. Locate the BIOS file from the ASUS website at www.asus.com. Follow the onscreen instructions to complete the updating process. 2.1.2 ASUS EZ Flash 2 utility The ASUS EZ Flash 2 feature allows you... Backup [ESC] Exit [Tab] Switch [Up/Down/Home/End] Move b. Insert the USB flash disk that contains the latest BIOS file to prevent system boot failure! 2-2 ASUS M2N68-AM PLUS Updating from a file, then click Next. You can launch EZ Flash 2 in two ways. a. Go to locate the correct...
User Manual
Page 27
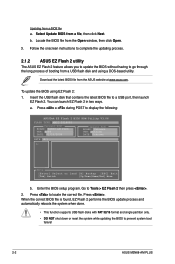
...USB flash disk that allows you to restore the BIOS file when it and starts erasing the corrupted BIOS file. The recovered BIOS may not be smaller than 8GB. • DO NOT shut down or reset the system while updating the BIOS! Restart the system after the utility completes the ...updating process. • Only the USB flash disk with FAT 32/16 format and single partition supports ASUS CrashFree BIOS 3. Bad BIOS checksum. You can cause system boot failure...
...USB flash disk that allows you to restore the BIOS file when it and starts erasing the corrupted BIOS file. The recovered BIOS may not be smaller than 8GB. • DO NOT shut down or reset the system while updating the BIOS! Restart the system after the utility completes the ...updating process. • Only the USB flash disk with FAT 32/16 format and single partition supports ASUS CrashFree BIOS 3. Bad BIOS checksum. You can cause system boot failure...
User Manual
Page 28
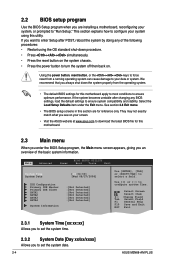
... enter Setup after changing any of the basic system information. Select Screen Select Item +- We recommend that you see on . 2.2 BIOS setup program Use the BIOS Setup program when you to set the system time. 2.3.2 System Date [Day xx/xx/xxxx] Allows you are for reference only....system can cause damage to your system, or prompted to set the system date. 2-4 ASUS M2N68-AM PLUS They may not exactly match what you always shut down procedure. • Press ++ simultaneously. • Press the reset button on the system chassis. • Press the power button to turn the system ...
... enter Setup after changing any of the basic system information. Select Screen Select Item +- We recommend that you see on . 2.2 BIOS setup program Use the BIOS Setup program when you to set the system time. 2.3.2 System Date [Day xx/xx/xxxx] Allows you are for reference only....system can cause damage to your system, or prompted to set the system date. 2-4 ASUS M2N68-AM PLUS They may not exactly match what you always shut down procedure. • Press ++ simultaneously. • Press the reset button on the system chassis. • Press the power button to turn the system ...


