
User Manual
Page 31
BIOS 2.1 使用 AFUDOS BIOS AFUDOS DOS BIOS BIOS 程式。AFUDOS BIOS BIOS BIOS 程式 BIOS 程式。 1.2MB BIOS 1 AFUDOS 程式(afudos. Reading flash ..... ok A:\> 當 BIOS DOS 31 All rights reserved. Version 1.19(ASUS V2.07(03.11.24BB)) Copyright (C) 2002 American Megatrends, Inc. done Write to file...... exe 2 DOS afudos /o[filename filename A:\>afudos /oOLDBIOS1.rom 3. 按下 afudos /oOLDBIOS1.rom AMI Firmware Update Utility -
BIOS 2.1 使用 AFUDOS BIOS AFUDOS DOS BIOS BIOS 程式。AFUDOS BIOS BIOS BIOS 程式 BIOS 程式。 1.2MB BIOS 1 AFUDOS 程式(afudos. Reading flash ..... ok A:\> 當 BIOS DOS 31 All rights reserved. Version 1.19(ASUS V2.07(03.11.24BB)) Copyright (C) 2002 American Megatrends, Inc. done Write to file...... exe 2 DOS afudos /o[filename filename A:\>afudos /oOLDBIOS1.rom 3. 按下 afudos /oOLDBIOS1.rom AMI Firmware Update Utility -

User Manual
Page 32
... reserved. done Reading flash ...... done Advance Check ...... WARNING!! WARNING!! 更新 BIOS 程式 AFUDOS BIOS 程式。 1 tw.asus.com BIOS 片中。 BIOS BIOS 2. 將 AFUDOS.EXE BIOS 3 DOS afudos /i[filename filename BIOS 程式。 A:\>afudos /iP5B-VM DO.ROM 4. Version 1.19(ASUS V2.07(03.11.24BB)) Copyright (C) 2002 American Megatrends, Inc. AFUDOS...
... reserved. done Reading flash ...... done Advance Check ...... WARNING!! WARNING!! 更新 BIOS 程式 AFUDOS BIOS 程式。 1 tw.asus.com BIOS 片中。 BIOS BIOS 2. 將 AFUDOS.EXE BIOS 3 DOS afudos /i[filename filename BIOS 程式。 A:\>afudos /iP5B-VM DO.ROM 4. Version 1.19(ASUS V2.07(03.11.24BB)) Copyright (C) 2002 American Megatrends, Inc. AFUDOS...

User Manual
Page 33
... 程式(AWDFLASH.EXE BIOS AwardBIOS Flash BIOS 程式。 1 http://tw.asus.com BIOS M2N-VM HDMI.bin FAT 32/16 格式的 USB BIOS 2 CD/DVD AwardBIOS Flash BIOS 3 DOS 4. 當 A BIOS 檔案與 AwardBIOS Flash 5 A awdflash 並按下 鍵。 AwardBIOS Flash Utility for ASUS V1.14 (C) Phoenix Technologies Ltd...
... 程式(AWDFLASH.EXE BIOS AwardBIOS Flash BIOS 程式。 1 http://tw.asus.com BIOS M2N-VM HDMI.bin FAT 32/16 格式的 USB BIOS 2 CD/DVD AwardBIOS Flash BIOS 3 DOS 4. 當 A BIOS 檔案與 AwardBIOS Flash 5 A awdflash 並按下 鍵。 AwardBIOS Flash Utility for ASUS V1.14 (C) Phoenix Technologies Ltd...

User Manual
Page 34
... OK Write OK No Update Write Fail Warning: Don't Turn Off Power Or Reset System! 在更新 BIOS 9 Flash Complete BIOS F1 AwardBIOS Flash Utility for ASUS V1.14 (C) Phoenix Technologies Ltd. All Rights Reserved For C51PV-MCP51-M2A-VM HDMI-00 DATE:04/13/2006 Flash Type - All Rights Reserved For...
... OK Write OK No Update Write Fail Warning: Don't Turn Off Power Or Reset System! 在更新 BIOS 9 Flash Complete BIOS F1 AwardBIOS Flash Utility for ASUS V1.14 (C) Phoenix Technologies Ltd. All Rights Reserved For C51PV-MCP51-M2A-VM HDMI-00 DATE:04/13/2006 Flash Type - All Rights Reserved For...
User Manual
Page 3
Contents Notices...v Safety information vi About this guide vi M2N68-AM PLUS specifications summary viii Chapter 1: Product introduction 1.1 Before you proceed 1-1 1.2 Motherboard overview 1-2 1.2.1 Motherboard layout 1-2 1.2.2 Layout contents 1-2 ... 1.7.2 Internal connectors 1-9 1.8 Software support 1-15 1.8.1 Installing an operating system 1-15 1.8.2 Support DVD information 1-15 Chapter 2: BIOS information 2.1 Managing and updating your BIOS 2-1 2.1.1 ASUS Update utility 2-1 2.1.2 ASUS EZ Flash 2 utility 2-2 2.1.3 ASUS CrashFree BIOS 3 utility 2-3 2.2 BIOS setup program 2-4 iii
Contents Notices...v Safety information vi About this guide vi M2N68-AM PLUS specifications summary viii Chapter 1: Product introduction 1.1 Before you proceed 1-1 1.2 Motherboard overview 1-2 1.2.1 Motherboard layout 1-2 1.2.2 Layout contents 1-2 ... 1.7.2 Internal connectors 1-9 1.8 Software support 1-15 1.8.1 Installing an operating system 1-15 1.8.2 Support DVD information 1-15 Chapter 2: BIOS information 2.1 Managing and updating your BIOS 2-1 2.1.1 ASUS Update utility 2-1 2.1.2 ASUS EZ Flash 2 utility 2-2 2.1.3 ASUS CrashFree BIOS 3 utility 2-3 2.2 BIOS setup program 2-4 iii
User Manual
Page 6
.... These devices could interrupt the grounding circuit. • Ensure that your power supply is set to change system settings through the BIOS setup menus. Detailed descriptions of the electrical outlet you need when installing and configuring the motherboard. Do not place the product in your... • Chapter 1: Product introduction This chapter describes the features of the motherboard and the new technology it supports. • Chapter 2: BIOS information This chapter tells how to the correct voltage in any area where it may become wet. • Place the product on it by...
.... These devices could interrupt the grounding circuit. • Ensure that your power supply is set to change system settings through the BIOS setup menus. Detailed descriptions of the electrical outlet you need when installing and configuring the motherboard. Do not place the product in your... • Chapter 1: Product introduction This chapter describes the features of the motherboard and the new technology it supports. • Chapter 2: BIOS information This chapter tells how to the correct voltage in any area where it may become wet. • Place the product on it by...
User Manual
Page 9
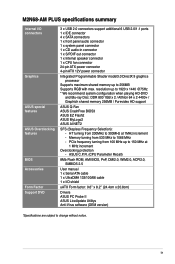
... SMBIOS 2.5 User manual 1 x Serial ATA cable 1 x UltraDMA 133/100/66 cable 1 x I /O connectors Graphics ASUS special features ASUS Overclocking features BIOS Accessories Form Factor Support DVD 3 x USB 2.0 connectors support additional 6 USB 2.0/1.1 ports 1 x IDE connector 4 x SATA... memory 256MB / Purevideo HD support ASUS Q-Fan ASUS CrashFree BIOS3 ASUS EZ Flash2 ASUS MyLogo2 ASUS AI NET2 SFS (Stepless Frequency Selection): - resolution up to 256MB Supports RGB with max. PCIe frequency turning from 533 MHz to 1066 MHz - M2N68-AM PLUS specifications summary Internal I /O shield ...
... SMBIOS 2.5 User manual 1 x Serial ATA cable 1 x UltraDMA 133/100/66 cable 1 x I /O connectors Graphics ASUS special features ASUS Overclocking features BIOS Accessories Form Factor Support DVD 3 x USB 2.0 connectors support additional 6 USB 2.0/1.1 ports 1 x IDE connector 4 x SATA... memory 256MB / Purevideo HD support ASUS Q-Fan ASUS CrashFree BIOS3 ASUS EZ Flash2 ASUS MyLogo2 ASUS AI NET2 SFS (Stepless Frequency Selection): - resolution up to 256MB Supports RGB with max. PCIe frequency turning from 533 MHz to 1066 MHz - M2N68-AM PLUS specifications summary Internal I /O shield ...
User Manual
Page 15
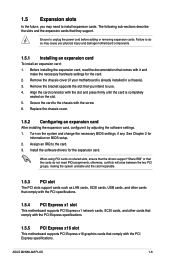
...slot and press firmly until the card is already installed in a chassis). 3. Turn on the slot. 5. When using PCI cards on BIOS setup. 2. Before installing the expansion card, read the documentation that comply with the screw. 6. Remove the chassis cover (if your ...completely seated on the system and change the necessary BIOS settings, if any. Replace the chassis cover. 1.5.2 Configuring an expansion card After installing the expansion card, configure it and make the necessary hardware settings for the card. 2. ASUS M2N68-AM PLUS 1-6 See Chapter 2 for the expansion card....
...slot and press firmly until the card is already installed in a chassis). 3. Turn on the slot. 5. When using PCI cards on BIOS setup. 2. Before installing the expansion card, read the documentation that comply with the screw. 6. Remove the chassis cover (if your ...completely seated on the system and change the necessary BIOS settings, if any. Replace the chassis cover. 1.5.2 Configuring an expansion card After installing the expansion card, configure it and make the necessary hardware settings for the card. 2. ASUS M2N68-AM PLUS 1-6 See Chapter 2 for the expansion card....

User Manual
Page 16
... modes (no power to default values. 2. Move the jumper cap from pins 1-2 (default) to re-enter data. Hold down and reboot the system, then the BIOS automatically resets parameter settings to CPU, DRAM in slow refresh, power supply in low power mode) using the connected USB devices. 1.6 Jumpers 1. Keep the cap... Time Clock (RTC) RAM in CMOS, which include system setup information such as system passwords. Shut down the key during the boot process and enter BIOS setup to pins 2-3.
... modes (no power to default values. 2. Move the jumper cap from pins 1-2 (default) to re-enter data. Hold down and reboot the system, then the BIOS automatically resets parameter settings to CPU, DRAM in slow refresh, power supply in low power mode) using the connected USB devices. 1.6 Jumpers 1. Keep the cap... Time Clock (RTC) RAM in CMOS, which include system setup information such as system passwords. Shut down the key during the boot process and enter BIOS setup to pins 2-3.

User Manual
Page 17
...BLINKING Data activity SPEED LED Status OFF ORANGE GREEN Description 10 Mbps connection 100 Mbps connection 1 Gbps connection LED LED (Orange) (Green) LAN port ASUS M2N68-AM PLUS 1-8 This feature requires an ATX power supply that can wake up feature. Keyboard/mouse power (3-pin KBPW) This jumper allows you can supply at least... or disable the keyboard/mouse and USB port 1-4 wake-up the computer by pressing a key on the +5VSB lead, and a corresponding setting in the BIOS. This 25-pin port connects a parallel printer, a scanner, or other devices. 3. Parallel port.
...BLINKING Data activity SPEED LED Status OFF ORANGE GREEN Description 10 Mbps connection 100 Mbps connection 1 Gbps connection LED LED (Orange) (Green) LAN port ASUS M2N68-AM PLUS 1-8 This feature requires an ATX power supply that can wake up feature. Keyboard/mouse power (3-pin KBPW) This jumper allows you can supply at least... or disable the keyboard/mouse and USB port 1-4 wake-up the computer by pressing a key on the +5VSB lead, and a corresponding setting in the BIOS. This 25-pin port connects a parallel printer, a scanner, or other devices. 3. Parallel port.
User Manual
Page 22
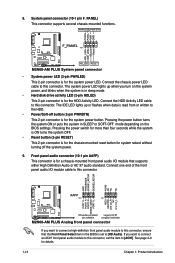
... is read from or written to the HDD. • Power/Soft-off the system power. 9. The IDE LED lights up when you turn on the BIOS settings. Connect one end of the front panel audio I /O module that the Front Panel Select item in sleep mode. • Hard disk drive activity LED... system ON or puts the system in SLEEP or SOFT-OFF mode depending on the system power, and blinks when the system is in the BIOS is for the system power LED. If you want to connect a high-definition front panel audio module to this connector. 8. If you want to connect...
... is read from or written to the HDD. • Power/Soft-off the system power. 9. The IDE LED lights up when you turn on the BIOS settings. Connect one end of the front panel audio I /O module that the Front Panel Select item in sleep mode. • Hard disk drive activity LED... system ON or puts the system in SLEEP or SOFT-OFF mode depending on the system power, and blinks when the system is in the BIOS is for the system power LED. If you want to connect a high-definition front panel audio module to this connector. 8. If you want to connect...
User Manual
Page 25
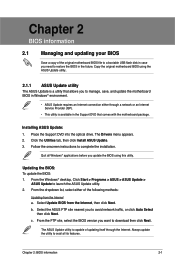
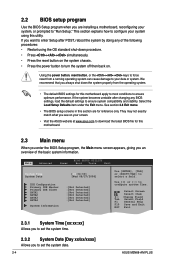
...click Next. Always update the utility to avail all Windows® applications before you update the BIOS using the ASUS Update utility.. 2.1.1 ASUS Update utility The ASUS Update is available in the Support DVD that comes with the motherboard package. The Drivers menu... appears. 2. c. Select Update BIOS from the Internet a. Chapter 2: BIOS information 2-1 Installing ASUS Update: 1. Chapter 2 BIOS information 2.1 Managing and updating your BIOS Save a copy of the original motherboard BIOS file to a bootable USB flash disk in case you to...
...click Next. Always update the utility to avail all Windows® applications before you update the BIOS using the ASUS Update utility.. 2.1.1 ASUS Update utility The ASUS Update is available in the Support DVD that comes with the motherboard package. The Drivers menu... appears. 2. c. Select Update BIOS from the Internet a. Chapter 2: BIOS information 2-1 Installing ASUS Update: 1. Chapter 2 BIOS information 2.1 Managing and updating your BIOS Save a copy of the original motherboard BIOS file to a bootable USB flash disk in case you to...
User Manual
Page 26
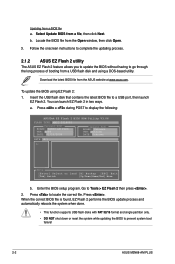
... can launch EZ Flash 2 in two ways. Insert the USB flash disk that contains the latest BIOS file to prevent system boot failure! 2-2 ASUS M2N68-AM PLUS When the correct BIOS file is found, EZ Flash 2 performs the BIOS update process and automatically reboots the system when done. • This function supports USB flash disks with...
... can launch EZ Flash 2 in two ways. Insert the USB flash disk that contains the latest BIOS file to prevent system boot failure! 2-2 ASUS M2N68-AM PLUS When the correct BIOS file is found, EZ Flash 2 performs the BIOS update process and automatically reboots the system when done. • This function supports USB flash disks with...
User Manual
Page 27
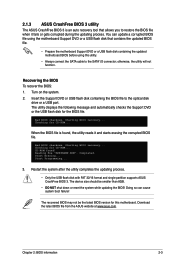
... smaller than 8GB. • DO NOT shut down or reset the system while updating the BIOS! Starting BIOS recovery... 2.1.3 ASUS CrashFree BIOS 3 utility The ASUS CrashFree BIOS 3 is found ! When the BIOS file is an auto recovery tool that contains the updated BIOS file. • Prepare the motherboard Support DVD or a USB flash disk containing the updated motherboard...
... smaller than 8GB. • DO NOT shut down or reset the system while updating the BIOS! Starting BIOS recovery... 2.1.3 ASUS CrashFree BIOS 3 utility The ASUS CrashFree BIOS 3 is found ! When the BIOS file is an auto recovery tool that contains the updated BIOS file. • Prepare the motherboard Support DVD or a USB flash disk containing the updated motherboard...
User Manual
Page 28
... Setup." Using the power button, reset button, or the ++ keys to force reset from the operating system. • The default BIOS settings for this motherboard apply to most conditions to ensure optimum performance. If the system becomes unstable after POST, reboot the system by... this section are installing a motherboard, reconfiguring your screen. • Visit the ASUS website at www.asus.com to set the system date. 2-4 ASUS M2N68-AM PLUS Use [+] or [-] to select a field. Main Advanced Power BIOS SETUP UTILITY Boot Tools Exit System Time 19:34:30] System Date [Wed...
... Setup." Using the power button, reset button, or the ++ keys to force reset from the operating system. • The default BIOS settings for this motherboard apply to most conditions to ensure optimum performance. If the system becomes unstable after POST, reboot the system by... this section are installing a motherboard, reconfiguring your screen. • Visit the ASUS website at www.asus.com to set the system date. 2-4 ASUS M2N68-AM PLUS Use [+] or [-] to select a field. Main Advanced Power BIOS SETUP UTILITY Boot Tools Exit System Time 19:34:30] System Date [Wed...
User Manual
Page 29
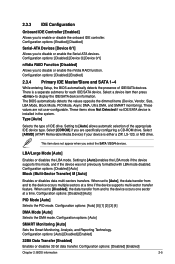
.../SATA device information. Configuration options: [Disabled] [Auto] PIO Mode [Auto] Selects the PIO mode. Configuration options: [Disabled] [Enabled] Chapter 2: BIOS information 2-5 Select [ARMD] (ATAPI Removable Media Device) if your device is either a ZIP, LS-120, or MO drive. Configuration options: [Disabled...Device 0] [Device 0/1] nVidia RAID Function [Disabled] Allows you to [Auto] allows automatic selection of the appropriate IDE device type. The BIOS automatically detects the values opposite the dimmed items (Device, Vendor, Size, LBA Mode, Block Mode, PIO Mode, Async DMA, Ultra DMA,...
.../SATA device information. Configuration options: [Disabled] [Auto] PIO Mode [Auto] Selects the PIO mode. Configuration options: [Disabled] [Enabled] Chapter 2: BIOS information 2-5 Select [ARMD] (ATAPI Removable Media Device) if your device is either a ZIP, LS-120, or MO drive. Configuration options: [Disabled...Device 0] [Device 0/1] nVidia RAID Function [Disabled] Allows you to [Auto] allows automatic selection of the appropriate IDE device type. The BIOS automatically detects the values opposite the dimmed items (Device, Vendor, Size, LBA Mode, Block Mode, PIO Mode, Async DMA, Ultra DMA,...
User Manual
Page 30
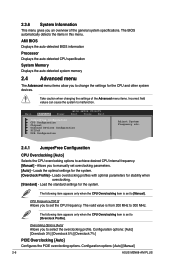
... Overclocking [Auto] Configures the PCIE overclocking options. Overcloking Options [Auto] Allows you to change the settings for stability when overclocking. [Standard] - AMI BIOS Displays the auto-detected BIOS information Processor Displays the auto-detected CPU specification System Memory Displays the auto-detected system memory 2.4 Advanced menu The Advanced menu items allow...values can cause the system to malfunction. Loads overclocking profiles with optimal parameters for the CPU and other system devices. Configuration options: [Auto] [Manual] 2-6 ASUS M2N68-AM PLUS
... Overclocking [Auto] Configures the PCIE overclocking options. Overcloking Options [Auto] Allows you to change the settings for stability when overclocking. [Standard] - AMI BIOS Displays the auto-detected BIOS information Processor Displays the auto-detected CPU specification System Memory Displays the auto-detected system memory 2.4 Advanced menu The Advanced menu items allow...values can cause the system to malfunction. Loads overclocking profiles with optimal parameters for the CPU and other system devices. Configuration options: [Auto] [Manual] 2-6 ASUS M2N68-AM PLUS
User Manual
Page 31
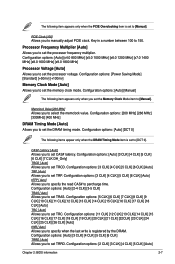
... to set to select the memclock value. PCIE Clock [100] Allows you to manually adjust PCIE clock. Configuration options: [2 CLK] [3 CLK] [4 CLK] [5 CLK] [Auto] Chapter 2: BIOS information 2-7 Configuration options: [3 CLK] [4 CLK] [5 CLK] [6 CLK] [Auto] tRTP [ Auto] Allows you to [Manual]. Configuration options: [Auto] [DCT 0] The following item appears only when the...
... to set to select the memclock value. PCIE Clock [100] Allows you to manually adjust PCIE clock. Configuration options: [2 CLK] [3 CLK] [4 CLK] [5 CLK] [Auto] Chapter 2: BIOS information 2-7 Configuration options: [3 CLK] [4 CLK] [5 CLK] [6 CLK] [Auto] tRTP [ Auto] Allows you to [Manual]. Configuration options: [Auto] [DCT 0] The following item appears only when the...
User Manual
Page 33
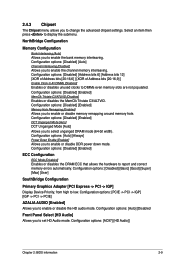
... Audio mode. Configuration options: [Disabled] [Enabled] MemClk Tristate C3/ATLVID [Disabled] Enables or disables the MemClk Tristate C3/ALTVID. Configuration options: [AC97] [HD Audio]] Chapter 2: BIOS information 2-9 NorthBridge Configuration Memory Configuration Bank Interleaving [Auto] Allows you to enable the channel memory interleaving. Configuration options: [Disabled] [Basic] [Good] [Super] [Max] [User] SouthBridge...
... Audio mode. Configuration options: [Disabled] [Enabled] MemClk Tristate C3/ATLVID [Disabled] Enables or disables the MemClk Tristate C3/ALTVID. Configuration options: [AC97] [HD Audio]] Chapter 2: BIOS information 2-9 NorthBridge Configuration Memory Configuration Bank Interleaving [Auto] Allows you to enable the channel memory interleaving. Configuration options: [Disabled] [Basic] [Good] [Super] [Max] [User] SouthBridge...
User Manual
Page 34
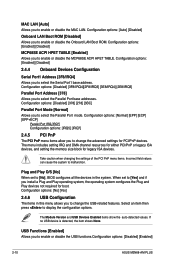
...: [Auto] [Disabled] Onboard LAN Boot ROM [Disabled] Allows you to enable or disable the USB functions.Configuration options: [Disabled] [Enabled] 2-10 ASUS M2N68-AM PLUS Configuration options: [Disabled] [378] [278] [3BC] Parallel Port Mode [Normal] Allows you to change the advanced settings for boot. The menu includes...system. Configuration options: [Disabled] [3F8/IRQ4][2F8/IRQ3] [3E8/IRQ4] [2E8/IRQ3] Parallel Port Address [378] Allows you to [No], BIOS configures all the devices in this menu allows you to select the Parallel Port mode. Plug and Play O/S [No] When set to [Yes] and...
...: [Auto] [Disabled] Onboard LAN Boot ROM [Disabled] Allows you to enable or disable the USB functions.Configuration options: [Disabled] [Enabled] 2-10 ASUS M2N68-AM PLUS Configuration options: [Disabled] [378] [278] [3BC] Parallel Port Mode [Normal] Allows you to change the advanced settings for boot. The menu includes...system. Configuration options: [Disabled] [3F8/IRQ4][2F8/IRQ3] [3E8/IRQ4] [2E8/IRQ3] Parallel Port Address [378] Allows you to [No], BIOS configures all the devices in this menu allows you to select the Parallel Port mode. Plug and Play O/S [No] When set to [Yes] and...


