User Manual
Page 9
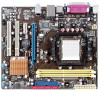
M2N68-AM PLUS specifications summary Internal I /O shield uATX Form factor: 9.6'' x 8.2'' (24.4cm x 20.8cm) Drivers ASUS PC Probe II ASUS LiveUpdate Utilitys Anti-Virus software (OEM version) *Specifications are subject to change without notice. Memory turning from 200MHz to 300MHz at 1 MHz increment Overclocking protection - ...
M2N68-AM PLUS specifications summary Internal I /O shield uATX Form factor: 9.6'' x 8.2'' (24.4cm x 20.8cm) Drivers ASUS PC Probe II ASUS LiveUpdate Utilitys Anti-Virus software (OEM version) *Specifications are subject to change without notice. Memory turning from 200MHz to 300MHz at 1 MHz increment Overclocking protection - ...
User Manual
Page 15
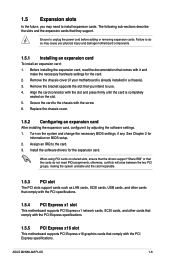
Remove the chassis cover (if your motherboard is completely seated on shared slots, ensure that the drivers support "Share IRQ" or that the cards do so may need IRQ assignments; ASUS M2N68-AM PLUS 1-6 Remove the bracket opposite the slot that comply with the screw. 6. When using PCI cards on...connector with it by adjusting the software settings. 1. Assign an IRQ to use. 4. Turn on BIOS setup. 2. Install the software drivers for information on the system and change the necessary BIOS settings, if any. The following sub-sections describe the slots and the expansion ...
Remove the chassis cover (if your motherboard is completely seated on shared slots, ensure that the drivers support "Share IRQ" or that the cards do so may need IRQ assignments; ASUS M2N68-AM PLUS 1-6 Remove the bracket opposite the slot that comply with the screw. 6. When using PCI cards on...connector with it by adjusting the software settings. 1. Assign an IRQ to use. 4. Turn on BIOS setup. 2. Install the software drivers for information on the system and change the necessary BIOS settings, if any. The following sub-sections describe the slots and the expansion ...
User Manual
Page 24
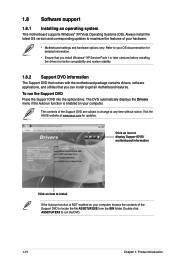
... settings and hardware options vary. Double-click ASSETUP.EXE to change at www.asus.com for better compatibility and system stability. 1.8.2 Support DVD information The Support DVD that comes with the motherboard package contains drivers, software applications, and utilities that you install Windows® XP Service Pack ... Support DVD are subject to run the Support DVD Place the Support DVD into the optical drive. The DVD automatically displays the Drivers menu if the Autorun function is NOT enabled on your OS documentation for detailed information. • Ensure that you can install...
... settings and hardware options vary. Double-click ASSETUP.EXE to change at www.asus.com for better compatibility and system stability. 1.8.2 Support DVD information The Support DVD that comes with the motherboard package contains drivers, software applications, and utilities that you install Windows® XP Service Pack ... Support DVD are subject to run the Support DVD Place the Support DVD into the optical drive. The DVD automatically displays the Drivers menu if the Autorun function is NOT enabled on your OS documentation for detailed information. • Ensure that you can install...
User Manual
Page 25
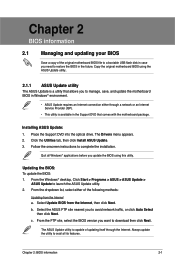
...in the future. The Drivers menu appears. 2. Click the Utilities tab, then click Install ASUS Update. 3. Always update the utility to avail all Windows® applications before you update the BIOS using the ASUS Update utility.. 2.1.1 ASUS Update utility The ASUS Update is a utility... package. b. Copy the original motherboard BIOS using this utility. From the Windows® desktop, Click Start > Programs > ASUS > ASUS Update > ASUS Update to complete the installation. Select Update BIOS from the Internet a. From the FTP site, select the BIOS version you to...
...in the future. The Drivers menu appears. 2. Click the Utilities tab, then click Install ASUS Update. 3. Always update the utility to avail all Windows® applications before you update the BIOS using the ASUS Update utility.. 2.1.1 ASUS Update utility The ASUS Update is a utility... package. b. Copy the original motherboard BIOS using this utility. From the Windows® desktop, Click Start > Programs > ASUS > ASUS Update > ASUS Update to complete the installation. Select Update BIOS from the Internet a. From the FTP site, select the BIOS version you to...
User Manual
Page 32
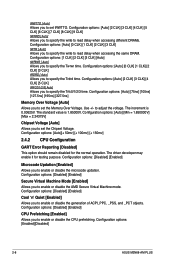
...50mv] [+ 100mv] [+ 150mv] 2.4.2 CPU Configuration GART Error Reporting [Disabled] This option should remain disabled for testing purpose. Configuration options: [Enabled][Disabled] 2-8 ASUS M2N68-AM PLUS Configuration options: [Auto] [2 CLK] [3 CLK] [4 CLK] [5 CLK] [6 CLK] [7 CLK] [8 CLK] [9 CLK] tWRRD [ Auto] Allows ...5ns] [195ns] [327.5ns] Memory Over Voltage [Auto] Allows you to set tRWTTO. The standard value is 0.00625V. The driver developer may enable it for the normal operation. Configuration options: [Disabled] [Enabled] Microcode Updation [Enabled] Allows you to enable or...
...50mv] [+ 100mv] [+ 150mv] 2.4.2 CPU Configuration GART Error Reporting [Disabled] This option should remain disabled for testing purpose. Configuration options: [Enabled][Disabled] 2-8 ASUS M2N68-AM PLUS Configuration options: [Auto] [2 CLK] [3 CLK] [4 CLK] [5 CLK] [6 CLK] [7 CLK] [8 CLK] [9 CLK] tWRRD [ Auto] Allows ...5ns] [195ns] [327.5ns] Memory Over Voltage [Auto] Allows you to set tRWTTO. The standard value is 0.00625V. The driver developer may enable it for the normal operation. Configuration options: [Disabled] [Enabled] Microcode Updation [Enabled] Allows you to enable or...


