
User Manual
Page 4
... the first time 2-51 2.5 Turning off the computer 2-52 2.5.1 Using the OS shut down function 2-52 2.5.2 Using the dual function power switch 2-52 Chapter 3: BIOS setup 3.1 Knowing BIOS 3-1 3.2 BIOS setup program 3-1 3.2.1 EZ Mode 3-2 3.2.2 Advanced Mode 3-3 3.3 Extreme Tweaker menu 3-5 3.4 Main menu 3-12 3.4.1 System Language [English 3-12 3.4.2 System Date [Day xx/xx/xxxx 3-12 3.4.3 System...
... the first time 2-51 2.5 Turning off the computer 2-52 2.5.1 Using the OS shut down function 2-52 2.5.2 Using the dual function power switch 2-52 Chapter 3: BIOS setup 3.1 Knowing BIOS 3-1 3.2 BIOS setup program 3-1 3.2.1 EZ Mode 3-2 3.2.2 Advanced Mode 3-3 3.3 Extreme Tweaker menu 3-5 3.4 Main menu 3-12 3.4.1 System Language [English 3-12 3.4.2 System Date [Day xx/xx/xxxx 3-12 3.4.3 System...
User Manual
Page 5
... 3-37 3.9 Exit menu 3-38 3.10 Updating BIOS 3-39 3.10.1 ASUS Update utility 3-40 3.10.2 ASUS EZ Flash 2 Utility 3-43 3.10.3 ASUS BIOS Updater 3-45 Chapter 4: Software support 4.1 Installing an operating system 4-1 4.2 Support DVD information 4-1 4.2.1 Running the support DVD 4-1 4.2.2 Drivers menu 4-2 4.2.3 Utilities menu 4-3 4.2.4 Make disk menu 4-4 4.2.5 Manual menu 4-4 4.2.6 Video menu 4-5 4.2.7 ASUS Contact information 4-5 4.2.8 Other information 4-6 4.3 Software information...
... 3-37 3.9 Exit menu 3-38 3.10 Updating BIOS 3-39 3.10.1 ASUS Update utility 3-40 3.10.2 ASUS EZ Flash 2 Utility 3-43 3.10.3 ASUS BIOS Updater 3-45 Chapter 4: Software support 4.1 Installing an operating system 4-1 4.2 Support DVD information 4-1 4.2.1 Running the support DVD 4-1 4.2.2 Drivers menu 4-2 4.2.3 Utilities menu 4-3 4.2.4 Make disk menu 4-4 4.2.5 Manual menu 4-4 4.2.6 Video menu 4-5 4.2.7 ASUS Contact information 4-5 4.2.8 Other information 4-6 4.3 Software information...
User Manual
Page 6
... Audio 4-31 4.3.11 Sound Blaster X-Fi MB 2 4-35 4.4 RAID configurations 4-38 4.4.1 RAID definitions 4-38 4.4.2 Installing Serial ATA hard disks 4-39 4.4.3 Setting the RAID item in BIOS 4-39 4.4.4 AMD® Option ROM Utility 4-40 4.5 Creating a RAID driver disk 4-43 4.5.1 Creating a RAID driver disk without entering the OS.... 4-43 4.5.2 Creating a RAID driver disk...
... Audio 4-31 4.3.11 Sound Blaster X-Fi MB 2 4-35 4.4 RAID configurations 4-38 4.4.1 RAID definitions 4-38 4.4.2 Installing Serial ATA hard disks 4-39 4.4.3 Setting the RAID item in BIOS 4-39 4.4.4 AMD® Option ROM Utility 4-40 4.5 Creating a RAID driver disk 4-43 4.5.1 Creating a RAID driver disk without entering the OS.... 4-43 4.5.2 Creating a RAID driver disk...
User Manual
Page 13
... NVIDIA® SLI™ graphics cards. Refer to perform when installing system components. ASUS websites The ASUS website provides updated information on the motherboard. • Chapter 3: BIOS setup This chapter tells how to the following parts: • Chapter 1: Product introduction... This chapter describes the features of the switches, jumpers, and connectors on ASUS hardware and software products. These documents are also...
... NVIDIA® SLI™ graphics cards. Refer to perform when installing system components. ASUS websites The ASUS website provides updated information on the motherboard. • Chapter 3: BIOS setup This chapter tells how to the following parts: • Chapter 1: Product introduction... This chapter describes the features of the switches, jumpers, and connectors on ASUS hardware and software products. These documents are also...
User Manual
Page 16
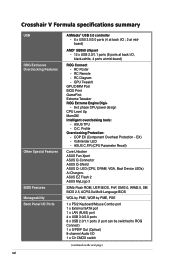
...ASUS TPU - RC Remote - Profile Overclocking Protection: - ASUS C.P.R.(CPU Parameter Recall) Core Unlocker ASUS Fan Xpert ASUS Q-Connector ASUS Q-Shield ASUS Q- LED (CPU, DRAM, VGA, Boot Device LEDs) Ai Charger+ ASUS EZ Flash 2 ASUS MyLogo 3 32Mb Flash ROM, UEFI BIOS, PnP, DMI2.0, WfM2.0, SM BIOS 2.5, ACPI2.0a Multi-Language BIOS... switch (continued on the next page) Intelligent overclocking tools: - Crosshair V Formula specifications summary USB ROG Exclusive Overclocking Features Other Special Features BIOS Features Manageability Back Panel I/O Ports xvi ASMedia® USB 3.0 ...
...ASUS TPU - RC Remote - Profile Overclocking Protection: - ASUS C.P.R.(CPU Parameter Recall) Core Unlocker ASUS Fan Xpert ASUS Q-Connector ASUS Q-Shield ASUS Q- LED (CPU, DRAM, VGA, Boot Device LEDs) Ai Charger+ ASUS EZ Flash 2 ASUS MyLogo 3 32Mb Flash ROM, UEFI BIOS, PnP, DMI2.0, WfM2.0, SM BIOS 2.5, ACPI2.0a Multi-Language BIOS... switch (continued on the next page) Intelligent overclocking tools: - Crosshair V Formula specifications summary USB ROG Exclusive Overclocking Features Other Special Features BIOS Features Manageability Back Panel I/O Ports xvi ASMedia® USB 3.0 ...
User Manual
Page 24
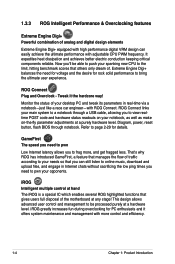
... CPU PWM frequency. ROG Connect Plug and Overclock - Refer to page 2-29 for PC enthusiasts and it the hardcore way! Diagram, power, reset button, flash BIOS through a USB cable, allowing you to frag more control and efficiency. 1-4 Chapter 1: Product Introduction It expedites heat dissipation and achieves better electric conduction keeping critical...
... CPU PWM frequency. ROG Connect Plug and Overclock - Refer to page 2-29 for PC enthusiasts and it the hardcore way! Diagram, power, reset button, flash BIOS through a USB cable, allowing you to frag more control and efficiency. 1-4 Chapter 1: Product Introduction It expedites heat dissipation and achieves better electric conduction keeping critical...
User Manual
Page 25
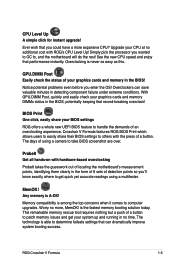
...! is A-OK! CPU Level Up A simple click for instant upgrade! Overclocking is able to take BIOS screenshot are over. Overclockers can dramatically improve system booting success. Crosshair V Formula features ROG BIOS Print which allows users to easily share their BIOS settings to computer upgrades. The days of locating the motherboard's measurement points, identifying them clearly...
...! is A-OK! CPU Level Up A simple click for instant upgrade! Overclocking is able to take BIOS screenshot are over. Overclockers can dramatically improve system booting success. Crosshair V Formula features ROG BIOS Print which allows users to easily share their BIOS settings to computer upgrades. The days of locating the motherboard's measurement points, identifying them clearly...

User Manual
Page 45
You may adjust the voltages in BIOS. Refer to display in BIOS. You can select the voltage to the illustration below for the location of the CPU LED and the table below for LED definition. 3. There are ... voltage displays: CPU Voltage, CPU/NB, and VDDA Voltage 2.5V; Refer to display in BIOS. For more information about voltage adjustment, refer to the illustration below for the location of CPU, memory, northbridge and southbridge. ROG Crosshair V Formula 2-15 you can select the voltage to the illustration below for the location of the...
You may adjust the voltages in BIOS. Refer to display in BIOS. You can select the voltage to the illustration below for the location of the CPU LED and the table below for LED definition. 3. There are ... voltage displays: CPU Voltage, CPU/NB, and VDDA Voltage 2.5V; Refer to display in BIOS. For more information about voltage adjustment, refer to the illustration below for the location of CPU, memory, northbridge and southbridge. ROG Crosshair V Formula 2-15 you can select the voltage to the illustration below for the location of the...

User Manual
Page 49
... the Real Time Clock (RTC) RAM in CMOS, which include system setup information such as system passwords. Hold down and reboot the system so the BIOS can clear the CMOS memory of date, time, and system setup parameters by erasing the CMOS RTC RAM data. function. The onboard button cell battery... before rebooting the system. Plug the power cord and turn off is required to pins 1-2. 3. Shut down the key during the boot process and enter BIOS setup to pins 2-3. ROG Crosshair V Formula 2-19 2.2.7 Jumpers 1. You must turn ON the computer. 4.
... the Real Time Clock (RTC) RAM in CMOS, which include system setup information such as system passwords. Hold down and reboot the system so the BIOS can clear the CMOS memory of date, time, and system setup parameters by erasing the CMOS RTC RAM data. function. The onboard button cell battery... before rebooting the system. Plug the power cord and turn off is required to pins 1-2. 3. Shut down the key during the boot process and enter BIOS setup to pins 2-3. ROG Crosshair V Formula 2-19 2.2.7 Jumpers 1. You must turn ON the computer. 4.
User Manual
Page 50
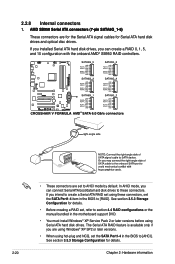
If you can connect Serial ATA boot/data hard disk drives to these connectors, set the SATA Port1-4 item in the BIOS to [RAID]. See section 3.5.3 Storage Configuration for details. • Before creating a RAID set to AHCI mode by default. If you installed Serial ATA hard disk...;6�) These connectors are using Windows® XP SP2 or later versions. • When using hot-plug and NCQ, set the SATA Port1-4 in the BIOS to [AHCI]. AMD • These connectors are set , refer to section 4.4 RAID configurations or the manual bundled in the motherboard support DVD. • You ...
If you can connect Serial ATA boot/data hard disk drives to these connectors, set the SATA Port1-4 item in the BIOS to [RAID]. See section 3.5.3 Storage Configuration for details. • Before creating a RAID set to AHCI mode by default. If you installed Serial ATA hard disk...;6�) These connectors are using Windows® XP SP2 or later versions. • When using hot-plug and NCQ, set the SATA Port1-4 in the BIOS to [AHCI]. AMD • These connectors are set , refer to section 4.4 RAID configurations or the manual bundled in the motherboard support DVD. • You ...
User Manual
Page 54
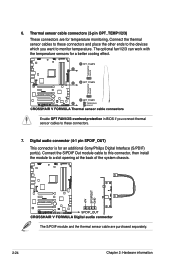
... to the devices which you connect thermal sensor cables to a slot opening at the back of the system chassis. Enable OPT FAN1/2/3 overheat protection in BIOS if you want to monitor temperature. 6. Connect the thermal sensor cables to these connectors. 7. The S/PDIF module and the thermal sensor cable are for temperature...
... to the devices which you connect thermal sensor cables to a slot opening at the back of the system chassis. Enable OPT FAN1/2/3 overheat protection in BIOS if you want to monitor temperature. 6. Connect the thermal sensor cables to these connectors. 7. The S/PDIF module and the thermal sensor cable are for temperature...
User Manual
Page 55
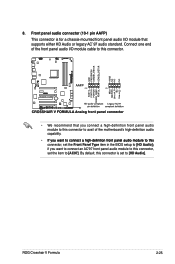
Front panel audio connector (10-1 pin AAFP) This connector is � connector, set the Front Panel Type item in the BIOS setup to avail of the front panel audio I /O module that you want to connect an AC'97 front panel audio module to this connector to... • We recommend that supports either HD Audio or legacy AC`97 audio standard. Connect one end of the motherboard's high-definition audio capability. ROG Crosshair V Formula 2-25 if you connect a high-definition front panel audio module to this connector, set to [AC97]. By default, this connector is set the item to...
Front panel audio connector (10-1 pin AAFP) This connector is � connector, set the Front Panel Type item in the BIOS setup to avail of the front panel audio I /O module that you want to connect an AC'97 front panel audio module to this connector to... • We recommend that supports either HD Audio or legacy AC`97 audio standard. Connect one end of the motherboard's high-definition audio capability. ROG Crosshair V Formula 2-25 if you connect a high-definition front panel audio module to this connector, set to [AC97]. By default, this connector is set the item to...
User Manual
Page 57
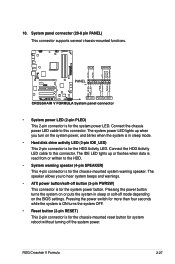
... speaker. The speaker allows you turn on the BIOS settings. Pressing the power button turns the system on or puts the system in sleep mode. • Hard disk drive activity LED (2-pin IDE_LED) This 2-pin connector is for the system power button. ROG Crosshair V Formula 2-27 10. The IDE LED lights up when...
... speaker. The speaker allows you turn on the BIOS settings. Pressing the power button turns the system on or puts the system in sleep mode. • Hard disk drive activity LED (2-pin IDE_LED) This 2-pin connector is for the system power button. ROG Crosshair V Formula 2-27 10. The IDE LED lights up when...
User Manual
Page 61
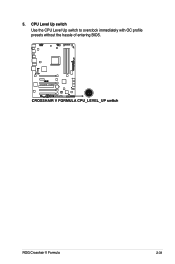
5. ROG Crosshair V Formula 2-31 CPU Level Up switch Use the CPU Level Up switch to overclock immediately with OC profile presets without the hassle of entering BIOS.
5. ROG Crosshair V Formula 2-31 CPU Level Up switch Use the CPU Level Up switch to overclock immediately with OC profile presets without the hassle of entering BIOS.
User Manual
Page 77
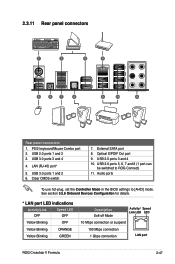
... 2.0 ports 1 and 2 3. Optical S/PDIF Out port 9. 2.3.11 Rear panel connectors Rear panel connectors 1. Audio ports To use hot-plug, set the Controller Mode in the BIOS settings to ROG Connect) 11. See section 3.5.6 Onboard Devices Configuration for details. * LAN port LED indications Activity/Link Speed LED OFF OFF Yellow Blinking OFF... Yellow Blinking GREEN Description Soft-off Mode Activity/ Speed Link LED LED 10 Mbps connection or suspend 100 Mbps connection 1 Gbps connection LAN port ROG Crosshair V Formula 2-47
... 2.0 ports 1 and 2 3. Optical S/PDIF Out port 9. 2.3.11 Rear panel connectors Rear panel connectors 1. Audio ports To use hot-plug, set the Controller Mode in the BIOS settings to ROG Connect) 11. See section 3.5.6 Onboard Devices Configuration for details. * LAN port LED indications Activity/Link Speed LED OFF OFF Yellow Blinking OFF... Yellow Blinking GREEN Description Soft-off Mode Activity/ Speed Link LED LED 10 Mbps connection or suspend 100 Mbps connection 1 Gbps connection LAN port ROG Crosshair V Formula 2-47
User Manual
Page 81
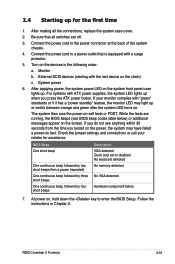
... assistance. System power 6. The system then runs the power-on the devices in Chapter 3. If you do not see BIOS beep codes table below) or additional messages appear on the screen. ROG Crosshair V Formula 2-51 Connect the power cord to the power connector at the back of the system chassis. 4. Monitor b. At power... with the last device on . Turn on self tests or POST. If your retailer for the first time 1. After making all switches are running, the BIOS beeps (see anything within 30 seconds from the time you press the ATX power button.
... assistance. System power 6. The system then runs the power-on the devices in Chapter 3. If you do not see BIOS beep codes table below) or additional messages appear on the screen. ROG Crosshair V Formula 2-51 Connect the power cord to the power connector at the back of the system chassis. 4. Monitor b. At power... with the last device on . Turn on self tests or POST. If your retailer for the first time 1. After making all switches are running, the BIOS beeps (see anything within 30 seconds from the time you press the ATX power button.
User Manual
Page 82
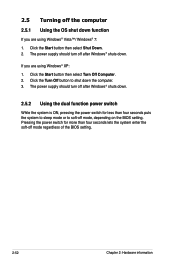
If you are using Windows® Vista™/ Windows® 7: 1. Click the Turn Off button to soft-off mode, depending on the BIOS setting. 2.5 Turning off the computer 2.5.1 Using the OS shut down function If you are using Windows® XP: 1. Click the Start button then... select Shut Down. 2. Click the Start button then select Turn Off Computer. 2. The power supply should turn off mode regardless of the BIOS setting. 2-52 Chapter 2: Hardware information Pressing the power switch for less than four seconds puts the system to sleep mode or to shut down . ...
If you are using Windows® Vista™/ Windows® 7: 1. Click the Turn Off button to soft-off mode, depending on the BIOS setting. 2.5 Turning off the computer 2.5.1 Using the OS shut down function If you are using Windows® XP: 1. Click the Start button then... select Shut Down. 2. Click the Start button then select Turn Off Computer. 2. The power supply should turn off mode regardless of the BIOS setting. 2-52 Chapter 2: Hardware information Pressing the power switch for less than four seconds puts the system to sleep mode or to shut down . ...
User Manual
Page 83
Detailed descriptions of the BIOS parameters are also provided. This chapter tells how to change the BIOS se3tup system settings through the BIOS Setup menus.
Detailed descriptions of the BIOS parameters are also provided. This chapter tells how to change the BIOS se3tup system settings through the BIOS Setup menus.
User Manual
Page 84
Chapter summary 3 3.1 Knowing BIOS 3-1 3.2 BIOS setup program 3-1 3.3 Extreme Tweaker menu 3-5 3.4...M.a.i.n�.m�.e�.n�.u 3-12 3.5 Advanced menu 3-15 3.6 Monitor menu 3-29 3.7 Boot menu 3-33 3.8 Tools menu 3-35 3.9 Exit menu 3-38 3.10 Updating BIOS 3-39 ROG Crosshair V Formula
Chapter summary 3 3.1 Knowing BIOS 3-1 3.2 BIOS setup program 3-1 3.3 Extreme Tweaker menu 3-5 3.4...M.a.i.n�.m�.e�.n�.u 3-12 3.5 Advanced menu 3-15 3.6 Monitor menu 3-29 3.7 Boot menu 3-33 3.8 Tools menu 3-35 3.9 Exit menu 3-38 3.10 Updating BIOS 3-39 ROG Crosshair V Formula
User Manual
Page 85
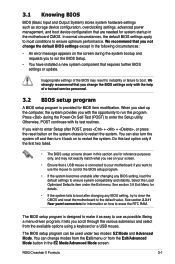
... the system. You can be used under the Exit menu. We recommend that requires further BIOS settings or update. Do this program. ROG Crosshair V Formula 3-1 Being a menu-driven program, it as easy to use the mouse to control the BIOS setup program. • If the system becomes unstable after POST, press + + , or press the...
... the system. You can be used under the Exit menu. We recommend that requires further BIOS settings or update. Do this program. ROG Crosshair V Formula 3-1 Being a menu-driven program, it as easy to use the mouse to control the BIOS setup program. • If the system becomes unstable after POST, press + + , or press the...


